1. Introdução
This manual provides essential instructions for the safe and effective use of your CARTREND 7740013 Car Battery Charger and Jump Starter. This device is designed to charge 12V vehicle batteries and provide jump-starting assistance for cars, trucks, and motorcycles. It also features an integrated compressor and work light. Please read this manual thoroughly before first use and retain it for future reference.
2. Instruções de segurança
Observe sempre as seguintes precauções de segurança para evitar ferimentos ou danos ao dispositivo e ao veículo:
- Leia todas as instruções: Before operating the unit, read and understand all safety and operating instructions.
- Ventilação: Ao carregar baterias, assegure-se de que haja ventilação adequada. As baterias podem produzir gases explosivos.
- Proteção para os olhos e o rosto: Use sempre proteção ocular e vestuário de proteção adequados ao trabalhar com baterias.
- Avoid sparks and flames: Do not smoke or allow sparks or flames in the vicinity of the battery or charger.
- Proper connection: Connect and disconnect battery clamps only when the charger is switched off.
- Polaridade: Conecte o vermelho (+) clamp to the positive terminal and the black (-) clamp to the negative terminal. Ensure correct polarity.
- Children and untrained persons: Keep the device out of reach of children and ensure only trained individuals operate it.
- Unidade danificada: Do not operate the unit if it has been dropped, damaged, or is not functioning correctly.
- Proteção contra superaquecimento: The device is equipped with overheat protection. If it overheats, it will automatically shut down. Allow it to cool before resuming use.
- Uso interno: Store the unit indoors in a dry, cool place.
3. Conteúdo da embalagem
Verifique se todos os itens estão presentes na embalagem:
- CARTREND 7740013 Power Station (Main Unit)
- AC Charging Adapter (for wall outlet)
- DC Charging Cable (for 12V vehicle outlet)
- Various adapter nozzles for compressor (e.g., for balls, bicycle tires)

Figura 3.1: The CARTREND 7740013 Power Station with its included accessories. This image displays the main unit, an AC charging adapter for household outlets, a DC charging cable for vehicle power sockets, and a set of small adapter nozzles for the air compressor, suitable for inflating various items.
4. Produto acabadoview
Familiarize yourself with the components of your CARTREND Power Station:
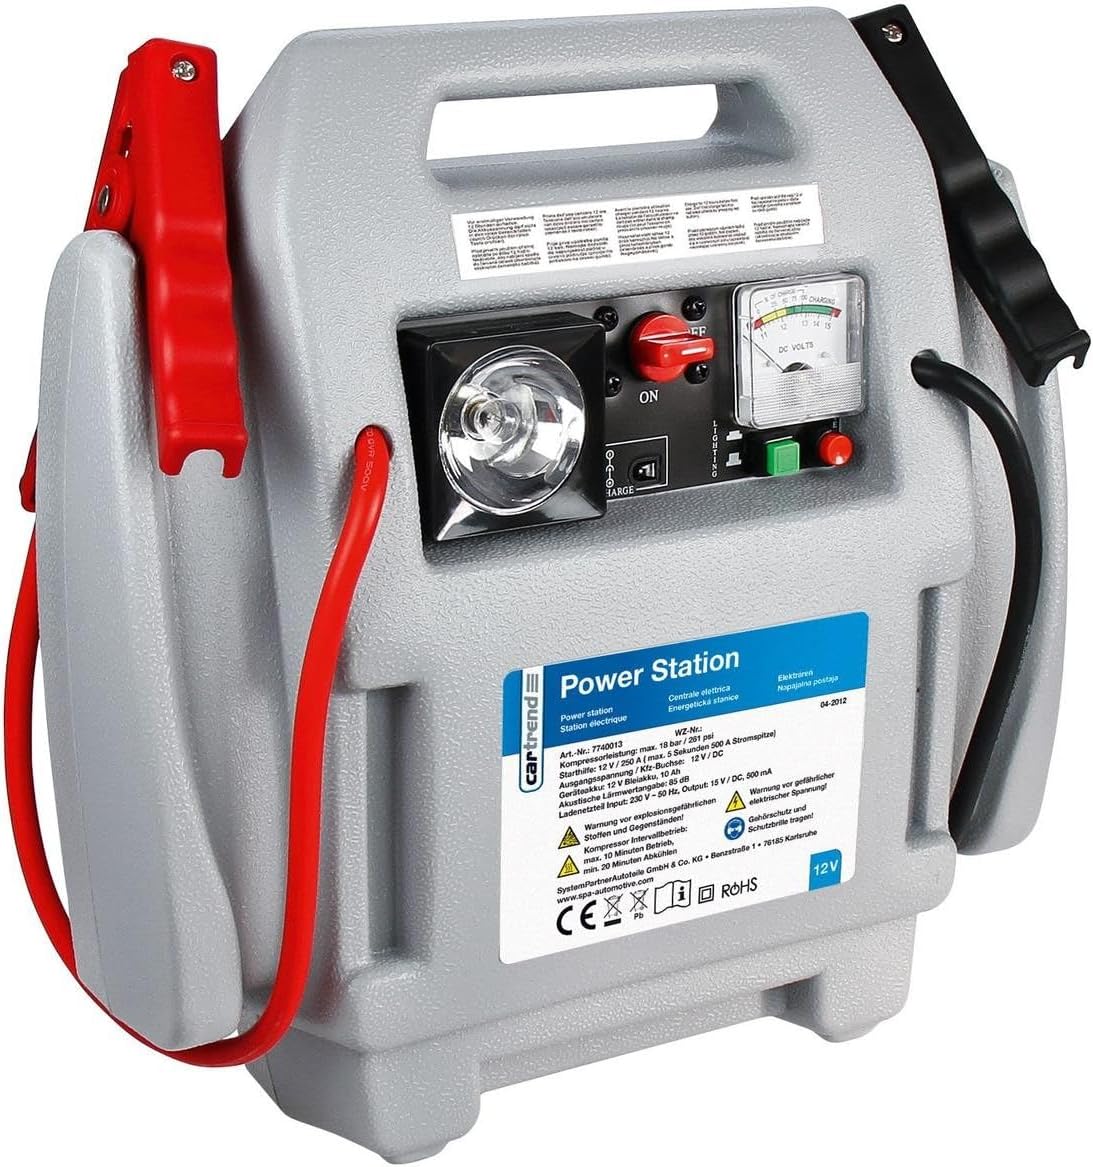
Figura 4.1: The CARTREND 7740013 Power Station. This image highlights the main unit with its integrated handle, heavy-duty battery clamps (red for positive, black for negative), a control panel featuring an ON/OFF switch, a work light, a battery status gauge (DC Volts), and buttons for various functions. The unit also includes an air compressor hose and pressure gauge.
- Bateria de serviço pesado Clamps: Red (+) for positive terminal, Black (-) for negative terminal.
- Alça Integrada: Para facilitar o transporte.
- Painel de controle: Contains switches and indicators.
- Chave ON / OFF: Ativa/desativa a unidade.
- Luz de trabalho: Proporciona iluminação em condições de pouca luz.
- Battery Status Gauge (DC Volts): Displays the internal battery voltage da central elétrica.
- Air Compressor Hose: For inflating tires and other items.
- Manômetro: Displays air pressure during compressor operation.
- 12V DC Output Socket: For powering 12V accessories (e.g., cigarette lighter socket).
- Porta de carregamento: For connecting the AC or DC charging adapter to recharge the internal battery.
5. Configuração e Carregamento Inicial
Before using the CARTREND Power Station for the first time, it must be fully charged. It is recommended to fully charge the unit after each use and at least every 3 months to maintain battery health.
5.1 Carregando a bateria interna
- Ensure the Power Station's ON/OFF switch is in the DESLIGADO posição.
- Connect the AC charging adapter to the charging port on the Power Station.
- Conecte o adaptador de carregamento CA a uma tomada de parede padrão de 230 V CA.
- Allow the unit to charge until the battery status indicator shows a full charge. This may take several hours for the initial charge.
- Once fully charged, disconnect the AC adapter from the wall outlet, then from the Power Station.
- Alternatively, you can charge the unit using the DC charging cable from a 12V vehicle outlet. Follow similar steps, ensuring the vehicle engine is running for optimal charging.
Observação: Do not overcharge the unit. Disconnect once fully charged. The internal battery is a sealed lead-acid type and requires regular charging to prevent sulfation and extend its lifespan.
6. Instruções de operação
6.1 Como dar partida em um veículo com cabos auxiliares
Before jump-starting, ensure the Power Station is fully charged and the vehicle's ignition is off.
- Ensure the Power Station's ON/OFF switch is in the DESLIGADO posição.
- Conecte o VERMELHO (+) cl positivoamp to the positive terminal of the vehicle's discharged battery.
- Conecte o PRETO (-) cl negativoamp to a solid, unpainted metal part of the vehicle's chassis, away from the battery and fuel lines. Do not connect directly to the negative battery terminal.
- Switch the Power Station's ON/OFF switch to the ON posição.
- Attempt to start the vehicle. If it does not start after 5-10 seconds, wait at least 3 minutes before trying again to prevent overheating the Power Station.
- Once the vehicle starts, immediately switch the Power Station's ON/OFF switch to the DESLIGADO posição.
- Desconecte o PRETO (-) cl negativoamp primeiro, então o VERMELHO (+) cl positivoamp.
- Recharge the Power Station as soon as possible after jump-starting.
6.2 Utilizando o compressor de ar
The integrated air compressor can inflate vehicle tires, sports equipment, and other inflatables.
- Ensure the Power Station's ON/OFF switch is in the ON posição.
- Attach the compressor hose nozzle securely to the item you wish to inflate. Use appropriate adapter nozzles if necessary (e.g., for bicycle tires or balls).
- Activate the compressor switch (refer to the control panel diagram for location).
- Monitor the pressure gauge and inflate to the recommended pressure.
- Once the desired pressure is reached, switch off the compressor and disconnect the nozzle.
- Importante: Do not operate the compressor continuously for more than 10 minutes. Allow it to cool down for at least 15 minutes between uses to prevent overheating.
6.3 Using the Work Light
The integrated work light provides convenient illumination.
- Ensure the Power Station's ON/OFF switch is in the ON posição.
- Locate the work light switch on the control panel and turn it on.
- Turn off the light when not in use to conserve battery power.
6.4 Using the 12V DC Output
The 12V DC output socket can power various 12V accessories (e.g., car vacuum cleaners, portable coolers).
- Ensure the Power Station's ON/OFF switch is in the ON posição.
- Plug your 12V accessory into the DC output socket.
- Ensure the accessory's power consumption does not exceed the unit's maximum output capacity.
- Disconnect the accessory when finished to conserve battery power.
7. Manutenção
Proper maintenance ensures the longevity and optimal performance of your Power Station.
- Recarregue regularmente: Fully recharge the unit after each use and at least every three months, even if not used, to prevent battery discharge and damage.
- Limpeza: Limpe o exterior da unidade com um pano macio eamp pano. Não use produtos químicos agressivos ou produtos de limpeza abrasivos.
- Armazenar: Store the Power Station in a cool, dry place, away from direct sunlight, moisture, and extreme temperatures. Ensure the ON/OFF switch is in the DESLIGADO position during storage.
- Inspeção de cabos: Inspecione periodicamente a bateria.amps, cables, and housing for any signs of damage, wear, or corrosion. Do not use the unit if any components are damaged.
8. Solução De Problemas
Consulte esta seção para obter informações sobre problemas comuns e suas soluções.
| Problema | Possível causa | Solução |
|---|---|---|
| A unidade não liga. | A bateria interna está descarregada. | Recharge the Power Station fully. |
| O veículo não pega com cabos auxiliares. | cl incorretoamp connection; Power Station battery low; Vehicle battery severely discharged. | Verifique clamp polarity and connection to chassis. Ensure Power Station is fully charged. Allow more time for vehicle battery to receive charge before attempting to start. Consult a mechanic if the vehicle still won't start. |
| O compressor não infla. | Hose not securely attached; Compressor switch off; Internal battery low. | Ensure hose is tightly connected. Turn on compressor switch. Recharge Power Station. |
| A unidade superaquece e desliga. | Prolonged use of compressor or jump-starting attempts. | This is the overheat protection. Allow the unit to cool down for at least 15-30 minutes before resuming use. |
9. Especificações
| Marca: | Cartrend |
| Número do modelo: | 7740013 |
| Tipo de produto: | Car Battery Charger, Jump Starter, Power Station |
| Volumetage: | 12 volts |
| Tipo de serviço do veículo: | Universal (Auto, Truck, Motorcycle) |
| Peso do item: | 5.41 quilos |
| Dimensões do produto: | 38 x 20 x 39 cm |
| Características especiais: | Overheat protection, Integrated compressor, Work light, 12V DC output |
10. Garantia e Suporte
Specific warranty information is typically provided with the product at the time of purchase. Please refer to the documentation included in your product packaging for details regarding warranty coverage and terms.
For technical support or service inquiries, please contact Cartrend customer service through their official website or the retailer from whom the product was purchased. Ensure you have your model number (7740013) and proof of purchase available when contacting support.