
1. Introdução
Thank you for choosing the Ultrak Heat Index Solar Powered Stopwatch, Model 830. This device is designed for precise timing and environmental monitoring, offering features such as temperature, humidity, heat index, and dew point calculations. It is ideal for athletes, coaches, and outdoor enthusiasts who require accurate data in various conditions. This manual provides detailed instructions to help you maximize the functionality and lifespan of your stopwatch.
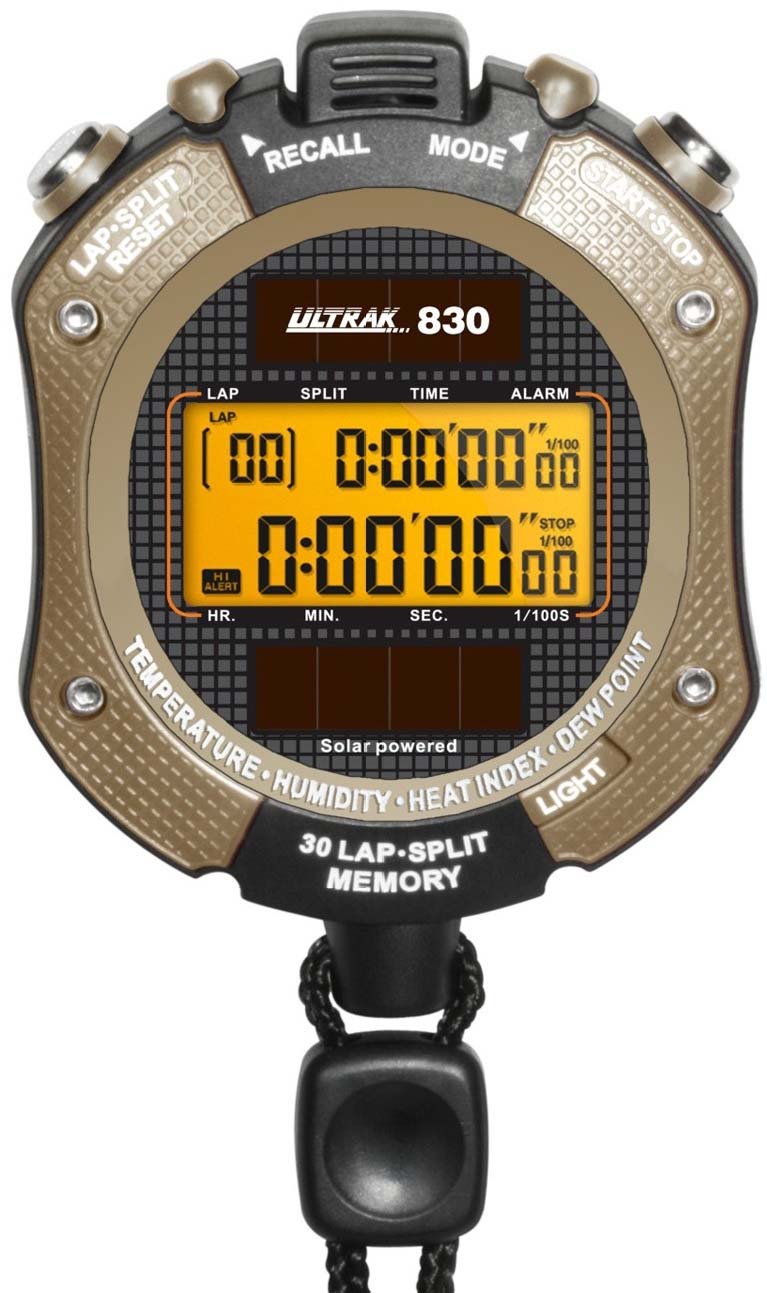
Figura 1: Frente view of the Ultrak Heat Index Solar Powered Stopwatch, displaying its digital screen and control buttons.
2. Principais características
- Accurate calculation of temperature, humidity, heat index, and dew point.
- 30 dual split recallable memory for tracking multiple laps or splits.
- Measures time up to 10 hours with 1/100 second resolution.
- Presettable countdown timer with an auto-repeat function.
- Displays time, calendar, and features an alarm function.
- Retroiluminação LED para visibilidade em condições de pouca luz.
- Solar-powered with a back-up lithium battery for continuous operation.
- Water-resistant design for use in various environments.
3. Configuração e uso inicial
3.1 Ligando
The Ultrak 830 is solar-powered. Ensure the solar panel on the front of the stopwatch is exposed to light for initial power-up. A built-in lithium battery provides backup power.
3.2 Configuração de hora e data
- No modo de tempo, pressione e segure o MODO Pressione o botão até que o visor pisque.
- Use o INICIAR/PARAR button to adjust the flashing digit (hours, minutes, seconds, year, month, day).
- Pressione o LAP / RESET botão para passar para a próxima configuração.
- Assim que todas as configurações estiverem corretas, pressione o MODO botão para sair do modo de configuração.
3.3 Ativando a luz de fundo
Pressione o LUZ button (usually located on the side or top) to illuminate the display for a few seconds in low-light conditions.
4. Instruções de operação
4.1 Função Cronômetro
- No modo de hora, pressione o MODO button repeatedly until "STOPWATCH" or a similar indicator appears.
- Imprensa INICIAR/PARAR para começar a cronometrar.
- Imprensa LAP / RESET to record a lap/split time while the stopwatch continues running. The display will momentarily show the lap time.
- Imprensa INICIAR/PARAR novamente para pausar o cronômetro.
- Imprensa LAP / RESET enquanto o cronômetro estava pausado para ser zerado.
4.2 Recalling Memory
The stopwatch can store up to 30 dual split times. After stopping the stopwatch, press the MEMÓRIA button (or a designated button, refer to on-device labels) to scroll through recorded lap and split times.
4.3 Temporizador de contagem regressiva
- Navigate to the "TIMER" mode using the MODO botão.
- Pressione e segure LAP / RESET para entrar no modo de configuração.
- Usar INICIAR/PARAR to adjust the hours, minutes, and seconds. Use LAP / RESET para mover entre dígitos.
- Imprensa MODO para confirmar a configuração.
- Imprensa INICIAR/PARAR Para iniciar a contagem regressiva. Um alarme soará quando o cronômetro chegar a zero.
- To activate auto-repeat, ensure this option is enabled in the timer setting mode (if available).
4.4 Heat Index and Environmental Readings
In the dedicated "HEAT INDEX" or "ENVIRONMENT" mode (accessed via the MODO button), the stopwatch will display current temperature, humidity, heat index, and dew point. Allow a few moments for the sensors to stabilize and provide accurate readings, especially after moving to a new environment.
4.5 Função de Alarme
- Go to "ALARM" mode using the MODO botão.
- Pressione e segure LAP / RESET para entrar no modo de configuração de alarme.
- Ajuste o horário do alarme usando INICIAR/PARAR and move between digits with LAP / RESET.
- Imprensa MODO para confirmar.
- Toggle the alarm ON/OFF using INICIAR/PARAR enquanto estiver no modo Alarme (não no modo de configuração).
5. Manutenção
- Limpeza: Wipe the stopwatch with a soft, damp pano. Não use produtos químicos agressivos ou produtos de limpeza abrasivos.
- Armazenar: Store in a cool, dry place away from direct sunlight when not in use for extended periods.
- Resistência à água: The stopwatch is water-resistant, but not waterproof. Avoid submerging it in water or exposing it to high-pressure water jets.
- Bateria: The solar panel charges the internal battery. Ensure regular exposure to light to maintain optimal battery life. No user-replaceable battery is required under normal operation.
6. Solução De Problemas
| Problema | Possível causa | Solução |
|---|---|---|
| A tela está em branco ou com brilho reduzido. | Insufficient light exposure for solar charging. | Expose the solar panel to bright light for several hours. |
| Data/hora incorreta. | Time/date not set correctly or reset after power loss. | Refer to Section 3.2 "Setting Time and Date" to adjust. |
| Stopwatch not responding. | Falha temporária de software. | Attempt a soft reset by pressing all buttons simultaneously for a few seconds (if applicable, consult specific model instructions if available). If not, allow battery to fully drain and recharge. |
| Inaccurate environmental readings. | Sensor obstruction or not enough time for stabilization. | Ensure sensors are clean and unobstructed. Allow 5-10 minutes for readings to stabilize after moving to a new environment. |
7. Especificações
- Modelo: Ultrak 830
- Timing Resolution: 1/100 de segundo
- Maximum Timing Capacity: 10 horas
- Memória: 30 dual split recallable memory
- Sensores Ambientais: Temperature, Humidity, Heat Index, Dew Point
- Fonte de energia: Solar powered with lithium backup battery
- Mostrar: Digital with LED backlight
- Resistência à água: Yes (splash resistant, not submersible)
- GTIN (UPC): 743223008308
8. Garantia e Suporte
Ultrak products are manufactured to high-quality standards. For specific warranty information, please refer to the warranty card included with your purchase or visit the official Ultrak website.
For technical support, troubleshooting assistance beyond this manual, or to inquire about replacement parts, please contact Ultrak customer service through their official website ou as informações de contato fornecidas na embalagem do seu produto.