Introdução
This manual provides detailed instructions for the installation, operation, and maintenance of your Cooler Master CM Storm Stryker Gaming Full Tower Computer Case. Designed for high-performance systems, the Stryker offers extensive cooling options, flexible storage configurations, and robust construction for enthusiasts and gamers.
Principais características
- Stylish black and white design with mesh front panel for optimal cooling.
- Integrated ultra-strong, rubber-coated carrying handle for portability.
- Unique 90-degree rotatable 5.25-inch/3.5-inch combo drive cages for installation flexibility.
- Rich I/O support with two USB 3.0 SuperSpeed ports and two USB 2.0 ports.
- Nine plus one expansion slots for extensive expandability.
- Adjustable fan speed control via top panel.
- External SSD drive hot-swap dock for quick data access.
- Full dust filter coverage to maintain internal cleanliness.
- Supports long graphics cards, including AMD Radeon HD 7970 and NVIDIA GTX 690.
- Internal toolbox and Storm Guard for securing peripherals.
Conteúdo da embalagem
Por favor, verifique se todos os itens estão presentes em sua embalagem:
- CM Storm Stryker Full Tower Case
- Caixa de acessórios (contendo parafusos, espaçadores, abraçadeiras, etc.)
- Manual do usuário (este documento)
Configuração e instalação
Before beginning installation, ensure your system is powered off and disconnected from the main power supply.
1. Abertura do Caso
Locate the thumbscrews on the rear of the case securing the side panels. Remove these screws and slide the side panels backward to detach them. The main side panel features a window, while the opposite panel is solid.

Image: Front-left perspective of the CM Storm Stryker case, highlighting the white chassis, black mesh front, and clear side panel window.
2. Instalação da placa-mãe
- Instale o espelho de E/S fornecido com a placa-mãe na abertura traseira do gabinete.
- Align the motherboard with the pre-installed standoffs. Additional standoffs may be required depending on your motherboard form factor (XL-ATX, ATX, Micro-ATX). Install any necessary standoffs from the accessory box.
- Coloque cuidadosamente a placa-mãe sobre os espaçadores e fixe-a com parafusos.
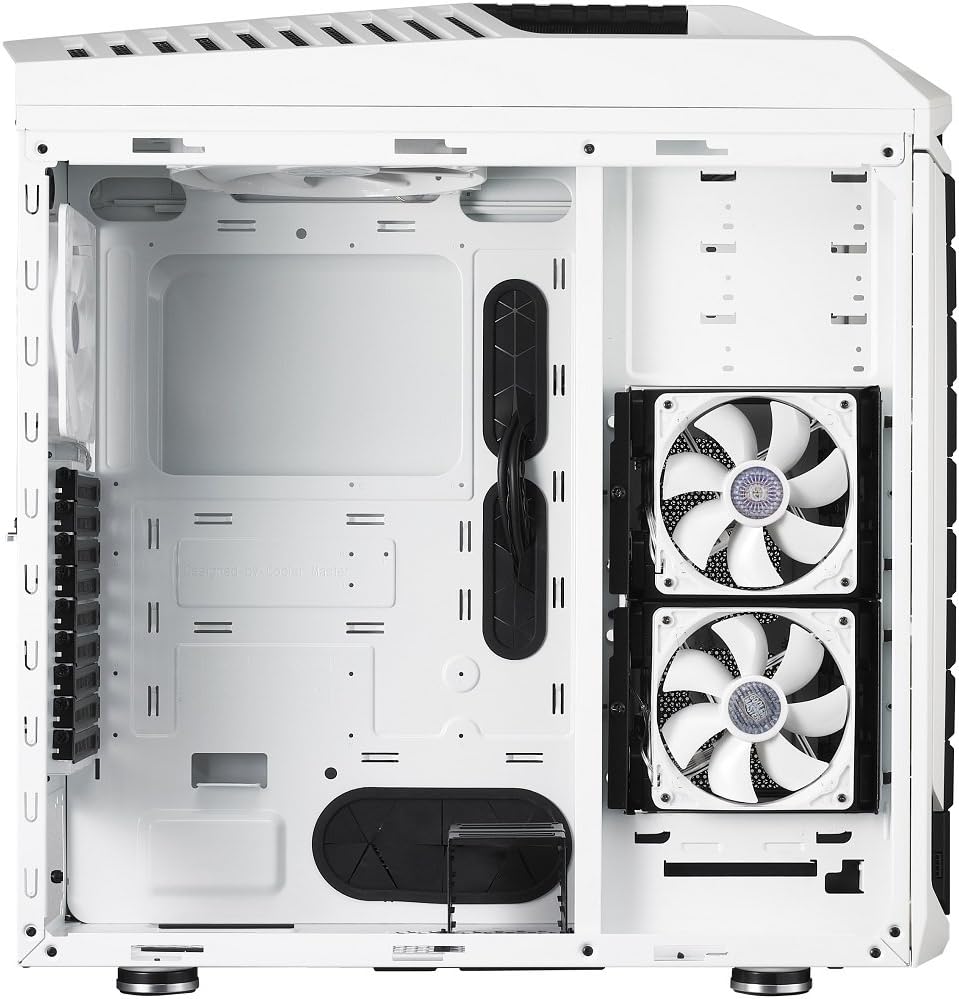
Imagem: Interior view of the CM Storm Stryker case from a different angle, showing the cable management cutouts, motherboard tray, and front-mounted fans.
3. Drive Installation (HDD/SSD/Optical Drives)
The CM Storm Stryker features modular and rotatable drive cages. The two 5.25-inch/3.5-inch combo cages can be rotated 90 degrees for easier installation or optimized airflow.
- 5.25-inch Devices (Optical Drives): Remove the desired front bay cover. Slide the optical drive into the bay until it clicks into place.
- 3.5-inch Hard Drives: Utilize the provided drive trays. Secure the HDD to a tray and slide the tray into an available slot in the drive cage.
- 2.5-inch SSDs: SSDs can be mounted directly onto the 3.5-inch drive trays or in the dedicated 2.5-inch bottom-mounted SSD drive cage (if not removed for additional fan installation).

Imagem: Interior view of the CM Storm Stryker case with the side panel removed, revealing the white internal structure, fan mounts, and drive bays.
4. Instalação da fonte de alimentação
The power supply mounts at the bottom rear of the case. Slide your power supply into the designated area and secure it with screws from the rear of the case.
5. Gerenciamento de cabos
Utilize the numerous cutouts and tie-down points behind the motherboard tray to route and secure cables. This improves airflow and maintains a clean interior aesthetic.
6. Conexões de E/S frontais
Connect the front panel cables (USB 3.0, USB 2.0, HD Audio, Power Switch, Reset Switch, Power LED, HDD LED) to the corresponding headers on your motherboard. Ensure correct polarity for LEDs.
7. Fan Connections and Controller
The case includes pre-installed fans connected to a fan controller. Connect the fan controller's power cable (Molex) to your power supply. The fan speed can be adjusted via the top panel controls.
8. Instalação da placa gráfica e da placa de expansão
Remove the necessary expansion slot covers from the rear of the case. Insert your graphics card or other expansion cards into the appropriate PCIe slots on your motherboard and secure them with screws or tool-less latches.
Operação
1. Ligando
After all components are installed and cables connected, replace the side panels. Connect your system to a power source and press the power button on the top panel to start your computer.
2. Controle de velocidade do ventilador
The top panel features buttons to adjust the speed of the connected case fans. Press the fan speed button to cycle through different speed settings. An LED indicator will show the current speed level.
3. External SSD Hot-Swap Dock
The external SSD hot-swap dock located on the top panel allows for quick insertion and removal of 2.5-inch SATA SSDs. Ensure the dock is properly powered (via an internal Molex connector) and connected to a SATA port on your motherboard. Carefully insert the SSD into the dock until it seats correctly.
Manutenção
1. Limpeza do filtro de poeira
The CM Storm Stryker includes removable dust filters on the front, top, and bottom. Regularly remove and clean these filters to prevent dust buildup and maintain optimal airflow. Filters can typically be rinsed with water and air-dried before reinstallation.
2. Limpeza Geral
Use a soft, dry cloth to clean the exterior of the case. For stubborn marks, a slightly damp cloth can be used. Avoid abrasive cleaners or solvents that may damage the finish.
Solução de problemas
- O sistema não liga: Verify all power connections, including the 24-pin ATX, 8-pin CPU, and graphics card power cables. Ensure the power supply switch is in the 'on' position. Check front panel power switch connection to the motherboard.
- Case fans not spinning: Confirm the fan controller is powered via its Molex connector. Ensure fans are properly connected to the fan controller. If an LED fan is not lighting up, check the polarity of its connection to the fan controller or motherboard header.
- USB ports not functioning: Verify the USB 3.0 and USB 2.0 headers are correctly connected to your motherboard.
- External SSD hot-swap not detected: Ensure the hot-swap dock's internal Molex power connector and SATA data cable are securely connected. Check your motherboard's BIOS settings for hot-plug support on the relevant SATA port.
Especificações
| Nome do modelo | CM Storm Stryker |
| Número do modelo | SGC-5000W-KWN1 |
| Tipo de caso | Torre cheia |
| Compatibilidade da placa-mãe | XL-ATX, ATX, Micro-ATX |
| Material | Aço, Plástico |
| Dimensões (C x L x A) | 11 x 25.6 x 25 polegadas (279 x 650 x 635 mm) |
| Peso do item | 33.7 libras (15.3 kg) |
| Cor | Preto e branco |
| Baias de unidade de 5.25" | 9 (converted from 5.25" bays) |
| Baias de unidade de 3.5" | 8 (converted from 5.25" bays) |
| Baias de unidade de 2.5" | 13 (converted from 5.25" bays) |
| Painel de E/S | USB 3.0 x 2, USB 2.0 x 2, Audio In & Out |
| Slots de expansão | 9 + 1 |
| Método de resfriamento | Ar |
| Tamanho do ventilador | 120 Millimeters (various positions) |
Garantia e Suporte
Para informações sobre garantia e suporte técnico, consulte o site oficial da Cooler Master. webou entre em contato com o departamento de atendimento ao cliente. Guarde seu comprovante de compra para eventuais solicitações de garantia.