Introdução
Thank you for choosing the SEVERIN SM 3718 Blender. This manual provides important information on the safe operation, assembly, maintenance, and troubleshooting of your appliance. Please read these instructions carefully before first use and keep them for future reference to ensure optimal performance and safety.
Instruções importantes de segurança
Ao usar aparelhos elétricos, precauções básicas de segurança devem sempre ser seguidas, incluindo as seguintes:
- Leia todas as instruções: Before operating the blender, read all instructions thoroughly.
- Segurança elétrica: Garantir o volumetage indicado no aparelho corresponde ao seu volume de alimentação localtage before connecting. Do not operate any appliance with a damaged cord or plug, or after the appliance malfunctions or has been dropped or damaged in any manner.
- Evite líquidos quentes: DO NOT blend hot liquids. The glass jar is not designed to tolerate hot liquids and may explode, causing severe injury. Allow hot ingredients to cool before blending.
- Segurança da lâmina: The blades are extremely sharp. Handle the blade assembly with extreme care, especially when removing or attaching it, and during cleaning.
- Montagem adequada: The appliance is equipped with a safety cut-out switch. It will only operate when the glass container is correctly and securely engaged in the base unit. Ensure the container is properly locked into place before starting.
- Estabilidade: Always operate the blender on a stable, flat, dry, and non-slip surface. The non-slip rubber feet provide stability.
- Supervisão: Supervisão cuidadosa é necessária quando qualquer aparelho é usado por ou perto de crianças. Mantenha o aparelho e o cabo fora do alcance das crianças.
- Desligue quando não estiver em uso: Always unplug the blender from the outlet when not in use, before assembling or disassembling parts, and before cleaning.
- Não transborde: Do not exceed the maximum fill level indicated on the glass container.
- Ventilação: Não bloqueie as aberturas de ventilação.
- Uso pretendido: This appliance is intended for household use only. Do not use it for commercial purposes or for anything other than its intended use.
Produto acimaview e Componentes
Familiarize yourself with the parts of your SEVERIN SM 3718 Blender:
- Unidade base: Contains the motor, control knob, and safety interlock.
- Glass Container: Removable 1.5 L capacity glass jar with measurement markings and a pouring spout.
- Conjunto de lâminas: Integrated stainless steel blade unit at the bottom of the glass container.
- Tampa: Secure lid for the glass container, with a central filling opening.
- Copo de medição: Small transparent cup that fits into the lid's central opening, also serving as a stopper.
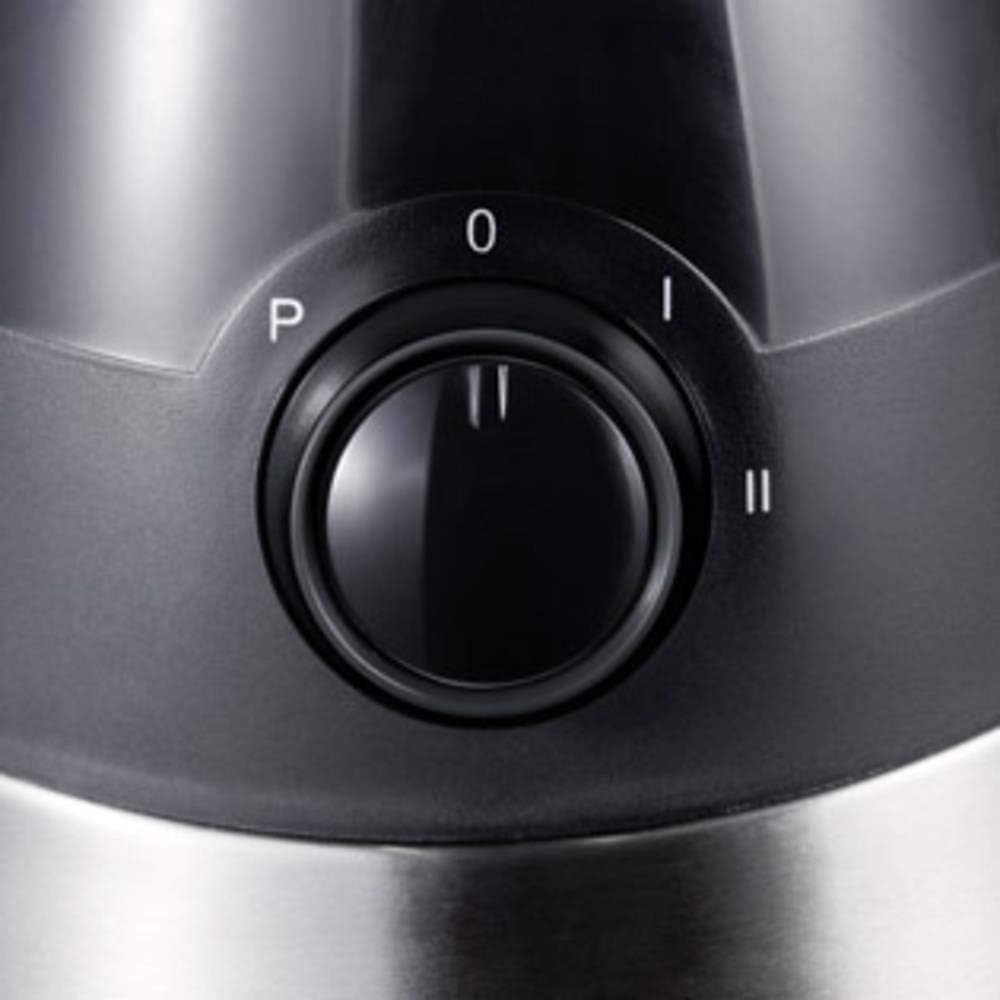
- Botão de controle: Rotary knob on the base unit for selecting speeds and pulse function.


Montagem e configuração
- Descompacte: Carefully unpack all components and remove any packaging materials.
- Limpar: Before first use, wash the glass container, lid, and measuring cup with warm soapy water. Rinse thoroughly and dry. Wipe the base unit with a damp pano.
- Assemble Container: Ensure the blade assembly is securely attached to the bottom of the glass container.
- Place Container on Base: Place the assembled glass container onto the base unit. Rotate it slightly until it clicks into place, ensuring the safety interlock is engaged. The blender will not operate if the container is not correctly seated.
- Tampa segura: Place the lid firmly onto the glass container. Insert the measuring cup into the lid's central opening.
- Conecte a energia: Plug the power cord into a suitable electrical outlet. Ensure the control knob is in the '0' (Off) position before plugging in.
Instruções de operação
- Preparar Ingredientes: Cut ingredients into small pieces (approx. 2-3 cm) to facilitate blending. Add liquids first, then softer ingredients, and finally harder ingredients or ice.
- Encher o recipiente: Place prepared ingredients into the glass container. Do not exceed the maximum fill line (1.5 L). Remember: Não use líquidos quentes.
- Tampa segura: Place the lid firmly on the container and insert the measuring cup.
- Selecione Velocidade: Gire o botão de controle para a velocidade desejada:
- 'I' (Speed 1): For softer ingredients and lighter blending tasks.
- 'II' (Speed 2): For harder ingredients and more intensive blending, reaching up to 20,000 rpm.
- Pulse Function ('P'): For short bursts of power or to achieve a coarser consistency, turn and hold the knob to the 'P' position. Release to stop. This is ideal for crushing ice or chopping.
- Mistura: Allow the blender to run until the desired consistency is achieved. If ingredients stick to the sides, turn off the blender, unplug it, remove the lid, and use a spatula to push ingredients down. Never use your hands or utensils while the blender is running.
- Finalize a mistura: Once blending is complete, turn the control knob back to the '0' (Off) position. Unplug the appliance from the power outlet.
- Derramar: Carefully remove the lid and pour your blended mixture using the convenient pouring spout.
Limpeza e Manutenção
A limpeza regular garante a durabilidade e a higiene do seu liquidificador.
- Desconecte: Certifique-se sempre de que o liquidificador esteja desconectado da tomada antes de limpá-lo.
- Desmontar: Remove the glass container from the base unit. Carefully detach the lid and measuring cup.
- Clean Glass Container and Blade: The glass container and blade assembly can be easily cleaned with warm water and dish soap. For stubborn residue, fill the container with warm water and a drop of dish soap, secure the lid, and run the blender on a low speed for a few seconds. Rinse thoroughly. Be extremely careful when handling the sharp blades.
- Limpar a unidade base: Limpe a unidade de base com anúncioamp cloth. Do not immerse the base unit in water or any other liquid. Do not use abrasive cleaners or scouring pads, as they may damage the surface.
- Seco: Certifique-se de que todas as peças estejam completamente secas antes de remontar ou guardar o liquidificador.
- Armazenar: Store the blender in a dry place. The integrated cable storage helps keep the cord tidy.
Solução de problemas
Se você tiver problemas com seu liquidificador, consulte os seguintes problemas e soluções comuns:
| Problema | Possível causa | Solução |
|---|---|---|
| O Blender não inicia. |
|
|
| Os ingredientes não estão se misturando suavemente. |
|
|
| Leakage from the bottom of the container. |
|
|
| Ruído alto ou cheiro incomum. |
|
|
Especificações técnicas
| Recurso | Especificação |
|---|---|
| Marca | Severino |
| Número do modelo | SM 3718 |
| Poder | Aproximadamente. 550 Watts |
| Volumetage | 220 Volts |
| Capacidade | 1.5 litros |
| Dimensões (C x L x A) | 21 x 18 x 40.2 cm |
| Peso | 3.36 quilos |
| Material | Stainless Steel, Glass (container), Plastic (base) |
| Número de velocidades | 2 + Função de Pulso |
| Características especiais | Pulse function, Safety cut-out, Non-slip feet, Integrated cable storage |
Garantia e Suporte ao Cliente
Your SEVERIN SM 3718 Blender comes with a Garantia de 2 ano from the date of purchase, covering manufacturing defects and material faults. Please retain your proof of purchase for warranty claims.
For technical assistance, spare parts, or warranty inquiries, please contact SEVERIN customer support. You can find contact information on the official Loja da marca Severin ou por meio de seus oficiais website.
Nota: Atualmente, não há informações disponíveis sobre a disponibilidade de peças de reposição.