
1. Introdução
This manual provides comprehensive instructions for the installation, operation, and maintenance of the L-com PR175B16BLK 16-Port 1U BNC Patch Panel. Please read this manual thoroughly before using the product to ensure proper functionality and safety.
2. Produto acabadoview
The L-com PR175B16BLK is a 1U rack-mountable BNC patch panel designed for efficient management and routing of coaxial signals. It features 16 BNC ports, providing a centralized connection point for various BNC-terminated devices within a rack environment. This panel is ideal for applications requiring organized and flexible BNC signal distribution.
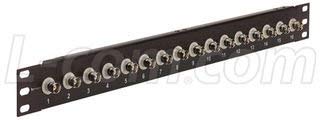
Figura 1: Frente view of the L-com PR175B16BLK 16-Port 1U BNC Patch Panel. This image displays the front view of the L-com PR175B16BLK 16-Port 1U BNC Patch Panel. It features sixteen BNC connectors arranged horizontally across a black 1U rack-mountable chassis. Each port is numbered from 1 to 16 for easy identification. The panel is designed for efficient cable management and signal routing in rack environments.
3. Configuração e instalação
Follow these steps for proper installation of the BNC patch panel:
- Desembalagem: Carefully remove the patch panel from its packaging. Inspect for any signs of damage during transit.
- Montagem em rack: The PR175B16BLK is a 1U rack-mountable unit. Align the mounting holes on the patch panel with the corresponding holes on your standard 19-inch equipment rack. Secure the panel using appropriate rack screws (not included) on both sides.
- Conexão à cabo: Connect your BNC-terminated coaxial cables to the desired ports on the front of the patch panel. Ensure each BNC connector is fully inserted and twisted clockwise until it locks securely into place.
- Gerenciamento de cabos: Utilize proper cable management techniques (e.g., cable ties, cable management panels) to organize connected cables and prevent strain on the connectors.
4. Instruções de operação
The L-com PR175B16BLK patch panel operates passively, facilitating signal routing without requiring external power. Its primary function is to provide a convenient and organized interface for BNC connections.
- Cabos de conexão: To connect a BNC cable, align the connector with the port, push it in, and twist clockwise until it clicks into place.
- Desconectando Cabos: To disconnect, twist the BNC connector counter-clockwise and pull it straight out from the port.
- Roteamento de sinal: Use the numbered ports to clearly identify and manage your BNC signal paths.
5. Manutenção
Regular maintenance ensures optimal performance and longevity of your patch panel.
- Limpeza: Periodically clean the exterior of the patch panel with a soft, dry, lint-free cloth. Avoid using abrasive cleaners or solvents.
- Inspeção: Routinely inspect all BNC connectors for signs of wear, corrosion, or damage. Ensure all cables are securely connected.
- Condições ambientais: Ensure the patch panel is operated within a stable environment, free from excessive dust, moisture, and extreme temperatures.
6. Solução De Problemas
If you encounter issues with signal transmission, consider the following troubleshooting steps:
- Sem sinal/Sinal intermitente:
- Verify that all BNC cables are securely connected to both the patch panel and the connected devices.
- Inspect cables for damage (e.g., kinks, cuts, loose connectors).
- Test cables individually if possible to isolate a faulty cable.
- Ensure the source device is transmitting a signal and the receiving device is properly configured.
- Conexões soltas: Re-seat any BNC connectors that appear loose. Ensure they are twisted clockwise until fully locked.
7. Especificações
| Recurso | Especificação |
|---|---|
| Número do modelo | PR175B16BLK |
| Marca | L-com |
| Tipo de conector | BNC Patch Panel |
| Número de portas | 16 |
| Rack Unit Height | 1U |
| Fabricante | L-COM |
| Data da primeira disponibilidade | 15 de julho de 2015 |
8. Garantia e Suporte
Warranty information for the L-com PR175B16BLK patch panel is typically provided by the manufacturer at the time of purchase or can be found on the official L-com website. For technical support, product inquiries, or warranty claims, please contact L-com directly through their official support channels.
L-com Contact Information: Please refer to the official L-com weblocal (www.l-com.com) for the most current contact details and support resources.