
1. Introdução
This manual provides essential information for the safe and efficient operation of your KitchenAid 5KMT223GER 2-Slot Automatic Toaster. Please read all instructions carefully before first use and retain for future reference.

Imagem 1.1: Frente view of the KitchenAid 5KMT223GER 2-Slot Automatic Toaster.
2. Instruções importantes de segurança
Ao usar aparelhos elétricos, precauções básicas de segurança devem sempre ser seguidas, incluindo as seguintes:
- Leia todas as instruções.
- Não toque em superfícies quentes. Use alças ou botões.
- Para evitar choques elétricos, não mergulhe o cabo, os plugues ou a torradeira em água ou qualquer outro líquido.
- É necessária supervisão rigorosa quando qualquer aparelho for usado por crianças ou perto delas.
- Desligue da tomada quando não estiver em uso e antes de limpar. Deixe esfriar antes de colocar ou retirar peças.
- Não utilize nenhum aparelho com cabo ou ficha danificados, ou após o aparelho apresentar mau funcionamento, ter caído ou sofrido qualquer tipo de dano. Leve o aparelho à assistência técnica autorizada mais próxima para inspeção, reparação ou ajuste.
- O uso de acessórios não recomendados pelo fabricante do aparelho pode causar ferimentos.
- Não utilize ao ar livre.
- Não deixe o cabo pendurado na borda da mesa ou do balcão, nem toque em superfícies quentes.
- Não coloque sobre ou perto de um queimador a gás ou elétrico quente, nem em um forno aquecido.
- Para desconectar, gire qualquer controle para a posição "desligado" e, em seguida, retire o plugue da tomada.
- Não utilize o aparelho para outro fim que não o pretendido.
- Alimentos grandes, embalagens de papel-alumínio ou utensílios não devem ser inseridos na torradeira, pois podem envolver risco de incêndio ou choque elétrico.
- Pode ocorrer um incêndio se as torradeiras estiverem cobertas ou em contato com materiais inflamáveis, incluindo cortinas, tapeçarias, paredes e similares, durante o funcionamento.
- Não tente retirar alimentos do forno quando a torradeira estiver conectada.
- Não opere sem supervisão.
- Always remove the crumb tray for cleaning. Do not operate the toaster without the crumb tray in place.
3. Peças e recursos
Familiarize yourself with the components of your KitchenAid 2-Slot Automatic Toaster:
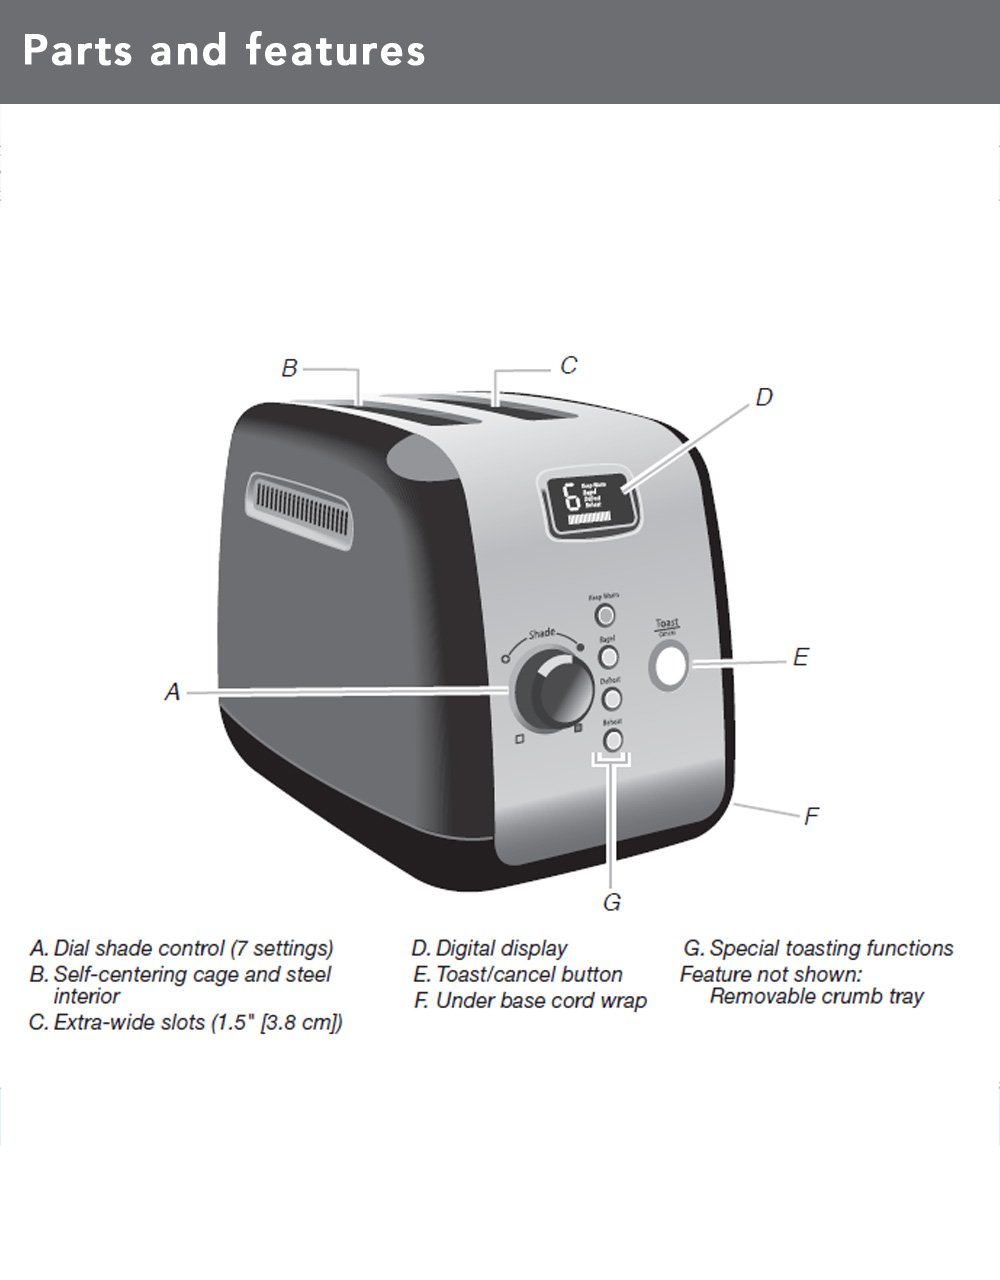
Image 3.1: Diagram illustrating the main parts and features of the toaster.
- Shade Control Dial (A): Adjusts the browning level with 7 settings.
- Self-Centering Bread Racks (B): Automatically centers bread for even toasting.
- Extra-Wide Slots (C): 3.8 cm (1.5 inches) wide slots accommodate various bread types.
- Digital Display (D): Shows selected shade setting and a countdown timer for toasting progress.
- Toast/Cancel Button (E): Initiates or cancels the toasting cycle. Features motorized lift.
- Under Base Cord Wrap (F): Para guardar o cabo de forma prática.
- Special Toasting Functions (G): Includes Keep Warm, Bagel, Defrost, and Reheat buttons.
- Bandeja de migalhas removível: Located at the back for easy cleaning (not shown in diagram).
4. Configuração
Before using your toaster for the first time:
- Desembale a torradeira e remova todos os materiais de embalagem.
- Limpe o exterior da torradeira com um panoamp cloth. Ensure it is completely dry before plugging in.
- Place the toaster on a stable, flat, heat-resistant surface, away from flammable materials.
- Ensure the crumb tray is properly inserted at the back of the toaster.
- For the first use, operate the toaster without bread on the highest shade setting (7) to burn off any manufacturing residues. A slight odor or smoke may be present; this is normal. Allow the toaster to cool completely.
5. Instruções de operação
Follow these steps to toast bread and use the special functions:

Image 5.1: Bread slices inserted into the toaster's extra-wide slots.
5.1 Torradas Básicas
- Ligue a torradeira a uma tomada elétrica aterrada.
- Place bread slices into the toasting slots. The self-centering racks will automatically adjust.
- Vire o Botão de controle de sombra to select your desired browning level (1 for lightest, 7 for darkest). The digital display will show the selected shade.
- Pressione o Toast/Cancel Button. The motorized lift will lower the bread into the slots, and the toasting cycle will begin. The digital display will show a countdown.
- Once the cycle is complete, the toaster will automatically raise the toasted bread.
- Para interromper o ciclo de tostagem a qualquer momento, pressione o Toast/Cancel Button. The bread will be raised.
5.2 Funções especiais
Your toaster includes dedicated buttons for specialized toasting needs:
- MANTENHA-SE AQUECIDO: Press this button after a toasting cycle to keep toasted food warm for up to one minute. The toaster will gently lower and raise the bread after the warming period.
- PACOTE: This function toasts the cut-side of a bagel while gently warming the outer surfaces. Insert bagels with the cut side facing inwards. Select your desired shade, then press the PÃOZINHO botão seguido pelo Toast/Cancel Button.
- DESCONGELAR: Use this function to defrost and toast frozen food. Select your desired shade, then press the DESCONGELAR botão seguido pelo Toast/Cancel Button. The toaster will automatically adjust the toasting time.
- REAQUECER: This function quickly reheats previously toasted food without further browning. Press the REAQUECER botão seguido pelo Toast/Cancel Button.
6. Limpeza e Manutenção
A limpeza regular garante o desempenho ideal e prolonga a vida útil da sua torradeira.
6.1 bandeja de migalhas

Image 6.1: The removable crumb tray for easy cleaning.
- Desligue sempre a torradeira da tomada e deixe-a arrefecer completamente antes de a limpar.
- Pull out the removable crumb tray located at the back of the toaster.
- Discard crumbs. The crumb tray can be washed in the top rack of a dishwasher or by hand with warm, soapy water. Rinse thoroughly and dry completely before reinserting.
- Never operate the toaster without the crumb tray properly inserted.
6.2 Exterior
- Limpe o exterior da torradeira com um panoamp pano e seque bem.
- Não utilize produtos de limpeza abrasivos ou esponjas de aço, pois podem riscar a superfície.
- Nunca mergulhe a torradeira em água ou qualquer outro líquido.
7. Solução De Problemas
If you experience issues with your toaster, refer to the following table for common problems and solutions:
| Problema | Possível causa | Solução |
|---|---|---|
| A torradeira não liga. | Não está conectado; energia outage; disjuntor desarmado. | Certifique-se de que a torradeira esteja firmemente conectada a uma tomada em funcionamento. Verifique o disjuntor da residência. |
| Bread does not lower or raise. | Toaster not powered; Toast/Cancel button not pressed; food jammed. | Ensure power is on. Press Toast/Cancel button. Unplug toaster and carefully remove any jammed food. |
| Tostagem irregular. | Espessura irregular do pão; acúmulo de migalhas. | Ensure bread slices are of similar thickness. Clean crumb tray regularly. |
| Cheiro de fumaça ou queimado. | Food jammed; crumb buildup; high shade setting. | Immediately press Cancel. Unplug and allow to cool. Remove jammed food or clean crumb tray. Reduce shade setting for next use. |
Se o problema persistir após tentar essas soluções, entre em contato com o suporte ao cliente da KitchenAid.
8. Especificações
| Recurso | Detalhe |
|---|---|
| Número do modelo | 5KMT223GER |
| O quetage | 1100 Watts |
| Volumetage | 220 Volts |
| Slot Count | 2 |
| Configurações de sombra | 7 |
| Funções especiais | Keep Warm, Bagel, Defrost, Reheat, Cancel |
| Material | Metal |
| Dimensões do produto (P x L x A) | 25 cm de profundidade x 34 cm de largura x 25.5 cm de altura |
| Peso do item | 2200 gramas |
| Componentes incluídos | Pop-up Toaster, Removable Crumb Tray |
9. Garantia e Suporte
Your KitchenAid 5KMT223GER 2-Slot Automatic Toaster is covered by a Garantia limitada de 2 ano a partir da data da compra. Esta garantia cobre defeitos de materiais e de fabricação sob uso doméstico normal.
For warranty service, technical support, or to order replacement parts, please contact KitchenAid customer service. Keep your purchase receipt as proof of purchase for warranty claims.