NEWTRY 6108
NEWTRY Pneumatic Rivet Nut Setting Kit 6108 User Manual
Model: 6108 (M6, M8, M10 Heads)
1. Introdução
Thank you for choosing the NEWTRY Pneumatic Rivet Nut Setting Kit Model 6108. This tool is designed for efficient and reliable installation of rivet nuts in various applications. This manual provides essential information for the safe and effective operation, maintenance, and troubleshooting of your pneumatic rivet nut setter. Please read this manual thoroughly before use and retain it for future reference.

Imagem 1: Terminadoview of the NEWTRY Pneumatic Rivet Nut Setting Kit 6108, showing the main tool, M6, M8, M10 heads, and a wrench.
2. Instruções de segurança
Sempre observe as precauções básicas de segurança para reduzir o risco de ferimentos pessoais e danos à ferramenta. O não cumprimento dessas instruções pode resultar em ferimentos graves.
- Use proteção ocular: Use sempre óculos de proteção aprovados pela ANSI ou óculos de segurança com proteção lateral.
- Use protetores auriculares: Prolonged exposure to noise can cause hearing damage.
- Use proteção para as mãos: Use appropriate gloves to protect hands from injury.
- Mantenha uma área de trabalho limpa: Áreas desordenadas são um convite a acidentes.
- Não exagere: Mantenha sempre uma posição correta e equilíbrio.
- Desconecte o suprimento de ar: Always disconnect the air supply before making adjustments, changing accessories, or servicing the tool.
- Utilize a pressão de ar correta: Certifique-se de que a pressão do ar comprimido não exceda a pressão máxima recomendada para a ferramenta.
- Inspecione a ferramenta antes de usar: Check for damaged parts, misalignment, or any other condition that may affect its operation.
- Mantenha as crianças afastadas: Não permita que crianças ou pessoas sem treinamento operem a ferramenta.
3. Componentes e estrutura do produto
Familiarize yourself with the various parts of your NEWTRY pneumatic rivet nut setting tool for proper operation and maintenance.

Image 2: Detailed diagram illustrating the main components of the pneumatic rivet nut tool.
- Frosted Alloy Steel Shell: Provides a durable and ergonomic grip.
- Polished Alloy Steel Shell: Houses the internal mechanisms.
- Iniciar interruptor: Activates the tool's operation.
- Air Regulating Valve: Controls the air flow and pressure.
- 1/4 Gas Pipe Joint: Connection point for the air supply hose.
- Válvula de escape: Releases air during operation.
- Gun Heads (M6, M8, M10): Interchangeable heads for different rivet nut sizes.
- Hexagon Wrench: Used for changing gun heads.

Imagem 3: Explodida view of the gun head assembly, detailing internal components like the pull rod, bearings, and gaskets.
4. Setup and Head Installation
Before operating the tool, ensure the correct rivet nut head is installed and the air supply is properly connected.
4.1 Connecting Air Supply
- Certifique-se de que o compressor de ar esteja desligado e despressurizado.
- Connect a 1/4-inch air hose to the 1/4 Gas Pipe Joint on the tool.
- Ajuste a pressão do compressor de ar para a faixa de operação recomendada (consulte as especificações).
- Ligue o compressor de ar.
4.2 Changing Rivet Nut Heads
The NEWTRY 6108 kit includes M6, M8, and M10 self-locking gun heads for quick replacement.
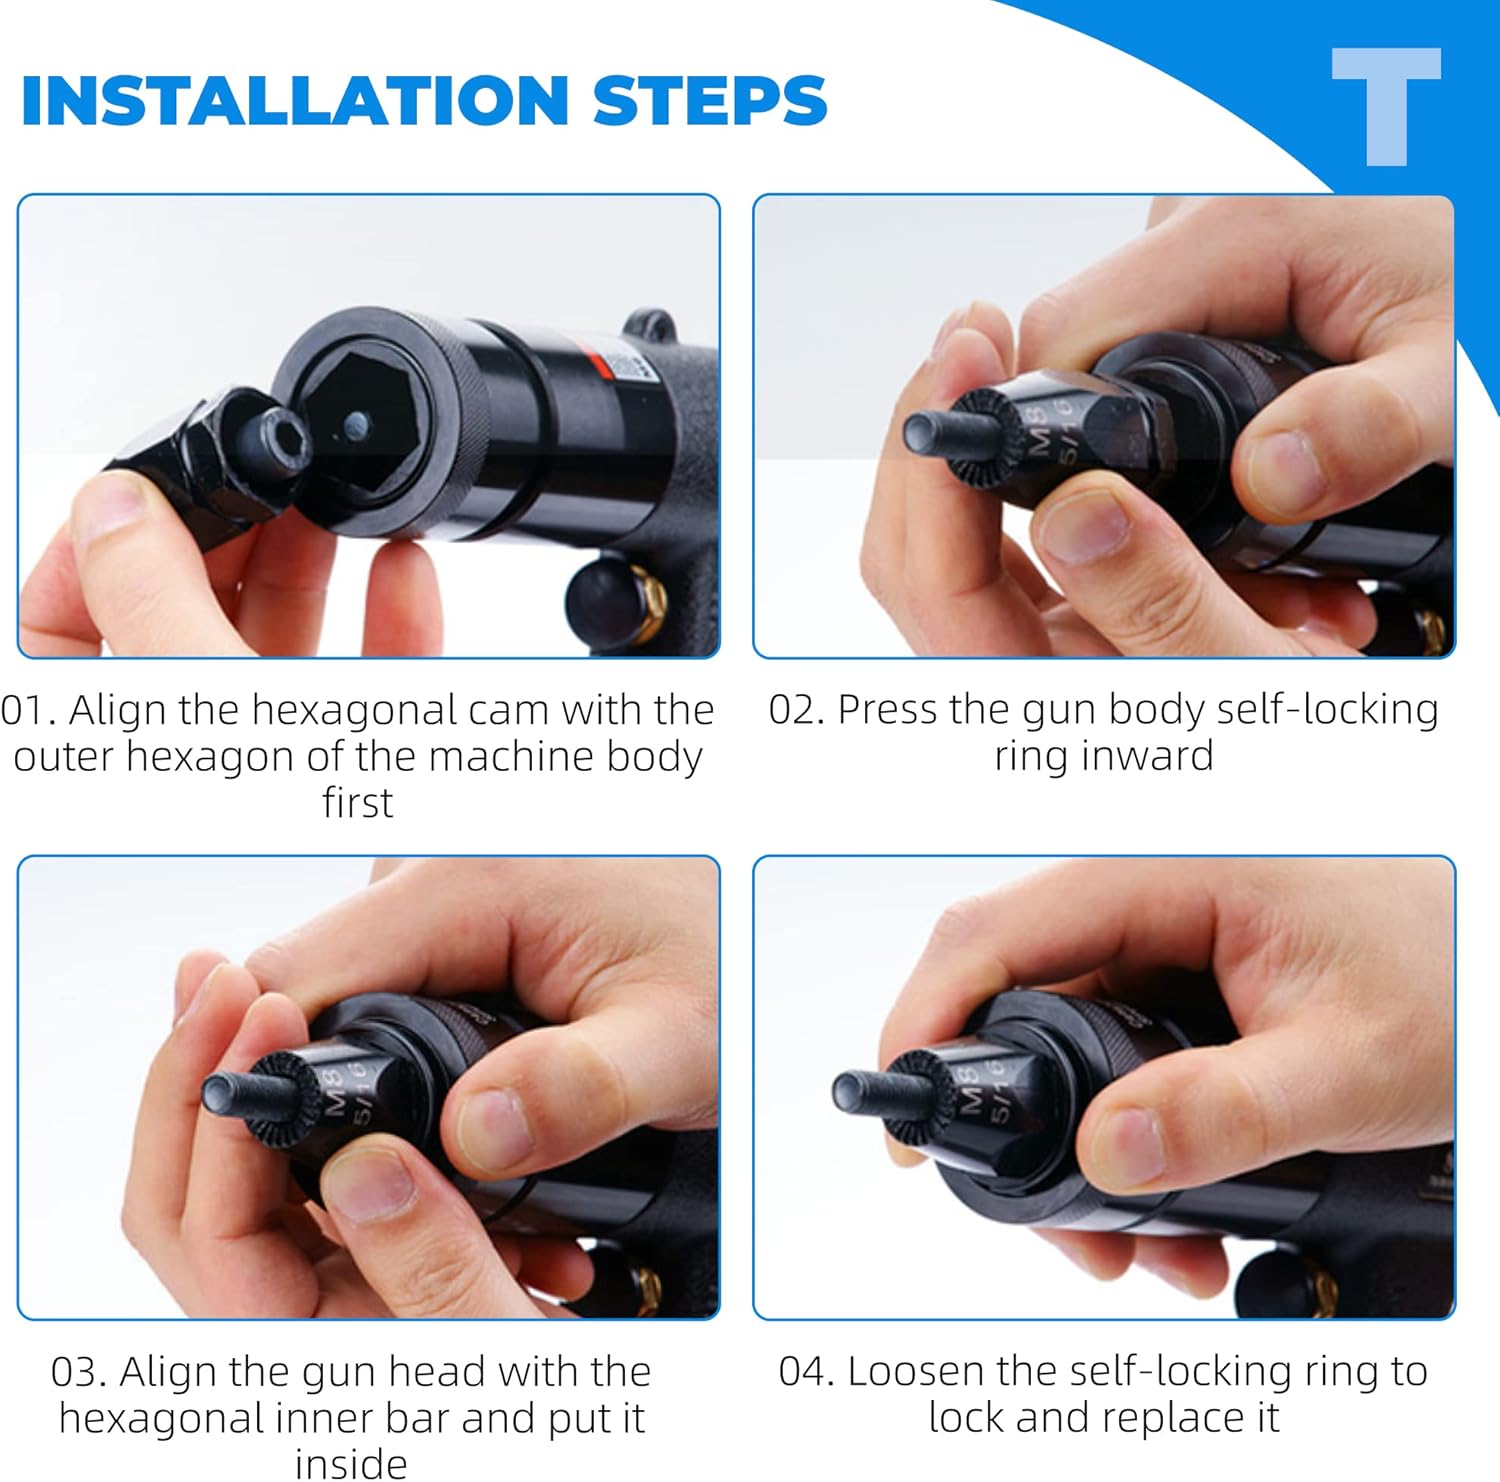
Image 4: Step-by-step guide for installing or changing the rivet nut gun head.
- Desconecte o suprimento de ar: Always disconnect the air hose from the tool before changing heads.
- Remove Current Head (if applicable): If a head is already installed, press the gun body's self-locking ring inward and unscrew the head.
- Align Hexagonal Cam: Align the hexagonal cam of the desired gun head (M6, M8, or M10) with the outer hexagon of the machine body.
- Press Self-Locking Ring: Press the gun body's self-locking ring inward.
- Insert Gun Head: Align the gun head with the hexagonal inner bar and push it firmly into place.
- Cabeça Segura: Loosen the self-locking ring to lock the gun head securely. Ensure it is fully seated and cannot be easily pulled out.
5. Instruções de operação
Follow these steps for effective and safe operation of your pneumatic rivet nut setter.

Image 5: The tool in action, demonstrating its ease of use and automatic retraction feature.
- Select Correct Head: Ensure the appropriate M6, M8, or M10 head is installed for your rivet nut size.
- Thread Rivet Nut: Thread the rivet nut onto the mandrel of the installed gun head.
- Insert into Workpiece: Insert the rivet nut into the pre-drilled hole in your workpiece.
- Ativar ferramenta: Press the start switch to activate the tool. The tool will pull the rivet nut, deforming it to create a secure thread in the material.
- Automatic Retraction: After the rivet nut is fully deformed and set, the rod will automatically retract, releasing the tool from the installed rivet nut.
- Inspecionar a instalação: Verify that the rivet nut is securely fastened and properly set.
5.1 Cenários de Aplicação
This tool is suitable for various applications including home construction, decoration, assembly, automotive parts, box manufacturing, and aviation riveting.
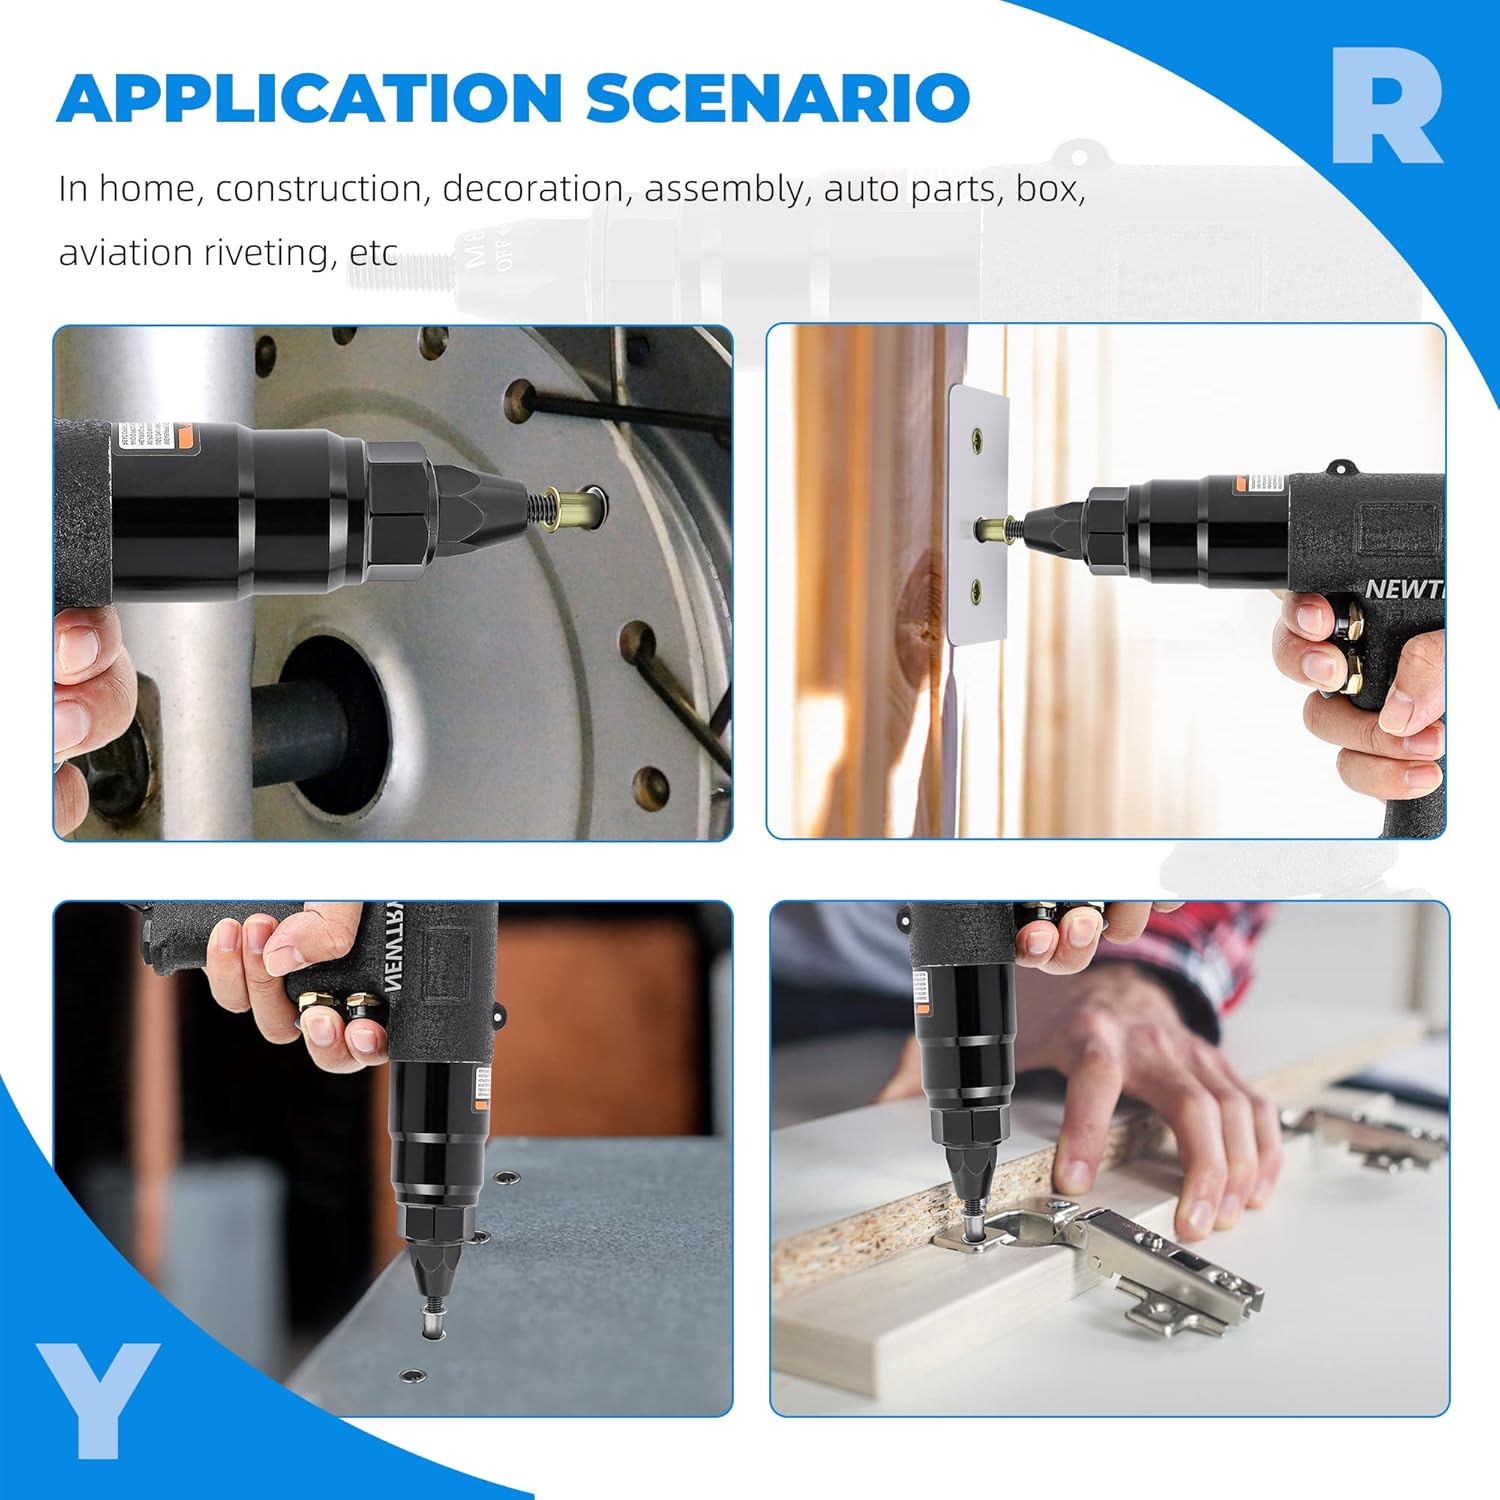
Imagem 6: Examples of where the pneumatic rivet nut tool can be effectively used.
6. Manutenção
A manutenção regular garante a longevidade e o desempenho ideal da sua ferramenta.
- Lubrificação: Apply a few drops of pneumatic tool oil into the air inlet before and after each use.
- Limpeza: Mantenha a ferramenta limpa e livre de detritos. Limpe a parte externa com um pano limpo.
- Armazenar: Store the tool in a dry, clean environment away from direct sunlight and extreme temperatures.
- Inspect Air Hose: Regularly check the air hose for wear, cuts, or leaks. Replace if damaged.
- Check Gun Heads: Inspect gun heads for wear or damage. Replace worn heads to ensure proper rivet nut setting.
7. Solução De Problemas
Consulte esta seção para obter informações sobre problemas comuns e suas soluções.
| Problema | Possível causa | Solução |
|---|---|---|
| A ferramenta não funciona ou funciona de forma fraca. | Low air pressure; air leak; clogged air inlet; insufficient lubrication. | Check air compressor pressure; inspect air hose connections; clean air inlet; lubricate tool. |
| Rivet nut not setting properly or spinning. | Incorrect gun head size; worn gun head; low air pressure; poor quality rivet nut. | Ensure correct head for rivet nut size; replace worn head; check air pressure; use high-quality rivet nuts. |
| Vazamentos de ar da ferramenta. | Conexões soltas; anéis de vedação ou juntas danificadas. | Tighten connections; inspect and replace damaged seals. |
If problems persist after attempting these solutions, please contact NEWTRY customer support.
8. Especificações
| Recurso | Detalhe |
|---|---|
| Modelo | 6108 (YX-306) |
| Applicable Rivet Nut Sizes | M6, M8, M10 |
| Consumo de ar | 5 CFM (approximate, for similar models) |
| Rotation Speed (6108) | 400 RPM |
| Dimensões da embalagem | 26 x 23 x 6.7 cm |
| Peso | 1.94 kg |
| Fabricante | NOVOTENTE |
Nota: As especificações estão sujeitas a alterações sem aviso prévio para melhoria do produto.
9. Informações de garantia
NEWTRY products are manufactured to high-quality standards. For specific warranty details, including coverage period and terms, please refer to the warranty card included with your purchase or visit the official NEWTRY webGuarde seu comprovante de compra para eventuais solicitações de garantia.
10. Suporte ao cliente
For technical assistance, spare parts, or any inquiries regarding your NEWTRY Pneumatic Rivet Nut Setting Kit, please contact NEWTRY customer service. Contact information can typically be found on the product packaging, the official NEWTRY website ou através do seu ponto de venda.
Visite o NEWTRY Store on Amazon Para mais produtos e informações.
Ask a question about this manual
Ask about setup, troubleshooting, compatibility, parts, safety, or missing instructions. Manuals+ will review the question and use this page’s manual context to help answer it.