
1. Introdução
This manual provides detailed instructions for the installation, operation, and maintenance of your Akozon Digital Programmable Timer. Please read this manual carefully before use to ensure proper function and safety.

Figure 1: Akozon Digital Programmable Timer 12V
2. Produto acabadoview e Características
The Akozon Digital Programmable Timer is a weekly programmable electronic timer designed for precise control of various electrical equipment. Its robust design and advanced features ensure reliable operation.
- Controle Automático: Automatically turns electrical equipment on and off according to preset schedules.
- Alta precisão: Equipped with a high-precision chip for accurate timing.
- Programação semanal: Supports advanced programming for up to one week in advance.
- Vários programas: Features 16 ON/OFF settings (programs) for daily or weekly scheduling.
- Energia de reserva: Integrated high-performance rechargeable battery maintains time display and stores data for over 12 months during power outage.
- Construção durável: Housing made of hard, durable plastic for extended lifespan.
- Tela LCD: Clear LCD for easy viewverificação de tempo e status do programa.
- Instalação em trilho DIN: Designed for convenient installation on a DIN rail.
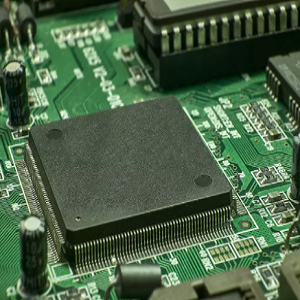
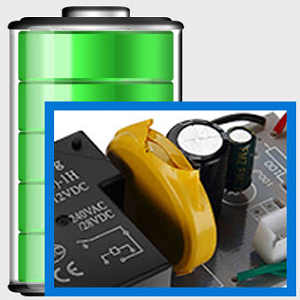
Figure 2: Internal components showing the high-precision chip and rechargeable backup battery.
3. Especificações
| Número do modelo | Akozonqegcgmk04u-01 |
| Vol de entradatage | 12 V DC / AC |
| Capacidade de saída | 25(16)A, 240VAC |
| Consumo de energia | <1 W |
| Intervalo de tempo | 1 minuto a 168 horas |
| Programas | 16 ON/OFF settings (daily/weekly) |
| Erro de tempo | <±2 seconds/day |
| Memória de falha de energia | >12 months (with internal rechargeable battery) |
| Temperatura de operação | -20°C a 55°C |
| Método de instalação | Trilho DIN |
| Dimensões (aprox.) | 36 mm (L) x 86 mm (A) x 65 mm (P) |
| Peso (aprox.) | 120g |
| Mostrar | LCD |

Figura 3: Dimensões detalhadas do produto e especificações principais.
4. Informações de segurança
- Sempre desconecte a energia antes da instalação ou manutenção.
- A instalação deve ser realizada por um eletricista qualificado para evitar choque elétrico ou danos ao aparelho.
- Garantir o volume de entradatage matches the timer's specifications (12V DC/AC). Connecting to incorrect voltage pode danificar a unidade.
- Do not expose the device to excessive moisture or extreme temperatures outside the specified operating range.
- Do not disassemble the timer; refer servicing to qualified personnel.
5. Configuração e instalação
5.1 Instalação em trilho DIN
The timer is designed for easy installation on a standard 35mm DIN rail. Simply clip the timer onto the rail in your distribution box.

Figura 4: Example of the timer installed on a DIN rail within a distribution box.
5.2 Instruções de Fiação
Refer to the wiring diagram below for correct connection. Ensure all connections are secure and comply with local electrical codes.
- Terminais 1 e 2: Power input (12V DC/AC).
- Terminais 3, 4, 5: Output contacts.
- 3: Normalmente fechado (NC)
- 4: Comum (COM)
- 5: Normalmente aberto (NÃO)

Figure 5: Detailed wiring diagram showing connections for power input and output contacts.

Figura 6: Examples of wiring methods, including direct load connection and connection via a contactor.
6. Instruções de operação
6.1 Initial Setup and Unlocking
- Upon first use, connect the timer to power (12V DC/AC).
- Pressione o REINICIAR button to clear all previous settings and initialize the timer.
- The timer display may be locked. To unlock, press the C/R button four times. The lock icon will disappear from the display. If no operation occurs for 15 seconds, the timer will automatically lock again.
6.2 Configurar a hora e o dia atuais
After unlocking, set the current time and day:
- Pressione o P button (Program button) once.
- Pressione o D+ button to set the current day of the week (MO, TU, WE, TH, FR, SA, SU).
- Pressione o H+ botão para definir a hora atual.
- Pressione o M+ botão para definir o minuto atual.
- Pressione o P Pressione novamente para sair do modo de configuração de hora.

Figura 7: Close view of the timer's control buttons.

Figure 8: Explanation of button functions and display elements, including day, hour, minute, and reset.
6.3 Controle Manual
Pressione o MANUAL C/R button to cycle through manual control modes:
- EM: A saída está continuamente ligada.
- CARRO: Timer operates according to programmed schedules.
- OFF: A saída está continuamente DESLIGADA.
Selecione AUTO for the timer to follow your programmed settings.
7. Programação de horários de LIGAR/DESLIGAR
The timer supports up to 16 ON/OFF programs. Follow these steps to set your desired schedules:
- Pressione o P botão para entrar no modo de programação. O visor mostrará "1 LIGADO".
- Imprensa D+ to select the day(s) for this program. You can choose a single day, weekdays, weekends, or all days.
- Imprensa H+ Para definir a hora de ativação.
- Imprensa M+ Para definir o minuto LIGADO.
- Imprensa P novamente. O visor mostrará "1 OFF".
- Imprensa D+ to select the day(s) for this OFF program (usually the same as ON, but can be different).
- Imprensa H+ Para definir a hora de DESLIGAMENTO.
- Imprensa M+ para definir o minuto de DESLIGAMENTO.
- Repita os passos 1 a 8 para programas adicionais de LIGAR/DESLIGAR (até 16). Pressione P para avançar para o próximo número do programa.
- Para sair do modo de programação, pressione a tecla MANUAL C/R button. Ensure the timer is set to AUTO Modo para execução de programas.
Note: If you need to cancel a program, press the C/R botão enquanto viewing the specific ON or OFF program. This will clear the settings for that program.
8. Aplicações
The Akozon Digital Programmable Timer is versatile and can be used in various applications, including:
- Controlling lamps and lighting systems (e.g., streetlights, garden lights, neon signs).
- Managing water heaters and preheaters.
- Automating agricultural facilities (e.g., irrigation systems).
- Controlling broadcasting equipment.
- Scheduling household appliances.
- Operating sprayers and bottling equipment.

Figura 9: Examples of environments where the timer can be used, such as controlling outdoor lighting and industrial equipment.
9. Manutenção
- Keep the timer clean and free from dust. Use a soft, dry cloth for cleaning.
- Não utilize produtos de limpeza abrasivos ou solventes.
- Garanta ventilação adequada ao redor do dispositivo para evitar superaquecimento.
- The internal battery is designed for long-term backup. If the timer consistently loses time or program settings after a power outage, the internal battery may need professional inspection.
10. Solução De Problemas
| Problema | Possível causa | Solução |
|---|---|---|
| O display está em branco. | No power supply or internal battery depleted. | Check power connections. Allow time for the internal battery to charge (connect to power for several hours). |
| Timer does not respond to button presses. | Timer is locked. | Pressione o C/R button four times to unlock. |
| Os programas não estão sendo executados. | Timer is not in AUTO mode. Incorrect program settings. | Imprensa MANUAL C/R até que "AUTO" seja exibido. Review e configurações corretas do programa. |
| A hora ou as configurações são perdidas após uma queda de energia.tage. | Internal backup battery is not charging or is depleted. | Ensure the timer is connected to power for sufficient time to charge the internal battery. If the issue persists, contact customer support. |
| Output is always ON or OFF, ignoring programs. | O temporizador está no modo manual LIGADO ou DESLIGADO. | Imprensa MANUAL C/R até que "AUTO" seja exibido. |
11. Garantia e Suporte
Akozon products are manufactured to high-quality standards. For warranty information or technical support, please refer to the contact details provided with your purchase or visit the official Akozon website.
Guarde o comprovante de compra para reclamações de garantia.