1. Introdução
Thank you for choosing the Walfront LCD Digital Programmable Weekly Timer Switch. This device is designed for automatic control of various electrical appliances based on user-defined schedules. Please read this manual carefully before installation and operation to ensure proper use and to prevent damage.
2. Informações de segurança
Aviso: A instalação elétrica deve ser realizada somente por pessoal qualificado. Desligue a energia antes da instalação ou manutenção para evitar choque elétrico.
- Garantir o volume de entradatage matches the timer's specifications (24V for this model).
- Do not exceed the maximum load capacity of 16A 250VAC (resistive load).
- Mantenha o dispositivo longe da água e da umidade excessiva.
- Do not attempt to disassemble or repair the unit yourself. Contact support if issues arise.
3. Produto acabadoview
The Walfront LCD Digital Programmable Weekly Timer Switch is a high-precision device built with durable, moisture-resistant, and corrosion-protected materials. It features a clear LCD display and supports up to 16 ON/OFF programs daily and weekly.
3.1 Principais Características
- High-quality construction for long lifespan.
- Automatic ON/OFF control for various electrical devices.
- Built-in 1.2V/40mA rechargeable battery for memory retention.
- Industrial-grade chip for high precision and strong anti-interference.
- Up to 16 ON and 16 OFF programming settings per day/week.
- LCD display showing real-time, hour, minute, and ON/AUTO/OFF status.
- DIN rail mounting design.
3.2 Componentes

Imagem 1: Frente view of the Walfront LCD Digital Programmable Weekly Timer Switch. Shows the LCD display and control buttons.

Imagem 2: Voltar view of the timer switch, illustrating the wiring terminals and basic electrical specifications printed on the unit.
4. Configuração e instalação
This timer is designed for DIN rail mounting. Ensure the DIN rail is securely installed before attaching the timer.
4.1 Diagrama de fiação

Imagem 3: Wiring diagrams showing direct connection (left) and connection with an AC contactor (right). The direct connection illustrates neutral and live wire inputs and load output. The AC contactor diagram shows 220V power input and output to the load device.
Fiação direta: Connect the neutral and live wires to the designated input terminals (L and N). Connect the load to the output terminals (typically 3 and 4 for normally open, or 3 and 5 for normally closed, as indicated on the device). Refer to the diagram on the device for exact terminal numbering.
Wiring with AC Contactor: For higher loads, connect the timer to control an AC contactor. The timer's output will switch the coil of the contactor, which in turn controls the main power to the load. This setup is shown on the right side of Image 3.
4.2 Inicialização e Carregamento da Bateria
Upon first use, connect the timer to power. The internal 1.2V/40mA rechargeable battery will begin charging. If the display is blank or shows incorrect time, allow it to charge for a few minutes. Press the "Reiniciar" button (often labeled with a small 'R' or 'C' and requires a pointed object) to clear all settings and start fresh.
5. Instruções de operação
5.1 Ajustando a hora atual
- Pressione o "CLOCK" button (often labeled with a clock icon) and hold it.
- Enquanto segura "CLOCK", pressione o "D+" botão para definir o dia da semana atual.
- Enquanto segura "CLOCK", pressione o "H+" botão para definir a hora atual.
- Enquanto segura "CLOCK", pressione o "M+" botão para definir o minuto atual.
- Solte o "CLOCK" botão. A hora está definida.
5.2 Setting 12/24 Hour Mode
By default, the timer operates in 24-hour mode. To switch between 12-hour (AM/PM) and 24-hour modes, press and hold the "CLOCK" button for approximately 5 seconds. The display will show "AM" for 12-hour mode or switch back to 24-hour format.
5.3 Programação de horários de LIGAR/DESLIGAR
The timer supports up to 16 ON and 16 OFF programs. Each program consists of an ON time and an OFF time.
- Pressione o "PROG" pressione o botão uma vez. O visor mostrará "1 LIGADO".
- Imprensa "D+" to select the day(s) for this ON program (e.g., Mon-Fri, Sat-Sun, or specific days).
- Imprensa "H+" para definir a hora LIGADA desejada.
- Imprensa "M+" para definir o minuto LIGADO desejado.
- Imprensa "PROG" novamente. O visor mostrará "1 OFF".
- Repita os passos 2 a 4 para definir o horário de DESLIGAMENTO do primeiro programa.
- Continuar pressionando "PROG" to cycle through "2 ON", "2 OFF", up to "16 ON", "16 OFF", setting each as needed.
- Após configurar todos os programas desejados, pressione o "CLOCK" button to exit programming mode and return to real-time display.
Observação: If you need to cancel a program, press the "PROG" button to select the program, then press the "MANUAL" button until "----" appears on the display for that program's time slot.
5.4 Controle manual (LIGADO/AUTOMÁTICO/DESLIGADO)
Pressione o "MANUAL" botão para alternar entre os modos de operação:
- EM: The output is continuously ON, ignoring all programs.
- CARRO: O temporizador funciona de acordo com os horários programados de LIGAR/DESLIGAR.
- OFF: The output is continuously OFF, ignoring all programs.
Certifique-se de que o temporizador esteja em "AUTO" mode for programmed operation.
5.5 Função de bloqueio de teclas
To prevent accidental changes to settings, the timer features a key lock function.

Imagem 4: The timer display showing the key lock symbol, indicating that the buttons are locked.
- To lock the keys: Press and hold the "C/R" (Cancel/Reset) button for approximately 4 seconds until a lock symbol appears on the LCD.
- To unlock the keys: Press and hold the "C/R" button again for approximately 4 seconds until the lock symbol disappears.
6. Especificações
| Parâmetro | Valor |
|---|---|
| Vol de entradatage | AC/DC 24V (This model) |
| Contact Rated Voltage | AC 180V~264V (50/60Hz) |
| Capacidade de carga | 16A 250VAC (Resistive Load) |
| Operações ON/OFF | 16 ON / 16 OFF (Manual/Auto) |
| Mostrar | LCD |
| Consumo de energia | 4.5VA (Max) |
| Erro | ≤2 seconds/day (at 25℃) |
| Método de montagem | DIN Rail (sold separately) |
| Intervalo de tempo | 1 minuto a 168 horas |
| Intervalo mínimo | 1 minuto |
| Temperatura de operação | -10℃ a 55℃ |
| Umidade operacional | 35-85% UR |
| Dimensões (C x L x A) | 86 x 36 x 65 mm |
| Bateria interna | 1.2V/40mA rechargeable, >15 days backup |
| Número de Circuitos | Changeover switch (SPDT) |
| Vida útil | Mechanical: 107, Electrical: 105 |
| Peso | 125g |
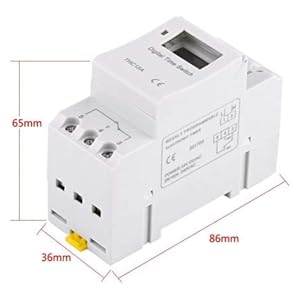
Imagem 5: Diagram illustrating the dimensions of the timer switch: 86mm length, 36mm width, and 65mm height.
7. Manutenção
- Keep the timer clean and free from dust. Use a dry, soft cloth for cleaning.
- Não utilize produtos de limpeza abrasivos ou solventes.
- Verifique periodicamente as conexões da fiação para garantir que estejam seguras.
- The internal battery is designed for long life and typically does not require replacement. If the timer loses settings frequently after power outages, the battery may need servicing by a qualified technician.
8. Solução De Problemas
| Problema | Possível causa | Solução |
|---|---|---|
| O display está em branco. | No power supply or internal battery discharged. | Check power connections. Allow the timer to charge for a few minutes after connecting to power. |
| O temporizador não liga/desliga conforme programado. | Timer is not in "AUTO" mode, programs are incorrect, or key lock is active. | Press "MANUAL" until "AUTO" is displayed. Review and correct programs. Unlock keys if necessary. |
| Os botões não respondem. | Key lock function is active. | Press and hold "C/R" for 4 seconds to unlock the keys. |
| O tempo é impreciso. | Minor drift (within specifications) or internal battery issue. | Reset and re-set the time. If inaccuracy persists or settings are lost frequently, contact support. |
9. Garantia e Suporte
Walfront strives to provide high-quality products. If you encounter any issues with your product, please contact us for prompt assistance. We offer return and refund services for product defects.
For support, please refer to the contact information provided with your purchase or visit the Walfront store on Amazon: Loja Walfront da Amazon.