
1. Introdução
The BNT Dummy Fake Security Camera is designed to provide a realistic visual deterrent against potential intruders. Its appearance closely mimics that of a functional surveillance camera, aiming to reduce the likelihood of criminal activity by creating the impression of active monitoring. This manual provides essential information for the proper setup, operation, and maintenance of your dummy camera.

Image 1.1: Two BNT white dummy fake security cameras, showcasing their realistic design.
2. O que está na caixa
Upon opening your package, you should find the following components:
- BNT Bullet Simulation Fake Camera (White) x 2
- Parafusos para instalação
- Manual do usuário (este documento)
- Warning Security Alert Sticker Decal x 2

Image 2.1: Package contents showing two dummy cameras, warning stickers, and screws.
3. Características
- Design realista: Mimics the appearance of a real surveillance camera.
- Luz LED piscando: Features a built-in red LED light that illuminates at night, simulating active recording.
- Sensor fotoelétrico: Automatically activates the red LED light in low-light conditions.
- Construção durável: Made from Acrylonitrile Butadiene Styrene (ABS) for indoor and outdoor use.
- À prova de intempéries: IP65 International Protection Rating ensures resistance to water.
- Fácil instalação: No wiring required, mounts easily to ceilings or walls.
- Ângulo ajustável: Features 2-axis rotation for flexible positioning (360-degree rotation, 90-degree tilt).
- Fonte de energia: Funciona com 2 pilhas AA (não incluídas).
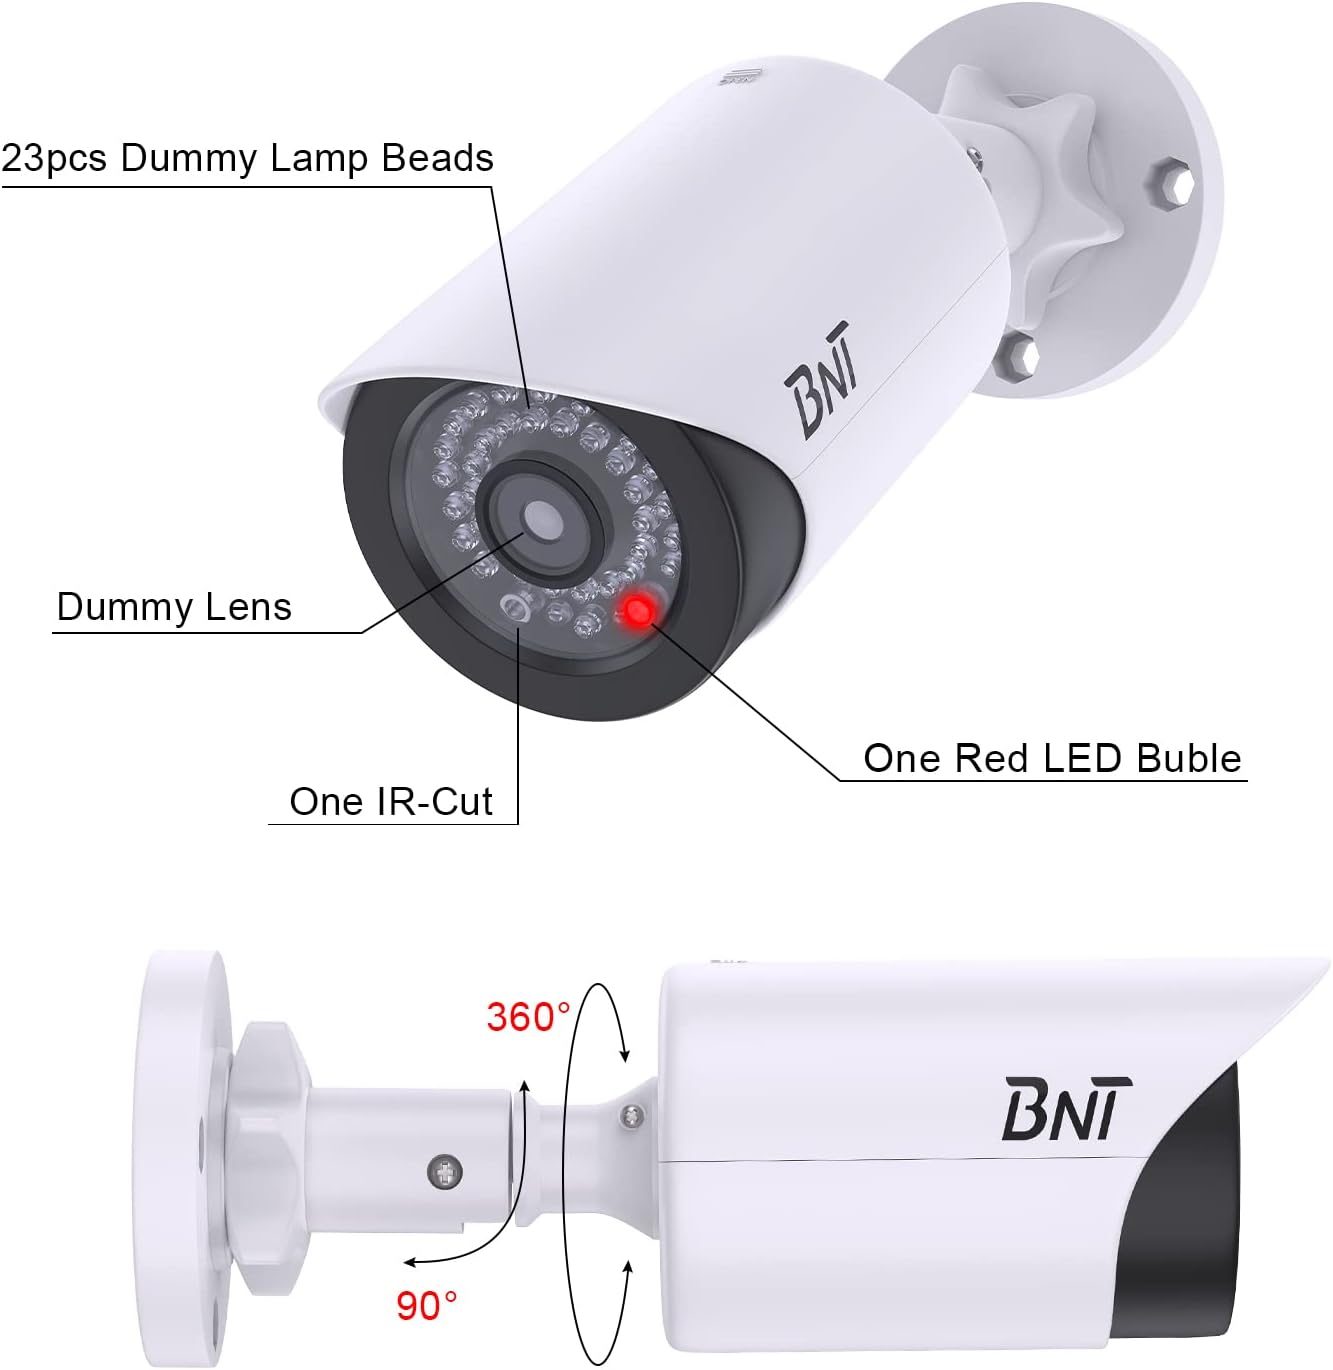
Image 3.1: Close-up of the dummy camera's front, showing the dummy lens, red LED, and rotation capabilities.
4. Configuração e instalação
4.1. Instalação da bateria
- Locate the battery compartment on the camera. This is typically found by sliding open the back cover.
- Insira 2 pilhas AA (não incluídas) no compartimento, certificando-se da polaridade correta (+/-).
- Feche o compartimento da bateria com segurança.

Image 4.1: Illustration of battery insertion into the dummy camera.
4.2. Montando a Câmera
The camera can be easily installed on a ceiling or wall using the provided screws. No complex wiring is necessary.
- Choose a suitable location for installation, considering visibility and desired deterrent effect.
- Position the mounting base against the surface and mark the screw holes.
- Drill pilot holes if necessary, then secure the mounting base with the provided screws.
- Fixe a câmera na base montada.
- Adjust the camera's angle using its 2-axis rotation feature to achieve the desired coverage.
Video: BNT Dummy Fake Security Camera Overview
Vídeo 4.2.1: Este vídeo fornece uma visão geral.view of the BNT Dummy Fake Security Camera, highlighting its features and realistic appearance.
Video: Protecting Property with Fake Cameras
Video 4.2.2: This video demonstrates how fake cameras can be used to enhance property security and deter potential threats.
5. Instruções de operação
The BNT Dummy Fake Security Camera is designed for simple, autonomous operation:
- Once batteries are installed, the built-in photoelectric sensor will detect ambient light levels.
- During daylight hours, the red LED light will remain off.
- As darkness falls, the photoelectric sensor will automatically activate the red LED light, causing it to illuminate. This simulates the operation of a real security camera's night vision or recording indicator.
- The camera provides 24/7 visual deterrence without any manual intervention after initial setup.

Image 5.1: The dummy camera's red LED light is active at night, providing a visual deterrent.
6. Manutenção
- Substituição da bateria: When the red LED light dims or stops illuminating, it is time to replace the batteries. Ensure to use high-quality AA batteries to prevent leakage and damage to the battery case.
- Proteção Ambiental: When replacing batteries, take care to avoid exposing the internal components to rain or moisture to maintain the lifespan of the battery case.
- Disposição: Please dispose of used batteries properly according to local regulations to protect the environment.
- Limpeza: Limpe periodicamente a parte externa da câmera com um pano macio e seco.amp pano para remover poeira e detritos. Evite usar produtos químicos agressivos.
7. Solução De Problemas
7.1. LED Light Not Illuminating at Night
- Verifique as baterias: Ensure that 2 AA batteries are correctly installed and are not depleted. Replace if necessary.
- Test Photoelectric Sensor: In a dark environment, cover the LED light with your hand. If the red LED light turns on, the product is functioning correctly. If it does not, check battery installation again.
- Fatores ambientais: Ensure the camera is not installed in an area with ambient light at night (e.g., streetlights, porch lights) that might prevent the photoelectric sensor from detecting sufficient darkness to activate the LED.
8. Especificações
| Recurso | Detalhe |
|---|---|
| Nome do modelo | BNT Dummy (Model BNT-K8FaCam-2PW) |
| Uso interno/externo | Interior, Exterior |
| Fonte de energia | Alimentado por bateria (2 pilhas AA, não incluídas) |
| Material | Acrilonitrila Butadieno Estireno (ABS) |
| Tipo de montagem | Teto, Parede |
| Viewângulo de engate | 120 graus |
| Avaliação de proteção internacional | IP65 (à prova d'água) |
| Dimensões do item (C x L x A) | 7.6 x 5.4 x 2.9 polegadas |
| Peso do item | 5.2 onças (148 gramas) |
| Recurso especial | Powered by 2 AA batteries (not included) |
9. Garantia e suporte
BNT provides reliable 24-month after-sales service for this product. If you have any questions, concerns, or require assistance with your BNT Dummy Fake Security Camera, please contact our dedicated customer service team. We are committed to ensuring your satisfaction.