Tacklife PES01A
Manual do usuário da serra circular Tacklife PES01A
Model: PES01A
1. Introdução
Thank you for choosing the Tacklife PES01A Circular Saw. This powerful and versatile tool is designed for efficient and precise cutting of various materials, including wood and plastic. Featuring a robust 1500W motor, laser guide, and adjustable cutting capabilities, it is an ideal tool for both professional and DIY projects. Please read this manual thoroughly before operation to ensure safe and effective use of your new circular saw.

Figure 1.1: Tacklife PES01A Circular Saw overview.
2. Instruções gerais de segurança
Siga sempre as precauções básicas de segurança ao usar ferramentas elétricas para reduzir o risco de incêndio, choque elétrico e ferimentos. Guarde este manual para futuras consultas.
2.1. Segurança da área de trabalho
- Mantenha a área de trabalho limpa e bem iluminada. Áreas desorganizadas ou escuras convidam a acidentes.
- Não opere ferramentas elétricas em atmosferas explosivas, como na presença de líquidos inflamáveis, gases ou poeira. Ferramentas elétricas criam faíscas que podem inflamar a poeira ou os vapores.
- Mantenha crianças e espectadores afastados enquanto estiver operando uma ferramenta elétrica. Distrações podem fazer com que você perca o controle.
2.2. Segurança elétrica
- Os plugues das ferramentas elétricas devem corresponder à tomada. Nunca modifique o plugue de forma alguma.
- Evite contato corporal com superfícies aterradas, como canos, radiadores, fogões e geladeiras. Há um risco maior de choque elétrico se seu corpo estiver aterrado.
- Não exponha ferramentas elétricas à chuva ou condições úmidas. A entrada de água em uma ferramenta elétrica aumentará o risco de choque elétrico.
- Não abuse do cabo. Nunca use o cabo para carregar, puxar ou desligar a ferramenta elétrica. Mantenha o cabo longe de calor, óleo, bordas afiadas ou peças móveis.
2.3. Segurança pessoal
- Use sempre proteção para os olhos. Use óculos de segurança ou protetores oculares.
- Use protetores auriculares ao operar a ferramenta por períodos prolongados.
- Vista-se adequadamente. Não use roupas largas ou joias. Mantenha seu cabelo e roupas longe de peças móveis.
- Fique alerta, observe o que está fazendo e use o bom senso ao operar uma ferramenta elétrica.
- Use safety clamps or a vise to secure the workpiece. This is safer than using your hand and it frees both hands to operate the tool.
2.4. Circular Saw Specific Safety
- Mantenha as mãos longe da área de corte e da lâmina. Mantenha sua segunda mão na alça auxiliar ou no alojamento do motor. Se ambas as mãos estiverem segurando a serra, elas não poderão ser cortadas pela lâmina.
- Não coloque a mão embaixo da peça de trabalho. A proteção não pode protegê-lo da lâmina abaixo da peça de trabalho.
- Ajuste a profundidade de corte à espessura da peça de trabalho. Menos de um dente inteiro da lâmina deve estar visível abaixo da peça de trabalho.
- Nunca segure a peça de trabalho em suas mãos ou na perna durante o corte. Prenda a peça de trabalho em uma plataforma estável.
- Segure a ferramenta elétrica pelas superfícies isoladas ao realizar uma operação em que o acessório de corte possa entrar em contato com fios ocultos ou com seu próprio cabo.
- Always ensure the lower guard is closed before placing the saw down.
3. Componentes e recursos
Familiarize yourself with the parts of your Tacklife PES01A Circular Saw before operation.

Figure 3.1: Key components of the circular saw.
- 1. Motor potente: Ensures good heat dissipation.
- 2. Interruptor a laser: Activates the laser guide.
- 3. 3M Power Cord & Cable Tie: Convenient for storage and use.
- 4. Interruptor de segurança duplo: Requires pressing both buttons to start, preventing accidental injury.
- 5. Rubberized Handle: For comfortable and secure grip.
- 6. Support Handle: Provides additional control.
- 7. Aluminum Alloy Cover: Durable housing.
- 8. Iron Base Plate: Sturdy base for cutting.
- 9. Iron Blade Guard: Protects the blade.
Acessórios incluídos:

Figure 3.2: Standard accessories included with the saw.
- 1 x Tacklife PES01A Circular Saw
- 1 x 185mm 24-Tooth TCT Blade (for wood/plastic)
- 1 x 185mm 40-Tooth TCT Blade (for wood/plastic)
- 1 x Hex Wrench (for blade changes)
- 1 x Parallel Guide Ruler
- 1 x Dust Port Adapter (35mm diameter)
- 1 x Manual do Usuário
- 1 x Cartão de garantia
4. Configuração e montagem
4.1. Instalação/Remoção da Lâmina
- Ensure the saw is unplugged from the power source before attempting any blade changes.
- Pressione e segure o botão de trava do eixo.
- Using the hex wrench, loosen the blade bolt by turning it counter-clockwise.
- Levante a proteção inferior da lâmina e remova cuidadosamente a lâmina antiga.
- Place the new blade onto the spindle, ensuring the teeth are pointing in the direction of the arrow on the saw's guard.
- Replace the blade bolt and tighten it securely with the hex wrench while holding the spindle lock button.
- Release the spindle lock and check that the blade rotates freely and the guard moves smoothly.
4.2. Attaching the Parallel Guide Ruler
The parallel guide ruler helps achieve straight cuts parallel to the edge of the workpiece.
- Slide the guide ruler into the slot on the front of the saw's base plate.
- Adjust the ruler to the desired cutting width.
- Tighten the locking screw to secure the ruler in place.
4.3. Conectando a Extração de Poeira
For a cleaner work environment, connect a vacuum cleaner to the dust port.
- Attach the 35mm dust port adapter to the dust outlet on the saw.
- Connect your vacuum cleaner hose to the adapter.
5. Instruções de operação
5.1. Ajuste da profundidade de corte
The cutting depth can be adjusted to match the thickness of your material. The maximum cutting depth at 90° is 65mm (2.5 inches).

Figure 5.1: Adjusting cutting depth for straight and bevel cuts.
- Loosen the depth adjustment lever located at the rear of the saw.
- Raise or lower the base plate to the desired cutting depth. Ensure only a small portion of the blade teeth extends below the workpiece.
- Aperte firmemente a alavanca de ajuste de profundidade.
5.2. Adjusting Bevel Angle (Miter Cut)
The saw can make bevel cuts up to 45°. The maximum cutting depth at 45° is 45mm (1.8 inches).
- Loosen the bevel adjustment knob/lever at the front of the saw.
- Incline a placa de base para o ângulo desejado (de 0° a 45°).
- Tighten the bevel adjustment knob/lever securely.
5.3. Utilizando o guia a laser
The integrated laser guide provides a visual line for precise cutting.

Figure 5.2: The laser guide assists in making straight cuts.
- Locate the laser switch on the saw.
- Flip the switch to turn the laser on. A red laser line will project onto your workpiece, indicating the cutting path.
- Align the laser line with your marked cut line on the material.
- Turn off the laser when not in use to conserve battery (if applicable) or prevent accidental activation.
5.4. Fazendo um corte
Certifique-se sempre de que a peça esteja firmemente presa.amped antes de cortar.

Figure 5.3: Cutting a wooden board with the circular saw.

Figure 5.4: Cutting a plastic sheet with the circular saw.
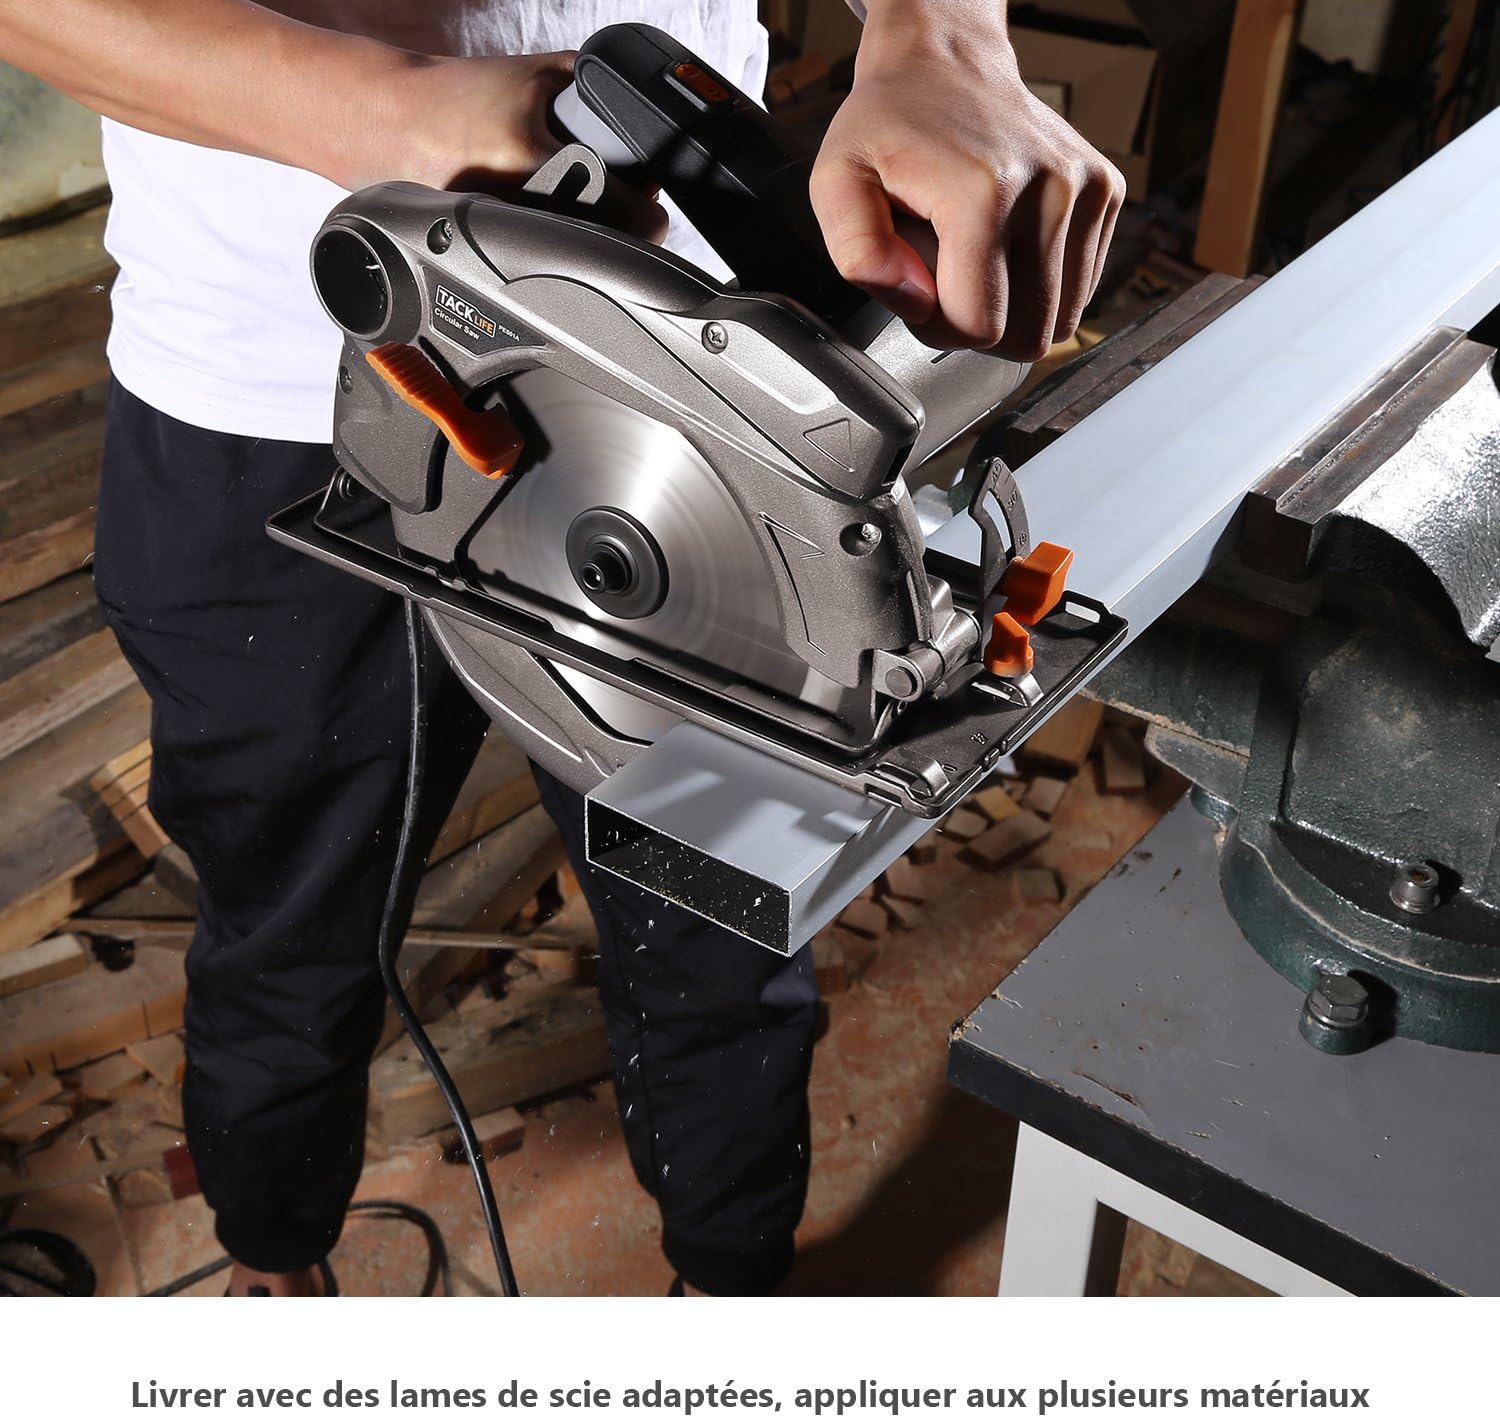
Figure 5.5: Cutting a metal profile with the circular saw (ensure appropriate blade is used).
- Ligue a serra a uma tomada elétrica adequada.
- Hold the saw firmly with both hands, ensuring a stable grip on the main and auxiliary handles.
- To start the saw, press the double safety switch (requires pressing both buttons simultaneously for safety).
- Deixe a lâmina atingir a velocidade máxima antes de iniciar o corte.
- Guide the saw smoothly and steadily along your marked line. Do not force the saw; let the blade do the work.
- Maintain a consistent feed rate.
- Assim que o corte estiver completo, solte o gatilho e deixe a lâmina parar completamente antes de levantar a serra da peça de trabalho.
- Unplug the saw after use.
6. Manutenção
A manutenção regular garante a longevidade e o funcionamento seguro da sua serra circular.
6.1. Limpeza
- Desligue sempre a serra da tomada antes de limpá-la.
- Use a soft brush or compressed air to remove dust and debris from the motor vents and blade guard.
- Wipe down the exterior of the saw with a damp pano. Não use produtos químicos agressivos ou produtos de limpeza abrasivos.
- Keep the base plate clean to ensure smooth gliding over the workpiece.
6.2. Cuidados com a lâmina
- Inspect blades regularly for dullness, cracks, or missing teeth. Replace damaged blades immediately.
- Clean resin and pitch buildup from blades using a suitable blade cleaner.
- Store blades properly to prevent damage and corrosion.
6.3. Armazenamento
- Guarde a serra em local seco e seguro, fora do alcance de crianças.
- Proteja o cabo de alimentação contra danos durante o armazenamento.
7. Solução De Problemas
Esta seção aborda problemas comuns que você pode encontrar com sua serra circular.
| Problema | Possível causa | Solução |
|---|---|---|
| A serra não inicia. | No power supply; Safety switch not engaged; Faulty power cord. | Check power outlet and circuit breaker; Ensure both safety switch buttons are pressed; Inspect power cord for damage. |
| Blade not cutting smoothly or burning wood. | Dull or dirty blade; Incorrect blade for material; Overfeeding the saw. | Replace or clean blade; Use appropriate blade for the material; Reduce feed rate. |
| Vibração excessiva. | Loose blade; Damaged blade; Worn bearings. | Tighten blade bolt; Replace blade; Contact customer support if bearings are suspected. |
| Laser guide not working. | Laser switch off; Laser lens dirty; Laser module faulty. | Turn on laser switch; Clean laser lens; Contact customer support. |
| A coleta de poeira é deficiente. | Dust port clogged; Vacuum not powerful enough; Hose not properly connected. | Clear dust port; Use a more powerful vacuum; Ensure hose is securely attached. |
8. Especificações técnicas
| Recurso | Especificação |
|---|---|
| Modelo | PES01A |
| Entrada de energia | 1500 W |
| Volumetage | 230 Volts |
| Velocidade sem carga | 4700 RPM |
| Diâmetro da lâmina | 185 mm (7-1/4 polegadas) |
| Profundidade máxima de corte (90°) | 65 mm (2.5 polegadas) |
| Profundidade máxima de corte (45°) | 45 mm (1.8 polegadas) |
| Capacidade de Bisel | 0° - 45° |
| Peso | 4.9 kg (10.8 libras) |
| Guia Laser | Sim |
| Diâmetro da Porta de Poeira | 35 milímetros |
9. Garantia e Suporte
Tacklife products are manufactured to high-quality standards and are warranted against defects in materials and workmanship. Please refer to the included warranty card for specific terms and conditions, including the warranty period and registration process.
Figura 9.1: Example of included warranty card.
Suporte ao cliente:
For technical assistance, troubleshooting, or warranty claims, please contact Tacklife customer support. Contact information can typically be found on the warranty card or the official Tacklife website.
- Website: www.tacklife.com (Por favor, verifique o oficial) website for the most up-to-date contact information.)
- E-mail: Refer to your warranty card or product packaging.
When contacting support, please have your product model (PES01A) and purchase date ready.