1. Produto acabadoview
The maylit 16.4ft RGB LED Strip Lights are designed to enhance your viewing experience and room ambiance. This lighting kit features 5050 LEDs, Bluetooth app control, music synchronization, and a remote control. It is suitable for 65-75 inch TVs and can be powered via a 5V TV USB interface.
Principais características:
- Controle de aplicativo Bluetooth: Manage colors, modes, and settings directly from your smartphone.
- Music Sync Function: Lights change and sync with music or ambient sound via a built-in microphone.
- Controle remoto: Includes a 24-key IR remote for convenient control of 16 colors and 4 flash modes.
- Função de temporização: Schedule automatic on/off times for your preferred lighting.
- Color Memory: Retains the last selected color setting when powered off.
- Alimentado por USB: Operates on DC 5V, typically from a TV USB port or a USB plug.
- Instalação flexível: Features double-sided adhesive tape and fixing buckles for secure mounting, allowing for flexible placement around TV corners.
2. O que está na caixa
- 16.4ft RGB LED Strip Light
- Controle remoto de 24 teclas
- Adhesive Tape (pre-applied)
- Fixing Buckles
- Cabo de alimentação USB
- 1 CR2 battery (for remote, included)
3. Configuração e instalação
Siga estes passos para instalar corretamente suas fitas de LED:
- Check the Light Strip: Before installation, unroll the LED strip and connect it to a USB power source to ensure all lights are working correctly.
- Limpe a superfície: Thoroughly clean the installation area on the back of your TV. Remove any dust, oil, or moisture to ensure optimal adhesion of the tape.
- Colocação do plano: Determine the path for the LED strip around the back of your TV. Avoid sharp 90-degree bends; use the included fixing buckles or gently curve the strip. Do not force fold the strip 360 degrees.
- Instalação do adesivo: Peel off the backing from the double-sided adhesive tape on the LED strip. Carefully press the strip onto the cleaned surface, applying firm pressure along its entire length. Use the fixing buckles at corners or critical points for added security.
- Conecte a energia: Plug the USB power cable into the LED strip controller, then connect the USB end to a 5V TV USB interface. If your TV does not have a USB interface, use a compatible USB wall adapter (not included).
- Teste e ajuste: Once installed and powered, use the remote control or the Bluetooth app to test the lights and adjust settings to your preference.
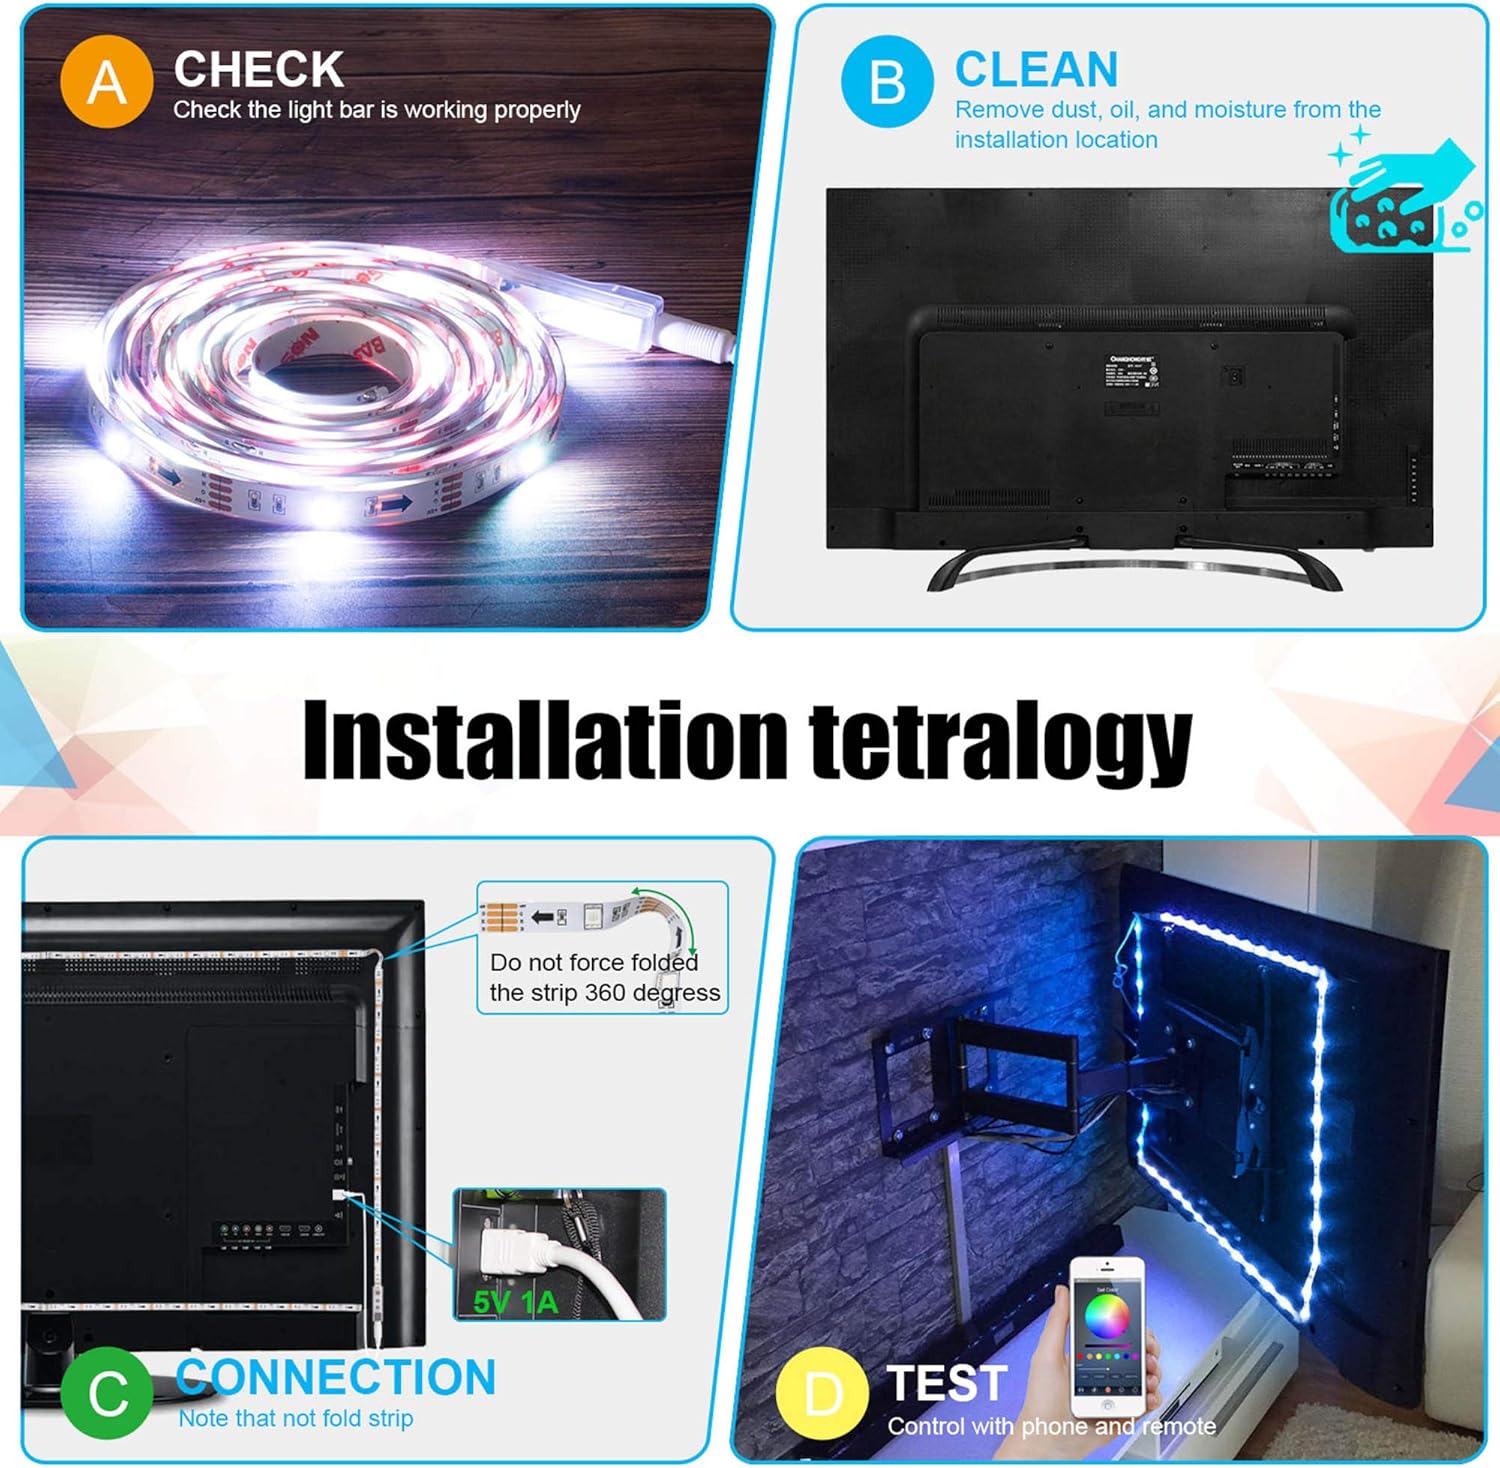
Image: Detailed steps for installing the LED strip lights, including checking the strip, cleaning the surface, connecting the power, and testing.

Imagem: Um excessoview of the maylit TV LED Backlight, highlighting Bluetooth APP Control, RGB 5050 LEDs, and 16 million colors.
4. Instruções de operação
4.1 Operação de controle remoto
The included 24-key remote control allows for basic functions:
- Ligar/desligar: Use the dedicated buttons to turn the lights on or off.
- Seleção de cores: Choose from 16 preset colors.
- Ajuste de brilho: Aumente ou diminua a intensidade da luz.
- Seleção de modo: Cycle through 4 flash modes (e.g., flash, strobe, fade, smooth).

Image: A visual representation of the LED strip lights, showing both the physical remote control and the smartphone app interface for controlling the lights.
4.2 Controle por aplicativo Bluetooth
For advanced control and customization, download the dedicated Bluetooth app (refer to the product packaging or included quick start guide for app name and QR code).
- Emparelhamento: Enable Bluetooth on your smartphone and open the app. The app should automatically detect and connect to your LED strip lights.
- Roda de cores: Access a full 16 million color spectrum for precise color selection.
- Brilho e saturação: Fine-tune the brightness and color saturation.
- Modo de música: Activate the music sync feature. The lights will respond to music played through your phone or ambient sounds picked up by the built-in microphone.
- Função de temporização: Set schedules for the lights to turn on or off automatically at specific times.
- Modos DIY: Create and save custom lighting effects and color sequences.

Image: The LED strip lights displaying dynamic color changes in sync with music, controlled via a smartphone app.

Image: Illustrates the smart timing function of the LED strip lights, showing how they can be set to promote sleep at night and assist with waking up in the morning.
5. Manutenção
- Limpeza: Gently wipe the LED strip with a dry, soft cloth to remove dust. Do not use liquid cleaners or abrasive materials.
- Adesão: If the strip begins to peel, re-secure it with additional fixing buckles or a strong adhesive suitable for electronics.
- Armazenar: If removing the lights for storage, carefully peel them off and coil them loosely. Store in a cool, dry place.
- Bateria remota: Replace the CR2 battery in the remote control when its range or responsiveness decreases.
6. Solução De Problemas
- As luzes não acendem:
- Ensure the USB cable is securely connected to both the LED strip controller and a functioning 5V USB power source.
- Check if the remote control battery is inserted correctly and has sufficient charge.
- Experimente uma porta USB ou adaptador de energia diferente.
- Controle remoto não funciona:
- Point the remote directly at the IR receiver on the LED strip controller.
- Substitua a bateria CR2 no controle remoto.
- Certifique-se de que não haja obstruções entre o controle remoto e o receptor.
- Bluetooth app not connecting:
- Certifique-se de que o Bluetooth esteja ativado em seu smartphone.
- Reinicie o aplicativo e tente conectar-se novamente.
- Ensure the LED strip is powered on.
- Se os problemas persistirem, tente desinstalar e reinstalar o aplicativo.
- Lights not syncing with music:
- Ensure the music mode is activated in the app or via the remote.
- Check if the built-in microphone is unobstructed and close enough to the audio source.
- Adjust the microphone sensitivity settings in the app, if available.
7. Especificações
| Recurso | Especificação |
|---|---|
| Marca | maylit |
| Número do modelo | MAYLIT-LANY-DACHICU-002 |
| Cor | RGB (vermelho, verde, azul) |
| Uso interno/externo | Interior |
| Características especiais | Bluetooth Control, Remote Controlled, Sync to Music, Timer, Mic Sync, App Control |
| Tipo de fonte de luz | LIDERADO |
| Fonte de energia | powered USB |
| Cor clara | Multicolorido |
| Volumetage | 5 Volts |
| O quetage | 4.25 watts |
| Número de fontes de luz | 132 |
| Tipo de controlador | App Control, Bluetooth, Remote Control |
| Material | Plástico + LED |
| Peso do item | 3.84 onças |
| Dimensões do produto | 4.72 x 4.72 x 1.18 polegadas |
| Baterias | 1 bateria CR2 necessária (incluída) |
8. Garantia e Suporte
For warranty information and customer support, please refer to the contact details provided on the product packaging or the official maylit webGuarde o comprovante de compra para eventuais solicitações de garantia.
9. Vídeos de Produtos
Video: A customer demonstrates the maylit LED strip lights behind a TV, showcasing various color changes and the overall effect on the room's ambiance. The video highlights the ease of use and visual impact.
Video: An honest review of the LED strip lights, showing the installation process on the back of a 75-inch TV and demonstrating the remote control's color-changing capabilities. The reviewer praises the ease of installation and various settings.
Video: A demonstration of the LED light strip's color-changing features, showing how the lights can be adjusted to different hues to match various moods or content displayed on the TV.
Video: A user demonstrates the installation of the LED strip lights on the back of a TV, emphasizing the importance of taking time for proper placement and showing the remote control functionality.
Vídeo: Um pequeno clipe mostrandoasing the LED strip lights installed behind a TV, demonstrating the vibrant colors and how they enhance the entertainment setup.