1. Produto acabadoview
The Alecto WS-1560 is a wireless weather station designed to provide accurate indoor and outdoor environmental data. Featuring a clear color display and a remote outdoor sensor, it offers comprehensive weather information and additional useful functions for your home.
Principais características:
- Mede a temperatura e a umidade internas e externas.
- Long-range wireless outdoor sensor (up to 100 meters).
- 5.7-inch well-lit color display with animated weather forecast icons.
- Temperature and ice alarm functions.
- Despertador com função soneca.
- Memory function for latest and highest readings.
- Moon phase indicator, date, day, and time display.
- Battery-operated main unit and outdoor sensor with backup batteries.

Figure 1.1: Alecto WS-1560 Main Unit and Wireless Outdoor Sensor.
2. Conteúdo da embalagem
Ensure all components are present and in good condition upon unpacking:
- Alecto WS-1560 Main Unit (Indoor Display)
- Sensor exterior sem fio
- Manual do usuário
- (Power adapter and batteries may be included depending on package)
Video 2.1: Illustrative video showing typical weather station components and basic setup. (Note: This video is for a related product and may not show the exact Alecto WS-1560 model.)
3. Configuração e instalação
3.1. Instalação da bateria
Both the main unit and the outdoor sensor require batteries for operation. Ensure you use the correct type and polarity.
- Sensor externo:
- Open the battery compartment on the back of the wireless outdoor sensor.
- Insira 2 pilhas AA (não incluídas) respeitando a polaridade indicada (+/-).
- Feche o compartimento da bateria com segurança.
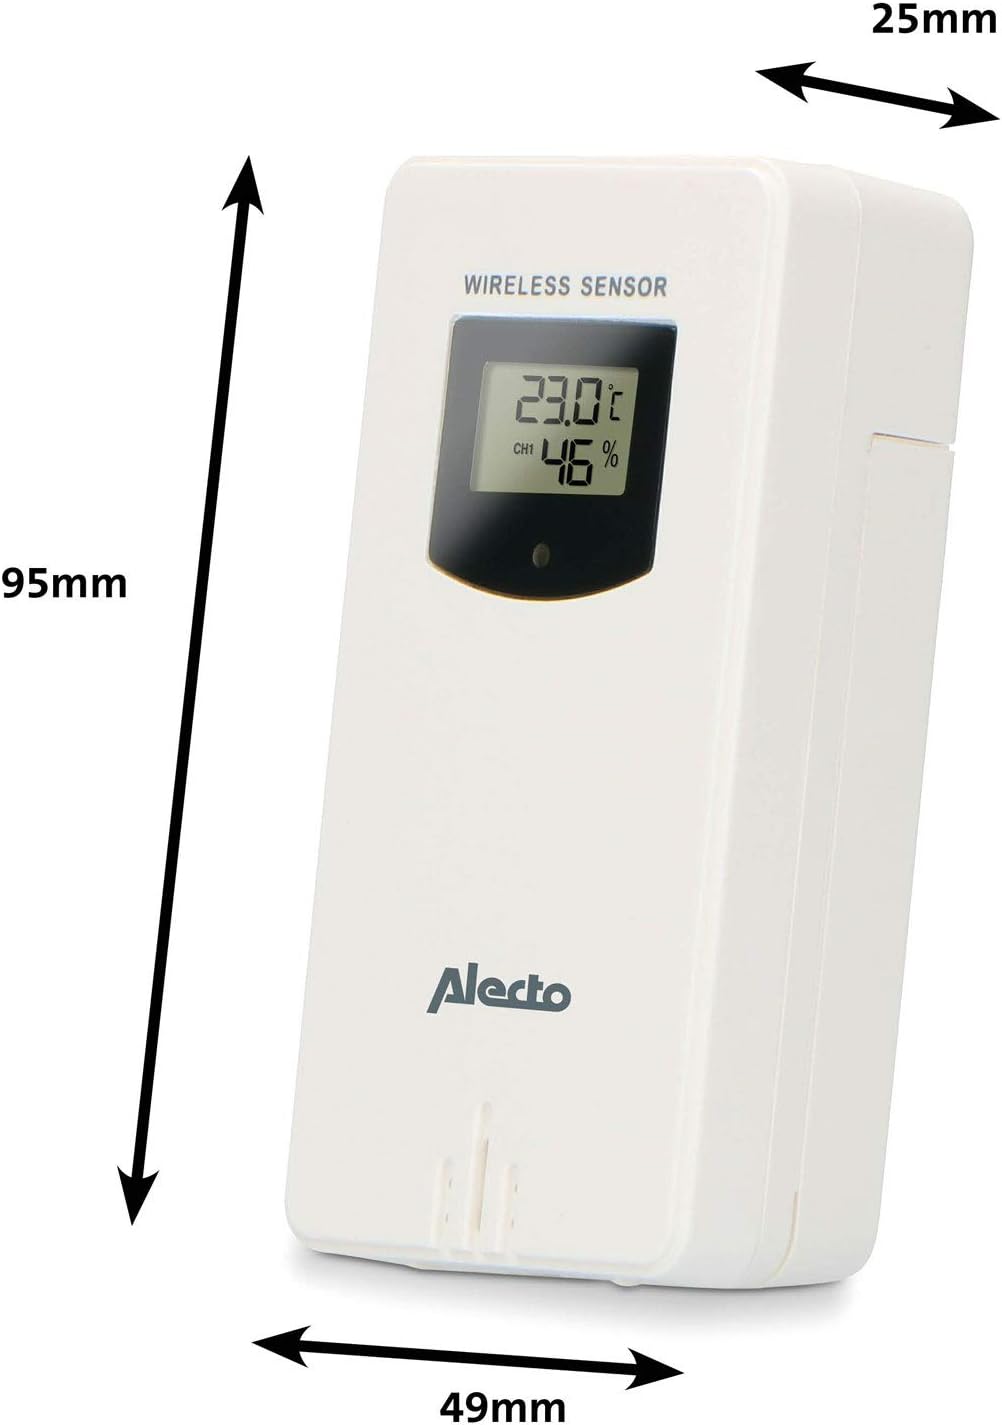
Figure 3.1: Wireless Outdoor Sensor dimensions and battery compartment location.
- Unidade principal:
- Abra o compartimento da bateria na parte traseira da unidade principal.
- Insert 2x AA batteries (not included) according to the polarity markings (+/-). These serve as backup batteries.
- Feche o compartimento da bateria com segurança.
- Connect the main unit to a power outlet using the provided power adapter (if included).

Figure 3.2: Main Unit dimensions and power input.
3.2. Colocação do Sensor
For accurate outdoor readings, proper placement of the wireless sensor is crucial:
- Place the sensor in a shaded area, away from direct sunlight, to prevent inaccurate temperature readings.
- Ensure good air circulation around the sensor.
- Mount the sensor vertically, approximately 1.5 to 2.5 meters (5 to 8 feet) above the ground.
- Avoid placing the sensor near heat sources (e.g., vents, windows) or moisture sources.
- The maximum transmission range is 100 meters (328 feet) in open air. Walls and other obstacles will reduce this range.

Figura 3.3: Example of outdoor sensor placement on a wall.
3.3. Emparelhando o sensor com a unidade principal
The main unit and sensor should automatically pair once both are powered on. If pairing does not occur:
- Certifique-se de que ambas as unidades tenham baterias novas e estejam dentro do alcance.
- Press the "TX" button inside the outdoor sensor's battery compartment to manually send a signal.
- On the main unit, you may need to initiate a search for the outdoor sensor (refer to the "Operation" section for specific button functions).
4. Operação
4.1. Layout da tela
A tela colorida de 5.7 polegadas oferece uma visualização nítida em toda a superfície.view of all measured data. Key areas include:
- Temperatura e umidade externas: Displays current outdoor conditions.
- Temperatura e umidade internas: Displays current indoor conditions.
- Animated Weather Forecast: Icons predict upcoming weather (sunny, partly cloudy, cloudy, rainy, snowy).
- Hora e data: Current time, day, and date.
- Pressão barométrica: Pressão atmosférica atual.
- Fase da lua: Graphical representation of the current moon phase.
- Temperature/Ice Alarm Indicators: Alerts for specific temperature thresholds or potential ice conditions.

Figura 4.1: Detalhado view of the main unit's color display.
4.2. Funções dos botões
The main unit features several buttons for setting and adjusting functions. Common buttons include:
- CONJUNTO: Enters setup mode for time, date, and other settings.
- MODO: Switches between display modes or confirms settings.
- UP/DOWN (or +/-): Adjusts values during setup or cycles through channels.
- ALARME: Ativa ou define a função de alarme.
- MEMÓRIA: Displays maximum/minimum temperature and humidity records. Long press to clear records.
- SNOOZE / LIGHT: Activates snooze during an alarm or adjusts backlight brightness.
Video 4.2: Illustrative video demonstrating various features and settings of a weather station. (Note: This video is for a related product and may not show the exact Alecto WS-1560 model.)
4.3. Definir hora e data
- Press and hold the "SET" button until the time display starts flashing.
- Use the "UP" or "DOWN" buttons to adjust the hour, then press "SET" to confirm and move to minutes.
- Repita o processo para minutos, ano, mês e dia.
- Press "SET" again to exit the setting mode.
4.4. Configurações de alarme
- Press the "ALARM" button once to view a hora do alarme.
- Pressione e mantenha pressionado o botão "ALARME" até que o horário do alarme comece a piscar.
- Use the "UP" or "DOWN" buttons to set the desired alarm hour and minute.
- Pressione "ALARME" para confirmar.
- To activate/deactivate the alarm, press the "ALARM" button briefly when the alarm time is displayed. An alarm icon will appear/disappear.
4.5. Max/Min Records
The weather station automatically records the maximum and minimum temperature and humidity values over a 24-hour period.
- Press the "MEM" button briefly to view os valores máximos registrados.
- Press "MEM" again to view os valores mínimos registrados.
- Press "MEM" a third time to return to current readings.
- To clear the records, press and hold the "MEM" button for a few seconds.
5. Manutenção
- Limpeza: Limpe a tela e as superfícies da unidade com um pano macio e seco.amp pano. Não use produtos de limpeza abrasivos ou solventes.
- Substituição da bateria: Replace batteries in both the main unit and the outdoor sensor when the low battery indicator appears on the display. Always replace all batteries at the same time with new ones of the same type.
- Cuidados com o sensor: Periodically check the outdoor sensor for debris or obstructions that might affect its readings. Ensure it remains in a shaded, well-ventilated area.
6. Solução De Problemas
| Problema | Possível causa | Solução |
|---|---|---|
| No outdoor temperature/humidity reading (or "---" displayed) |
|
|
| Leituras imprecisas de temperatura/umidade |
|
|
| A tela está escura ou em branco |
|
|
7. Especificações
| Número do modelo | WS-1560 |
| Marca | Alecto |
| Fonte de alimentação (unidade principal) | Power Adapter (if included) + 2x AA batteries (backup) |
| Fonte de alimentação (sensor externo) | 2 pilhas AA |
| Dimensões do produto (unidade principal) | 5.1 x 16.5 x 12.3 cm |
| Peso do produto | 440 g |
| Alcance do sensor sem fio | Até 100 metros (ao ar livre) |
| Tamanho da tela | 5.7 polegadas / 14.5 cm |
| Origem | China |
8. Garantia e Suporte
For warranty information, technical support, or service inquiries, please refer to the warranty card included with your product or visit the official Alecto webGuarde o comprovante de compra como prova de aquisição.
Alecto Website: www.alecto.nl (General Alecto web(O site e a página de suporte específica podem variar)