
1. Produto acabadoview
This electric rivet nut accessory is designed for use with a drill, transforming it into a versatile tool for drilling, pulling rivets, and screwing. It offers strong durability, high strength, and a long service life. Its portable size and low noise make it suitable for both DIY home projects and outdoor use, providing an efficient and labor-saving solution.
Principais características:
- Portable size with reduced noise for an optimal user experience.
- Enhances drilling efficiency, saving labor and simplifying operation.
- Capable of drilling, pulling rivets, and screwing when used with a drill.
- Practical tool for DIY home projects or outdoor applications.
- Constructed from high-quality material for strong durability, high strength, and extended lifespan.
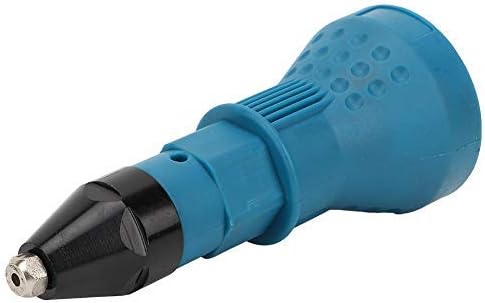
Figure 1.1: The Zerone Electric Rivet Nut Accessory. This image displays the main unit of the rivet gun adapter, featuring its distinctive blue body and black front section, designed to attach to a standard drill.
2. Informações de segurança
Always follow basic safety precautions when using this product to reduce the risk of injury. This tool is designed to be used with a power drill, and all safety guidelines for your drill should also be observed.
- Proteção para os olhos: Use sempre óculos de proteção aprovados pela ANSI ou óculos de segurança com proteção lateral ao operar esta ferramenta.
- Proteção das mãos: Wear appropriate work gloves to protect your hands from sharp edges and debris.
- Fixar a peça de trabalho: Certifique-se de que o material com o qual você está trabalhando esteja bem fechado.amped ou segurado para evitar movimento durante a operação.
- Ventilação adequada: Work in a well-ventilventilated area to avoid inhaling dust or fumes.
- Estado da ferramenta: Before each use, inspect the tool for any damage or wear. Do not use if damaged.
- Desconecte a energia: Always disconnect the drill from its power source before making any adjustments, changing accessories, or performing maintenance.
- Mantenha-se afastado: Mantenha as mãos, cabelos e roupas largas longe das peças móveis.
- Crianças e espectadores: Mantenha crianças e espectadores afastados enquanto opera a ferramenta.
3. Conteúdo da embalagem
Verifique se todos os itens listados abaixo estão incluídos em seu pacote. Caso algum item esteja faltando ou danificado, entre em contato com o suporte ao cliente.
- 1 x Rivet Drill Gun Adapter (Main Unit)
- 2 x Accessories (Wrenches/Spanners for installation and maintenance)

Figure 3.1: Package Contents. This image shows the main blue rivet gun adapter unit along with two silver-colored wrenches or spanners, which are included accessories for assembly and maintenance.
4. Especificações
| Atributo | Valor |
|---|---|
| Fabricante | Zerone |
| Número da peça | Zeronead6gigwyf4-01 |
| Cor | Azul |
| Dimensões do produto (C x L x A) | 1 x 1 x 1 cm |
| Material | High-quality material (as per product description) |
| Tipo de fonte de alimentação | Requires external power drill |
| Quantidade por pacote | 1 |
| Componentes incluídos | Rivet Drill Gun Adapter, 2 Accessories |
| Disponível para compra desde | 12 de setembro de 2020 |
5. Configuração
Follow these steps to properly attach the rivet nut accessory to your electric drill.
- Prepare Your Drill: Ensure your electric drill is unplugged or its battery is removed. Open the drill chuck wide enough to accept the hexagonal shaft of the rivet adapter.
- Adaptador de inserção: Insert the hexagonal shaft of the rivet drill gun adapter into the drill chuck. Ensure it is fully seated.
- Aperte o mandril: Firmly tighten the drill chuck around the adapter's shaft. Make sure it is secure to prevent slippage during operation.
- Select Rivet Size: Depending on the rivet size you intend to use, ensure the correct nose piece is installed on the adapter. Use the provided wrenches to change nose pieces if necessary.

Figure 5.1: Adapter Hexagonal Shaft. This image provides a close-up view of the hexagonal shaft at the rear of the rivet gun adapter, which is designed to be inserted and secured into the chuck of an electric drill.

Figure 5.2: Detailed Hexagonal Drive. A more detailed view of the hexagonal drive shaft, emphasizing its robust construction for secure attachment to a drill.
6. Instruções de operação
Once the adapter is securely attached to your drill, you can begin riveting. Always refer to the safety information before operation.
- Preparar a peça de trabalho: Drill a pilot hole in your workpiece that matches the diameter of the rivet you intend to use.
- Rebite de inserção: Insert the rivet into the nose piece of the rivet gun adapter.
- Ferramenta de Posição: Place the rivet end into the pre-drilled hole in your workpiece. Ensure the tool is held perpendicular to the surface.
- Activate Drill: Slowly activate your electric drill in the forward direction. The adapter will begin to pull the rivet, deforming its tail to create a secure fastening.
- Complete Riveting: Continue to operate the drill until the rivet stem breaks off, indicating a successful set.
- Remove Stem: Reverse the drill to eject the broken rivet stem from the adapter.

Figure 6.1: Tool in Operation. This image demonstrates the rivet gun adapter being actively used to set a rivet into a wooden board, illustrating the practical application of the tool.

Figure 6.2: Rivet Setting Mechanism. A close-up view of the front end of the rivet gun adapter, highlighting the mechanism responsible for gripping and setting the rivets.
7. Manutenção
Regular maintenance will ensure the longevity and optimal performance of your rivet nut accessory.
- Limpeza: After each use, wipe down the tool with a clean, dry cloth to remove any dust, debris, or metal shavings. Do not use harsh chemicals or abrasive cleaners.
- Lubrificação: Periodically apply a small amount of light machine oil to any moving parts or pivot points to ensure smooth operation.
- Inspeção: Regularly inspect the nose pieces and internal components for wear or damage. Replace worn parts as necessary.
- Armazenar: Store the tool in a clean, dry place, away from direct sunlight and extreme temperatures. Keep it in its original packaging or a protective case when not in use.
8. Solução De Problemas
If you encounter issues while using the rivet nut accessory, refer to the following common problems and their solutions.
| Problema | Possível causa | Solução |
|---|---|---|
| Rivet not setting properly | Incorrect rivet size for nose piece; Insufficient drill speed/power; Worn nose piece. | Ensure correct nose piece matches rivet diameter; Use a drill with adequate power and speed; Replace worn nose piece. |
| Rivet stem not breaking off | Insufficient pulling force from drill; Rivet material too strong for tool. | Increase drill speed or use a more powerful drill; Ensure the tool is rated for the rivet material. |
| Adapter slipping in drill chuck | Chuck not tightened sufficiently; Dirty or oily shaft. | Ensure drill chuck is tightened firmly; Clean the hexagonal shaft before insertion. |
| Ruído excessivo ou vibração | Loose components; Lack of lubrication; Damaged internal parts. | Check all connections and tighten if loose; Apply lubrication as per maintenance section; If problem persists, contact support. |
9. Garantia e Suporte
For information regarding warranty coverage, returns, or technical support, please refer to the retailer's policy where the product was purchased or visit the official Zerone webGuarde o comprovante de compra como prova de aquisição.
For further assistance, you may contact Zerone customer service through their official channels. Please have your product model number (Zeronead6gigwyf4-01) and purchase date ready when contacting support.