
NEXT 8000
Manual do Usuário do Receptor de Satélite Full HD NEXT 8000
Modelo: 8000
Introdução
Thank you for choosing the NEXT 8000 Full HD Satellite Receiver. This manual provides detailed instructions for the proper installation, operation, and maintenance of your device. Please read this manual thoroughly before using the receiver to ensure optimal performance and safety.
The NEXT 8000 is designed to deliver a high-quality viewing experience with its Full HD capabilities, multi-satellite search, and media playback features. It supports various languages and offers convenient software upgrades via USB.
Conteúdo da embalagem
Por favor, verifique se todos os itens estão presentes na embalagem:
- NEXT 8000 Satellite Receiver Unit
- Controle remoto
- Cabo HDMI
- Cabo USB
- Adaptador de energia

Image: The NEXT 8000 Full HD Satellite Receiver unit shown alongside its remote control.
Guia de configuração
1. Conectando o receptor
Follow these steps to connect your satellite receiver to your television and satellite dish:
- Satélite IN: Connect the coaxial cable from your satellite dish to the 'LNB IN' port on the back of the receiver.
- Conexão HDMI: Use the provided HDMI cable to connect the 'HD OUT' port on the receiver to an available HDMI input on your television. Note the HDMI input number on your TV (e.g., HDMI 1, HDMI 2).
- Conexão AV (Opcional): If your TV does not have an HDMI input, use an AV cable (not included) to connect the 'AV' port on the receiver to the corresponding AV inputs on your television.
- Conexão de energia: Connect the power adapter to the 'DC 12V' input on the receiver, then plug the adapter into a power outlet.
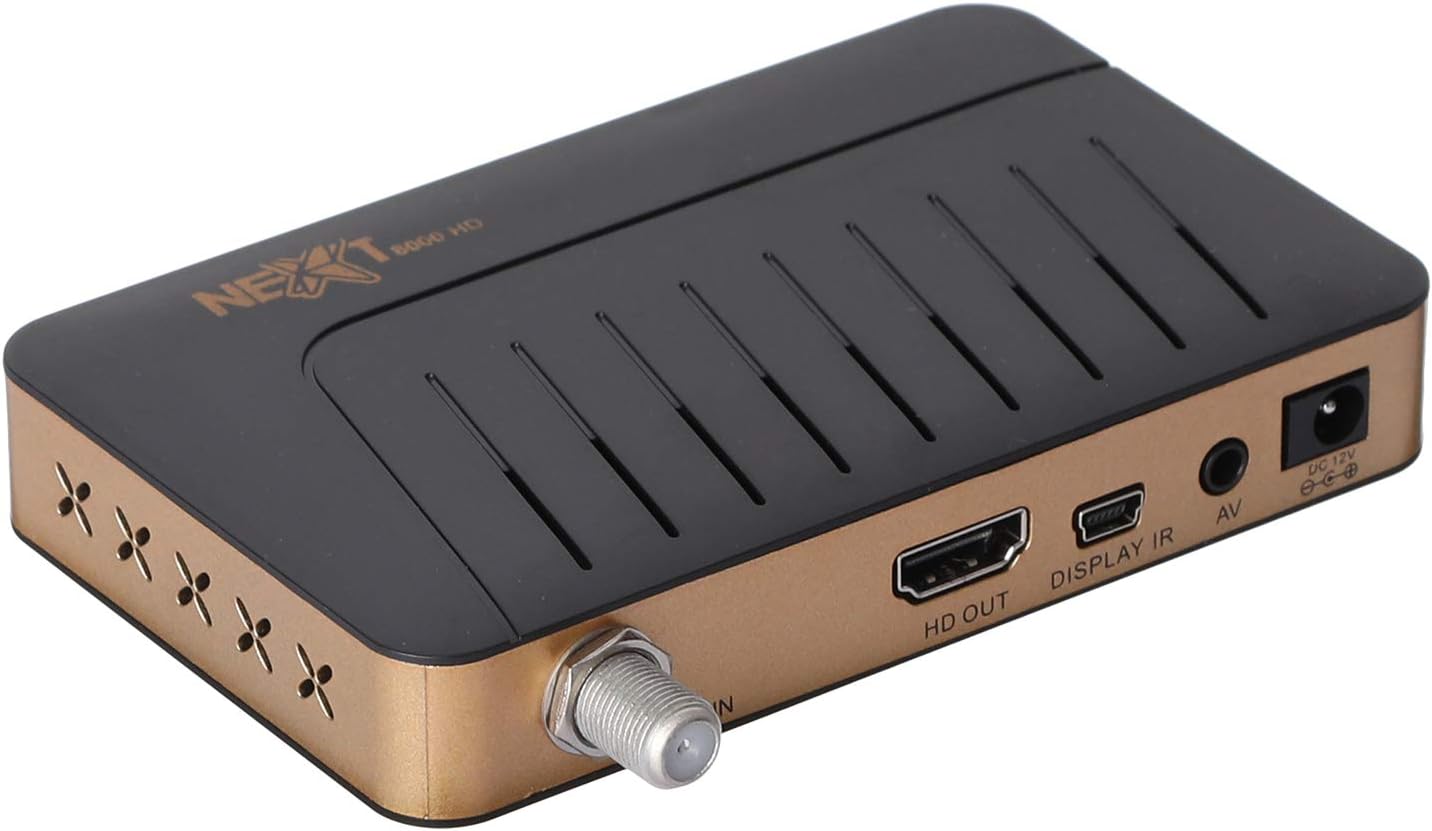
Imagem: Traseira view of the NEXT 8000 receiver, highlighting the LNB IN, HD OUT (HDMI), AV, and DC 12V power input ports.
2. Inicialização e configuração
Após conectar todos os cabos:
- Turn on your television and select the correct HDMI or AV input source.
- The receiver will power on automatically. The initial setup wizard should appear on your screen.
- Follow the on-screen instructions to select your preferred language, time zone, and perform a channel scan. Refer to the 'Operating Instructions' section for details on channel scanning.
3. Controle remotoview
Familiarize-se com as funções do controle remoto:

Image: The remote control for the NEXT 8000 satellite receiver, showing various buttons for power, navigation, volume, channel, and special functions.
- Botão de energia: Turns the receiver on/off or to standby mode.
- CARDÁPIO: Acessa o menu principal de configurações e funcionalidades.
- OK: Confirma as seleções ou exibe a lista de canais.
- Botões de seta (para cima/para baixo/para a esquerda/para a direita): Navega pelos menus e opções.
- EXIT: Retorna à tela anterior ou sai do menu.
- VOLUME +/-: Ajusta o volume.
- CH +/-: Muda de canais.
- EPG: Exibe o Guia Eletrônico de Programação.
- SENTADO: Selects satellite.
- USB: Acessa a reprodução de mídia USB.
- Mudança de horário: Activates the Timeshift function (requires USB storage).
Instruções de operação
1. Channel Search and Management
To find and organize channels:
- Pressione o MENU botão no controle remoto.
- Navigate to 'Installation' or 'Channel Search' using the arrow buttons and press OK.
- Select 'Multi-satellite search' or 'Network search' based on your setup.
- Follow the on-screen prompts to initiate the scan. The receiver will automatically detect available channels.
- After the scan, you can access options to 'Program lock', 'Delete', 'Move', or 'Rename' channels within the channel management menu.
2. Reprodução de mídia via USB
The receiver supports media playback from a USB flash drive.
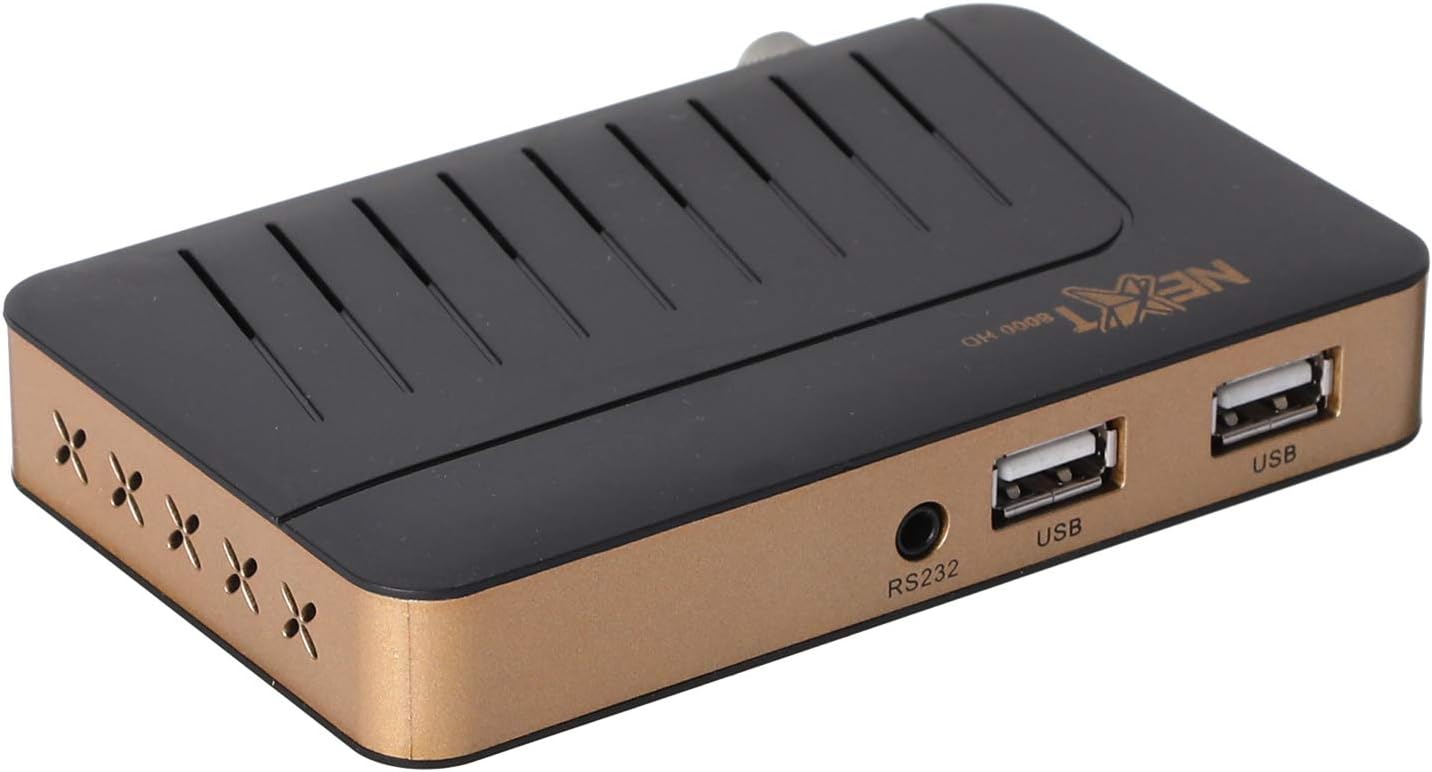
Imagem: Frente view of the NEXT 8000 receiver, showing the two USB ports available for connecting external storage devices.
- Insert a USB flash drive into one of the USB ports on the receiver.
- Pressione o USB button on the remote control or navigate to the 'Media' menu.
- Select the type of media you wish to play (e.g., Video, Music, Photo).
- Browse your USB drive content and select the desired file. The receiver supports AVI, MKV, TS, TP, TRP, MPG, and MP4 files.
3. Gravação e Timeshift
To record programs or use the Timeshift function, a USB storage device must be connected.
- Gravação: Enquanto assiste a um programa, pressione o Registro button (usually a red circle) on the remote control to start recording. Press it again to stop. Recorded content will be saved to the connected USB drive.
- Mudança de horário: Pressione o Mudança de tempo button on the remote control to pause live TV. You can then fast-forward or rewind within the buffered content.
4. Guia Eletrônico de Programação (EPG)
Pressione o EPG botão no controle remoto para view the 7-day electronic program guide. This allows you to see upcoming programs and set reminders or recordings.
5. Bloqueio parental
To restrict access to certain channels or menus, navigate to the 'System Settings' or 'Parental Control' menu. You can set a password to lock programs or specific functions.
Manutenção
1. Software Upgrade via USB
To ensure your receiver has the latest features and bug fixes, you can upgrade its software:
- Baixe o software mais recente file from the official NEXT website to a USB flash drive. Ensure the file is placed in the root directory of the USB drive.
- Insira a unidade flash USB na porta USB do receptor.
- Vá para MENU > 'System Settings' > 'Software Upgrade' (or similar option).
- Select 'Upgrade by USB' and choose the software file.
- Confirm the upgrade. The receiver will restart automatically after the upgrade is complete. Do not power off the receiver during the upgrade process.
2. Limpeza
To clean the receiver, disconnect it from the power supply. Use a soft, dry cloth to wipe the exterior surfaces. Do not use liquid cleaners or abrasive materials.
Solução de problemas
If you encounter issues with your NEXT 8000 receiver, refer to the following table:
| Problema | Possível causa | Solução |
|---|---|---|
| Sem imagem ou som | Incorrect TV input selected; Loose HDMI/AV cable; Receiver not powered on. | Select correct TV input; Check all cable connections; Ensure receiver is powered on. |
| Nenhum canal encontrado | Satellite dish not aligned; Incorrect LNB settings; Channel scan not performed. | Check satellite dish alignment; Verify LNB settings in menu; Perform a channel scan. |
| Controle remoto não funciona | Dead batteries; Obstruction between remote and receiver; Remote sensor blocked. | Replace batteries; Remove obstructions; Ensure receiver's IR sensor is clear. |
| Mídia USB não reproduzindo | Não suportado file format; USB drive not properly inserted; Corrupted file. | Verificar file format compatibility; Re-insert USB drive; Try a different USB drive or file. |
Se o problema persistir após tentar essas soluções, entre em contato com o suporte ao cliente.
Especificações
Key technical specifications for the NEXT 8000 Full HD Satellite Receiver:
- Modelo: 8000
- Resolução de saída de vídeo: 576i, 576p, 720p, 1080i, 1080p (50/60 Hz)
- Conectividade: HDMI, USB (2 ports), RS232, AV
- Formatos de áudio suportados: Dolby Digital, DTS, AAC, PCM
- Supported Video/Media Formats: AVI, MKV, TS, TP, TRP, MPG, MP4
- Memória de armazenamento: 100 satellites, 4000 frequencies, 8000 channels
- Processador: Sunplus
- Características: Recording by USB flash, Screen enlargement, Multi-satellite search, Network search, Media playback, 7-day Electronic Program Guide (EPG), Teletex, Timeshift, Parental lock.
- Dimensões: 19.6 x 17.4 x 6.6 cm
- Peso: 396 g
Garantia e Suporte
For warranty information and technical support, please refer to the documentation provided with your purchase or visit the official NEXT product support website. Guarde o recibo de compra como comprovante para solicitações de garantia.
Ask a question about this manual
Ask about setup, troubleshooting, compatibility, parts, safety, or missing instructions. Manuals+ will review the question and use this page’s manual context to help answer it.