1. Introdução
This manual provides detailed instructions for the installation, operation, and maintenance of your Aquaphor RO-70S Reverse Osmosis Water Filter System. Please read this manual thoroughly before installation and use to ensure proper functioning and longevity of your system. The Aquaphor RO-70S is designed to provide high-quality purified drinking water by effectively removing various contaminants.

Figure 1: Aquaphor RO-70S Reverse Osmosis Water Filter System, front view.
2. Informações de segurança
Always follow basic safety precautions when installing or maintaining the Aquaphor RO-70S system to reduce the risk of fire, electric shock, and injury. Keep this manual for future reference.
- Certifique-se de que todas as conexões estejam seguras e sem vazamentos para evitar danos causados pela água.
- Não utilize o sistema com água microbiologicamente insegura ou de qualidade desconhecida sem desinfecção adequada antes ou depois do sistema.
- Disconnect power before performing any maintenance or filter changes.
- Install the system in an area protected from freezing temperatures and direct sunlight.
- Only use genuine Aquaphor replacement filters and parts.
3. Conteúdo da embalagem
Verify that all components listed below are present in your package. Refer to Figure 2 for a visual representation of the components.
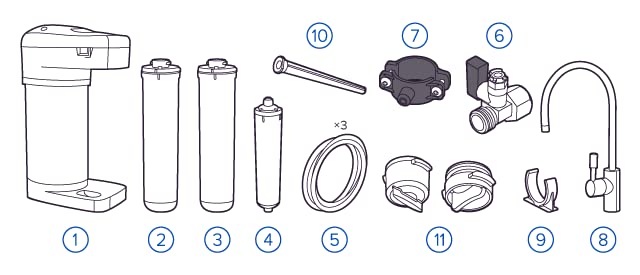
Figure 2: Aquaphor RO-70S System Components.
- Unidade de filtro principal
- Pre-filter cartridges (e.g., K5, K2)
- RO membrane cartridge (e.g., RO-50S)
- Post-filter cartridge (e.g., K7B)
- Connection fittings and tubing
- Water supply adapter with shut-off valve
- Válvula de sela de drenagem
- Drinking water faucet
- Filter wrench (if applicable)
- Manual do usuário
4. Configuração e instalação
The Aquaphor RO-70S system is designed for under-sink installation. Professional installation is recommended, but if you choose to install it yourself, follow these general steps. Ensure you have adequate space as shown in Figure 3 and Figure 4.

Figure 3: Under-sink installation exampeu.
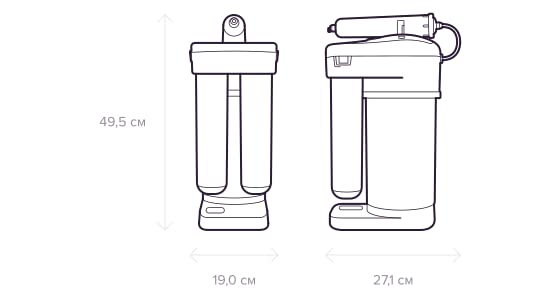
Figure 4: Dimensions of the Aquaphor RO-70S system (L x W x H: 27.1 x 19 x 49.5 cm).
4.1. Verificações de pré-instalação
- Confirm water pressure is within the recommended range (check specifications).
- Ensure sufficient space under the sink for the unit and future filter changes.
- Desligue o abastecimento principal de água antes de iniciar a instalação.
4.2. Etapas de Instalação (Geral)
- Instale a torneira: Drill a hole (if necessary) in the sink or countertop and mount the dedicated drinking water faucet.
- Conectar ao fornecimento de água fria: Install the water supply adapter to the cold water line under the sink.
- Instale o suporte de drenagem: Attach the drain saddle valve to the drain pipe to allow wastewater discharge.
- Mount the Filter Unit: Place the main filter unit in the desired under-sink location.
- Conecte a tubulação: Connect the appropriate tubing from the water supply adapter to the filter inlet, from the filter outlet to the faucet, and from the filter's drain port to the drain saddle.
- Lave o sistema: Slowly turn on the water supply. Allow the system to flush for at least 10-15 minutes to remove air and carbon fines. Check for leaks.
5. Instruções de operação
The Aquaphor RO-70S system operates automatically once installed. It uses a multi-stage filtration process to provide clean drinking water.
5.1. Filtration Process
- Pre-filtration: The CarbFiber Block technology in the pre-filters removes organic impurities, heavy metals, and chlorine, filtering particles down to 5 microns. This stage protects the RO membrane.
- Membrana de Osmose Reversa: The RO-50S membrane acts as a barrier against toxic substances, heavy metals, pesticides, bacteria, and viruses, ensuring high-purity water.
- Post-filtration: A final filter polishes the water, improving taste and odor.

Figure 5: Aquaphor RO-70S filter cartridges.
5.2. Uso diário
Simply open the dedicated drinking water faucet to dispense purified water. The system will automatically refill the internal tank (if applicable) as water is drawn.
6. Manutenção
Regular maintenance is crucial for the optimal performance and longevity of your Aquaphor RO-70S system. This primarily involves replacing the filter cartridges.
6.1. Substituição do filtro
- Pre-filters (K5, K2): Normalmente, a substituição ocorre a cada 3 a 6 meses, dependendo da qualidade da água e do uso.
- RO Membrane (RO-50S): Generally replaced every 1-2 years.
- Post-filter (K7B): Typically replaced every 6-12 months.
Always refer to the specific filter replacement schedule provided with your filter cartridges or consult the Aquaphor website para obter informações detalhadas.
6.2. Replacement Procedure (General)
- Turn off the water supply to the RO system.
- Abra a torneira para aliviar a pressão.
- Remove the old filter cartridges by twisting or unscrewing them (refer to specific filter instructions).
- Insert new cartridges, ensuring they are properly seated and sealed.
- Abra lentamente o abastecimento de água e verifique se há vazamentos.
- Flush the system for several minutes as per initial setup instructions.
7. Solução De Problemas
If you encounter issues with your Aquaphor RO-70S system, consult the following common troubleshooting tips.
7.1. Low Water Flow from Faucet
- Filtros entupidos: Replace pre-filters or RO membrane if they are past their service life.
- Baixa pressão de água: Ensure the incoming water pressure meets the system's requirements.
- Câmara de descompressão: Ensure the system has been properly flushed after installation or filter change.
7.2. Unusual Taste or Odor
- Expired Post-filter: Replace the post-carbon filter.
- New System Flush: Ensure the system was adequately flushed during initial setup.
- RO Membrane Failure: If taste issues persist, the RO membrane may need replacement.
7.3. Vazamentos
- Conexões soltas: Check all tubing connections and fittings for tightness.
- Damaged O-rings: Inspect O-rings on filter housings and replace if damaged.
8. Especificações
| Recurso | Detalhe |
|---|---|
| Número do modelo | RO-70S |
| Marca | AQUÁFORA |
| Dimensões do produto (C x L x A) | 27.1 x 19 x 49.5 cm |
| Peso | 5.9 quilogramas |
| Recurso especial | Osmose Reversa |
| Material | Fibra de carbono, plástico |
| Capacidade | 5 Litres (likely internal tank or daily output) |
| Componentes incluídos | Under-sink filter system |
| Tipo de instalação | Sob a pia |
| Método de Purificação | Carbon Block, Reverse Osmosis |
| Fonte de energia | Cabo elétrico |
| Maximum TDS Level Supported | 1000 PPM |
9. Garantia e Suporte
For warranty information, technical support, or to purchase replacement parts, please contact Aquaphor customer service or visit the official Aquaphor website. Guarde o recibo de compra como comprovante para solicitações de garantia.
Fabricante: AQUÁFORA
Disponibilidade de peças de reposição: Information unavailable (as per product data, users should contact manufacturer directly)