
1. Introdução
Thank you for choosing the Millennium Lighting Delvona 8-Light Chandelier, Model 4388-MB. This manual provides essential information for the safe installation, operation, and maintenance of your new lighting fixture. Please read these instructions thoroughly before beginning installation and retain them for future reference.
This chandelier features a matte black finish and is designed for indoor use in dry locations. It accommodates eight incandescent bulbs (E12 base, 60 watts maximum each, bulbs sold separately).

Image 1.1: The Millennium Lighting Delvona 8-Light Chandelier in Matte Black. This image displays the full fixture, including the ceiling canopy, chain, central rod, and eight curved arms each holding an E12 bulb socket.
2. Informações de segurança
AVISO: Risk of electric shock. Disconnect power at the fuse box or circuit breaker before installation or servicing. Consult a qualified electrician if you are unsure about electrical wiring.
- Instalação profissional recomendada: Due to the nature of electrical work and fixture assembly, professional installation by a licensed electrician is strongly recommended.
- This fixture is UL Listed and meets CSA standards, ensuring compliance with safety regulations.
- Classificado para Somente locais secos. Do not install in areas exposed to moisture or water.
- Certifique-se de que todas as conexões elétricas estejam seguras e em conformidade com as normas e regulamentos locais.
- Não exceda a temperatura máximatage of 60 watts per bulb. Use E12 base incandescent bulbs.
- Aviso da Proposta 65: Este produto pode conter substâncias químicas que o Estado da Califórnia reconhece como causadoras de câncer, defeitos congênitos ou outros danos reprodutivos. Para mais informações, visite [link para o site do Estado da Califórnia]. www.P65Warnings.ca.gov.
3. Conteúdo da embalagem
Carefully unpack all components and inspect for any damage. Keep all packaging materials until you are satisfied with the product. The package should contain the following:
- Chandelier Frame (with 8 light arms)
- Teto Canopy
- Mounting Hardware (crossbar, screws, wire nuts)
- Corrente
- Central Rod/Stem
- Manual de instruções
Observação: Light bulbs are not included and must be purchased separately.
4. Especificações
| Recurso | Especificação |
|---|---|
| Número do modelo | 4388 MB |
| Marca | iluminação do milênio |
| Coleção | Delvona |
| Cor de acabamento | Preto fosco |
| Material | Metal |
| Dimensões (Largura x Comprimento x Altura) | 37.88 x 37.88 x 20.38 polegadas |
| Peso do item | 11.48 libras |
| Número de luzes | 8 |
| LampTipo de ing | Incandescente |
| Base de lâmpada | E12 (Candelabro) |
| Max Wattage por lâmpada | 60 Watts |
| Volumetage | 120 Volts |
| Classificação de Umidade | Damp Rated (UL Listed for Dry Location) |
| Montagem necessária | Sim |
| UPC | 842639033543 |
5. Configuração e instalação
IMPORTANTE: Ensure power is disconnected at the circuit breaker before starting installation. Professional installation is highly recommended.
5.1 Ferramentas necessárias (não incluídas)
- Chave de fenda Phillips
- Chave de fenda de cabeça chata
- Alicates de decapagem de fios
- Alicate
- Fita isolante
- Escada
5.2 Etapas de instalação
- Desligue a energia: Locate the circuit breaker controlling the light fixture and turn it OFF.
- Preparar o local de montagem: If replacing an existing fixture, carefully remove it. Ensure the junction box is securely mounted and capable of supporting the chandelier's weight (approximately 11.48 lbs).
- Attach Mounting Crossbar: Secure the mounting crossbar to the junction box using the provided screws.
- Assemble Chandelier: Connect the central rod to the main body of the chandelier. Attach the desired length of chain to the central rod and the ceiling canopy loop.
- Conexões de fios: Carefully connect the fixture's wires to the house wiring. Typically, connect the black wire from the fixture to the black (hot) wire from the junction box, the white wire from the fixture to the white (neutral) wire from the junction box, and the bare copper or green ground wire from the fixture to the ground wire from the junction box. Secure connections with wire nuts and electrical tape.
- Monte Canopy: Carefully lift the chandelier and tuck the wires into the junction box. Secure the ceiling canopy to the mounting crossbar using the provided screws.
- Instalar Lâmpadas: Refer to Section 6.1 for bulb installation.
- Restaurar energia: Once installation is complete and all connections are secure, turn the power back ON at the circuit breaker.
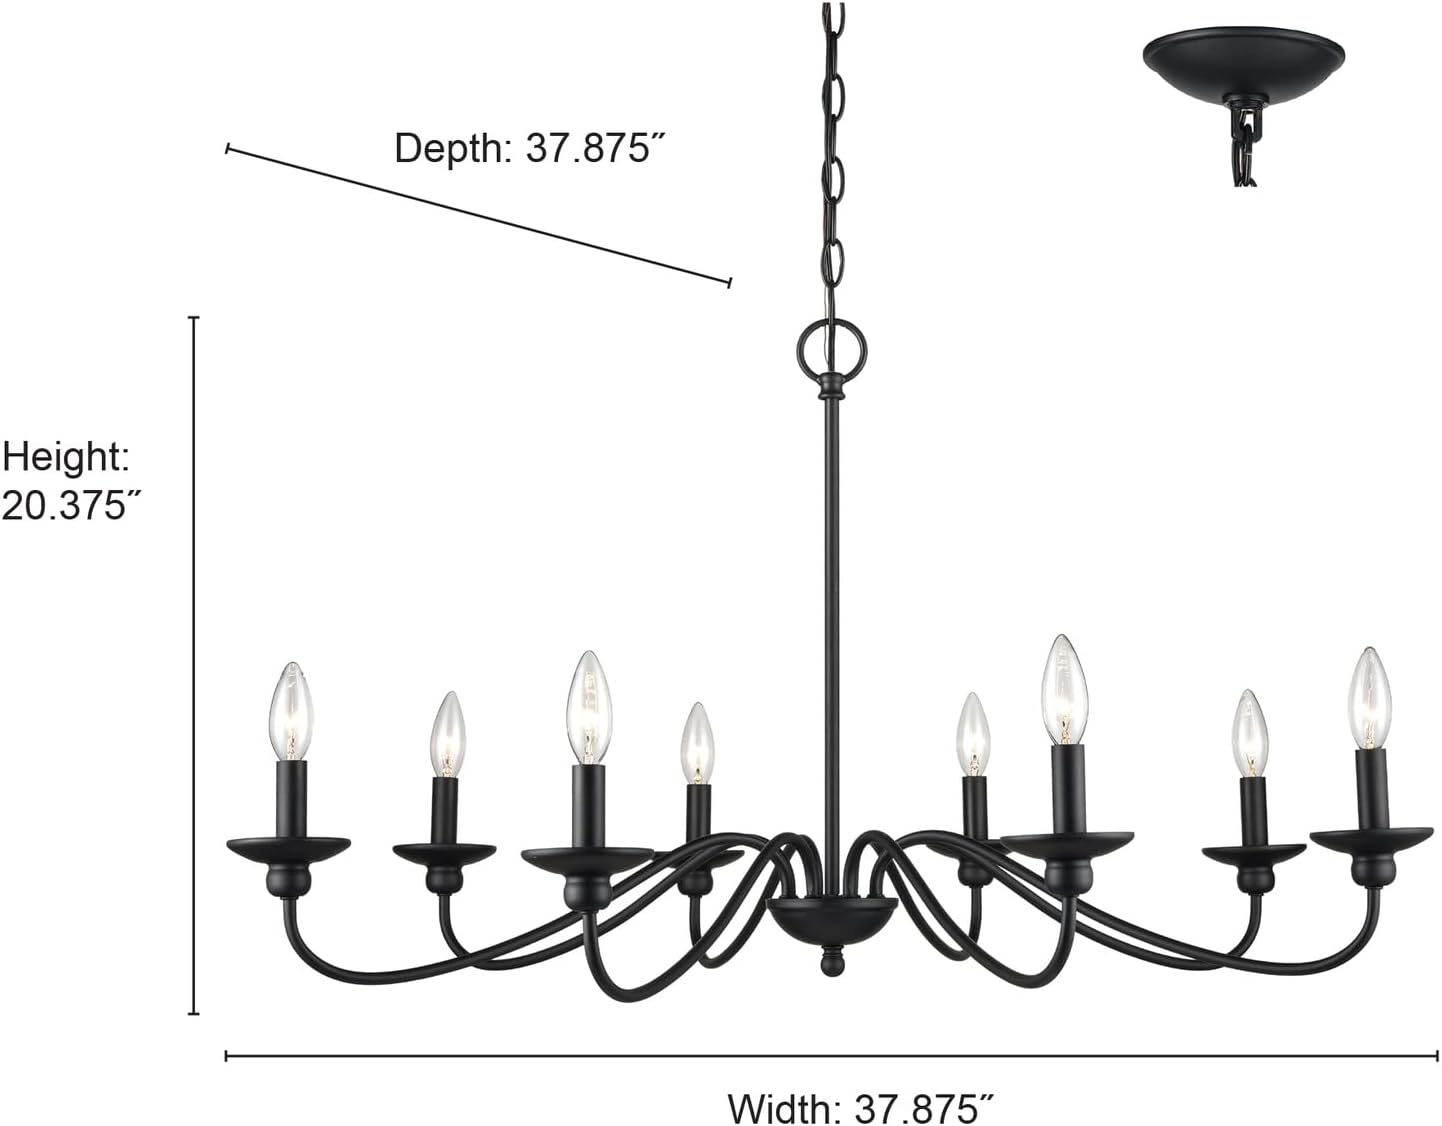
Image 5.1: Diagram showing the dimensions of the Millennium Lighting Delvona Chandelier. The width is 37.875 inches, depth is 37.875 inches, and the height of the fixture body is 20.375 inches. This image helps in planning the installation space.
6. Instruções de operação
6.1 Instalação de Lâmpadas
Ensure power is OFF before installing or replacing bulbs.
- Carefully screw eight (8) E12 (candelabra base) incandescent bulbs into the sockets.
- Não exceda 60 watts por lâmpada.
- Restaure a energia no disjuntor.

Imagem 6.1: Um close-up view of one of the chandelier's light arms, showing the matte black finish and an installed E12 incandescent bulb. This illustrates the bulb type and how it sits in the fixture.
6.2 Ligar/Desligar
The chandelier is controlled by a standard wall switch (push button type) connected to the fixture's electrical circuit. Flip the wall switch to turn the lights on or off.
6.3 Dimmer Compatibility
This fixture is compatible with standard wall dimmers. Ensure that the dimmer switch is rated for incandescent loads and is installed according to its manufacturer's instructions.
7. Manutenção
7.1 Limpeza
Always turn off the power and allow the fixture to cool before cleaning.
- Limpe o aparelho com um pano macio e seco.
- Não utilize produtos de limpeza abrasivos, solventes ou polidores, pois podem danificar o acabamento.
7.2 Substituição da lâmpada
Ensure power is OFF and bulbs are cool before replacing.
- Unscrew the old bulb counter-clockwise.
- Screw in a new E12 base incandescent bulb (max 60 watts) clockwise until snug.
- Não aperte demais.
8. Solução De Problemas
| Problema | Possível causa | Solução |
|---|---|---|
| A luz não acende | Sem energia para o dispositivo elétrico Conexão de fio solto Lâmpada com defeito Interruptor de parede com defeito | Verifique o disjuntor e o interruptor de parede. Verify all wire connections are secure (ensure power is off). Substitua a lâmpada. Teste ou substitua o interruptor de parede. |
| Luzes piscam | Conexão de fio solto Interruptor dimmer incorreto Lâmpada com defeito | Check wire connections (ensure power is off). Certifique-se de que o dimmer seja compatível com lâmpadas incandescentes. Substitua a lâmpada. |
| As lâmpadas queimam rapidamente | O que está incorretotage lâmpada Volumetage flutuações | Ensure bulbs do not exceed 60 watts. Consulte um eletricista para verificar a voltagem da sua casa.tage. |
9. Garantia e Suporte
This Millennium Lighting fixture comes with a Garantia limitada do fabricante de 1 ano. a partir da data da compra. Esta garantia cobre defeitos em materiais e mão de obra sob uso normal.
For warranty claims, technical support, or replacement parts, please contact Millennium Lighting customer service. Keep your proof of purchase for warranty validation.
Informações de contato: Please refer to the Millennium Lighting official website or your retailer for current contact details.
10. Isenção de responsabilidade legal
Millennium Lighting is not responsible for any damages or injuries resulting from improper installation, misuse, or modification of this product. It is the user's responsibility to ensure that the installation and use of this product comply with all local electrical and building codes.
Please check your local laws and regulations before purchasing e instalando este produto.