1. Introdução
Thank you for choosing the Conentool 21V Cordless Drill Driver Set. This manual provides essential information for the safe and effective use of your new tool. Please read all instructions carefully before operation to ensure proper handling, maximize performance, and prevent injury. Keep this manual for future reference.
2. Instruções de segurança
Sempre observe as precauções básicas de segurança ao usar ferramentas elétricas para reduzir o risco de incêndio, choque elétrico e ferimentos pessoais.
Avisos gerais de segurança para ferramentas elétricas
- Segurança da Área de Trabalho: Mantenha sua área de trabalho limpa e bem iluminada. Áreas desorganizadas ou escuras são propícias a acidentes. Não opere ferramentas elétricas em atmosferas explosivas, como na presença de líquidos, gases ou poeira inflamáveis.
- Segurança elétrica: Evite o contato do corpo com superfícies aterradas, como canos, radiadores, fogões e geladeiras. Não exponha ferramentas elétricas à chuva ou umidade.
- Segurança pessoal: Use sempre proteção para os olhos. Utilize equipamentos de segurança adequados, como máscaras contra poeira, calçados de segurança antiderrapantes, capacetes ou protetores auriculares, quando necessário. Vista-se adequadamente; evite roupas largas ou joias.
- Uso e cuidados com a ferramenta: Não force a ferramenta elétrica. Utilize a ferramenta elétrica adequada para a sua aplicação. Desconecte o plugue da tomada e/ou remova a bateria antes de fazer qualquer ajuste, trocar acessórios ou guardar as ferramentas elétricas.
- Uso e cuidados com a bateria: Recarregue apenas com o carregador especificado pelo fabricante. Não utilize as baterias com outras ferramentas elétricas.
3. Conteúdo da embalagem
Your Conentool 21V Cordless Drill Driver Set includes the following items:
- 1x Furadeira sem fio
- 1x Estojo de transporte
- 2 baterias de íons de lítio de 1500mAh
- 1x Carregador
- 9x Socket Wrenches ( 4-12mm)
- 12x Screwdriver Bits
- Conventional Drill Bits
- Tile Drill Bit
- Long Screwdriver Bit
- 1x Flexible Drill Shaft

Image: Complete Conentool 21V Cordless Drill Driver Set with all accessories laid out.
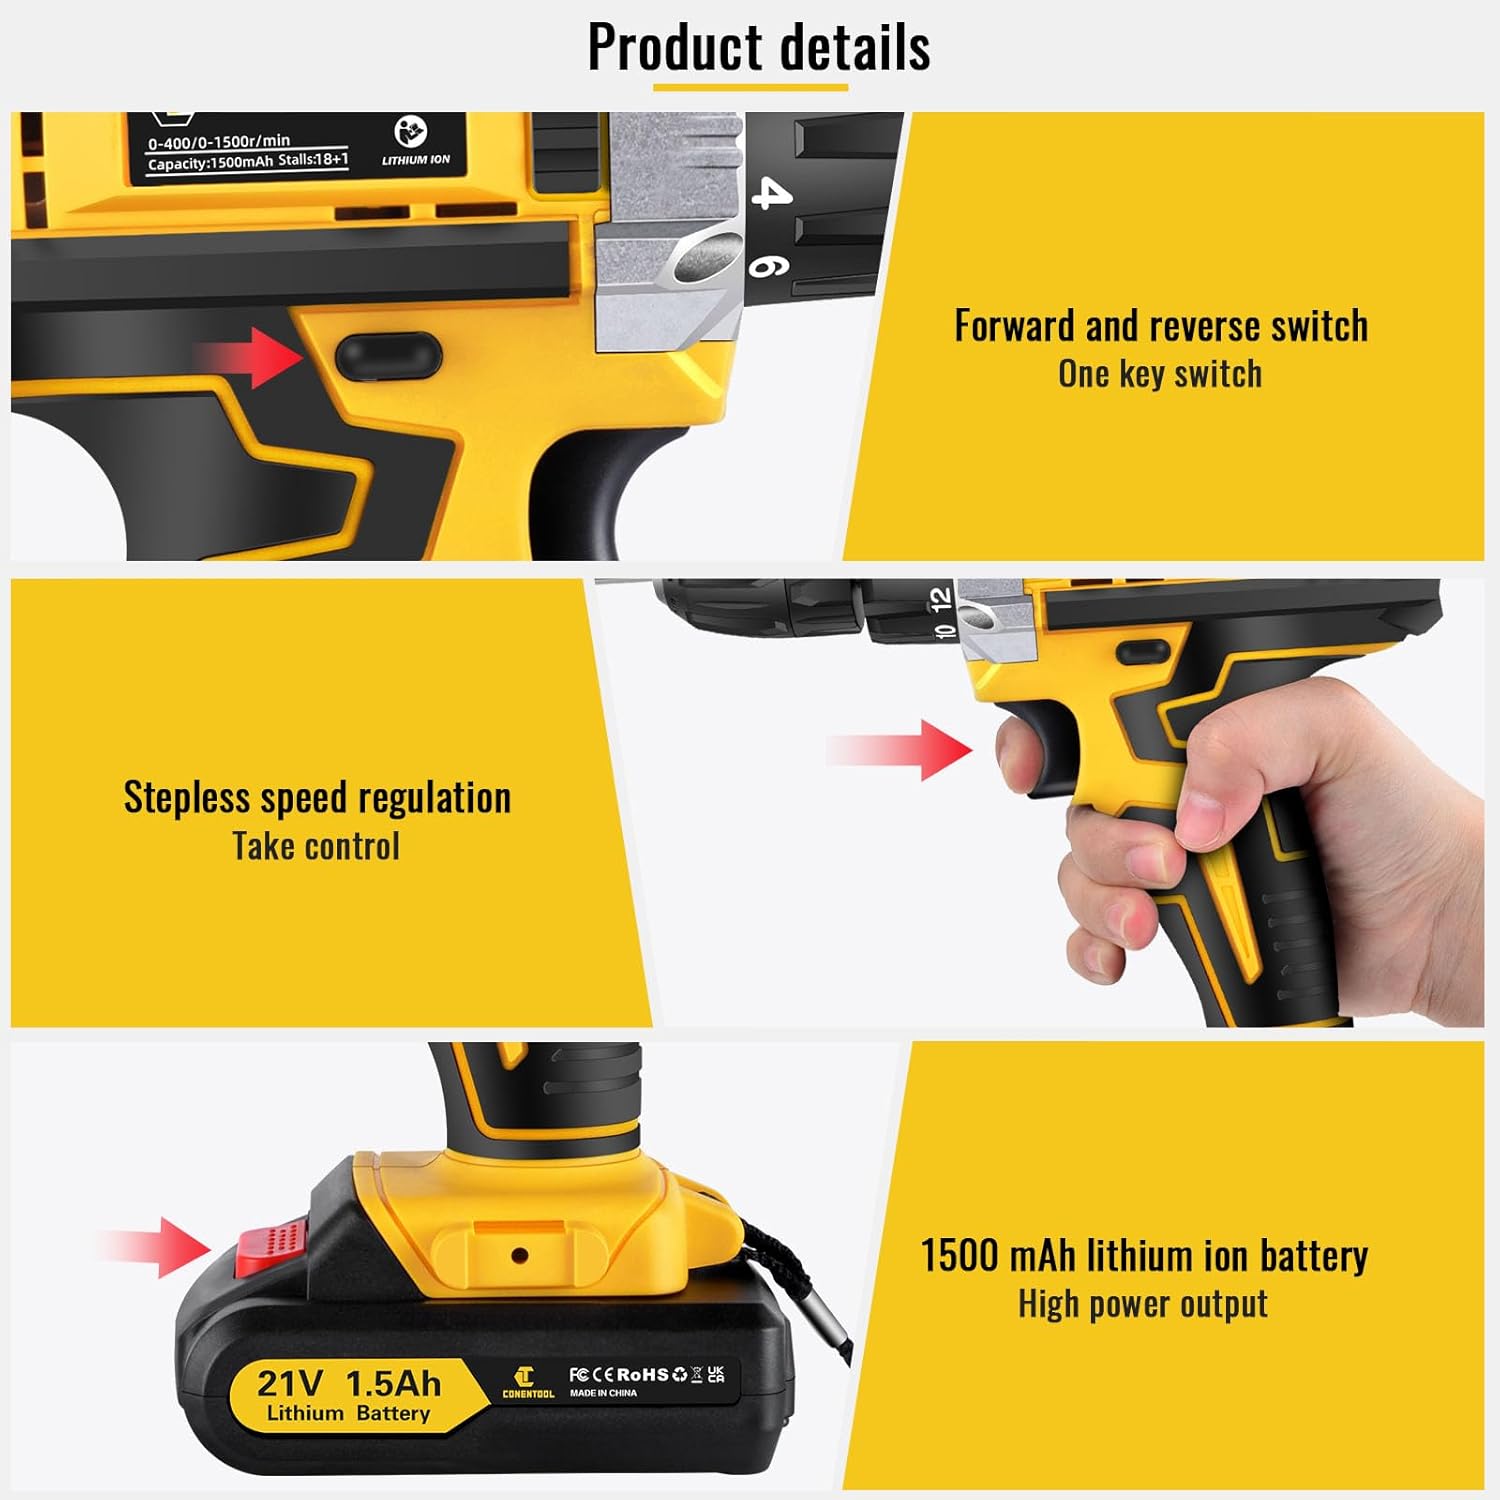
Imagem: Close-up view of the various accessories included in the set, such as the drill, batteries, charger, and different types of bits and wrenches.
4. Produto acabadoview
The Conentool 21V Cordless Drill Driver is a versatile and powerful tool designed for various drilling and screwing tasks. It features a robust motor, ergonomic design, and multiple adjustable settings for optimal performance.
Principais características:
- 45N.m Max Torque: Fornece ample potência para aplicações exigentes.
- 18+1 Torque Adjustment: Allows precise control for different materials and tasks, from delicate screwing to heavy-duty drilling.
- Two-Speed Setting: Offers flexibility with a low speed (0-400rpm) for high torque applications and a high speed (0-1500rpm) for faster drilling.
- Baterias duplas de 1500mAh: Ensures extended operation time with quick charging.
- Design compacto e leve: Minimizes user fatigue during prolonged use.
- Luz LED embutida: Ilumina a área de trabalho, melhorando a visibilidade em condições de pouca luz.
- 3/8" (10mm) Self-Locking Chuck: Enables quick and easy bit changes.
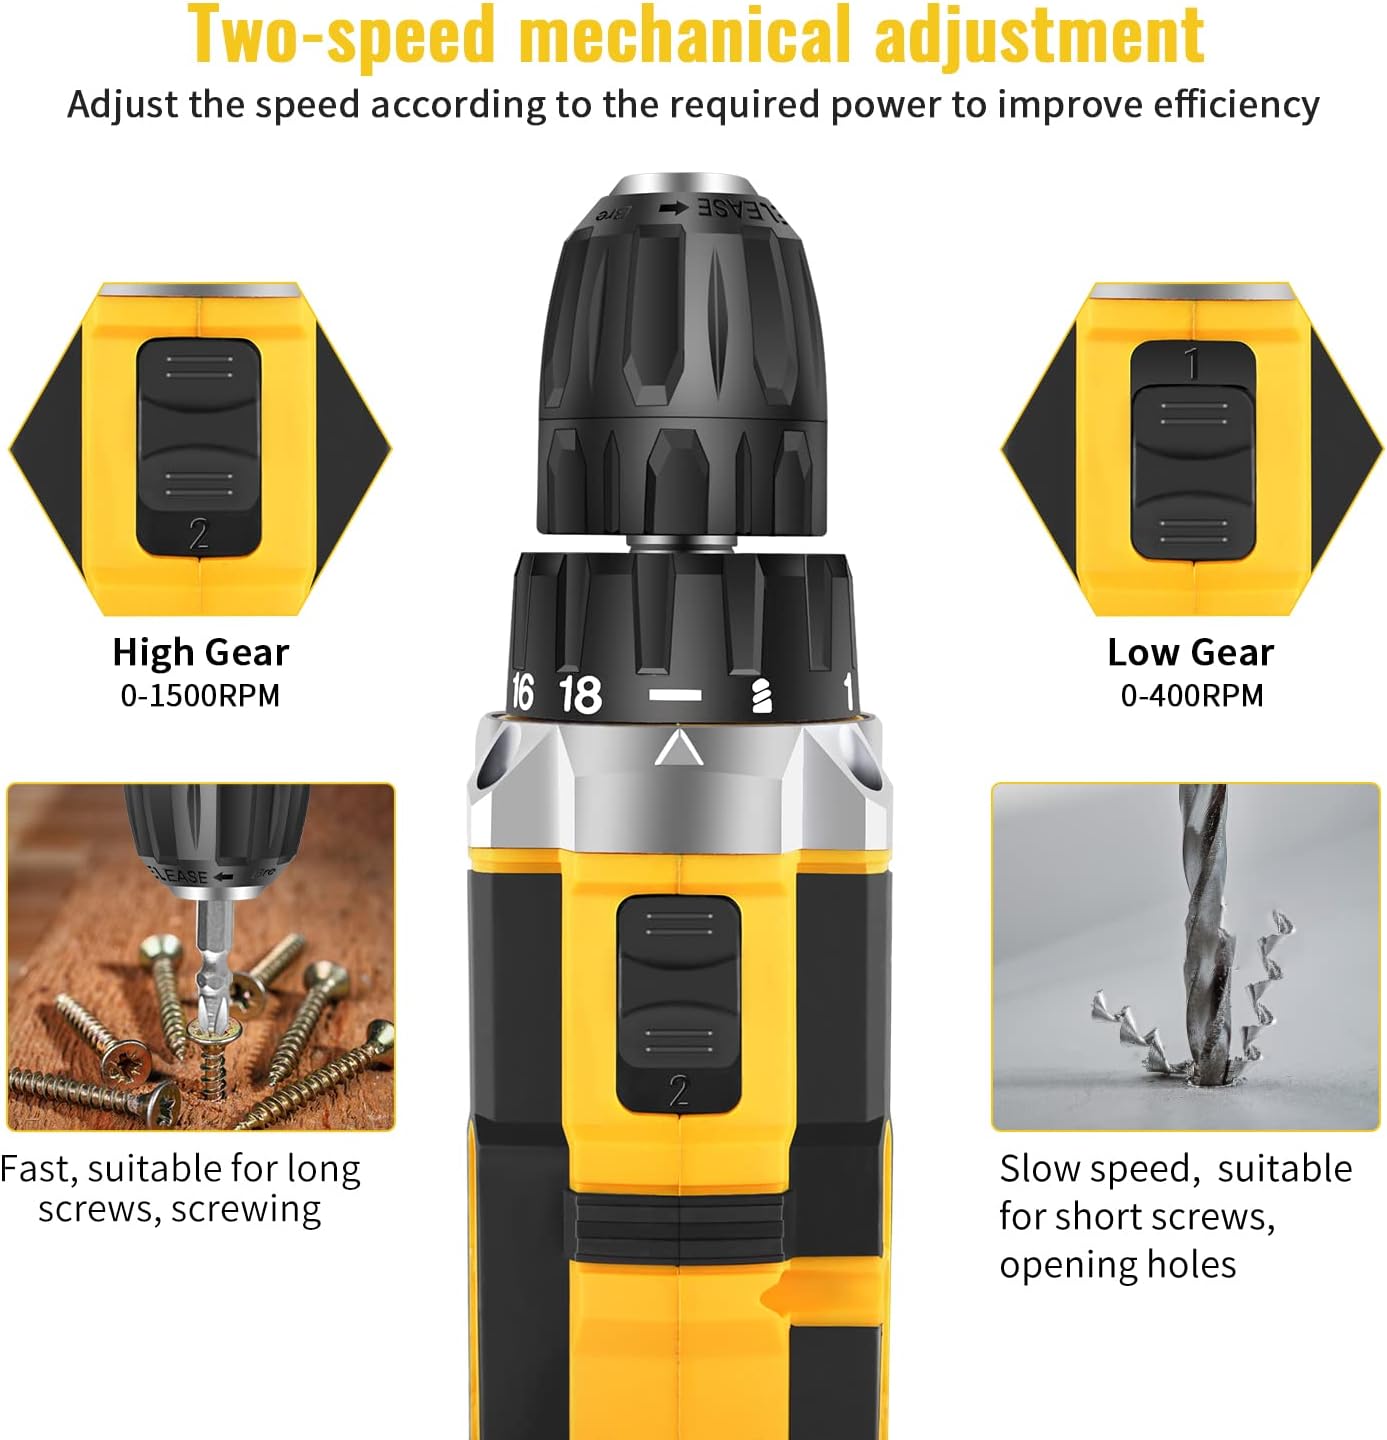
Image: Detailed diagram pointing out various features of the drill, including torque settings, speed selector, ventilation, LED light, and grip.

Image: Visual representation of the drill's internal motor, highlighting its 45N.m maximum torque and efficient heat dissipation.

Image: The drill depicted as lightweight and compact, designed to reduce user fatigue.

Image: Illustration of the drill's motor cooling system, demonstrating effective heat dissipation.

Image: Close-up of the integrated LED light, designed to illuminate the work area.
5. Configuração
5.1 Carregando a bateria
The drill comes with two 1500mAh lithium-ion batteries. Before first use, fully charge both batteries. A fast charger is included, and a full charge typically takes about 1 hour.
- Conecte o carregador a uma tomada elétrica padrão.
- Deslize a bateria sobre o carregador até ouvir um clique.
- The charger indicator light will show the charging status (refer to charger manual for specific light indications).
- Depois de totalmente carregada, remova a bateria do carregador.
5.2 Instalação/Remoção da bateria
- Para instalar: Alinhe a bateria com a base do cabo da furadeira e deslize-a até que ela se encaixe firmemente no lugar.
- Para remover: Press the battery release button located on the front of the battery pack and slide the battery out of the drill handle.

Image: Details on battery installation and removal, along with trigger and switch controls.
5.3 Installing Drill Bits/Screwdriver Bits
The drill features a 3/8" (10mm) self-locking chuck for quick and easy bit changes.
- Gire o mandril no sentido anti-horário para abrir as garras.
- Insira a broca ou a ponta de chave de fenda desejada no mandril, certificando-se de que esteja firmemente encaixada.
- Rotate the chuck clockwise to tighten the jaws securely around the bit. Ensure the bit is centered and tight before operation.

Image: Close-up of the drill chuck, showing how to insert and secure bits.
6. Instruções de operação
6.1 Ligar/Desligar e Gatilho de Velocidade Variável
The drill is activated by pressing the variable speed trigger. The speed of rotation increases as you press the trigger further.
- To start the drill, press the trigger.
- Para aumentar a velocidade, pressione o gatilho com mais força.
- Para parar a furadeira, solte o gatilho.

Image: Illustration of the variable speed trigger and the forward/reverse button.
6.2 Two-Speed Mechanical Adjustment
The drill has two mechanical speed settings, selected via a switch on top of the drill housing.
- Gear 1 (Low Speed: 0-400rpm): Provides higher torque, ideal for driving screws or drilling into harder materials.
- Gear 2 (High Speed: 0-1500rpm): Provides lower torque but faster rotation, suitable for drilling into softer materials or for quick tasks.

Image: Diagram showing the two-speed selector switch and its corresponding RPM ranges.
6.3 Torque Adjustment (18+1 Settings)
The torque collar allows you to adjust the amount of rotational force the drill applies. This prevents over-tightening screws or damaging materials.
- Rotate the torque collar to select the desired setting from 1 to 18. Lower numbers are for smaller screws and softer materials, higher numbers for larger screws and harder materials.
- The drill icon setting is for drilling applications, providing maximum torque.

Image: The torque adjustment ring with settings for different materials.
6.4 Interruptor de avanço/reverso
The forward/reverse switch is located above the trigger and controls the direction of rotation.
- Deslize o interruptor para a esquerda para girar para a frente (para furar e apertar parafusos).
- Deslize o interruptor para a direita para inverter a rotação (para soltar parafusos ou remover brocas).
- When the switch is in the center position, the trigger is locked, preventing accidental startup.
6.5 Usando a luz LED
A luz LED integrada acende automaticamente quando o gatilho é pressionado, proporcionando visibilidade em áreas de trabalho com pouca iluminação.

Image: The LED light in action, illuminating the work surface, and the onboard bit holder.
7. Manutenção
A manutenção regular garante a longevidade e o desempenho ideal da sua furadeira.
- Limpeza: Mantenha as aberturas de ventilação desobstruídas e limpas. Use um pano macio e seco.amp Use um pano para limpar a ferramenta. Não utilize produtos químicos agressivos ou abrasivos.
- Cuidados com a bateria: Armazene as baterias em local fresco e seco, longe da luz solar direta. Não armazene baterias totalmente descarregadas por longos períodos. Recarregue-as periodicamente se não estiverem em uso.
- Armazenar: Store the drill and all accessories in the provided carry case in a dry, secure location, out of reach of children.
8. Solução De Problemas
If you encounter issues with your Conentool drill, refer to the following common problems and solutions:
| Problema | Possível causa | Solução |
|---|---|---|
| A furadeira não inicia | Battery not charged; Battery not properly inserted; Forward/Reverse switch in center (locked) position. | Charge battery; Re-insert battery securely; Move switch to forward or reverse position. |
| Perda de energia durante a operação | Battery low; Overload. | Recharge battery; Reduce pressure on the drill or use a lower speed/higher torque setting. |
| A peça oscila ou cai. | Chuck not tightened sufficiently; Bit shank damaged. | Re-tighten chuck firmly; Replace damaged bit. |
| Superaquecimento | Prolonged heavy use; Blocked ventilation. | Allow tool to cool down; Clear ventilation openings. |
If the problem persists after attempting these solutions, please contact Conentool customer support.
9. Especificações
| Recurso | Especificação |
|---|---|
| Número do modelo | P000125 |
| Volumetage | 21V |
| Tipo de Bateria | Íon de lítio |
| Capacidade da bateria | 1500mAh (1.5Ah) |
| Max Torque | 45 Nm |
| Configurações de torque | 18+1 |
| Velocidade sem carga (baixa) | 0-400 RPM |
| Velocidade sem carga (alta) | 0-1500 RPM |
| Tamanho do mandril | 3/8" (10 mm) |
| Fonte de energia | Alimentado por bateria |
| Material | Metal |
| Peso do item | 2.5 kg |
| Dimensões do produto | 30.5 x 27 x 10.5 cm |
10. Garantia e Suporte
Conentool is committed to providing high-quality tools. For any product-related inquiries, technical assistance, or warranty claims, please contact Conentool customer support. Refer to your purchase documentation for specific warranty terms and contact information.
You can also visit the official Conentool store on Amazon for more information and support: Conentool Store

