Aquacomputer WACP-472
Manual do Usuário do Bloco de Água para CPU Aquacomputer Cuplex Kryos Next com Vision 1700
Model: WACP-472
1. Introdução
This manual provides comprehensive instructions for the installation, operation, and maintenance of your Aquacomputer Cuplex Kryos Next with Vision 1700 CPU water block. This high-performance water block is designed for Intel LGA 1700 processors, offering efficient cooling and integrated monitoring capabilities through its Vision display.
Please read this manual thoroughly before proceeding with installation to ensure proper function and to prevent damage to your components.
2. Informações de segurança
- Desligue sempre a alimentação do computador antes de instalar ou realizar qualquer manutenção em seus componentes.
- Water cooling systems involve liquids. Exercise extreme caution to prevent leaks. Test your loop for leaks thoroughly before powering on your system.
- Use only approved coolants for water cooling systems. Do not use tap water.
- Handle the water block and other components with care to avoid physical damage.
- Mantenha fora do alcance de crianças.
3. Conteúdo da embalagem
Verifique se todos os componentes listados abaixo estão presentes em seu pacote:
- Aquacomputer Cuplex Kryos Next with Vision 1700 CPU Water Block
- Mounting hardware for Intel LGA 1700 socket
- Pasta térmica
- Placa traseira
- Hex key / Allen wrench
- Spreader tool (for thermal paste)
- Documentação (este manual)
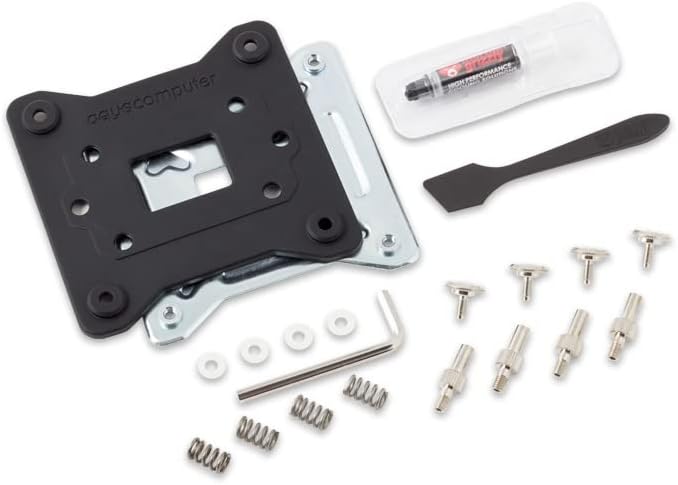
Image 3.1: Included mounting hardware, thermal paste, and tools for the Aquacomputer Cuplex Kryos Next water block.
4. Configuração e instalação
4.1 Pré-instalação
- Ensure your motherboard is compatible with the Intel LGA 1700 socket.
- Clean the CPU surface thoroughly with isopropyl alcohol to remove any dust or residue.
- Familiarize yourself with your motherboard's CPU socket area and the water block's mounting mechanism.
4.2 Mounting the Water Block
- Instalar a placa traseira: Position the LGA 1700 backplate on the rear of your motherboard, aligning the holes with the CPU socket mounting holes.
- Aplicar pasta térmica: Apply a small amount of thermal paste (pea-sized dot or thin line) to the center of your CPU's integrated heat spreader (IHS). Use the provided spreader tool if necessary to create a thin, even layer.
- Position Water Block: Carefully place the Aquacomputer Cuplex Kryos Next water block onto the CPU, ensuring the mounting holes on the water block align with the backplate and motherboard. Avoid sliding the block once it makes contact with the thermal paste.
- Bloqueio seguro de água: Use the provided mounting screws and springs. Tighten the screws in a diagonal pattern (e.g., top-left, bottom-right, top-right, bottom-left) gradually until snug. Do not overtighten.

Image 4.1: The Aquacomputer Cuplex Kryos Next with Vision 1700 water block, showing its integrated display and mounting bracket.
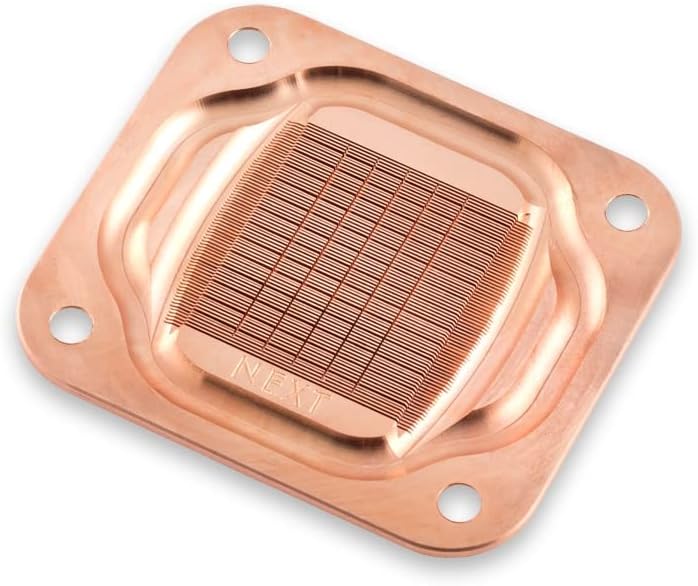
Image 4.2: The copper cold plate of the Aquacomputer Cuplex Kryos Next, featuring a dense array of micro-fins for optimal heat transfer.
4.3 Conexão ao circuito de refrigeração
- Instalar acessórios: Screw your chosen G1/4" fittings into the inlet and outlet ports of the water block. Ensure they are hand-tightened securely.
- Conecte a tubulação: Attach your tubing to the fittings, ensuring a secure and leak-free connection.
- Integrate into Loop: Connect the water block into your custom water cooling loop. The flow direction typically does not significantly impact performance for this type of block, but consult your pump and radiator manuals for optimal flow paths.
4.4 conexões elétricas
- Vision Display: Connect the included USB cable from the water block to an available internal USB header on your motherboard. This powers the Vision display and allows for data communication with Aquacomputer software.
- Optional Fan/Pump Control: If your water block includes additional fan or pump control features, connect the relevant cables to your motherboard's fan headers or a dedicated fan controller as per your system's requirements.
5. Operating the Vision Display
The integrated Vision display provides real-time monitoring of critical system parameters, typically CPU temperature. Once your system is powered on and the USB connection is established, the display will activate.
- Exibição padrão: The display typically shows the current coolant or CPU temperature.
- Controle de software: For advanced configuration, such as changing displayed values, adjusting brightness, or updating firmware, download and install the Aquacomputer Aquasuite software from the official Aquacomputer website.
6. Manutenção
Regular maintenance ensures optimal performance and longevity of your water cooling system.
6.1 Coolant Replacement
- It is recommended to replace your coolant every 6-12 months, depending on the coolant type and system usage.
- Drain the old coolant completely from your loop.
- Flush the system with distilled water or a dedicated flushing agent.
- Refill the loop with fresh, high-quality coolant.
6.2 Cleaning the Water Block
- If performance degrades or visible buildup occurs, the water block may need cleaning.
- Carefully disassemble the water block (refer to Aquacomputer's official guides if unsure).
- Clean the micro-fins and channels with a soft brush and distilled water. Avoid abrasive materials.
- Rinse thoroughly and ensure all components are dry before reassembly.
7. Solução De Problemas
| Problema | Possível causa | Solução |
|---|---|---|
| Altas temperaturas da CPU | Insufficient thermal paste, poor mounting pressure, air bubble in loop, clogged fins. | Reapply thermal paste, re-mount water block, bleed air from loop, clean water block. |
| Vision Display Not Working | USB cable disconnected, driver issue, software conflict. | Check USB connection, reinstall Aquasuite software, update motherboard USB drivers. |
| Visible Leaks | Loose fittings, damaged O-rings, cracked tubing. | Immediately power off system. Tighten fittings, inspect and replace O-rings/tubing. |
8. Especificações
| Nome do produto: | Aquacomputer Cuplex Kryos Next with Vision 1700 |
| Número do modelo: | WACP-472 (21856) |
| Compatibilidade: | Soquete Intel LGA 1700 |
| Material: | Acetal top, Copper cold plate |
| Dimensões: | 3.94 x 1.97 x 0.5 polegadas |
| Peso do item: | 0.434 onças |
| Conectividade: | G1/4" threads for fittings, Internal USB header for Vision display |
| Fabricante: | Aquacomputer |
9. Garantia
Aquacomputer products are manufactured to high-quality standards. For specific warranty terms and conditions, please refer to the official Aquacomputer webou entre em contato com o suporte ao cliente. Guarde o comprovante de compra para eventuais solicitações de garantia.
10. Suporte
For technical assistance, troubleshooting beyond this manual, or further product information, please visit the official Aquacomputer website or contact their customer support department. Online resources, FAQs, and forums may also be available.
Website: www.aquacomputer.de (Examp(O link, o link real pode variar)
Ask a question about this manual
Ask about setup, troubleshooting, compatibility, parts, safety, or missing instructions. Manuals+ will review the question and use this page’s manual context to help answer it.