
1. Instruções importantes de segurança
Please read this manual carefully before operating your AireMax APH10CE Portable Air Conditioner. Keep these instructions for future reference. Failure to follow these instructions may result in electric shock, fire, or personal injury.
- Always connect the unit to a properly grounded 115V/60Hz electrical outlet.
- Não opere a unidade com um cabo ou plugue danificado.
- Do not block air inlets or outlets. Ensure at least 12 inches (30 cm) of clearance around the unit for proper airflow.
- Não introduza os dedos ou objetos estranhos nas aberturas de ventilação.
- Não utilize o aparelho próximo a gases inflamáveis ou materiais combustíveis.
- Desligue sempre o aparelho da tomada antes de limpá-lo ou realizar qualquer manutenção.
- Este aparelho não se destina ao uso por pessoas (incluindo crianças) com capacidades físicas, sensoriais ou mentais reduzidas, ou com falta de experiência e conhecimento, a menos que tenham recebido supervisão ou instruções sobre o uso do aparelho de uma pessoa responsável pela sua segurança.
- As crianças devem ser supervisionadas para garantir que não brinquem com o aparelho.
2. Produto acabadoview
The AireMax APH10CE is a portable air conditioner designed to provide efficient cooling and dehumidification for spaces up to 600 square feet (approximately 55 m²). It features a self-evaporative system, three fan speeds, and a sleep function for enhanced comfort.
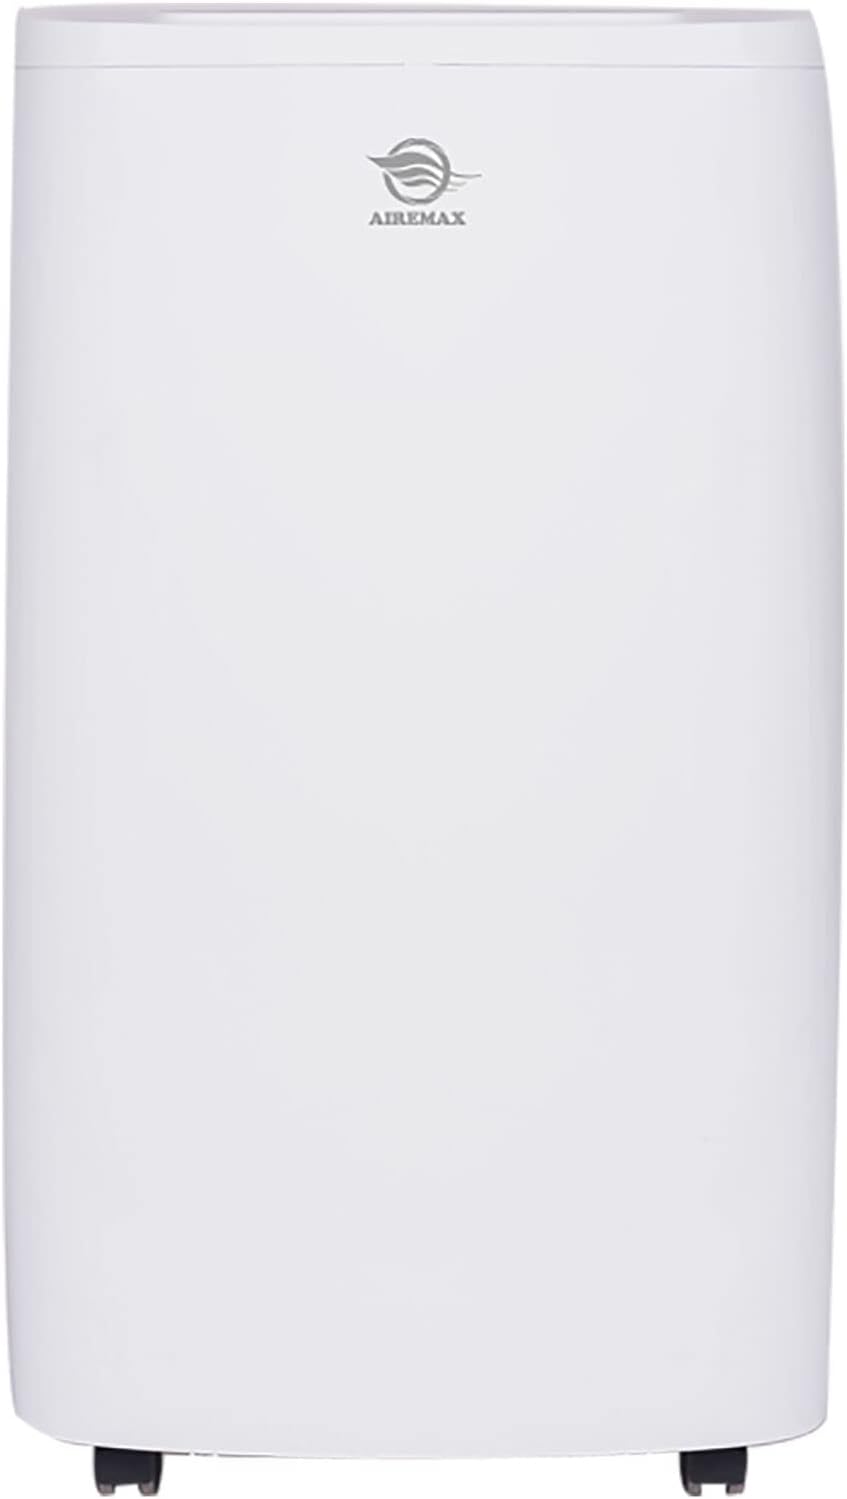
Figura 2.1: Frente view of the AireMax APH10CE Portable Air Conditioner. This image shows the sleek, white design of the unit with the AireMax logo prominently displayed at the top.

Figura 2.2: Angulado view of the AireMax APH10CE Portable Air Conditioner. This perspective highlights the side vents and the overall compact design, suitable for various room settings.
Painel de controle

Figura 2.3: Close-up of the AireMax APH10CE control panel. The panel features an LED display and touch buttons for various functions including Timer, Fan speed, Temperature Up/Down, Mode, and Power.
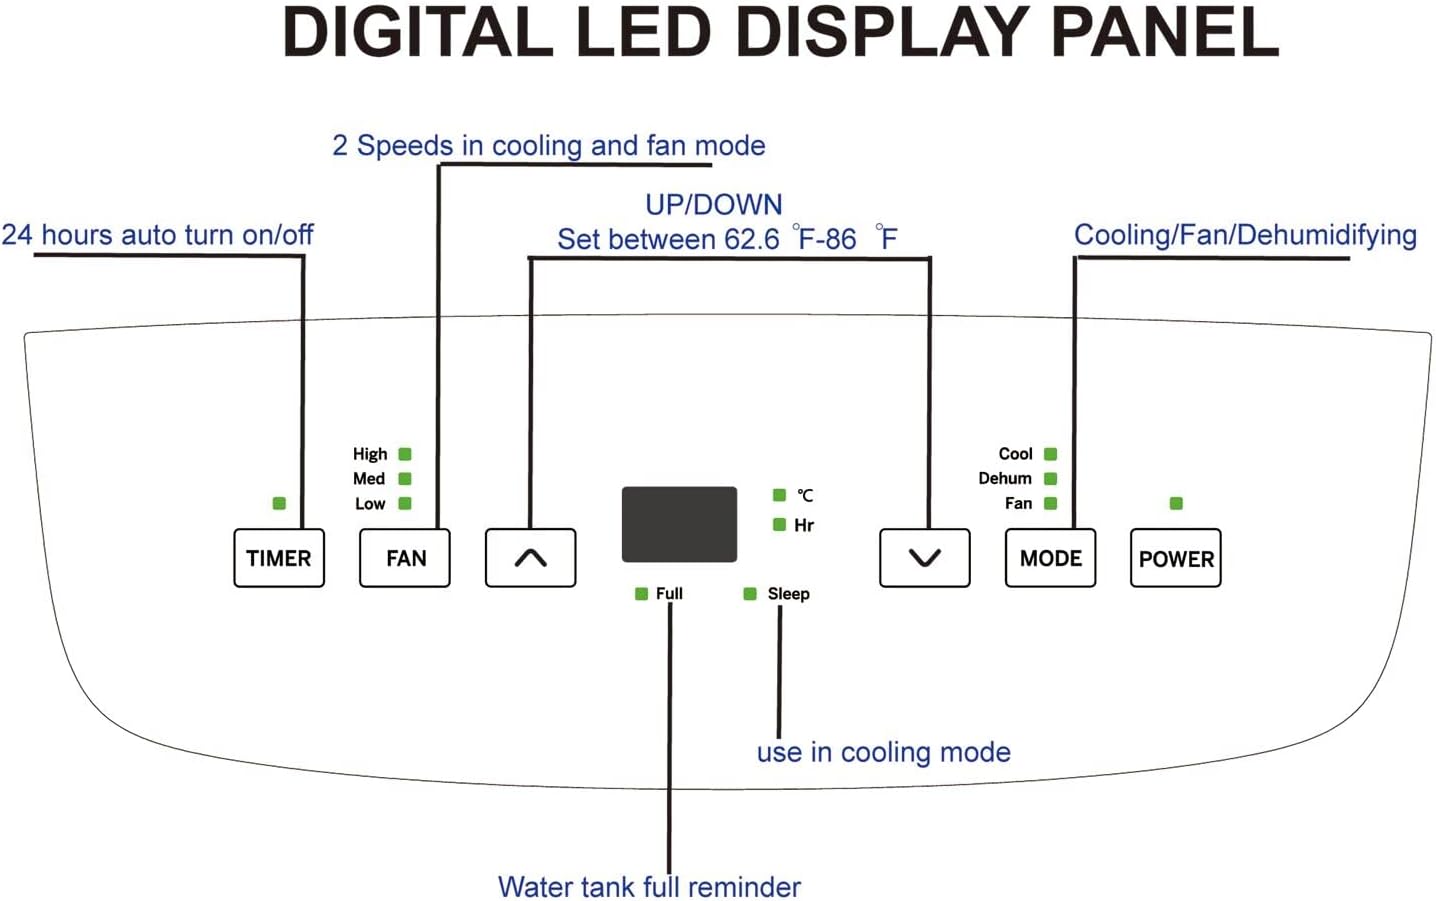
Figura 2.4: Diagram illustrating the functions of the Digital LED Display Panel. It shows controls for Timer (24 hours auto on/off), Fan (High, Med, Low speeds), Up/Down buttons for temperature (62.6°F - 86°F), Mode (Cooling, Dehumidifying, Fan), and Power. Indicators for "Full" (water tank) and "Sleep" mode are also visible.
Traseira View e Componentes

Figura 2.5: Traseira view of the AireMax APH10CE with key components labeled. This includes the Filter Frame, Dust Removing Filter, Exhaust Connector, and Double Drainage Hoses, indicating options for water removal.

Figura 2.6: Traseira view of the AireMax APH10CE, providing a clearer look at the air vents and the integrated power cord storage area, designed for neat organization when not in use.
3. Componentes incluídos
Your AireMax APH10CE Portable Air Conditioner package should contain the following items:
- AireMax APH10CE Portable Air Conditioner Unit
- Controle remoto
- Bateria (para controle remoto)
- Kit para janela (para instalação da mangueira de exaustão)
- Mangueira de exaustão
- Conector redondo
- Adaptador
- Manual do Proprietário (este documento)
- Informações de garantia
If any components are missing or damaged, please contact AireMax customer support.
4. Configuração e instalação
A instalação correta é crucial para o funcionamento eficiente do seu ar-condicionado portátil.
4.1 Colocação da unidade
- Coloque a unidade em uma superfície plana e estável.
- Certifique-se de que haja pelo menos 30 cm (12 polegadas) de espaço ao redor da unidade para uma circulação de ar adequada.
- Posicione a unidade perto de uma janela ou porta de correr para a instalação da mangueira de exaustão.
- The unit is designed for rooms up to 600 sq ft (approx. 55 m²).
- The unit is equipped with 4-direction casters and side handles for easy transport within your home.
4.2 Instalação do Kit de Janelas
The window kit allows you to vent the hot air outside, which is essential for effective cooling.
- Assemble the window kit components according to the diagrams provided in the separate window kit instructions (if applicable) or by connecting the adapter to the exhaust hose.
- Extend the window kit to fit your window opening. Secure it in place.
- Attach the exhaust hose to the unit's exhaust connector (refer to Figure 2.5).
- Connect the other end of the exhaust hose to the adapter in the window kit.
- Certifique-se de que todas as conexões estejam seguras para evitar que o ar quente retorne ao ambiente.
4.3 Configuração do sistema de drenagem
The AireMax APH10CE features a self-evaporative system, which typically means most condensed water is recycled for cooling and expelled with the exhaust air. However, in high humidity conditions, manual drainage may be required.
- For continuous drainage (especially in dehumidifier mode or high humidity), connect a drainage hose (not always included, check components list) to one of the double drainage hoses outlets at the rear of the unit (refer to Figure 2.5).
- Route the hose to a floor drain or a suitable collection container.
- Ensure the hose is sloped downwards to allow gravity drainage.
- The unit has a "Water tank full reminder" indicator on the control panel (Figure 2.4). When this illuminates, the unit will stop operating until the water tank is drained manually.
5. Instruções de operação
Familiarize yourself with the control panel (Figure 2.3 and 2.4) and remote control for optimal operation.
5.1 Ligar/Desligar
- Pressione o PODER Botão no painel de controle ou no controle remoto para ligar ou desligar a unidade.
Seleção de 5.2 modos
Pressione o MODO Pressione o botão repetidamente para alternar entre os modos disponíveis:
- Modo de resfriamento: For air conditioning. Set your desired temperature using the PARA CIMA/PARA BAIXO buttons. The temperature range is 62.6°F (17°C) to 86°F (30°C).
- Modo de desumidificação: For removing excess moisture from the air. The unit can remove up to 90 pints of moisture per day. Fan speed is typically fixed in this mode.
- Modo fã: For air circulation without cooling. You can adjust the fan speed.
5.3 Ajuste da velocidade da ventoinha
No modo de resfriamento ou ventilação, pressione o FAN button to select between High, Medium, or Low fan speeds.
5.4 Função do temporizador
The timer allows you to set the unit to automatically turn on or off after a specified period (up to 24 hours).
- Com a unidade ligada, pressione o CRONÔMETRO botão.
- Use o PARA CIMA/PARA BAIXO buttons to set the desired number of hours for the unit to turn off.
- Com a unidade desligada, pressione o CRONÔMETRO botão.
- Use o PARA CIMA/PARA BAIXO buttons to set the desired number of hours for the unit to turn on.
5.5 Função Sono
The Sleep function is designed for comfortable overnight operation in cooling mode. It gradually increases the set temperature by a few degrees over several hours to save energy and prevent overcooling.
- Activate the Sleep function by pressing the dedicated button on the remote control (if available) or by selecting it via the control panel (refer to Figure 2.4 for indicator).
5.6 Reinício Automático
The unit features an automatic restart function. In case of a power outage, a unidade retomará automaticamente a operação com as últimas configurações assim que a energia for restaurada.
6. Manutenção
Regular maintenance ensures optimal performance and extends the lifespan of your AireMax APH10CE.
6.1 Limpando o Filtro de Ar
The unit is equipped with removable mesh filters (refer to Figure 2.5). Clean them regularly, especially if the unit is used frequently.
- Desligue o ar-condicionado da tomada.
- Locate and remove the filter frame from the rear of the unit.
- Gently remove the mesh filter from the frame.
- Vacuum any loose dust from the filter.
- Wash the filter under warm, running water with a mild detergent if necessary.
- Enxágue bem e deixe o filtro secar completamente ao ar antes de reinseri-lo.
- Reinstall the filter into the frame and then back into the unit.
6.2 Drenagem da água acumulada
While the unit has a self-evaporative system, manual drainage may be necessary if the "Water tank full reminder" indicator illuminates.
- Desligue o ar condicionado.
- Place a shallow pan or tray beneath the drainage outlet(s) at the rear of the unit.
- Remova o(s) bujão(ões) de drenagem para permitir que a água escorra.
- Once all water has drained, replace the drain plug(s) securely.
6.3 Limpeza da parte externa da unidade
- Limpe o exterior da unidade com um pano macio e úmidoamp pano.
- Não utilize produtos químicos agressivos, abrasivos ou solventes.
6.4 Armazenamento
Se a unidade for armazenada por um período prolongado:
- Drain all accumulated water completely.
- Limpe o filtro de ar.
- Store the power cord neatly in its designated storage area (Figure 2.6).
- Guarde a unidade em local fresco e seco, longe da luz solar direta e de temperaturas extremas.
7. Solução De Problemas
Antes de entrar em contato com o suporte ao cliente, consulte o guia de solução de problemas a seguir para problemas comuns.
| Problema | Possível causa | Solução |
|---|---|---|
| A unidade não liga. | No power supply; Power cord not plugged in; Circuit breaker tripped; Water tank full. | Ensure unit is plugged into a live 115V/60Hz outlet; Check circuit breaker; Drain water tank if "Full" indicator is on. |
| A unidade está funcionando, mas não está refrigerando. | Air filter clogged; Exhaust hose not properly installed or blocked; Room too large; Doors/windows open; Temperature setting too high. | Clean air filter; Check exhaust hose for proper installation and obstructions; Close doors and windows; Lower temperature setting. |
| "Full" indicator is on. | O tanque de água está cheio. | Esvazie o tanque de água conforme descrito na Seção 6.2. |
| A unidade é barulhenta. | Unit not on a level surface; Fan speed too high; Obstruction in fan. | Place unit on a level surface; Reduce fan speed; Check for obstructions. (Note: Normal operating noise level is 64 dB). |
| O controle remoto não funciona. | Pilhas descarregadas ou inseridas incorretamente; Obstrução entre o controle remoto e a unidade. | Replace batteries; Ensure line of sight to unit's receiver. |
8. Especificações
Detailed technical specifications for the AireMax APH10CE Portable Air Conditioner.
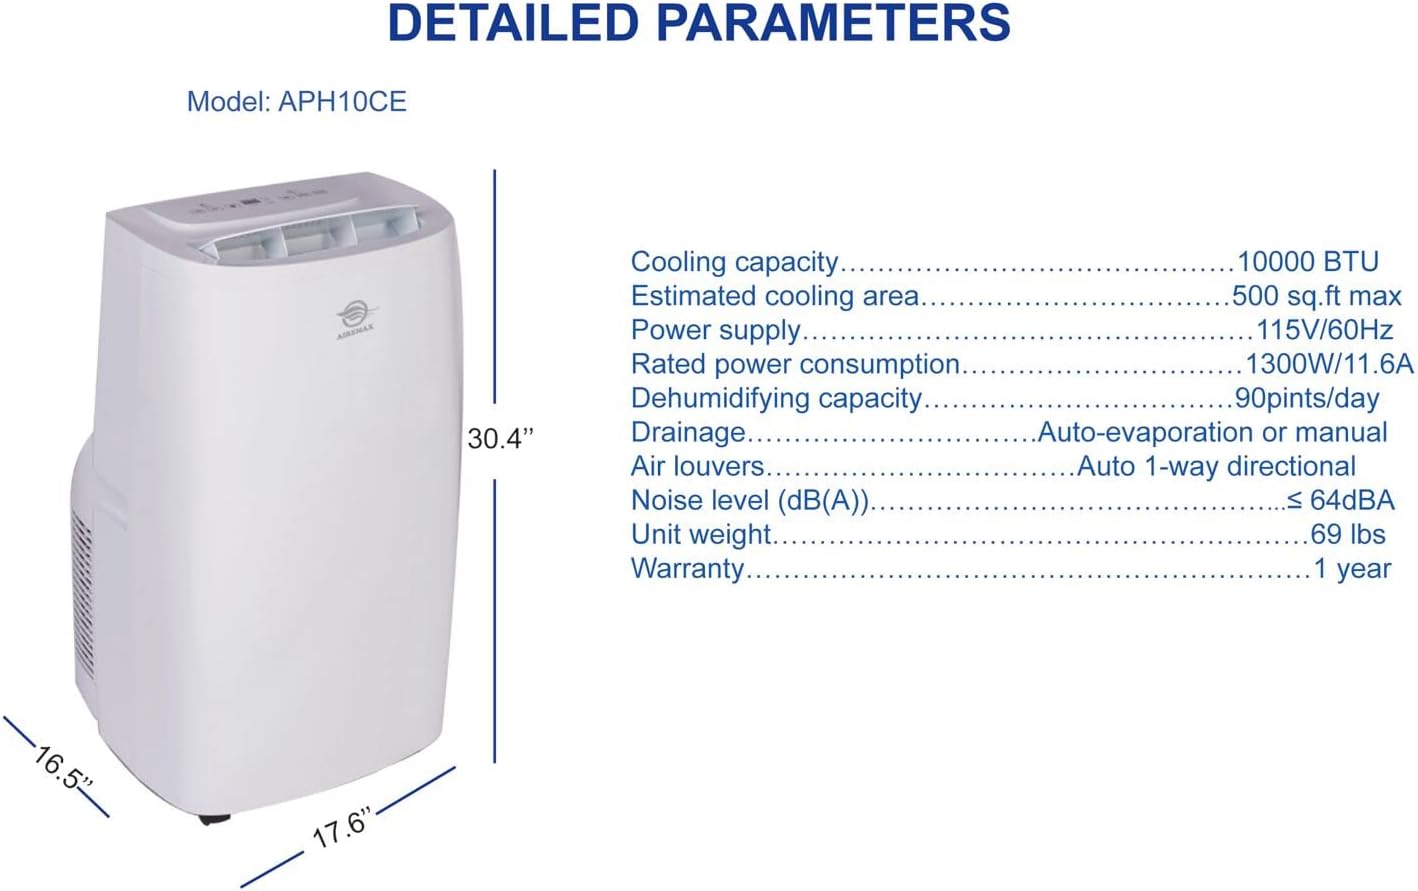
Figura 8.1: Diagram showing detailed parameters and dimensions of the AireMax APH10CE. This includes cooling capacity, power supply, dehumidifying capacity, and physical dimensions.
| Parâmetro | Valor |
|---|---|
| Número do modelo | APH10CE |
| Capacidade de refrigeração (SACC) | 10,000 BTU |
| Capacidade de resfriamento (ASHRAE) | 15,000 BTU |
| Estimated Cooling Area | Up to 600 sq ft (approx. 55 m²) |
| Fonte de energia | 115 V / 60 Hz |
| Consumo de energia nominal | 1300W / 11.6A |
| Capacidade de desumidificação | 90 pints / dia |
| Nível de ruído | 64 dB |
| Dimensões (C x L x A) | 16.54 x 17.64 x 30.39 polegadas (42.01 x 44.81 x 77.19 cm) |
| Peso unitário | 72.5 libras (32.89 kg) |
| Características especiais | Dehumidifier, Rapid Cooling, Auto-evaporation, Auto restart after power failure |
| Grelhas de ar | Auto 1-way directional |
| Drenagem | Auto-evaporation or manual |
9. Garantia e Suporte
Your AireMax APH10CE Portable Air Conditioner comes with a manufacturer's warranty. Please refer to the separate warranty information included in your package for details on coverage and terms.
For technical assistance, troubleshooting beyond this manual, or to inquire about replacement parts, please contact AireMax customer support. Contact information can typically be found on the product packaging, the official AireMax website, or the warranty document.
Please have your model number (APH10CE) and purchase date ready when contacting support.