
1. Introdução
This manual provides detailed instructions for the installation, operation, and maintenance of your SOGTICPS BL912-40A-WIFI MPPT Solar Charge Controller. This advanced charge controller is designed for off-grid solar applications, compatible with 12V/24V battery systems, including Gel, Flooded, and Lithium types. It features efficient MPPT tracking, an LCD display, dual USB outputs, and WiFi connectivity for remote monitoring.
Principais características:
- Innovative MPPT (Maximum Power Point Tracking) technology for up to 99% tracking efficiency.
- Volume do sistema automático 12V/24Vtage detecção.
- Integrated LCD display for real-time monitoring of temperature, charge current, discharge current, and power generation.
- Comprehensive system protection: over-temperature, over-current, short-circuit, open-circuit, and reverse polarity.
- Compatibility with Gel, Flooded, and Lithium battery types.
- Dual 5V 2A USB outputs for charging mobile devices.
- WiFi communication for remote parameter adjustment and monitoring via a dedicated application.
- Industrial-grade main control chip with 16AD sampprecisão.
- Two-way MOS tube anti-reverse circuit for high-power charging and low heat generation.
2. Instruções de segurança
Leia atentamente todas as instruções antes da instalação e operação. O não cumprimento destas instruções pode resultar em danos ao aparelho, ferimentos pessoais ou danos materiais.
- Certifique-se de que todas as conexões estejam firmes e corretas para evitar tensão excessiva.tagqueda e potenciais perigos.
- Instale o controlador em local interno, longe da luz solar direta, de altas temperaturas e da umidade.
- The controller generates heat during operation; ensure adequate ventilation.
- Connect the battery first, then the solar panel, and finally the load. Disconnect in the reverse order: load, solar panel, then battery.
- Do not connect any inverter directly to the load terminals of the controller.
- Certifique-se de que a tensão de circuito aberto do painel solar esteja correta.tage (Voc) não excede o volume máximo de entrada do controladortage.
- Use appropriate circuit breakers or fuses for the battery and solar panel circuits.
- Keep children away from the solar power system.
- Não tente desmontar ou reparar o controlador por conta própria. Contate pessoal qualificado para assistência técnica.
3. Produto acabadoview
The SOGTICPS BL912-40A-WIFI solar charge controller features a robust design with an intuitive LCD display and multiple connection points.

Imagem: Frente view of the SOGTICPS BL912-40A-WIFI Solar Charge Controller, highlighting its security protection features such as short-circuit, overload, overcharge, under-voltage, e sobre-voltage proteção.
Componentes:
- Tela LCD: Exibe o status e os parâmetros do sistema em tempo real.
- Botões de controle: For navigating menus and setting parameters.
- Solar Panel Input Terminals: Connect to solar panels.
- Terminais da bateria: Connect to the battery bank.
- Terminais de saída de carga: Connect to DC loads.
- Duas portas USB (5V 2A): Para carregar dispositivos externos.
- Antena WiFi: Para comunicação sem fio.
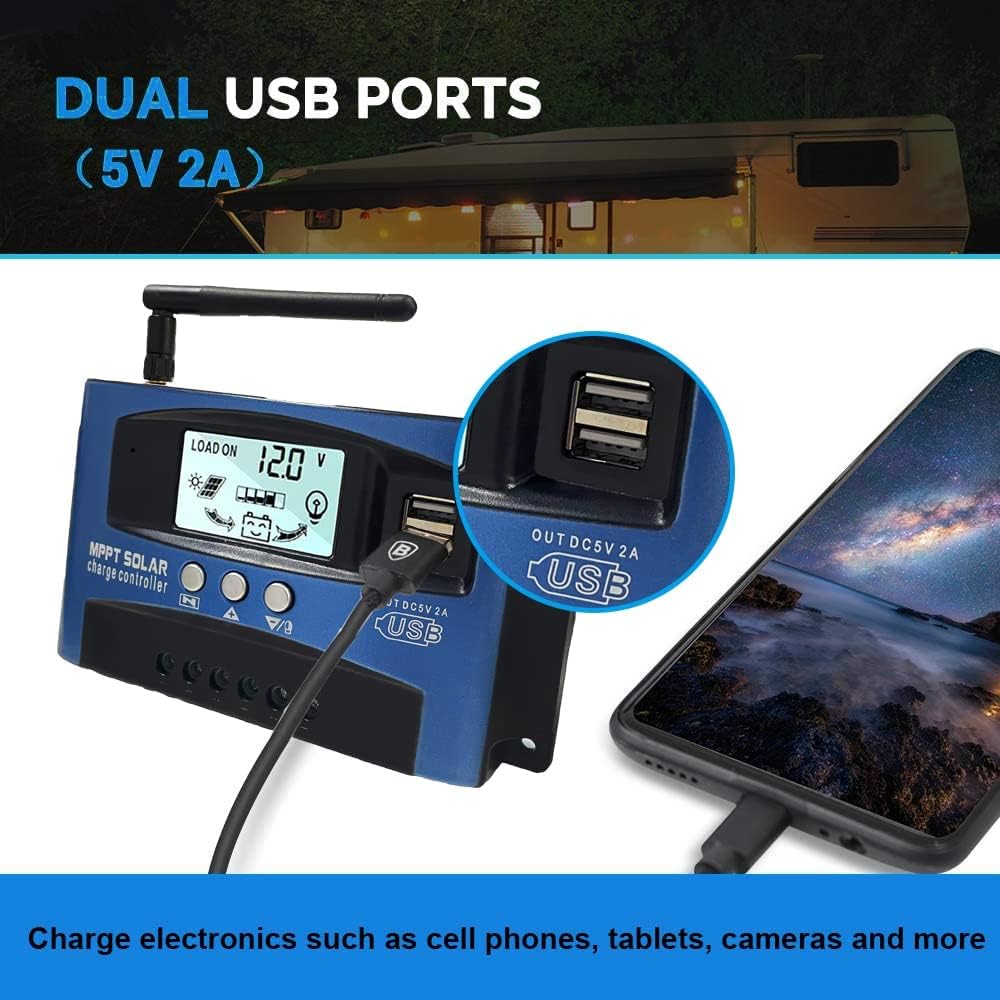
Imagem: Fechar-se view of the SOGTICPS BL912-40A-WIFI Solar Charge Controller, showing the dual 5V 2A USB ports in use, charging a smartphone.
4. Configuração e instalação
Proper installation is critical for the safe and efficient operation of your solar charge controller. Follow the connection order precisely.
Ordem de conexão:
- Connect the Battery First: Connect the battery to the charge controller's battery terminals. Ensure correct polarity (+ to + and - to -). The controller will automatically detect 12V or 24V system voltage.
- Conecte os painéis solares: Connect the solar panels to the charge controller's solar input terminals. Again, observe correct polarity.
- Connect DC Load (Optional): Connect your DC loads to the load output terminals.
Importante: When disconnecting, reverse the order: first disconnect the load, then the solar panels, and finally the battery. Failure to follow this order may damage the controller or other components.
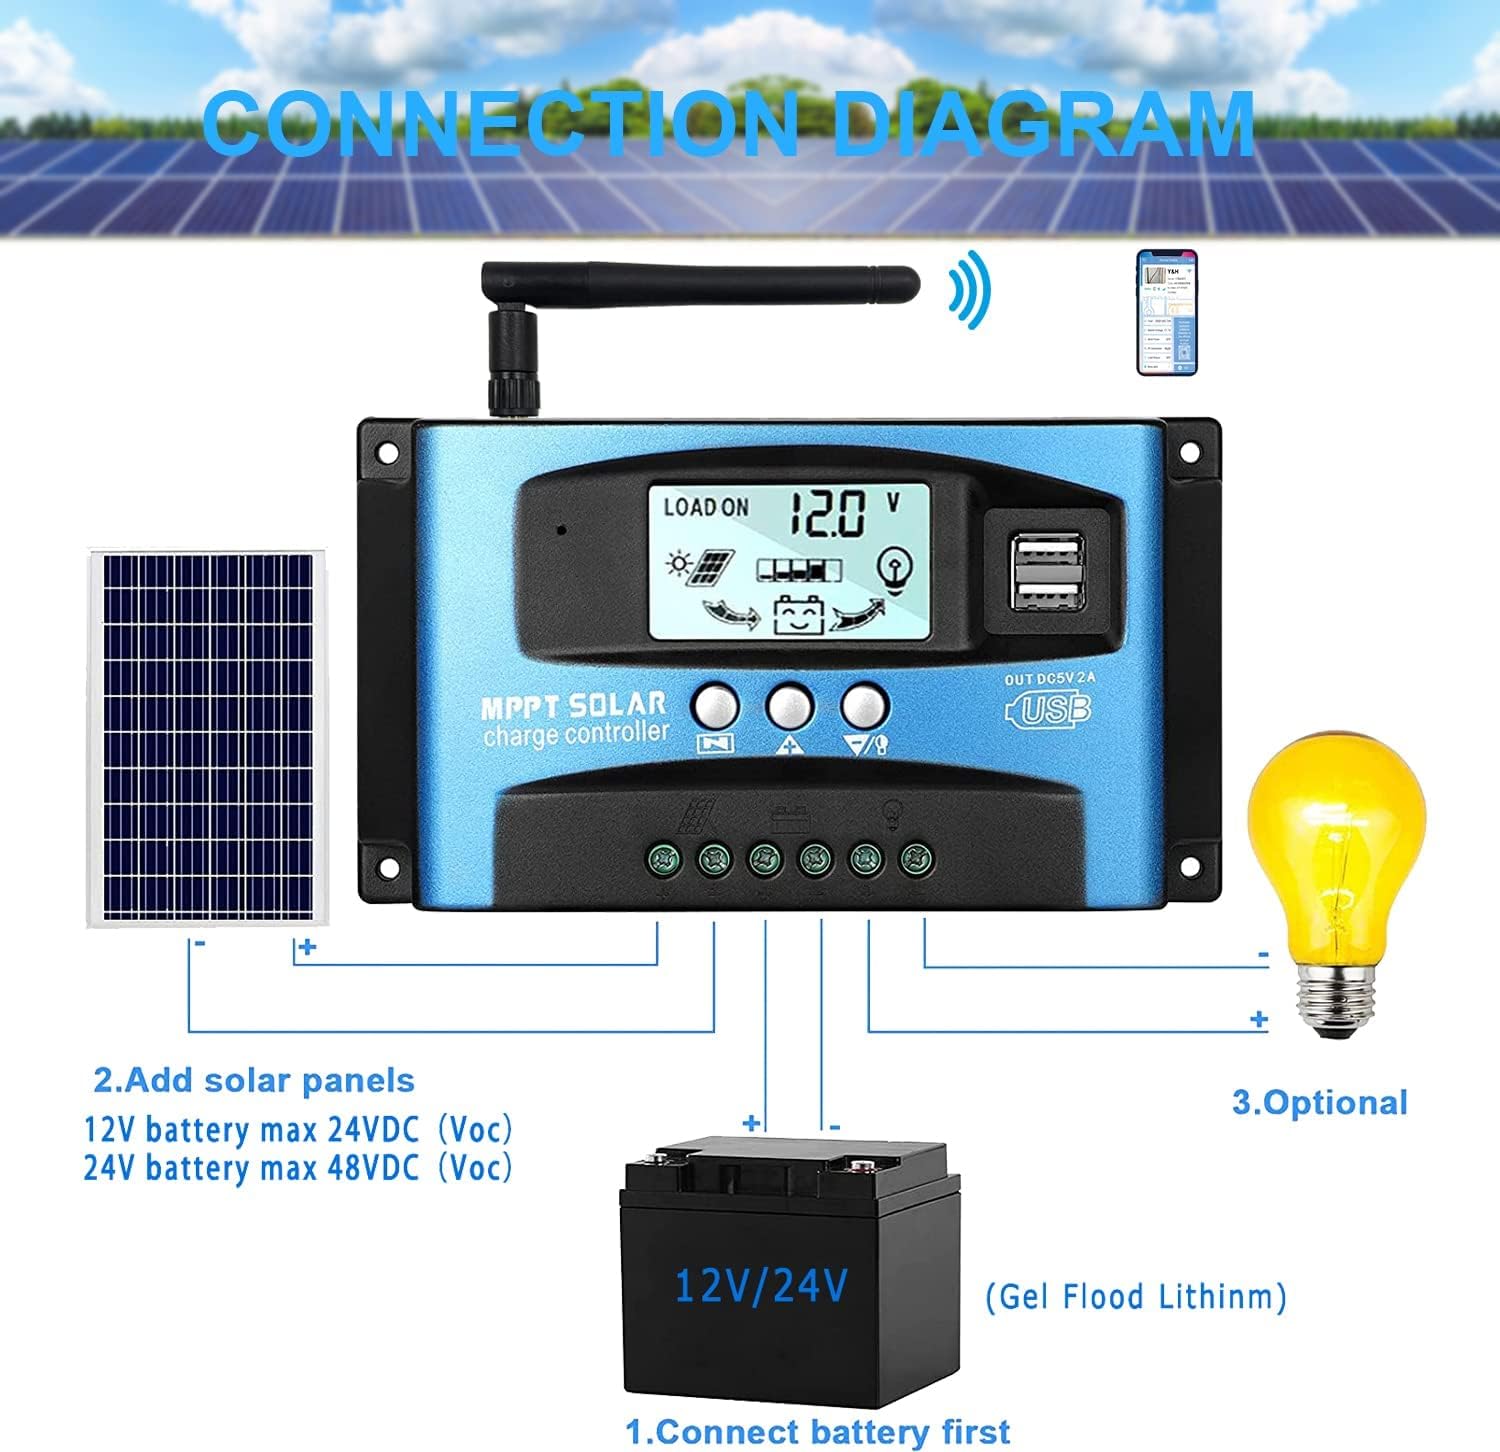
Imagem: A clear connection diagram illustrating the proper wiring sequence for the solar charge controller, connecting to a battery, solar panels, and an optional DC load. It emphasizes connecting the battery first.
Compatibilidade da bateria:
The controller is compatible with various battery types, including Gel, Flooded (Lead-Acid), and Lithium batteries. Ensure the correct battery type is selected in the controller settings for optimal charging.

Imagem: Visual representation showing the SOGTICPS BL912-40A-WIFI Solar Charge Controller's compatibility with Gel, Flooded, and Lithium battery types, indicated by arrows pointing between battery icons and the controller.
5. Instruções de operação
LCD Display and Navigation:
The LCD provides real-time information about your solar system. Use the control buttons to navigate through the display interfaces and adjust parameters.

Imagem: A series of LCD screen captures demonstrating the browsing interface and parameter setting process for the SOGTICPS BL912-40A-WIFI Solar Charge Controller. It shows main display, float voltage, reconexão de descarga, parada de descarga, modo de trabalho de carga, tipo de bateria e exibição de parâmetros de trabalho.
- Browsing Interface: Pressione o MENU button to cycle through different display interfaces, showing information such as main display, float voltage, descarga reconectar voltage, volume de parada de descargatage, load work mode, battery type, and other work parameters.
- Parâmetros de configuração: In interfaces 2-8, press the MENU botão para entrar no modo de configuração. Use o UP e ABAIXO buttons to adjust the values. Press MENU Novamente, confirme e saia do modo de configuração.
Monitoramento de Wi-Fi:
The controller supports WiFi connectivity, allowing you to monitor and control your solar system remotely via a smartphone application.

Imagem: The SOGTICPS BL912-40A-WIFI Solar Charge Controller shown alongside a smartphone displaying its monitoring application interface. This illustrates the wireless monitoring capability of the PV system.
- Instalação do aplicativo: Download the dedicated application for your smartphone (Android). Refer to the QR code or instructions provided with the product for app download.
- Conexão: Follow the in-app instructions to connect your controller to your local WiFi network.
- Monitoramento Remoto: Uma vez conectado, você pode view real-time data such as temperature, charge current, discharge current, accumulated power generation, battery voltage, and adjust charging modes from anywhere.
6. Manutenção
A manutenção regular garante a longevidade e o desempenho ideal do seu controlador de carga solar.
- Verifique as conexões: Inspecione periodicamente todas as conexões da fiação para garantir que estejam firmes e livres de corrosão.
- Controlador limpo: Mantenha o controlador limpo e livre de poeira e detritos. Use um pano seco para a limpeza.
- Ventilação: Ensure the installation area has adequate ventilation to prevent overheating.
- Inspeção da bateria: Regularly check battery terminals for corrosion and ensure battery fluid levels (for flooded batteries) are correct.
- Monitoramento do sistema: Use the LCD display or the WiFi app to monitor system performance and identify any anomalies early.
7. Solução De Problemas
If you encounter issues with your solar charge controller, refer to the following common problems and solutions:
| Problema | Possível causa | Solução |
|---|---|---|
| Sem exibição no LCD | Bateria desconectada ou com baixa voltagemtage; polaridade inversa. | Verifique as conexões da bateria e voltage. Certifique-se da polaridade correta. |
| Bateria não carrega | Solar panels not connected; insufficient sunlight; faulty solar panel; incorrect battery type setting. | Check solar panel connections and ensure adequate sunlight. Verify solar panel functionality. Confirm battery type setting. |
| Carregar não está funcionando | Load disconnected; battery low voltage protection; overload protection. | Check load connections. Charge battery. Reduce load or check for short circuits. |
| WiFi app issues (connection/language) | Incorrect WiFi setup; app region/language settings; firmware issues. | Ensure correct WiFi network and password. Check app settings for language. Contact support if issues persist. |
8. Especificações
| Parâmetro | Valor |
|---|---|
| Modelo | BL912-40A-WIFI |
| Corrente de carga nominal | 40 UMA |
| Vol do Sistematage | 12V/24V Auto-detection |
| Max PV Input Power (12V) | 480 W |
| Max PV Input Power (24V) | 960 W |
| Painel solar recomendado Vol.tage | 18V for 12V battery; 36V for 24V battery |
| Autoconsumo | <10mA |
| Temperatura de operação | -14 °F a 140 °F (-10 °C a 60 °C) |
| Tipo de exibição | LCD |
| Saída USB | Dual 5V 2A |
| Comunicação | Wi-fi |
| Dimensões (Pacote) | 18 x 11 x 5 cm |
| Peso (Pacote) | 330 gramas |
| Referência do fabricante | 2-BL912-40A-WIFI-DE |
| UPC | 732246237116 |
9. Garantia e Suporte
For warranty information and technical support, please refer to the documentation included with your purchase or contact SOGTICPS customer service. Keep your purchase receipt as proof of purchase.