1. Introdução
Thank you for choosing the Goshyda Portable Multimedia 1080P Projector. This compact and versatile device is designed to provide a personal cinema experience, supporting various multimedia inputs for entertainment, presentations, and more. Please read this manual carefully before using the projector to ensure proper operation and to maximize its lifespan.

Image 1.1: The Goshyda YG300 Mini Portable Projector in a home entertainment setting.
2. Informações de segurança
- Fonte de energia: Use only the specified 5V 2A power adapter or a compatible power bank. Incorrect voltage pode danificar o dispositivo.
- Ventilação: Não obstrua as aberturas de ventilação. Garanta uma circulação de ar adequada ao redor do projetor para evitar o superaquecimento.
- Ambiente: Avoid exposing the projector to water, moisture, dust, or extreme temperatures. Operate in a clean, dry environment.
- Limpeza: Desligue a energia antes de limpar. Use um pano macio e seco. Não use produtos de limpeza líquidos ou em aerossol.
- Desmontagem: Não tente desmontar ou reparar o projetor por conta própria. Encaminhe todos os serviços de manutenção a pessoal qualificado.
- Proteção para os olhos: Não olhe diretamente para a lente do projetor quando a lente estiver ligada.amp está ligado.
3. Conteúdo da embalagem
Por favor, verifique o conteúdo da embalagem ao desembalar. Se algum item estiver faltando ou danificado, entre em contato com o vendedor.
- Goshyda Portable Projector
- Controle remoto
- Cabo AV
- Adaptador de energia
- Manual do usuário (este documento)

Image 3.1: Included accessories with the Goshyda Portable Projector.
4. Produto acabadoview
4.1. Recursos do projetor
- 1080P Resolution Support: Produz imagens nítidas e detalhadas.
- Design compacto e portátil: Weighing approximately 290g, it is easy to carry.
- Multi-Port Connectivity: Includes USB, HDMI, AV, memory card slot, and audio output.
- Alto-falantes embutidos: Provides integrated audio for convenience.
- Energia flexível: Can be powered by a 5V 2A wall charger or power bank.

Image 4.1: Visual representation of the projector's main features.
4.2. Projector Ports and Controls
Familiarize yourself with the various ports and controls on your projector.
- Lente: Front-facing projection lens.
- Anel de foco: Ajusta a nitidez da imagem.
- Power Input (DC IN): Connects to the 5V 2A power adapter.
- Porta HDMI: Para conectar dispositivos através de um cabo HDMI.
- Porta USB: Para conectar dispositivos de armazenamento USB.
- Porta AV: For connecting devices via AV cable.
- Slot para cartão MicroSD: For inserting a memory card.
- Saída de áudio: Para conectar alto-falantes externos ou fones de ouvido.
- Botões de controle: On the top panel for basic navigation and selection.

Imagem 4.2: Lateral view of the projector highlighting its connectivity ports.

Image 4.3: Close-up of the projector lens.
5. Configuração
5.1. Conexão de energia
- Connect the provided power adapter to the DC IN port on the projector.
- Conecte o adaptador de alimentação a uma tomada elétrica padrão.
- Alternatively, for portable use, connect a 5V 2A power bank to the DC IN port.

Image 5.1: Powering the projector via wall adapter or power bank.
5.2. Posicionamento e Projeção
Place the projector on a stable, flat surface. The optimal projection distance is between 1 to 2.5 meters, allowing for a screen size of up to 60 inches.
- For a 24-inch screen, place the projector approximately 0.8 meters away.
- For a 47-inch screen, place the projector approximately 1.2 meters away.
- For a 60-inch screen, place the projector approximately 1.6 meters away.
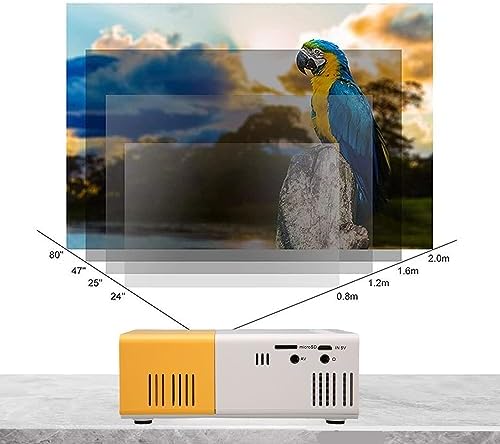
Image 5.2: Projection distance guidelines for various screen sizes. Note: Maximum recommended projection size is 60 inches.
5.3. Ajuste de foco
After placing the projector and powering it on, rotate the focus ring located around the lens until the projected image appears clear and sharp.
6. Instruções de operação
6.1. Ligar/desligar
- Ligar: Pressione o botão liga/desliga no projetor ou no controle remoto.
- Desligar: Pressione o botão liga/desliga novamente. O projetor será desligado.
6.2. Seleção da fonte de entrada
Use the 'Source' button on the remote control or the projector's control panel to cycle through available input sources (HDMI, USB, AV, MicroSD).
6.3. Menu de Navegação
Use the arrow buttons on the remote control or projector to navigate through menus. Press 'OK' or 'Enter' to confirm selections. Use the 'Return' or 'Back' button to go back to the previous menu.
7. Conectividade
The projector offers multiple connectivity options for various devices.

Image 7.1: Connectivity options for the Goshyda projector.
7.1. Conexão HDMI
Connect devices such as laptops, TV Sticks, game consoles (e.g., for Xbox One), or Blu-ray players using an HDMI cable. Select 'HDMI' as the input source.
7.2. Conexão USB
Insira um pen drive na porta USB para reproduzir conteúdo multimídia. files directly. Select 'USB' as the input source and navigate through your files.
7.3. Conexão AV
Use the provided AV cable to connect older devices like DVD players. Select 'AV' as the input source.
7.4. Conexão de Smartphone/Tablet
To connect directly to your smartphone or tablet, you will need an appropriate adapter (e.g., Micro USB to HDMI, Type-C to HDMI, or a dedicated HD multimedia interface device), depending on your device's operating system (OS X or Android) and available ports. These adapters are sold separately.
7.5. Saída de áudio
Connect external speakers or headphones to the audio output port for enhanced sound.
8. Manutenção
- Limpeza de lentes: Use um pano macio e sem fiapos, próprio para lentes ópticas, para limpar delicadamente a lente do projetor. Não utilize materiais abrasivos ou produtos químicos agressivos.
- Limpeza externa: Limpe a parte externa do projetor com um pano macio e seco.
- Armazenar: Quando não estiver em uso por longos períodos, guarde o projetor em local fresco e seco, longe da luz solar direta e da poeira.
9. Solução De Problemas
| Problema | Possível causa | Solução |
|---|---|---|
| Sem energia | Power adapter not connected or faulty; insufficient power supply. | Ensure the 5V 2A power adapter is securely connected and plugged into a working outlet. Try a different power source or power bank. |
| Nenhuma imagem | Incorrect input source selected; cable not connected properly; device not outputting signal. | Select the correct input source (HDMI, USB, AV). Check all cable connections. Ensure the connected device is powered on and outputting a signal. |
| A imagem está borrada | Foco não ajustado; projetor muito perto/longe da tela. | Rotate the focus ring to sharpen the image. Adjust the projection distance within the recommended range (1-2.5m). |
| Sem som | Volume too low or muted; external speakers not connected; audio format not supported. | Increase the volume on the projector and the source device. Check if external speakers are properly connected. Ensure the audio format is supported. |
10. Especificações
| Recurso | Detalhe |
|---|---|
| Marca | Goshyda |
| Número do modelo | Goshyda89pkbg17g0 |
| Resolução de exibição | 1920 x 1080 (1080P Support) |
| Brilho | 200 Lúmens |
| Proporção da tela | 4:3 |
| Distância de projeção | 1 a 2.5 metros |
| Tamanho da projeção | Até 60 polegadas |
| Tecnologia de Conectividade | HDMI, USB, AV, MicroSD, Audio Out |
| Entrada de energia | 5V 2A |
| Tipo de exibição | LCD |
| Dimensões do produto | 12L x 8.5W x 4.6H cm (Approx. 4.7 x 3.3 x 1.8 inches) |
| Fator de forma | Portátil |
| Tipo de montagem | Montagem de mesa |
11. Garantia e Suporte
For warranty information and customer support, please refer to the documentation provided with your purchase or contact your retailer directly. Keep your proof of purchase for warranty claims.