LWLONGWEI PDS-3010G
LWLONGWEI PDS-3010G DC Power Supply User Manual
Model: PDS-3010G
1. Introdução
This manual provides essential information for the safe and effective operation of your LWLONGWEI PDS-3010G DC Power Supply. Please read this manual thoroughly before use and retain it for future reference.
1.1 O que está incluído
- 1 x LWLONGWEI PDS-3010G Variable DC Power Supply
- 1 set of Output Power Cords (banana plug to alligator clip)
- 1 x Input Power Cord
- 1 x Manual do Usuário
1.2 Precauções de segurança
- Certifique-se de que a fonte de alimentação esteja devidamente aterrada.
- Não opere em ambientes úmidos ou secosamp condições.
- Verifique o volume de entradatage switch (110V/220V) on the rear panel is set correctly for your local power grid before connecting the power cord. Incorrect setting can cause damage.
- Evite curto-circuito nos terminais de saída.
- Não abra o casing; there are no user-serviceable parts inside except for the fuse, which should only be replaced by qualified personnel.
- Garanta ventilação adequada ao redor da unidade para evitar superaquecimento.
2. Produto acabadoview
The LWLONGWEI PDS-3010G is a high-precision, adjustable switching regulated DC power supply offering 0-30V and 0-10A output. It features a 4-digit LED display for accurate voltage, current, and power readings, along with coarse and fine adjustment knobs for precise control.

Figure 2.1: Front Panel Functions
This image illustrates the front panel of the PDS-3010G power supply. It highlights the 4-digit LED displays for voltage, current, and power, along with indicator lights for Constant Voltage (C.V.) and Constant Current (C.C.) modes. The panel also shows the coarse and fine adjustment knobs for both voltage and current, a 5V/2A USB charging interface, and the output terminals (negative, grounding, positive).
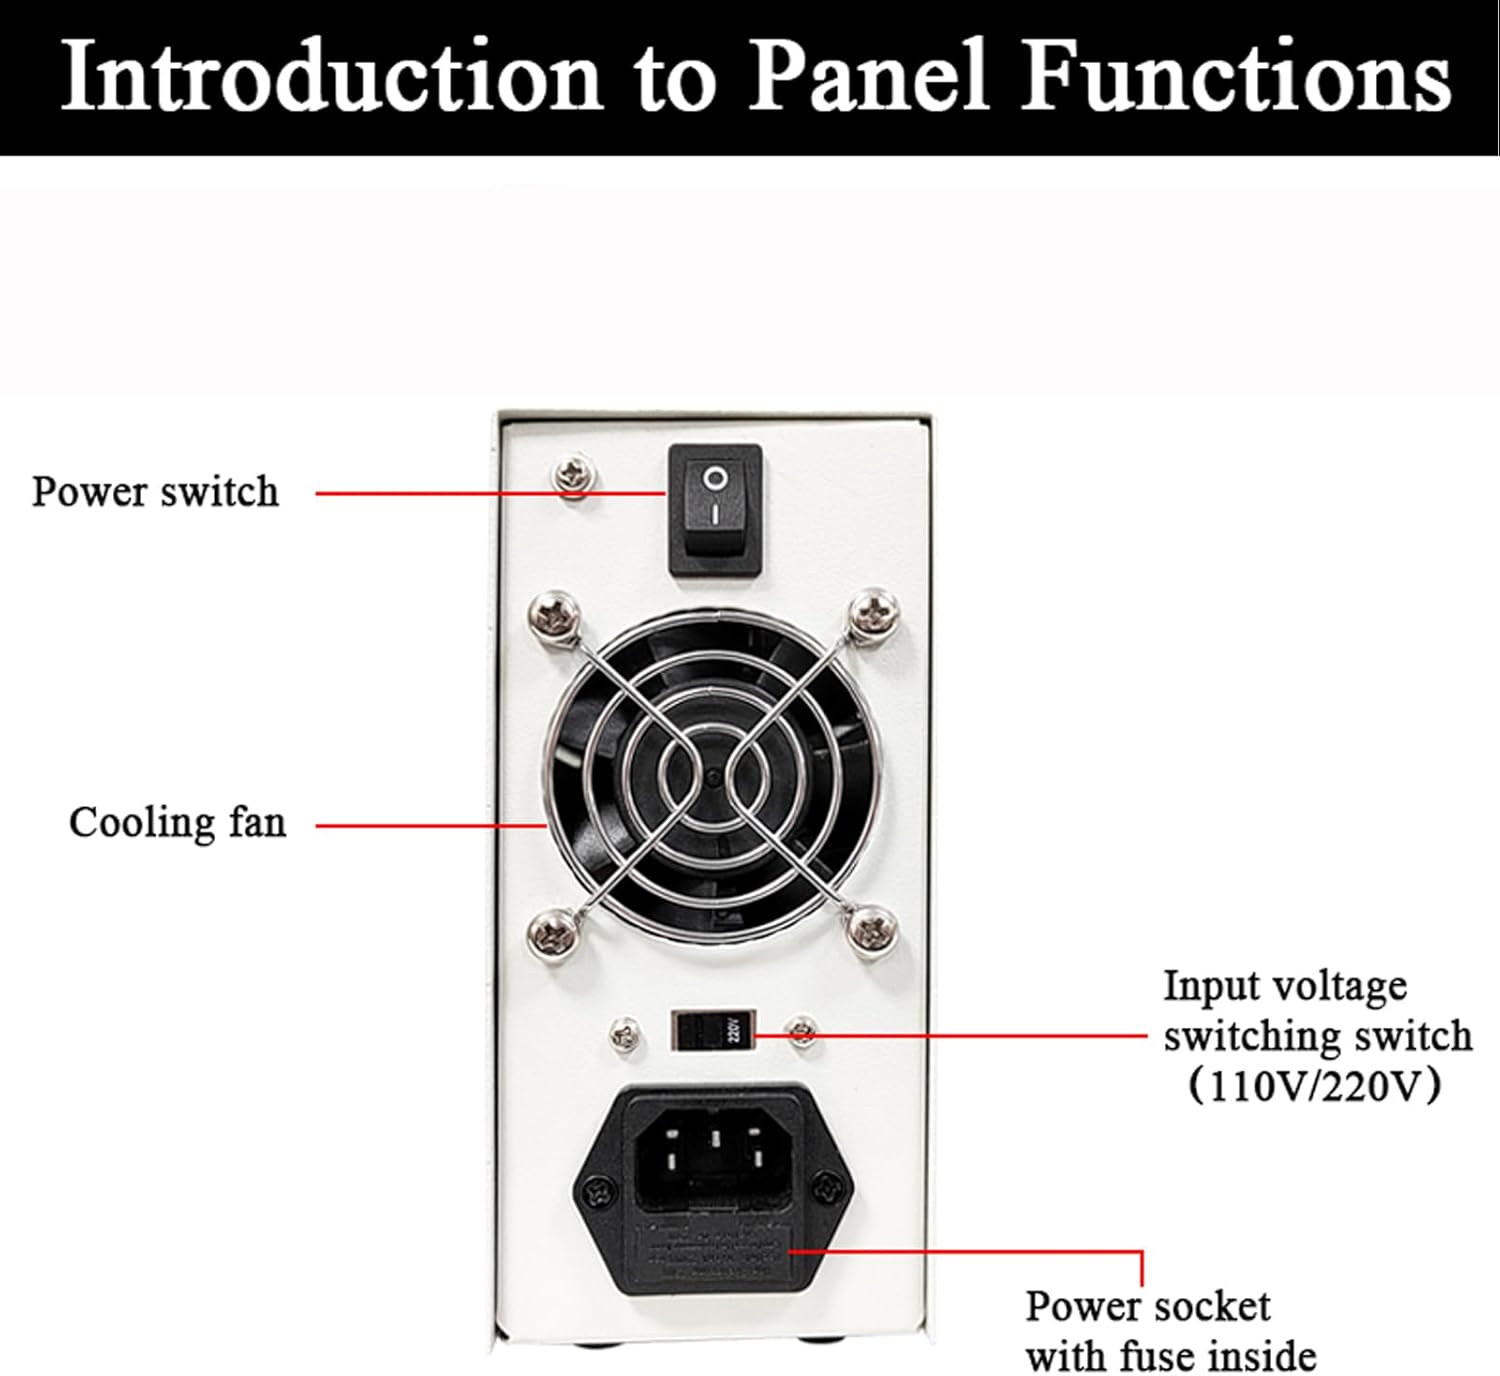
Figure 2.2: Rear Panel Functions
This image displays the rear panel of the PDS-3010G power supply. Key components identified include the main power switch, the cooling fan for thermal management, the input voltage switching switch (110V/220V) which must be set correctly, and the power socket with an internal fuse.
2.1 Controles e Indicadores do Painel Frontal
- Volumetage Exibição: 4-digit LED display showing the output voltage em Volts (V).
- Exibição atual: 4-digit LED display showing the output current in Ampéres (A).
- Exibição de energia: 4-digit LED display showing the output power in Watts (W).
- C.V. Indicator Light: Illuminates when the unit is operating in Constant Voltagmodo e.
- C.C. Indicator Light: Illuminates when the unit is operating in Constant Current mode.
- V-COARSE / V-FINE Knobs: Coarse and fine adjustment knobs for setting the output voltage.
- A-COARSE / A-FINE Knobs: Coarse and fine adjustment knobs for setting the output current limit.
- USB 5V/2A Interface: Provides a fixed 5V, 2A output for charging devices.
- Terminais de saída: Black (Negative), Yellow (Grounding), Red (Positive) terminals for connecting the load.
2.2 Componentes do painel traseiro
- Interruptor de alimentação: Main switch to turn the unit ON or OFF.
- Ventilador de resfriamento: Activates automatically to dissipate heat when the internal temperature exceeds 50°C (122°F).
- Vol de entradatage Switching Switch (110V/220V): Seleciona o volume de entrada apropriadotage para sua região. Ensure this is set correctly before connecting to power.
- Tomada de energia: For connecting the input power cord. Contains an internal fuse.
Vídeo 2.1: Produto em Excessoview
Este vídeo fornece uma breve visão geral sobreview of the LWLONGWEI PDS-3010G DC Power Supply, showcasing its front and rear panels, input voltage selection, USB charging capability, and certifications. It highlights key features and components of the device.
3. Configuração
- Colocação: Place the power supply on a stable, level surface with adequate ventilation. Ensure no obstructions block the cooling fan on the rear panel.
- Vol de entradatage Seleção: Locate the red input voltage switching switch on the rear panel (refer to Figure 2.2). Use a small tool to set it to either 110V or 220V, matching your local power grid. Failure to set this correctly can damage the unit.
- Conexão de energia: Connect the provided input power cord to the power socket on the rear panel and then to a grounded AC outlet.
- Conexão do cabo de saída: Connect the provided output power cords (banana plug to alligator clip) to the output terminals on the front panel. The red cable connects to the red (+) terminal, the black cable to the black (-) terminal, and the yellow cable to the yellow (ground) terminal if grounding is required for your application.
- Inicialização: Ensure all adjustment knobs (V-COARSE, V-FINE, A-COARSE, A-FINE) are turned fully counter-clockwise to their minimum settings. Flip the power switch on the rear panel to the 'ON' position. The LED displays should illuminate.
4. Instruções de operação
4.1 Configuração do Voltage e atual
- Pre-setting Current Limit (Constant Current Mode):
a. With no load connected to the output terminals, turn the A-COARSE and A-FINE knobs clockwise to set the desired maximum current limit. The C.C. indicator may light up, and the current display will show the set limit.
b. Turn the V-COARSE and V-FINE knobs clockwise to set the desired output voltage. The C.V. indicator should light up. - Conectando a Carga: Connect your device or circuit to the output terminals using the output power cords. Ensure correct polarity.
- Operação:
a. If the load draws less current than the pre-set limit, the unit will operate in Constant Voltage (C.V.) mode, and the C.V. indicator will be lit. The voltage display will show the set voltage, and the current display will show the actual current drawn by the load.
b. If the load attempts to draw more current than the pre-set limit, the unit will automatically switch to Constant Current (C.C.) mode, and the C.C. indicator will be lit. The current display will show the pre-set current limit, and the voltagO display mostrará o volumetage across the load at that current. - Adjusting During Operation: You can adjust voltage and current limits during operation using the respective coarse and fine adjustment knobs. Use fine adjustment for precise tuning.
4.2 Using the USB 5V/2A Interface
The USB port on the front panel provides a fixed 5V, 2A output. This can be used to charge compatible USB devices or power small electronics. Simply connect your USB device to this port.
5. Manutenção
5.1 Limpeza
To clean the unit, disconnect it from all power sources and loads. Use a soft, dry cloth to wipe the exterior. Do not use abrasive cleaners or solvents. Ensure no liquids enter the unit.
5.2 Sistema de Resfriamento
The PDS-3010G features an intelligent temperature control cooling fan. The fan will activate automatically when the internal working temperature exceeds 50°C (122°F) to maintain optimal operating conditions and prolong the product's lifespan. Ensure the rear fan grille remains clear of dust and obstructions.

Figure 5.1: Intelligent Temperature Control Fan
This image highlights the rear panel of the power supply, emphasizing the intelligent temperature control fan. The fan is designed to reduce noise and extend its lifespan by adjusting speed based on load and internal temperature, ensuring efficient heat dissipation.
6. Solução De Problemas
- Sem energia:
a. Check if the input power cord is securely connected to both the unit and the AC outlet.
b. Verify the power switch on the rear panel is in the 'ON' position.
c. Ensure the input voltagA chave seletora (110V/220V) está configurada corretamente para a sua região.
d. Check the internal fuse. If blown, it indicates an issue and should be replaced by qualified personnel with a fuse of the same rating. - Sem Volume de Saídatage/Atual:
a. Ensure the output cables are correctly connected to the terminals and the load.
b. Check if the voltage and current adjustment knobs are set above zero.
c. If the C.C. indicator is lit and current is at maximum, the load may be drawing more current than the set limit, or there might be a short circuit in the load. - Fan is Loud/Always On:
The intelligent fan activates based on internal temperature. If it runs continuously or loudly, ensure adequate ventilation around the unit and that the fan grille is not obstructed. This is normal operation under higher loads or ambient temperatures. - Leituras imprecisas:
While the unit provides high precision, for critical measurements, always verify with a calibrated external multimeter.
7. Especificações

Figure 7.1: Parameter Specifications
This image presents a detailed table of technical specifications for the LWLONGWEI PDS-3010G, including electrical parameters, environmental conditions, and physical dimensions. It also shows a side-by-side comparison of the unit with its measurements.
| Parâmetro | Valor |
|---|---|
| Marca | LWLONGWEI |
| Modelo | PDS-3010G |
| Volume de saídatage | 0-30 V ajustável |
| Corrente de saída | Ajustável de 0 a 10 A |
| Potência de saídatage | 300 W |
| Volumetage Precisão de exibição | ±0.5%FS |
| Precisão de exibição atual | ±0.5%FS |
| Volumetage Resolução | 0.01V |
| Resolução Atual | 0.01A |
| Ripples Noise | ≤0.5%FS (Valid value) |
| Volumetage Estabilidade | ≤0.5%FS |
| Estabilidade Atual | ≤0.5%FS |
| Load Stability | ≤0.5%FS |
| Fixed USB Output | 5V/2A |
| Temperatura do ambiente operacional | -10°C a 40°C |
| Operating Environment Relative Humidity | <80% |
| Temperatura das Condições de Armazenamento | -20°C a 50°C |
| Storage Conditions Relative Humidity | <70% |
| Dimensões gerais (C x L x A) | 200 x 73 x 160 mm (7.87 x 2.87 x 6.3 polegadas) |
| Peso do item | 1.5 kg (3.3 libras) |
| Método de resfriamento | Air (Intelligent Fan) |
8. Garantia e Suporte
The LWLONGWEI PDS-3010G DC Power Supply is designed for reliable operation. For warranty information or technical support, please refer to the documentation provided with your purchase or contact LWLONGWEI customer service directly. Technical support is available from LWLONGWEI.