1. Introdução
The RADEKLY Instant Print Camera for Kids is designed to provide an engaging and creative photography experience for children. This digital camera features instant black and white printing, 1080P HD video recording, and a variety of fun filters and games. This manual provides essential information for setting up, operating, and maintaining your camera.
2. O que está na caixa
Upon unboxing your RADEKLY Instant Print Camera, you should find the following components:
- 1 x RADEKLY Instant Print Camera (Model 681)
- 3 x Rolls of Thermal Print Paper (one pre-loaded)
- Cabo de carregamento 1 x USB Type-C
- 1 x Cordão
- 1 cartão Micro SD de 32 GB (pré-instalado ou incluído separadamente)
- 6 x Colorful Pens
- 1 x Sheet of Decorative Stickers
- 1 x Manual do Usuário

Figure 2.1: All components included with the RADEKLY Instant Print Camera.
Vídeo 2.1: Um excessoview of the RADEKLY Instant Print Camera and its included accessories, demonstrating the unboxing process and initial setup steps.
3. Configuração
3.1. Carregando a câmera
Before first use, fully charge the camera. Connect the provided USB Type-C cable to the camera's charging port and the other end to a compatible USB power adapter (not included) or computer. The charging indicator light will illuminate during charging and turn off when fully charged. A full charge provides approximately 2.5 hours of continuous usage.

Figure 3.1: Charging the RADEKLY Instant Print Camera via its Type-C port.
3.2. Carregando o papel de impressão
The camera uses thermal print paper for instant black and white photos. One roll is typically pre-loaded. To load or replace paper:
- Gently push up the side of the camera where the lens is located to open the paper slot.
- Insert a new roll of thermal paper into the compartment, ensuring the paper feeds out towards the top of the camera.
- Close the camera securely until it clicks into place. A small portion of paper should protrude from the top.

Figure 3.2: Steps for loading thermal print paper into the camera.
3.3. Inserindo o cartão Micro SD
The 32GB Micro SD card is typically pre-installed. If not, locate the SD card slot (usually on the side or bottom of the camera) and insert the card with the gold contacts facing down until it clicks into place. This card stores color photos and videos.
4. Instruções de operação
4.1. Ligar/desligar
Press and hold the Power/Mode button (usually marked with a power icon or 'M') for a few seconds to turn the camera on or off. The screen will display a welcome message upon startup.
4.2. Taking Photos and Instant Printing
Para tirar uma foto:
- Ensure the camera is in photo mode (indicated by an icon on the screen).
- Enquadre sua foto usando a tela de 2.4 polegadas.
- Press the Shutter button (often a large, central button) to capture the image.
The camera will instantly print a black and white version of the photo. A color version will be saved to the Micro SD card. You can also select previously taken photos from the gallery and print them again.
4.3. Gravação de vídeo
Para gravar um vídeo:
- Switch to video mode using the Mode button.
- Pressione o botão do obturador para iniciar a gravação. Pressione-o novamente para parar.
Videos are recorded in 1080P HD quality and saved to the Micro SD card.
4.4. Digital Zoom and Flash
The camera features 16X digital zoom. Use the 'Previous/Zoom In' and 'Next/Zoom Out' buttons to adjust the zoom level. The built-in flash can be activated for low-light conditions.

Figure 4.1: Demonstrating the 16X digital zoom and flash features.
4.5. Filters, Frames, and Stickers
Enhance your photos with 15 scene filters and 16 sticker options. These can be applied before taking a photo or during playback. The camera also supports various photo frames.
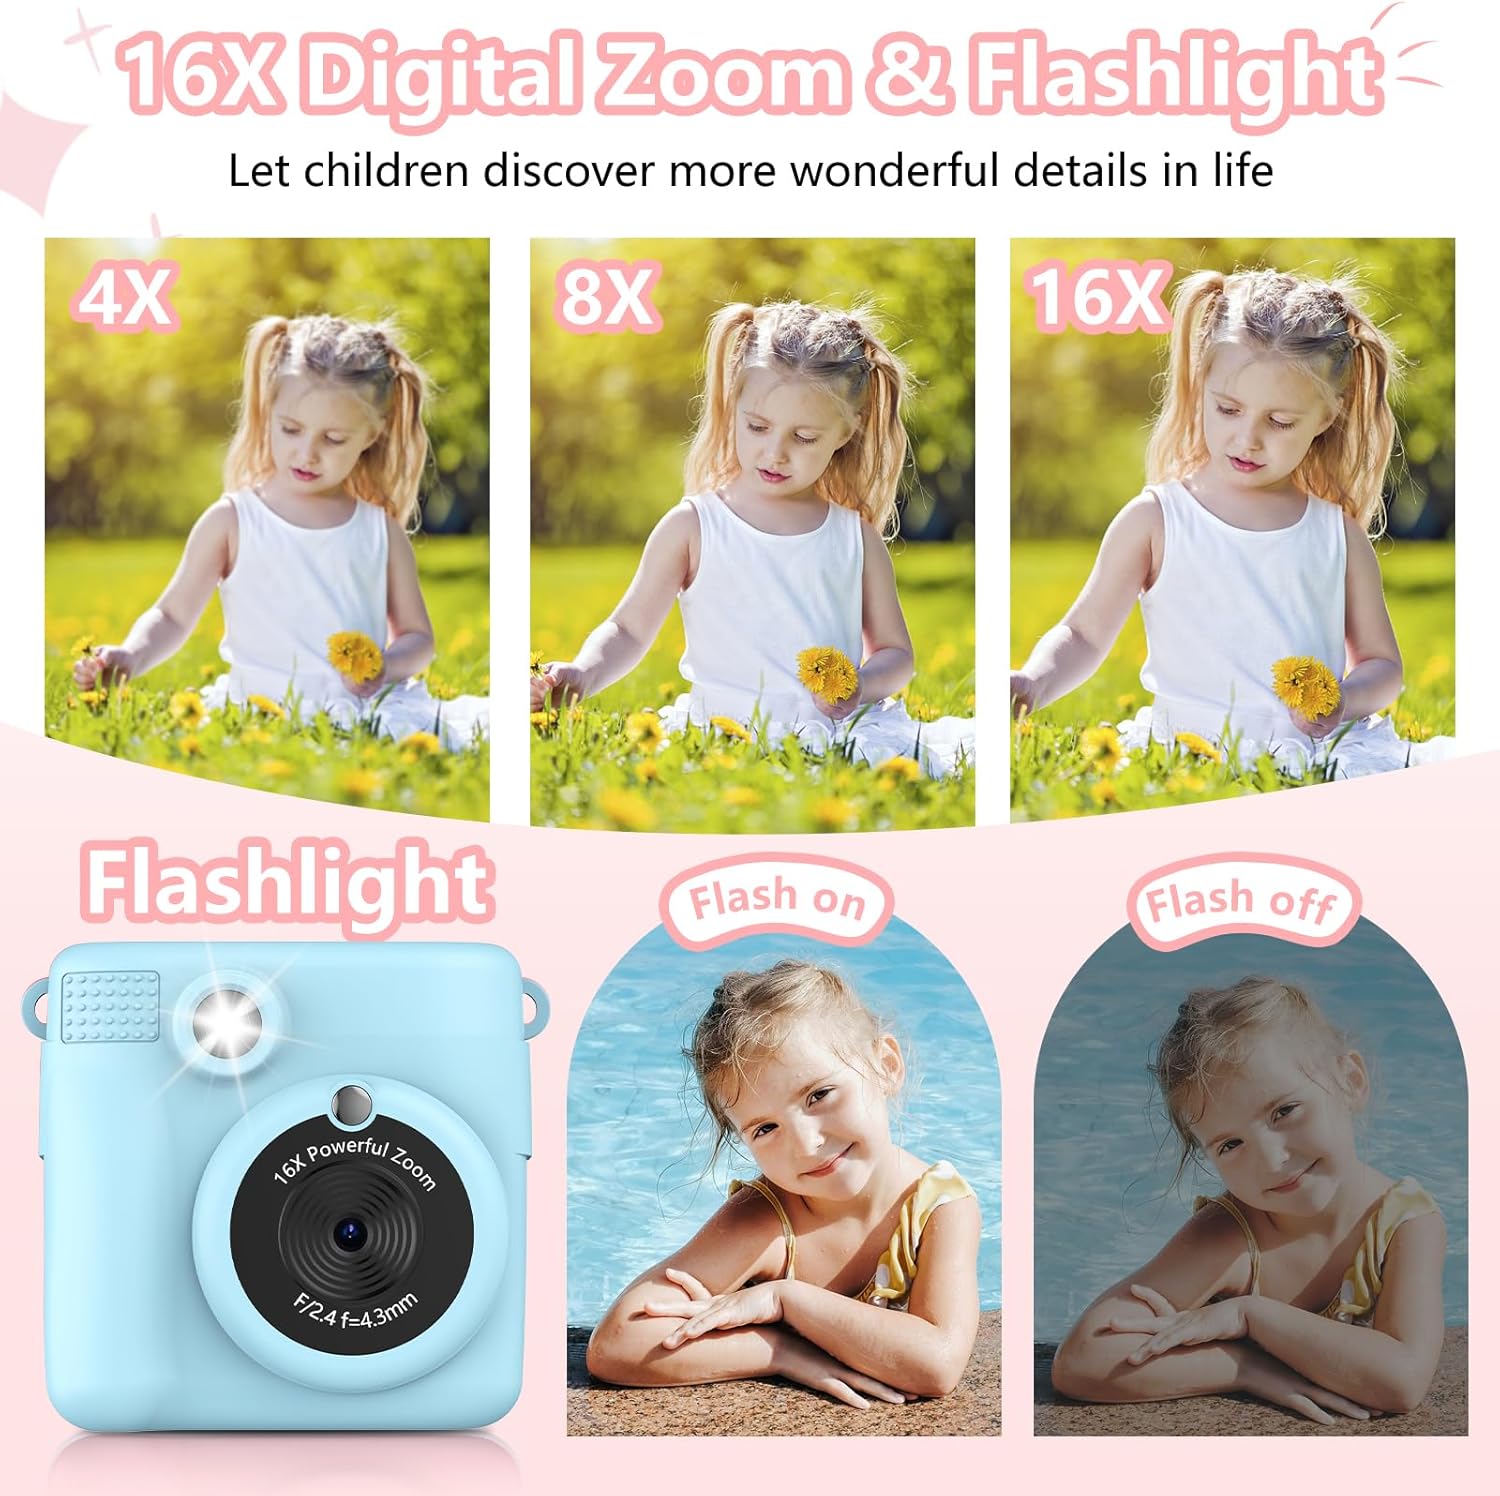
Figura 4.2: Examples of filters, mirror effects, and photo frames.
4.6. Games and MP3 Player
The camera includes built-in games for entertainment. It also functions as an MP3 player, allowing children to listen to music. Refer to the on-screen menu for game selection and MP3 playback controls.
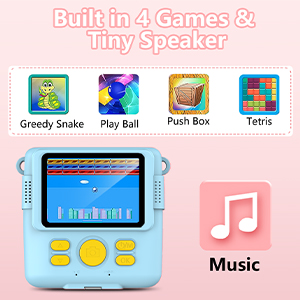
Figure 4.3: Built-in games and MP3 player interface.
4.7. Deleting Photos
To delete photos from the Micro SD card, navigate to the gallery or playback mode. Select the photo you wish to delete and follow the on-screen prompts, usually by long-pressing the 'OK' button to confirm deletion.
5. Recursos encerradosview
- Função de impressão instantânea: Produces black and white thermal prints immediately after capture.
- Vídeo de alta definição: Records videos in 1080P resolution.
- Tela grande: Features a 2.4-inch screen for viewnavegação.
- Zoom digital: Up to 16X digital zoom for capturing distant subjects.
- Opções criativas: Includes 15 scene filters, 16 sticker options, and various photo frames.
- Entretenimento: Built-in games and an MP3 player.
- Design portátil: Compact and lightweight with a lanyard for easy carrying.
- Bateria recarregável: 1000mAh Lithium Polymer battery for extended use.
- Armazenar: Comes with a 32GB Micro SD card for storing color photos and videos.

Figure 5.1: Key features of the RADEKLY Instant Print Camera.
6. Manutenção
- Limpeza: Use a soft, dry cloth to clean the camera body and screen. Avoid abrasive cleaners or solvents.
- Armazenamento de papel: Store thermal print paper in a cool, dry place away from direct sunlight to preserve its quality.
- Cuidados com a bateria: Charge the camera regularly, even if not in frequent use, to maintain battery health. Avoid extreme temperatures.
- Cartão SD: Periodically back up important photos and videos from the Micro SD card to a computer or other storage device.
7. Solução De Problemas
If you encounter issues with your RADEKLY Instant Print Camera, refer to the following common solutions:
- Câmera não liga: Ensure the battery is charged. Connect the camera to a charger and try again.
- Má qualidade de impressão: Check if the thermal paper is loaded correctly and is not damaged. Ensure the paper roll is not depleted.
- Atolamento de papel: Open the paper compartment and carefully remove any jammed paper. Re-insert the paper roll correctly.
- Não foi possível salvar fotos/vídeos: Verifique se o cartão Micro SD está inserido corretamente e se há espaço livre suficiente.
- Câmera não responde: Locate the small reset button (often a pinhole) and gently press it with a thin object (like a paperclip) to restart the camera.
8. Especificações
| Recurso | Especificação |
|---|---|
| Dimensões do produto | 3.54 x 3.54 x 2 polegadas |
| Peso do item | 4.8 onças (135 gramas) |
| Número do modelo | 681 |
| Bateria | 1 bateria de polímero de lítio (incluída) |
| Recurso especial | Impressão instantânea |
| Tipo de formato de filme | Instant |
| Componentes incluídos | Corpo e acessórios da câmera |
| Dispositivos compatíveis | Câmera |
9. Garantia e Suporte
Para informações sobre garantia ou suporte técnico, consulte a embalagem do produto ou entre em contato diretamente com o fabricante. Guarde o comprovante de compra como prova de aquisição.