1. Introdução
Thank you for choosing the Conentool 21V Cordless Impact Drill/Driver Kit. This tool is designed for various drilling and screwdriving tasks in wood, metal, plastics, and masonry. Please read this manual carefully before operating the tool to ensure safe and efficient use. Keep this manual for future reference.

Image 1.1: The Conentool 21V Cordless Impact Drill/Driver Kit, including the drill, two 2500mAh batteries, charger, and a variety of drill bits and accessories in a carrying case.
2. Instruções gerais de segurança
AVISO: Leia todos os avisos de segurança, instruções, ilustrações e especificações fornecidos com esta ferramenta elétrica. O não cumprimento de todas as instruções listadas abaixo pode resultar em choque elétrico, incêndio e/ou ferimentos graves.
2.1 Segurança da Área de Trabalho
- Mantenha a área de trabalho limpa e bem iluminada. Áreas desorganizadas ou escuras convidam a acidentes.
- Não opere ferramentas elétricas em atmosferas explosivas, como na presença de líquidos inflamáveis, gases ou poeira. Ferramentas elétricas criam faíscas que podem inflamar a poeira ou os vapores.
- Mantenha crianças e espectadores afastados enquanto estiver operando uma ferramenta elétrica. Distrações podem fazer com que você perca o controle.
2.2 Segurança elétrica
- Os plugues das ferramentas elétricas devem corresponder à tomada. Nunca modifique o plugue de forma alguma.
- Evite contato corporal com superfícies aterradas, como canos, radiadores, fogões e geladeiras. Há um risco maior de choque elétrico se seu corpo estiver aterrado.
- Não exponha ferramentas elétricas à chuva ou condições úmidas. A entrada de água em uma ferramenta elétrica aumentará o risco de choque elétrico.
2.3 Segurança Pessoal
- Use sempre proteção para os olhos. Utilize óculos de segurança, óculos de proteção ou protetor facial.
- Use protetores auriculares ao operar a ferramenta por períodos prolongados.
- Vista-se adequadamente. Não use roupas largas ou joias. Mantenha seu cabelo e roupas longe de peças móveis.
- Fique alerta, observe o que está fazendo e use o bom senso ao operar uma ferramenta elétrica.
3. Conteúdo da embalagem
Verifique se todos os itens listados abaixo estão incluídos em seu pacote. Caso algum item esteja faltando ou danificado, entre em contato com o suporte ao cliente.
- 1 x Conentool 21V Cordless Impact Drill/Driver
- 2 baterias de íon-lítio de 2500 mAh
- 1 x Carregador de bateria
- 1 x Flexible Shaft Extension
- Various Drill Bits (for wood, metal, masonry)
- Various Screwdriver Bits
- Adaptadores de soquete
- Estojo de transporte
- Manual do usuário

Imagem 3.1: Uma cobertura completaview of the kit contents, including the drill, two batteries, charger, flexible shaft, various drill bits, screwdriver bits, and socket adapters, all neatly arranged.
4. Produto acabadoview
Familiarize yourself with the main components of your drill/driver:
- Mandril: Suporta brocas e pontas de chave de fenda.
- Anel de ajuste de torque: Selects the desired torque setting.
- Anel Seletor de Modos: Switches between screwdriving, drilling, and impact drilling modes.
- Interruptor seletor de velocidade: Changes between high and low-speed gears.
- Interruptor de gatilho: Activates the tool and controls speed (variable speed).
- Seletor de marcha à frente/ré: Altera o sentido de rotação.
- Luz de trabalho LED: Ilumina a área de trabalho.
- Bateria: Fornece energia à ferramenta.
- Botão de liberação da bateria: Para remover a bateria.
- Lidar: Cabo ergonômico para uso confortável.

Imagem 4.1: Um interno view highlighting the brushless motor, which provides increased power, efficiency, and a quieter operation with no sparks.
5. Configuração
5.1 Carregando a bateria
The battery pack is not fully charged at the time of purchase. It is recommended to fully charge the battery before first use.
- Conecte o carregador a uma tomada elétrica padrão.
- Slide the battery pack onto the charger base. Ensure it clicks into place.
- The charger indicator light will show the charging status. A red light typically indicates charging, and a green light indicates a full charge.
- Depois de totalmente carregado, desconecte o carregador da tomada e remova a bateria.

Image 5.1: The battery charger connected to a wall outlet, with a battery pack inserted for charging. The red light indicates charging, and the green light indicates a completed charge.
5.2 Instalando e Removendo a Bateria
- Para instalar: Align the battery pack with the base of the tool handle and slide it in until it clicks securely into place.
- Para remover: Press the battery release button (usually located at the front of the battery) and slide the battery pack out of the tool.

Imagem 5.2: Um corte transversal view of the 2500mAh battery pack, illustrating its internal lithium-ion cells and power management system, designed for up to 90 minutes of use per battery.
5.3 Instalação e remoção de brocas/pontas de chave de fenda
- Para instalar: Rotate the chuck counter-clockwise to open the jaws. Insert the desired bit into the chuck as far as it will go. Rotate the chuck clockwise to tighten the jaws firmly around the bit.
- Para remover: Gire o mandril no sentido anti-horário para soltar as garras e puxar a broca para fora.
Ensure the bit is securely fastened to prevent it from slipping during operation.
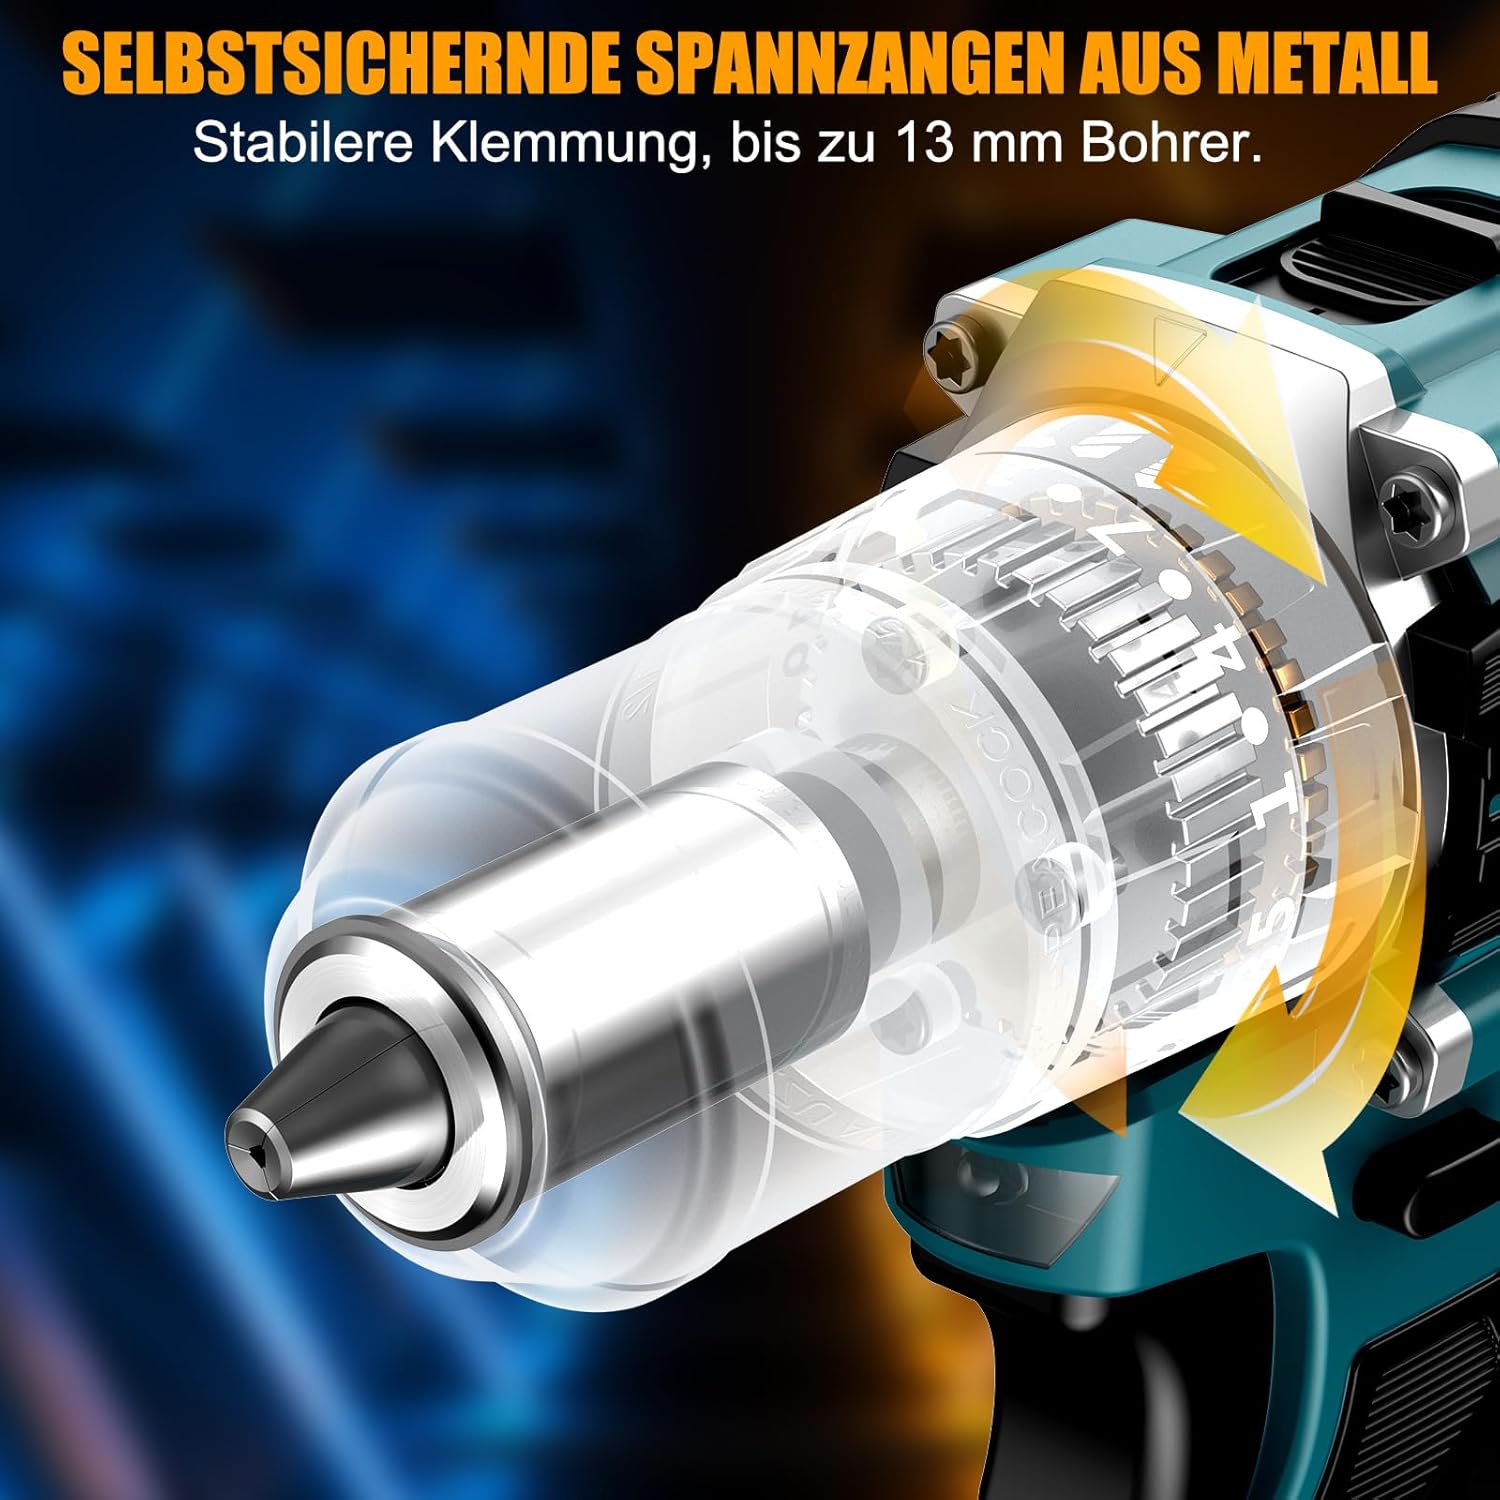
Imagem 5.3: Uma descrição detalhada view of the self-locking metal chuck, demonstrating its stable clamping mechanism capable of holding drill bits up to 13mm securely.
6. Instruções de operação
6.1 Ligar/Desligar e Controle de Velocidade
- To turn the tool ON, press the trigger switch. The speed is variable; press the trigger further for higher speed.
- Para desligar a ferramenta, solte o interruptor de gatilho.
- The integrated LED work light will illuminate when the trigger is pressed, providing visibility in dimly lit areas.
6.2 Rotação para frente/para trás
The forward/reverse selector switch is located above the trigger. Push it to the left for forward rotation (for screwdriving and drilling) and to the right for reverse rotation (for removing screws or freeing jammed bits). Ensure the tool is stopped before changing direction.
6.3 Speed Gear Selection
The drill features a 2-speed gear selector switch on top of the tool:
- Gear 1 (Low Speed, 0-650 RPM): Ideal for high-torque applications like driving large screws or drilling large holes.
- Gear 2 (High Speed, 0-1850 RPM): Suitable for fast drilling in softer materials and smaller diameter holes.
Always select the appropriate gear for the task. Change gears only when the tool is completely stopped.
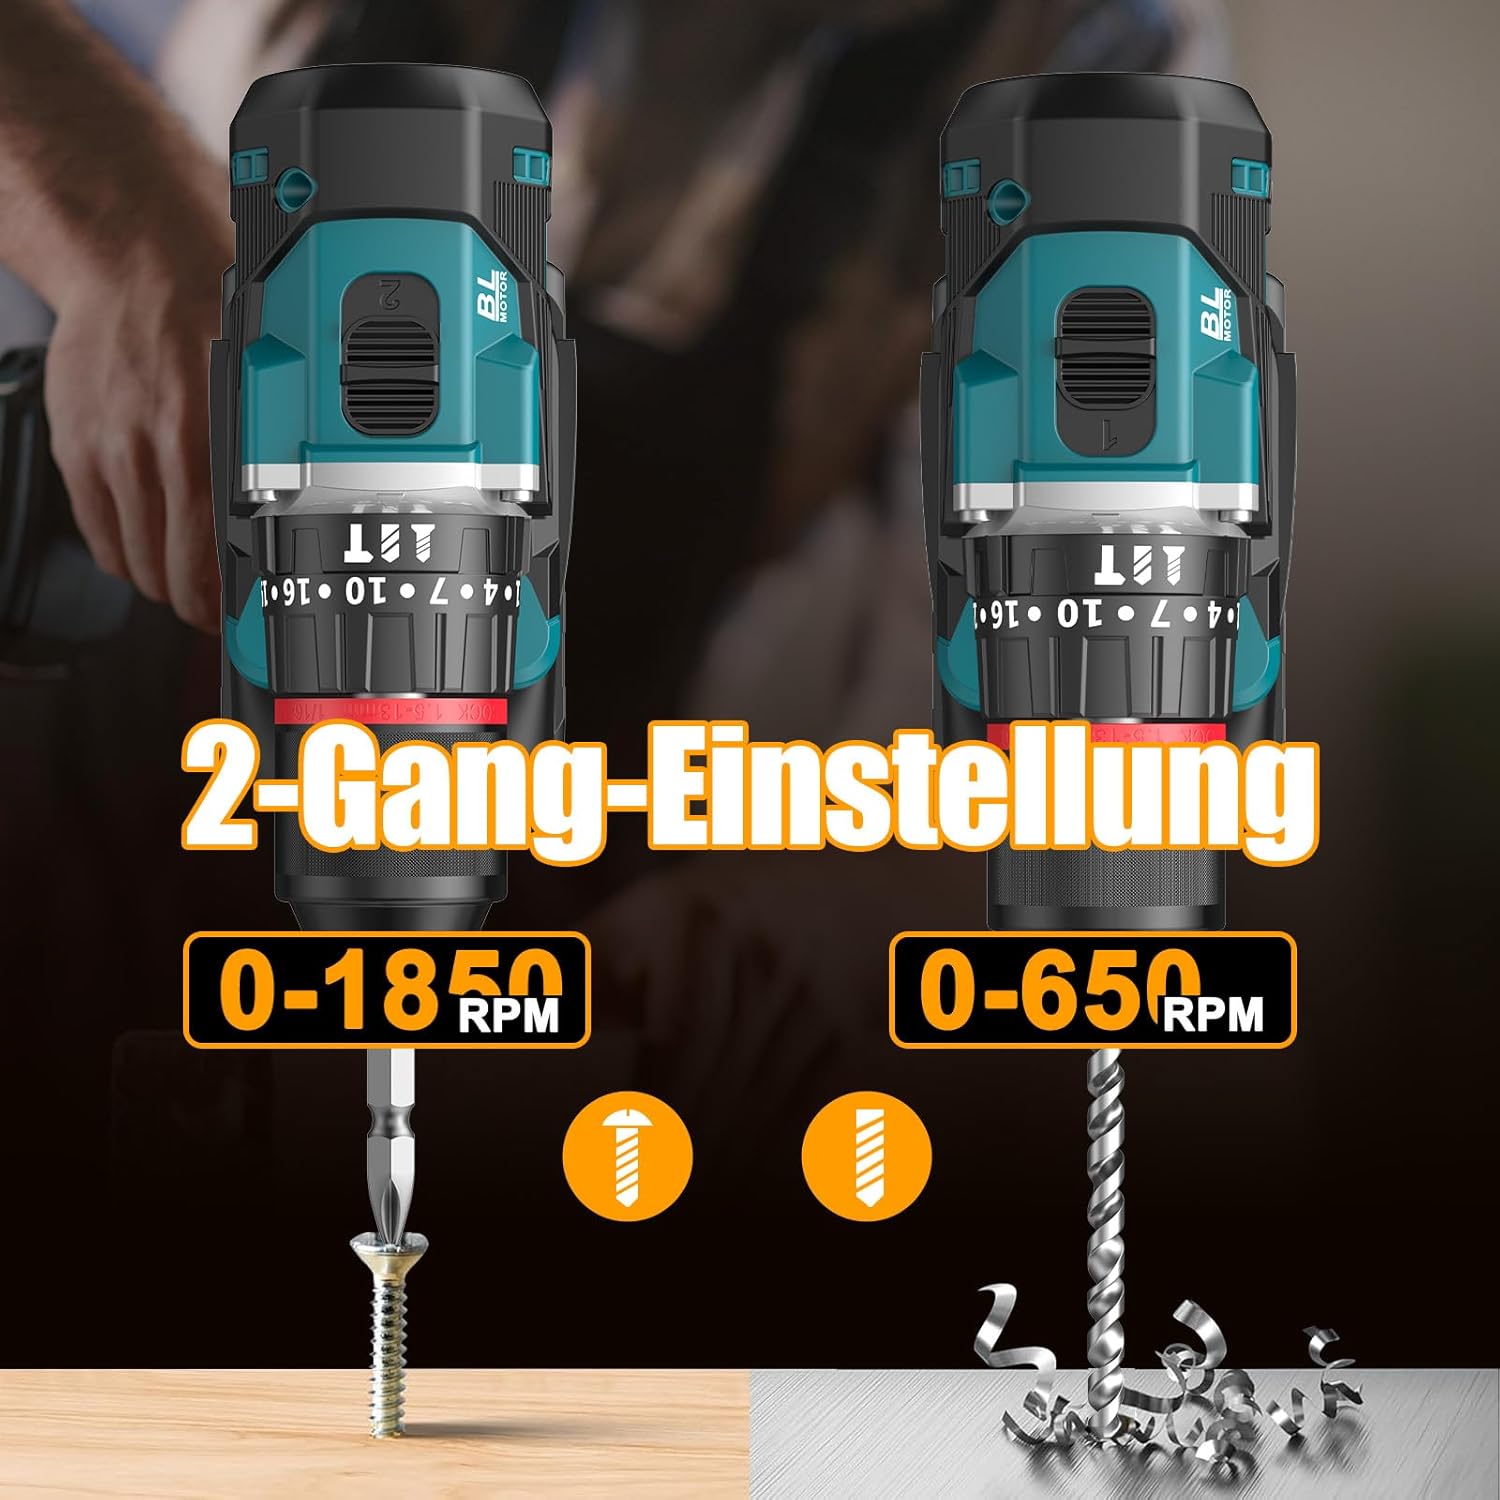
Image 6.1: An illustration demonstrating the two-speed gear settings: Gear 1 (0-650 RPM) for screwdriving and Gear 2 (0-1850 RPM) for drilling, allowing for optimal performance based on the application.
6.4 Ajuste de torque e seleção de modo
The torque adjustment ring allows you to set the desired torque for screwdriving applications, preventing overtightening or stripping screws. The mode selector ring allows you to switch between different operating modes.
- Screwdriving Mode (Torque Settings 1-35): Use these settings to match the torque to the screw size and material. Lower numbers for smaller screws/softer materials, higher numbers for larger screws/harder materials.
- Modo de perfuração (Ícone de broca): For general drilling without impact. The clutch is disengaged, providing maximum torque.
- Modo de perfuração por impacto (Ícone de martelo): For drilling into masonry or concrete, providing a hammering action in addition to rotation.
The drill offers 35+3 settings, including 35 torque settings for screwdriving and 3 modes (screwdriving, drilling, impact drilling).

Image 6.2: A visual representation of the 35+3 torque and mode settings, indicating precise power control and a maximum torque of 55 N.m, suitable for various materials like wood, brick, plastic, and metal.
7. Manutenção
7.1 Limpeza
- Desconecte sempre a bateria antes de realizar qualquer limpeza ou manutenção.
- Mantenha as aberturas de ventilação da ferramenta limpas para evitar o superaquecimento.
- Use um pano macio e macioamp pano para limpar a ferramenta casing. Não utilize produtos químicos agressivos ou produtos de limpeza abrasivos.
7.2 Armazenamento
- Guarde a ferramenta e as baterias em local fresco e seco, longe da luz solar direta e da umidade.
- Guarde a ferramenta em seu estojo para protegê-la contra poeira e danos.
- Mantenha fora do alcance de crianças.

Image 7.1: A person carrying the Conentool drill kit in its durable black carrying case, designed for convenient storage and transport of the tool and its accessories.
7.3 Cuidados com a bateria
- Do not store batteries in a discharged state. Recharge them regularly, especially if not used for extended periods.
- Evite expor as baterias a temperaturas extremas.
- Não tente desmontar ou modificar a bateria.
8. Solução De Problemas
| Problema | Possível causa | Solução |
|---|---|---|
| A ferramenta não inicia | Bateria não carregada ou instalada incorretamente. | Certifique-se de que a bateria esteja totalmente carregada e inserida corretamente. |
| Potência ou velocidade reduzidas | A carga da bateria está baixa. | Recarregue a bateria. |
| A broca escorrega no mandril | O mandril não está suficientemente apertado. | Tighten the chuck firmly around the bit. Ensure the bit shank is clean. |
| Superaquecimento | Orifícios de ventilação obstruídos; uso intenso e contínuo. | Limpe as aberturas de ventilação. Deixe a ferramenta esfriar durante o uso prolongado. |
9. Especificações
| Recurso | Especificação |
|---|---|
| Número do modelo | ebvc-sd-de |
| Volumetage | 21 Volts |
| Tipo de Bateria | Íon de lítio |
| Capacidade da bateria | 2500mAh (cada) |
| Max Torque | 55 Nm |
| Configurações de torque | 35 + 3 Modes (Screwdriving, Drilling, Impact Drilling) |
| Velocidade sem carga (1ª marcha) | 0-650 RPM |
| Velocidade sem carga (2ª marcha) | 0-1850 RPM |
| Tamanho do mandril | 13 mm (3/8 inch) Keyless |
| Dimensões do produto | 35 x 31 x 10 cm |
| Peso (com bateria) | 1.5 quilos |
10. Garantia e Suporte
Conentool products are manufactured to high-quality standards. In the unlikely event of a defect due to material or manufacturing fault, please contact your retailer or Conentool customer service. Please retain your proof of purchase for warranty claims.
For further assistance, technical support, or to inquire about spare parts, please refer to the contact information provided with your purchase or visit the official Conentool website.