
1. Introdução
This manual provides detailed instructions for the safe and efficient operation of your YITRANIC 2500W Pure Sine Wave Inverter. Please read this manual thoroughly before installation and use, and retain it for future reference.
The YITRANIC 2500W Pure Sine Wave Inverter converts 12V DC battery power to 110V AC household power, suitable for various applications including home backup, camping, and vehicle use. It features a pure sine wave output, ensuring compatibility with sensitive electronics, and includes both wireless and wired LCD remote control options.
2. Informações de segurança
AVISO: Failure to follow these safety instructions may result in electric shock, fire, serious injury, or death. Always exercise caution when working with electrical equipment.
- Não abra o inversor casing. Não existem peças internas que possam ser reparadas pelo usuário.
- Garanta ventilação adequada ao redor do inversor para evitar superaquecimento.
- Connect the inverter only to a 12V DC power source. Do not connect to 24V or higher DC systems.
- Always connect the inverter to the battery terminals with correct polarity (positive to positive, negative to negative). Reverse polarity connection will damage the inverter.
- Mantenha o inversor longe de água, umidade e materiais inflamáveis.
- Do not overload the inverter. The continuous output power is 2500W, with a peak surge power of 5000W.
- Desconecte o inversor da bateria antes de realizar qualquer manutenção ou limpeza.
3. Conteúdo da embalagem
Verifique se todos os itens estão presentes na embalagem:
- YITRANIC 2500W Pure Sine Wave Inverter Unit
- 2-in-1 Remote Controller (Wireless and Wired)
- DC Battery Cables (Red and Black)
- Backup Fuses
- USB Charging Cable (for remote controller)
- Manual do usuário (este documento)

Figure 3.1: Inverter unit with DC cables, remote controller, wireless receiver, USB cable, and fuses.
4. Produto acabadoview e Características
4.1 Inverter Components

Figure 4.1: Front panel with AC outlets, USB ports, Type-C port, and remote connection. Side panel with DC input terminals and cooling fans.
- Tomadas CA: Four standard US 110V AC outlets for connecting appliances.
- Portas USB: Dual 5V/3A QC3.0 USB fast charging ports.
- Porta Type-C: One PD30W Type-C port for compatible devices.
- Interface de controle remoto: Port for wired remote connection and wireless receiver.
- Terminais de entrada CC: Red (+) and Black (-) terminals for 12V DC battery connection.
- Ventiladores de refrigeração: Dual temperature-controlled fans activate automatically when the internal temperature exceeds 45°C.
- Chave ON / OFF: Main power switch on the inverter unit.
4.2 Controle Remoto
The inverter includes a versatile 2-in-1 remote controller, offering both wireless and wired operation for convenience.
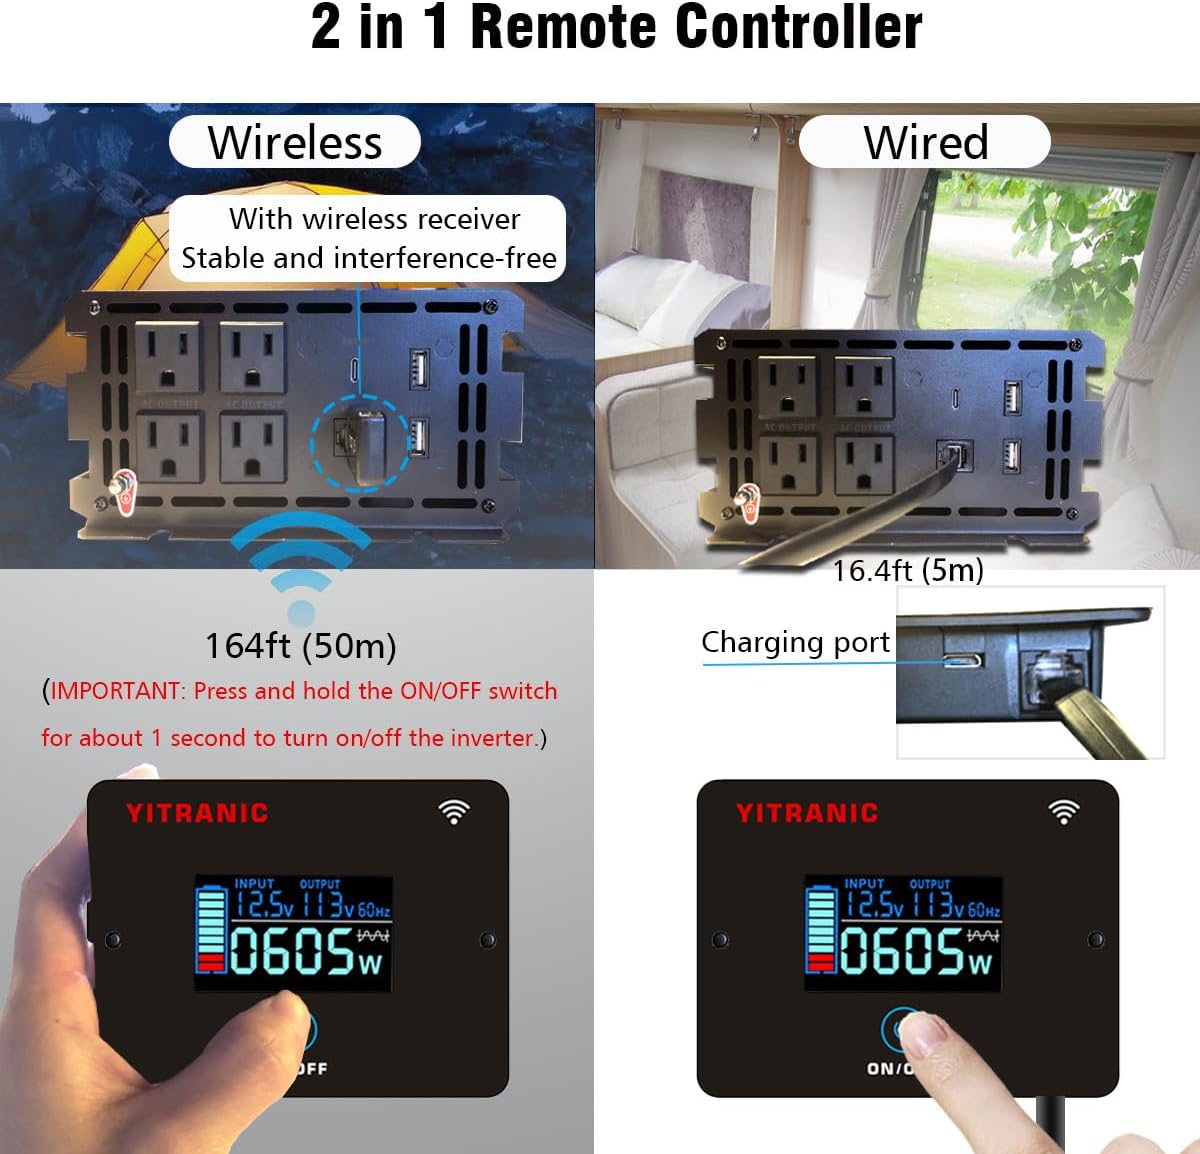
Figure 4.2: Remote controller showing wireless operation with receiver and wired connection via cable.
- Operação sem fio: Connect the wireless receiver to the inverter's remote port. The remote can operate up to 164 feet (50 meters) away.
- Operação com fio: Connect the remote directly to the inverter's remote port using the provided 16.4ft (5m) cable.
- Tela LCD: Mostra volume de entradatage, volume de saídatage, frequency, and power consumption.
- Botão ON/OFF: Press and hold for approximately 1 second to turn the inverter on or off.
- Porta de carregamento: The remote controller has a built-in rechargeable Li-Ion battery, charged via a USB cable.
4.3 Saída de Onda Senoidal Pura
This inverter produces a pure sine wave output, which is identical to the AC power supplied by utility grids. This ensures compatibility and safe operation for all types of electronic devices, including sensitive equipment like laptops, medical devices, and appliances with motors.

Figure 4.3: Pure Sine Wave compatibility with various appliances compared to modified sine wave.
4.4 Multiple Protection Features
The inverter is equipped with multiple safety features to protect both the device and connected equipment:

Figure 4.4: Visual representation of the inverter's built-in protection mechanisms.
- Proteção contra sobrecarga: Shuts down if connected load exceeds rated power.
- Proteção contra superaquecimento: Activates cooling fans and shuts down if internal temperature is too high.
- Undervoltage Proteção: Shuts down if input DC voltage cai muito baixo.
- Sobrevoltage Proteção: Shuts down if input DC voltage excede os limites de segurança.
- Proteção de conexão reversa: Protege contra a conexão incorreta da polaridade da bateria.
- Proteção contra curto-circuito: Protects against short circuits in the output.
5. Configuração e instalação
5.1 Escolha de um local de instalação
- Install the inverter in a dry, well-ventilated area, away from direct sunlight and heat sources.
- Ensure there is sufficient space around the inverter for proper airflow, especially around the cooling fans.
- Monte o inversor com segurança em uma superfície plana e estável.
5.2 Connecting to a 12V DC Battery
IMPORTANTE: Before making any connections, ensure the inverter's main ON/OFF switch is in the OFF position.
- Identify the positive (+) and negative (-) terminals on your 12V DC battery.
- Conecte o vermelho DC cable to the vermelho (+) terminal do inversor.
- Conecte a outra extremidade do vermelho DC cable to the positivo (+) terminal da bateria.
- Conecte o preto DC cable to the Preto (-) terminal do inversor.
- Conecte a outra extremidade do preto DC cable to the negativo (-) terminal da bateria.
- Certifique-se de que todas as conexões estejam firmes e seguras para evitar contatos soltos e arcos elétricos.

Figure 5.1: DC input terminals for battery connection.
5.3 Configuração do Controle Remoto
Choose between wired or wireless operation for the remote controller:
- Conexão com fio: Plug the remote cable into the "REMOTE" port on the inverter and the corresponding port on the remote controller.
- Conexão sem fio: Plug the wireless receiver into the "REMOTE" port on the inverter. The remote controller will automatically pair with the receiver. Ensure the remote controller's battery is charged using the provided USB cable.
6. Operação
6.1 Turning the Inverter On/Off
- After connecting the battery, press and hold the ON/OFF button on the inverter unit or the remote controller for approximately 1 second.
- The LCD display on the remote controller will illuminate, showing input voltage, volume de saídatage, e consumo de energia atual.
- To turn off the inverter, press and hold the ON/OFF button again for approximately 1 second.
6.2 Conectando aparelhos de corrente alternada
- Garanta o valor totaltage of all connected AC appliances does not exceed the inverter's continuous output power of 2500W.
- Plug your AC appliances into the 110V AC outlets on the inverter's front panel.
- For appliances with high starting currents (e.g., motors, refrigerators), ensure their surge wattage is within the inverter's 5000W surge capacity.
6.3 Utilizando portas USB e Type-C
- Connect your USB-powered devices to the QC3.0 USB ports for fast charging.
- Connect compatible devices to the PD30W Type-C port for power delivery charging.
6.4 Compreendendo o visor LCD
The remote controller's LCD provides real-time operational status:

Figure 6.1: LCD display indicating input voltage, volume de saídatage, power, and potential error codes (OV, LV, OT, OL, SC).
- ENTRADA: Exibe a tensão de entrada CC atual.tage da bateria.
- SAÍDA: Exibe a tensão de saída CAtage frequência (ex.: 110V 60Hz).
- O QUETAGE: Shows the real-time power consumption of connected devices in watts.
- Ícone da bateria: Indicates the approximate charge level of the remote controller's internal battery.
- Códigos de erro: The display may show codes like OV (Overvoltage), LV (Low Voltage), OT (Over Temperature), OL (Overload), SC (Short Circuit) if a protection mechanism is triggered. Refer to the Troubleshooting section for details.
7. Manutenção
- Limpeza: Periodically clean the inverter's exterior with a dry, soft cloth. Ensure the cooling vents are free from dust and debris. Do not use liquid cleaners.
- Conexões: Regularly check battery cable connections for tightness and corrosion. Clean any corrosion with a wire brush and baking soda solution.
- Armazenar: Se for armazenar o inversor por um período prolongado, desconecte-o da bateria e guarde-o em local fresco e seco.
- Substituição de fusíveis: The inverter contains internal fuses. If a fuse blows, it indicates a significant issue. Contact customer support for assistance; do not attempt to replace internal fuses yourself.
8. Solução De Problemas
If the inverter is not functioning correctly, refer to the following table for common issues and solutions:
| Problema | Possível causa | Solução |
|---|---|---|
| No power output, inverter OFF. | Conexões de bateria soltas, baixa tensão da bateriatage, inverter switch OFF. | Check and tighten battery cables. Charge battery. Press and hold ON/OFF switch for 1 second. |
| Inverter shuts down with "OL" (Overload) on LCD. | Connected load exceeds 2500W continuous or 5000W surge. | Reduza o total de wattage of connected appliances. Restart inverter. |
| Inverter shuts down with "LV" (Low Voltage) on LCD. | Vol da bateriatage é muito baixo (abaixo de 10.5V). | Recarregue ou substitua a bateria. |
| Inverter shuts down with "OV" (Overvoltage) on LCD. | Vol da bateriatage é muito alto (acima de 15.5V). | Disconnect from charging source. Check battery voltage. |
| Inverter shuts down with "OT" (Over Temperature) on LCD. | Inverter is overheating due to poor ventilation or excessive load. | Ensure adequate ventilation. Reduce load. Allow inverter to cool down. |
| No power from USB/Type-C ports. | Inverter is OFF, or device is incompatible. | Turn on the inverter. Check device compatibility. |
If the problem persists after attempting these solutions, please contact YITRANIC customer support.
9. Especificações
| Recurso | Especificação |
|---|---|
| Modelo | 2500W-12V |
| Potência Contínua | 2500 W |
| Potência de surto | 5000 W |
| Volume de entrada CCtage | 12V |
| Vol de saída ACtage | 110V |
| Frequência de saída AC | 60Hz |
| Forma de onda de saída | Pure Sine Wave |
| Saída USB | Dual 5V/3A QC3.0 |
| Saída Tipo C | PD30W |
| Eficiência | ≥ 90% |
| Dimensões do produto | 15.75 x 3.54 x 7.09 polegadas (40 x 9 x 18 cm) |
| Peso do item | 10 libras (4.5 kg) |
| Certificações | Certificado pela FCC |
10. Garantia e Suporte ao Cliente
YITRANIC products are designed and manufactured to high-quality standards. For warranty information, technical support, or any questions regarding your inverter, please contact YITRANIC customer support through the retailer where the product was purchased or visit the official YITRANIC website.
Please have your model number (2500W-12V) and purchase date available when contacting support.