Westfield Vega 375 2.0
Manual do usuário do toldo Westfield Vega 375 2.0
Ano Modelo 2024
1. Introdução
Thank you for choosing the Westfield Vega 375 2.0 Awning. This manual provides essential information for the safe and efficient setup, operation, and maintenance of your new awning. Please read this manual thoroughly before first use and keep it for future reference.
The Vega 375 2.0 is designed for caravans and motorhomes with an attachment height between 255 cm and 285 cm, offering generous space and robust protection for your outdoor adventures.
2. Informações de segurança
- Always ensure the awning is securely anchored to the ground using all provided pegs and guy ropes to prevent damage from wind.
- Do not use the awning in extreme weather conditions, such as strong winds, heavy snowfall, or thunderstorms.
- Keep all flame and heat sources away from the awning fabric. The fabric is not fireproof.
- Ensure proper ventilation to prevent condensation buildup, especially during prolonged use.
- Children should be supervised when near the awning, especially during setup and takedown.
- Regularly inspect the air tubes for any signs of damage or leaks.
3. Conteúdo da embalagem
Your Westfield Vega 375 2.0 Awning package should contain 19 items. Please check that all components are present before beginning assembly:
- Westfield Vega 375 2.0 Awning Fabric
- Inflatable Air Poles (integrated with Advanced Air System - AAS)
- High-Volume Hand Pump
- Pegs and Guy Ropes
- Bolsa de Transporte
- Repair Kit (patches for fabric and air tubes)
- Manual de Instruções (este documento)
- Other necessary fittings and accessories
4. Instruções de configuração
The Westfield Vega 375 2.0 features the Advanced Air System (AAS) for quick and easy inflation from a single point.
4.1 Preparing the Site
- Choose a flat, clear area free of sharp objects.
- Position your caravan or motorhome, ensuring there is enough space for the awning.
4.2 Attaching the Awning
- Unpack the awning and lay it out flat on the ground next to your vehicle.
- Slide the awning beading into the awning rail of your caravan or motorhome. Ensure it is fully inserted along the entire length.
- Once attached, pull the awning out from the vehicle to its full extent.
4.3 Inflation (Advanced Air System - AAS)
- Locate the inflation valve, typically found on one of the main air tubes.
- Connect the provided hand pump to the valve.
- Begin inflating the awning. The AAS allows the entire frame to inflate from a single point. Inflate until the air tubes are firm but not rigid. Refer to the pressure gauge on your pump if available, or inflate until the structure stands firmly.
- Once inflated, close the valve securely.
4.4 Pegging and Guy Ropes
- Peg down the four corners of the awning base first, ensuring the awning is taut and square.
- Extend and peg out all remaining pegging points around the base.
- Attach and tension all guy ropes. Angle the guy ropes away from the awning at approximately 45 degrees for maximum stability.

Image: Westfield Vega 375 2.0 awning attached to a caravan, demonstrating a typical setup.

Image: Westfield Vega 375 2.0 awning attached to a motorhome, highlighting its spacious design and compatibility.

Image: The Westfield Vega 375 2.0 awning structure, showing the inflatable air frame before full attachment.
5. Operating the Awning
The Vega 375 2.0 is designed for user-friendly operation.
5.1 Doors and Windows
- The awning features large windows with rounded corners for easy zipping.
- All windows have internal blinds for privacy, which can be rolled up and secured.
- The main doors can be rolled up and secured or used as canopy extensions with optional poles (not included).
- Integrated mosquito nets are present on ventilation points and some door panels to allow airflow while keeping insects out.

Imagem: Interior view of the Westfield Vega 375 2.0 awning, showcasing the spaciousness and large windows.

Image: Westfield Vega 375 2.0 awning with front panels open, demonstrating the integrated mosquito nets for ventilation.
6. Manutenção
Proper maintenance will extend the life of your awning.
6.1 Limpeza
- Clean the awning fabric with lukewarm water and a soft brush or sponge. Do not use harsh detergents or abrasive cleaners.
- For stubborn dirt, use a specialized awning cleaner, following the product instructions carefully.
- Enxágue abundantemente com água limpa.
6.2 Secagem e Armazenamento
- Always ensure the awning is completely dry before packing it away to prevent mildew and fabric degradation.
- Store the awning in its carry bag in a cool, dry place, away from direct sunlight and extreme temperatures.
6.3 Air Tube Care
- Avoid over-inflating the air tubes.
- If a puncture occurs, use the provided repair kit to patch the affected area. For larger damage, professional repair may be necessary.
7. Solução De Problemas
| Problema | Possível causa | Solução |
|---|---|---|
| Awning not standing firm | Under-inflated air tubes; insufficient pegging/guy ropes. | Inflate air tubes to correct pressure; ensure all pegs and guy ropes are securely fastened and tensioned. |
| Air leak from tubes | Valve not closed properly; puncture in air tube. | Check valve is fully closed; locate puncture and use repair kit. |
| Condensation inside awning | Lack of ventilation; temperature difference. | Ensure ventilation points are open; open windows/doors periodically for airflow. |
| Zíperes emperrando | Sujeira ou detritos nos dentes do zíper; falta de lubrificação. | Clean zippers with a brush; apply a silicone-based zipper lubricant. |
8. Especificações
| Recurso | Detalhe |
|---|---|
| Modelo | Westfield Vega 375 2.0 |
| Awning Dimensions (W x D) | 375 cm x 250 cm |
| Altura do acessório | 255 cm - 285 cm |
| Material principal | HydroTech® Cotton Touch Special Fabric |
| Tipo de quadro | Advanced Air System (AAS) Inflatable |
| Cor | Red (Model Color) |
| Montagem necessária | Sim |
| Modo de operação | Manual |
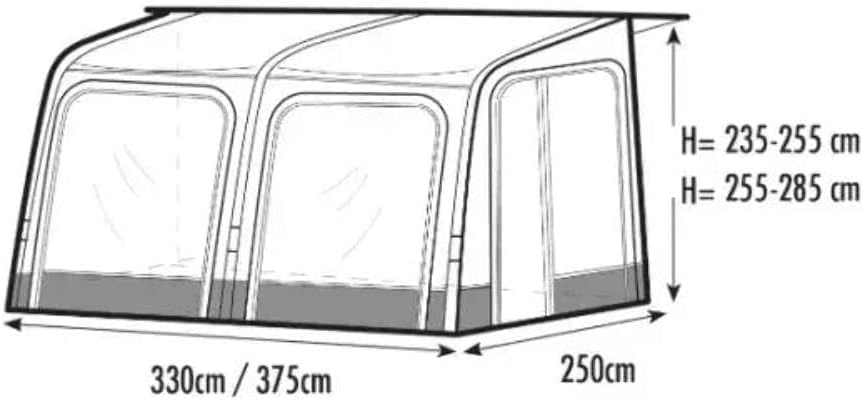
Image: Technical diagram showing the dimensions of the Westfield Vega 375 2.0 awning.
9. Garantia e Suporte
Para informações sobre a garantia, consulte a documentação fornecida no momento da compra ou entre em contato com o revendedor. Guarde o comprovante de compra para eventuais solicitações de garantia.
For technical support or spare parts, please contact Westfield customer service or your authorized dealer. Contact details can typically be found on the Westfield official webno site ou no seu recibo de compra.