
1. Instruções importantes de segurança
When using electrical appliances, basic safety precautions should always be followed to reduce the risk of fire, electric shock, and personal injury. Read all instructions carefully before using the Milex Digital Steam Iron.
- Certifique-se sempre do volumetagO "e" na etiqueta de classificação corresponde à sua tensão da rede elétrica.tage.
- Não mergulhe o ferro de passar, o cabo de alimentação ou a ficha em água ou outros líquidos.
- Desligue o ferro da tomada ao enchê-lo com água, esvaziá-lo ou quando não estiver em uso.
- Não opere nenhum aparelho com um cabo ou plugue danificado, ou após o aparelho apresentar mau funcionamento ou ter caído ou danificado de qualquer maneira.
- Mantenha o ferro e o cabo de alimentação fora do alcance de crianças e animais de estimação quando estiverem ligados ou a arrefecer.
- Never leave the iron unattended while it is connected to the power supply or on an ironing board.
- Utilize o ferro apenas para o uso doméstico a que se destina.
- The soleplate of the iron can become extremely hot. Avoid direct contact with the hot soleplate.
- Ao deixar o ferro em repouso, coloque-o sempre sobre uma superfície estável e resistente ao calor.
2. Produto acabadoview
The Milex Digital Steam Iron MSI004 is designed for efficient garment care. Familiarize yourself with its components before use.
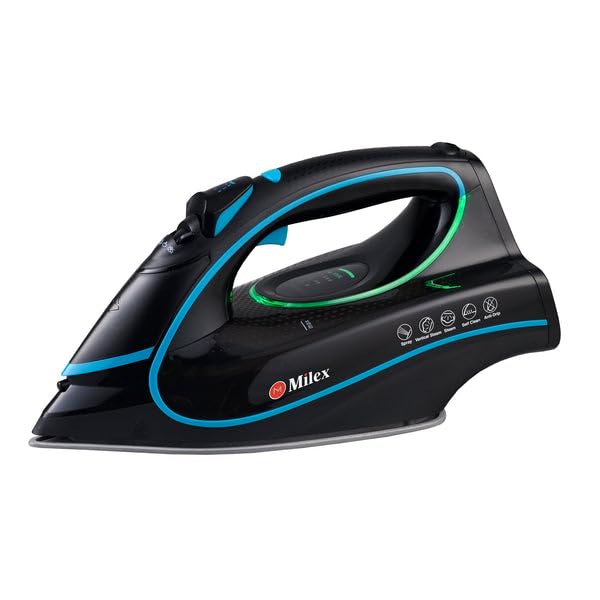
Figure 1: Milex Digital Steam Iron (3/4 view)
This image displays the Milex Digital Steam Iron from a three-quarter angle, highlighting its sleek black design with blue and green accents. Key features visible include the handle, water tank, and the general shape of the soleplate.
Componentes:
- Bocal de pulverização de água: Para umedecer tecidos.
- Entrada de enchimento de água: Local onde a água é adicionada ao tanque.
- Steam Control Dial/Buttons: To adjust steam output.
- Temperature Control Dial/Buttons: To select desired heat setting.
- Telão LED: Mostra as configurações atuais.
- Lidar: For gripping the iron.
- Tanque de água: Reservatório de água.
- Base: A superfície aquecida que desliza sobre o tecido.
- Cabo de alimentação: Conecta o ferro de passar à tomada elétrica.

Figure 2: Ceramic Soleplate
Esta imagem fornece um close-up. view of the ceramic soleplate, showing its textured surface and steam vents designed for even heat distribution and smooth gliding.
3. Configuração e primeiro uso
3.1 Desembalagem
- Remove the iron from its packaging.
- Remova qualquer película protetora ou adesivo da base do produto.
- Inspect the iron for any signs of damage. If damaged, do not use and contact customer support.
3.2 Enchendo o Tanque de Água
- Certifique-se de que o ferro esteja desligado da tomada.
- Set the steam control to the "Dry Ironing" position (if applicable).
- Abra a tampa da entrada de enchimento de água.
- Usando um copo medidor, despeje cuidadosamente água limpa da torneira no reservatório até a linha de enchimento "MAX". Não encha demais.
- Feche bem a tampa de entrada de água.
Observação: For areas with hard water, it is recommended to use a mixture of 50% tap water and 50% distilled water to prevent mineral buildup. Never use perfumed water, vinegar, starch, or descaling agents in the water tank.
4. Instruções de operação
4.1 Preparing for Ironing
- Sort garments according to fabric type (e.g., linen, cotton, wool, silk, synthetics).
- Check garment care labels for recommended ironing temperatures.
- Plug the iron into a suitable electrical outlet. The LED display will illuminate.
4.2 Ajuste de temperatura e vapor
- Use the temperature control buttons to select the appropriate heat setting for your fabric. The LED display will show the selected temperature.
- Allow the iron to heat up until the indicator light (if present) or LED display confirms it has reached the desired temperature.
- For steam ironing, ensure the water tank is filled. Adjust the steam control to the desired steam level. Steam is typically available at higher temperature settings.
- For dry ironing, ensure the water tank is empty or the steam control is set to "Dry Ironing".
4.3 Using Steam Functions
- Vapor Contínuo: Select a steam setting on the control. Steam will be continuously emitted from the soleplate.
- Explosão de vapor: Press the "Burst" button for an extra shot of steam to remove stubborn wrinkles. Wait a few seconds between bursts.
- Spray de água: Press the "Spray" button to lightly moisten fabric before ironing.
4.4 Recurso de desligamento automático
The iron is equipped with an auto-shutoff safety feature. If left unattended horizontally for a certain period (e.g., 30 seconds) or vertically (e.g., 8 minutes), the heating element will automatically turn off. To reactivate, simply move the iron.
4.5 Sistema Anti-Gotejamento
The anti-drip system prevents water from dripping from the soleplate when the iron is not hot enough to produce steam. This helps prevent water stains on delicate fabrics.
5. Manutenção e Limpeza
Regular maintenance ensures optimal performance and extends the life of your Milex Digital Steam Iron.
5.1 Após cada utilização
- Desligue o ferro da tomada e deixe-o esfriar completamente.
- Esvazie toda a água restante do tanque de água.
5.2 Limpeza da base do motor
- When the soleplate is cool, wipe it with a damp Pano e um produto de limpeza não abrasivo, se necessário.
- Não utilize esponjas abrasivas ou produtos químicos agressivos, pois estes podem danificar o revestimento cerâmico.
5.3 Função de autolimpeza
The iron features a self-cleaning function to remove mineral deposits from the steam vents.
- Encha o tanque de água até a linha MAX.
- Ligue o ferro na tomada e ajuste a temperatura para o máximo.
- Assim que o ferro atingir a temperatura máxima, desligue-o da tomada.
- Segure o ferro horizontalmente sobre uma pia.
- Press and hold the self-clean button (refer to product diagram for location). Hot water and steam will be expelled from the soleplate, flushing out mineral deposits.
- Agite o ferro suavemente para frente e para trás até que o reservatório de água esteja vazio.
- Plug the iron back in and allow it to heat up again to dry the soleplate.
- Unplug and store once cool.
5.4 Armazenamento
Always store the iron upright on its heel rest, with the cord neatly wrapped, once it has completely cooled down and the water tank is empty.
6. Solução De Problemas
| Problema | Possível causa | Solução |
|---|---|---|
| O ferro não esquenta. | Não está conectado; energia outage; auto-shutoff activated; faulty outlet. | Check power connection; check circuit breaker; move iron to reactivate; try a different outlet. |
| Sem vapor ou vapor insuficiente. | Water tank empty; temperature too low for steam; steam vents clogged; steam control set to "Dry". | Fill water tank; increase temperature setting; perform self-clean; adjust steam control. |
| Gotejamento de água da base do produto. | Temperatura muito baixa para vapor (sistema antigotejamento em funcionamento); reservatório de água cheio demais. | Aumente a temperatura; não encha demais o reservatório de água. |
| Flocos brancos ou resíduos nas roupas. | Mineral buildup in water tank/steam vents. | Perform self-clean function; use distilled water or a mix with tap water. |
7. Especificações
| Número do modelo | MSI004 |
| Marca | Milex |
| Poder | 2400 W |
| Volumetage | 220-240 V, 50 Hz |
| Funções | Dry, Spray, Steam, Burst |
| Material da placa de base | Cerâmica |
| Tipo de exibição | LIDERADO |
| Capacidade do tanque de água | 450ml |
| Características especiais | Anti-drip, Auto-shutoff, Lightweight |
| Dimensões do produto (C x L) | 32L x 16W centímetros |
8. Garantia e Suporte ao Cliente
For information regarding warranty coverage, please refer to the warranty card included with your product or contact the retailer where the product was purchased.
If you experience any issues or have questions about your Milex Digital Steam Iron, please contact Milex customer support. You can find more information and contact details on the official Milex website ou através do Milex Store on Amazon.