Introdução
This manual provides essential information for the setup, operation, and maintenance of your new Tucus replacement remote control. This remote is designed to be compatible with various JVC Micro COMPACT COMPONENT Stereo Systems, including models RM-SUXQ30UW, RM-SUXQ30US, UX-Q30S, UX-Q30B, UX-Q30P, and UX-Q30W. While it is a replacement remote and not the original device's remote, common functions are expected to operate normally. Please review this guide thoroughly to ensure proper use and longevity of your remote control.
Configurar
1. Instalação da bateria
The remote control requires two (2) AA batteries (not included) for operation. Follow these steps to install them:
- Localize o compartimento da bateria na parte traseira do controle remoto.
- Deslize a tampa do compartimento da bateria para baixo ou para fora para abri-lo.
- Insira duas pilhas AA, certificando-se de que os terminais positivo (+) e negativo (-) estejam alinhados corretamente com as marcações dentro do compartimento.
- Deslize a tampa do compartimento da bateria de volta para o lugar até ouvir um clique que a encaixe firmemente.

Figure 1: Back of the remote control showing the battery compartment cover.
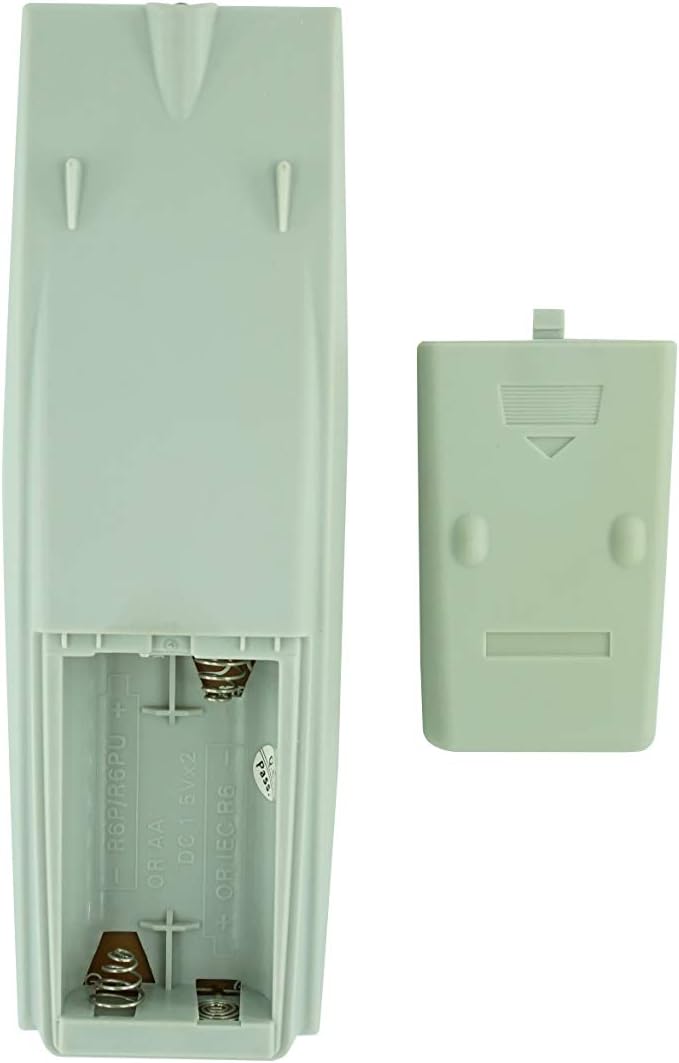
Figure 2: Battery compartment with cover removed, ready for battery insertion.
2. Uso inicial
Once batteries are installed, the remote control is ready for use. Point the remote directly at your JVC Micro COMPACT COMPONENT Stereo System. No additional programming is typically required for this replacement remote for the listed compatible models.
Instruções de operação
This remote control provides access to the primary functions of your JVC stereo system. Below is a general overview of common button functions. Please note that while the functionality is guaranteed, the exact button layout may differ slightly from your original remote.

Figura 3: Frente view do controle remoto com layout de botões.
Principais funções:
- EM ESPERA/LIGADO: Powers the stereo system on or off.
- EXIBIÇÃO: Changes or shows display information.
- RELÓGIO / TEMPORIZADOR: Accesses clock and timer settings.
- DORMIR: Sets a sleep timer for automatic power off.
- Botões numéricos (0-9, +10): Direct input for track numbers, radio frequencies, etc.
- GRAVES / AGUDOS: Ajusta os níveis de graves e agudos.
- Navigation (UP, DOWN, LEFT, RIGHT, SET): Utilizado para navegação e seleção em menus.
- Playback Controls (PLAY/PAUSE, STOP, FAST FORWARD, REWIND, SKIP): Controla a reprodução de mídia.
- Source Selection (CD, TAPE, FM/AM, AUX/MD): Seleciona a fonte de entrada de áudio.
- FM MODE / REV.MODE: Toggles FM stereo/mono or tape reverse mode.
- AUTO PRESET: Automatically scans and saves radio stations.
- PRGM / RANDOM / REPEAT: Controls program, random, and repeat playback modes.
- PTY SEARCH / PTY SELECT: For Program Type search and selection on radio.
- DISPLAY / TA/News / Info: Provides additional display information or traffic/news announcements.
- AHB PRO: Activates or deactivates Active Hyper-Bass PRO.
- VOLUME (+/-): Ajusta o nível de volume principal.
For specific advanced functions, please refer to the original instruction manual of your JVC Micro COMPACT COMPONENT Stereo System.
Manutenção
Limpando o controle remoto
Para manter a aparência e a funcionalidade do controle remoto, limpe-o regularmente:
- Limpe a superfície com um pano macio e seco.
- Para sujeira persistente, levementeampLimpe o pano com água ou um detergente suave e não abrasivo. Não borrife o detergente diretamente no controle remoto.
- Evite usar produtos químicos agressivos, solventes ou esponjas de limpeza abrasivas, pois estes podem danificar o acabamento ou os componentes internos do controle remoto.
Substituição da bateria
Replace batteries when the remote's response becomes sluggish or it stops functioning. Always replace both batteries at the same time with new ones of the same type (AA). Do not mix old and new batteries, or different types of batteries.
Armazenar
Se o controle remoto não for usado por um longo período, remova as pilhas para evitar vazamento e possíveis danos ao controle.
Solução de problemas
- O controle remoto não está respondendo:
- Verifique se as pilhas estão inseridas corretamente, respeitando a polaridade (+/-).
- Substitua as pilhas velhas por novas.
- Ensure there are no obstructions between the remote control and the stereo system's infrared receiver.
- Certifique-se de estar dentro do alcance efetivo do controle remoto.
- Some buttons not working or unexpected behavior:
- This remote is a replacement and while common functions are supported, the button layout or specific advanced functions might not perfectly match your original remote. Refer to the button layout image in the Operating Instructions section.
- Ensure the stereo system is powered on and set to the correct input source.
- Remote appears damaged:
- If the remote has been dropped or exposed to liquids, internal damage may have occurred. In such cases, replacement may be necessary.
Especificações
| Marca | Genérico |
| Fabricante | TUCUS |
| Número do modelo | DVT-C9F24992D65E215A7DD6011D34514A46 |
| Modelos compatíveis | JVC RM-SUXQ30UW, RM-SUXQ30US, UX-Q30S, UX-Q30B, UX-Q30P, UX-Q30W Micro COMPACT COMPONENT Stereo SYSTEM |
| Tipo de material | Outro |
| Fonte de energia | 2 pilhas AA (não incluídas) |
| ASIN | B0D79958PW |
| Data da primeira disponibilidade | 17 de junho de 2024 |
Informações de garantia
This product comes with a 3-month warranty from the date of purchase. This warranty covers manufacturing defects and ensures the remote control functions as intended for compatible models. Please retain your proof of purchase for any warranty claims.
Suporte ao cliente
If you have any questions regarding the compatibility or functionality of this remote control, or if your specific device model is not listed, please contact the seller directly for assistance. The seller stocks a wide range of remote controls and parts and can confirm suitability for your needs.
For general inquiries or to provide feedback, please refer to the contact information provided by your retailer or the seller.


