
1. Introdução
Thank you for choosing the Metal Defender TS-P1 Portable Walk-Through Metal Detector. This device is designed for rapid deployment and efficient security screening in various environments, including events, schools, and courthouses. Its foldable, lightweight design and advanced detection capabilities ensure reliable performance. This manual provides essential information for the proper setup, operation, and maintenance of your metal detector.

Image 1.1: The Metal Defender TS-P1 Portable Walk-Through Metal Detector, fully assembled and ready for use.
2. Informações de segurança
Please read and understand all safety instructions before operating the Metal Defender TS-P1. Failure to follow these instructions may result in injury or damage to the device.
- Fonte de energia: Use only the specified 12V power adapter or fully charged internal batteries. Ensure the power outlet meets the device's requirements.
- Condições ambientais: Operate the detector within recommended temperature and humidity ranges. Avoid exposure to extreme weather conditions unless the device's IP67 rating is specifically applicable to the situation.
- Conjunto: Ensure all components are securely connected and latched before operation. Do not force connections.
- Colocação: Position the detector on a stable, level surface. Avoid areas with strong electromagnetic interference that could affect performance.
- Crianças e animais de estimação: Keep children and pets away from the device during operation and assembly.
- Manutenção: Disconnect power before cleaning or performing any maintenance. Refer to the Maintenance section for proper procedures.
3. Configuração e montagem
The Metal Defender TS-P1 is designed for quick and tool-free assembly. Follow these steps for proper setup:
- Desembalagem: Retire cuidadosamente todos os componentes da embalagem. Verifique se todas as peças listadas na lista de embalagem estão presentes.
- Base Unit Placement: Place the base unit (which includes the head unit and leg bases when folded) on a flat, stable surface. The base unit also features wheels for easy transportation when collapsed.
- Extending the Columns: The detector disassembles to less than one-third of its standing height. Carefully extend the side columns upwards from the base. Each segment will click into place.
- Fechos de segurança: Ensure all latches on the side columns are fully engaged to secure the detector in its upright position.
- Conexão de energia: The unit can operate on its internal rechargeable battery (up to 40 hours) or be plugged directly into a power source. Connect the DC input plug to either foot of the detector.
- Inicialização: Pressione o botão liga/desliga no painel de controle para ligar o dispositivo.
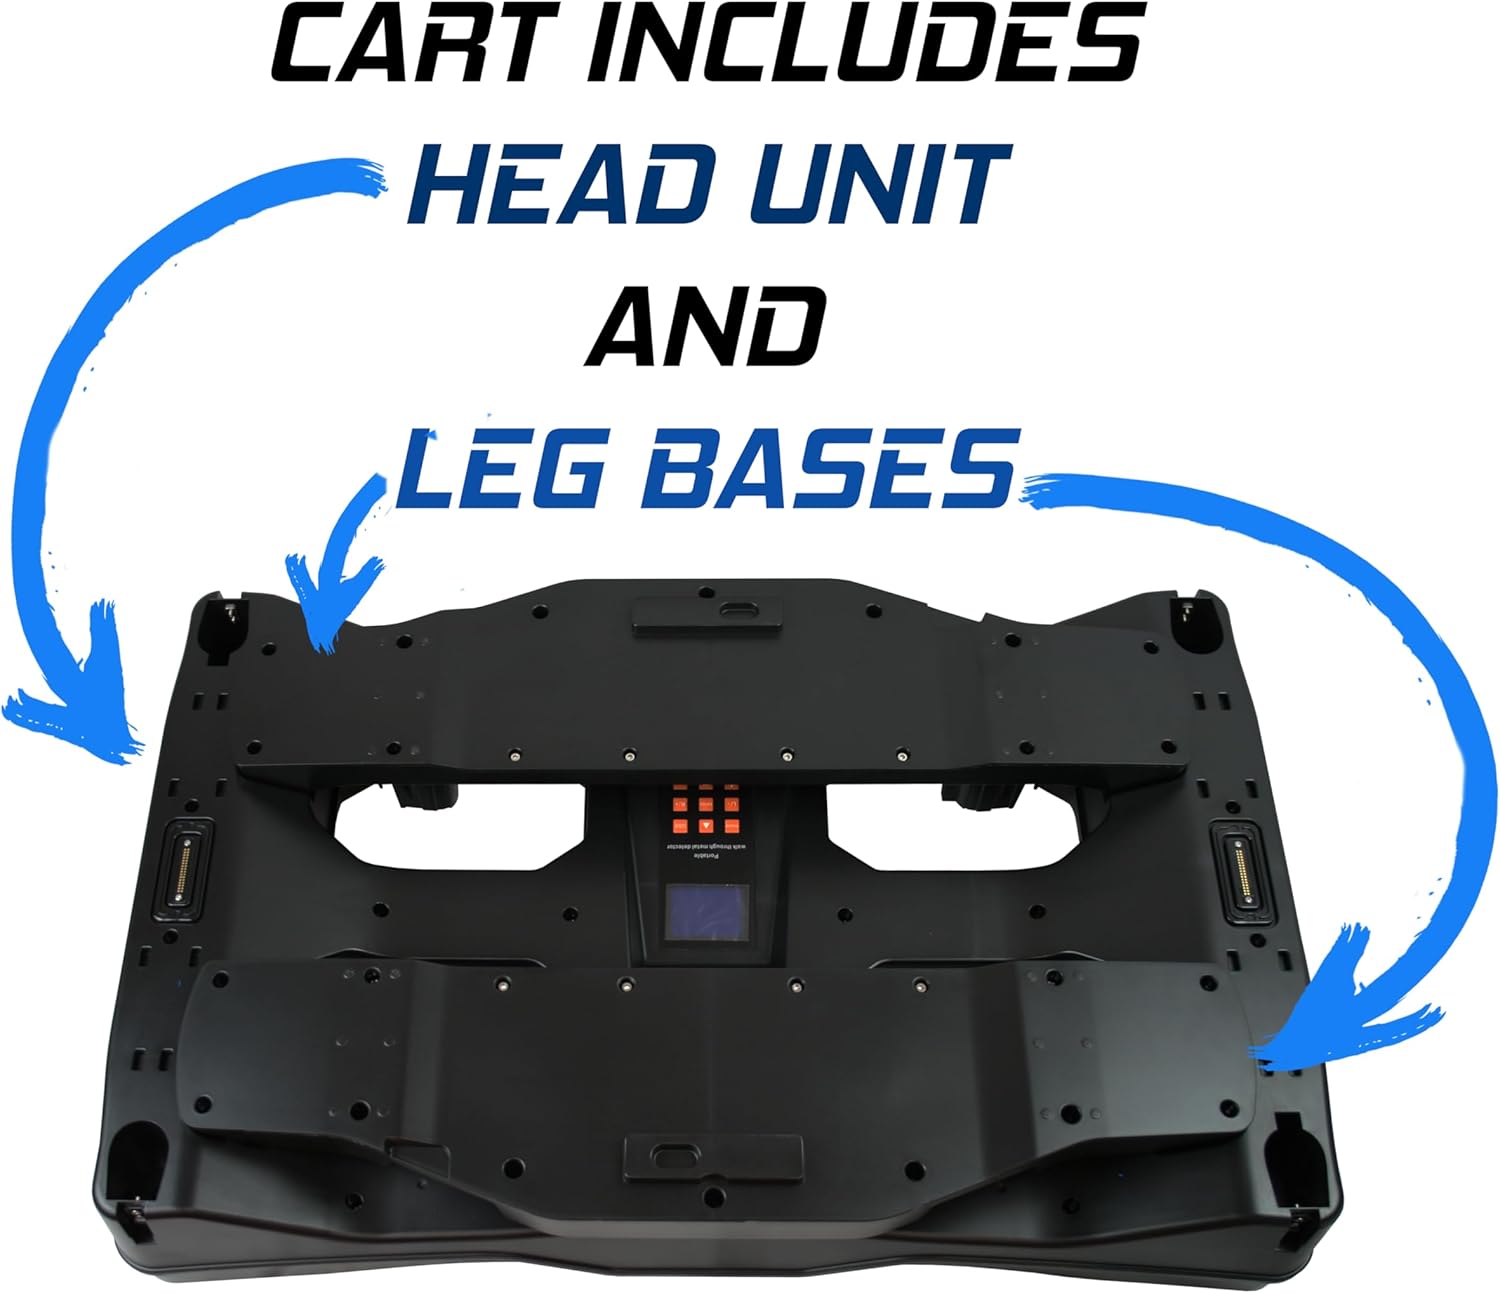
Image 3.1: The base unit, which houses the head unit and leg bases when the detector is collapsed.

Image 3.2: Comparison of the detector's assembled height (7 ft) versus its collapsed height (2.06 ft).
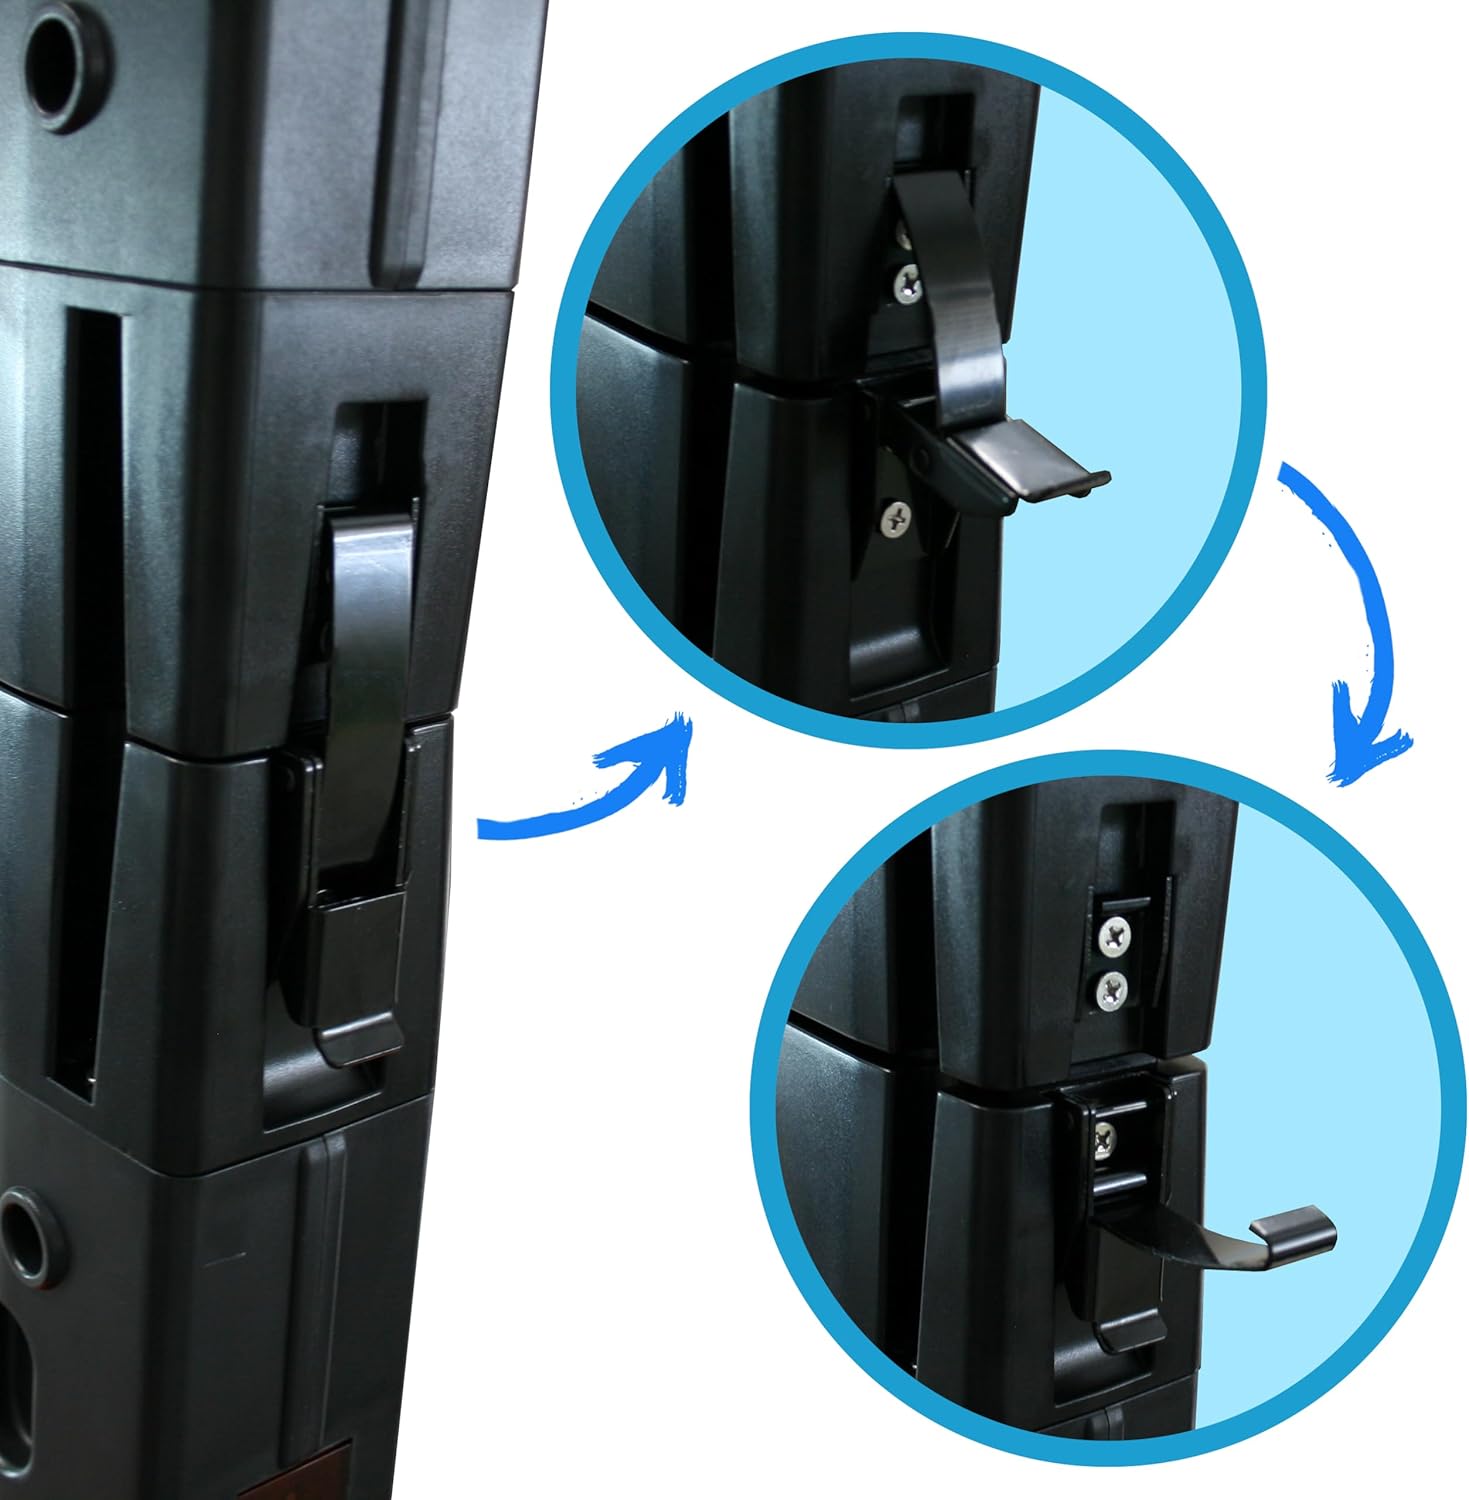
Image 3.3: Detail of the secure latching mechanism for the column segments.

Image 3.4: Location of the DC input plug on the detector's base.
The complete security package includes a strap case, a backup battery, and a free handheld wand for additional screening flexibility.

Image 3.5: Included straps and buckles for securing the detector during transport.
4. Instruções de operação
The TS-P1 features an intuitive control panel and advanced detection capabilities.
4.1 Painel de controle sobreview
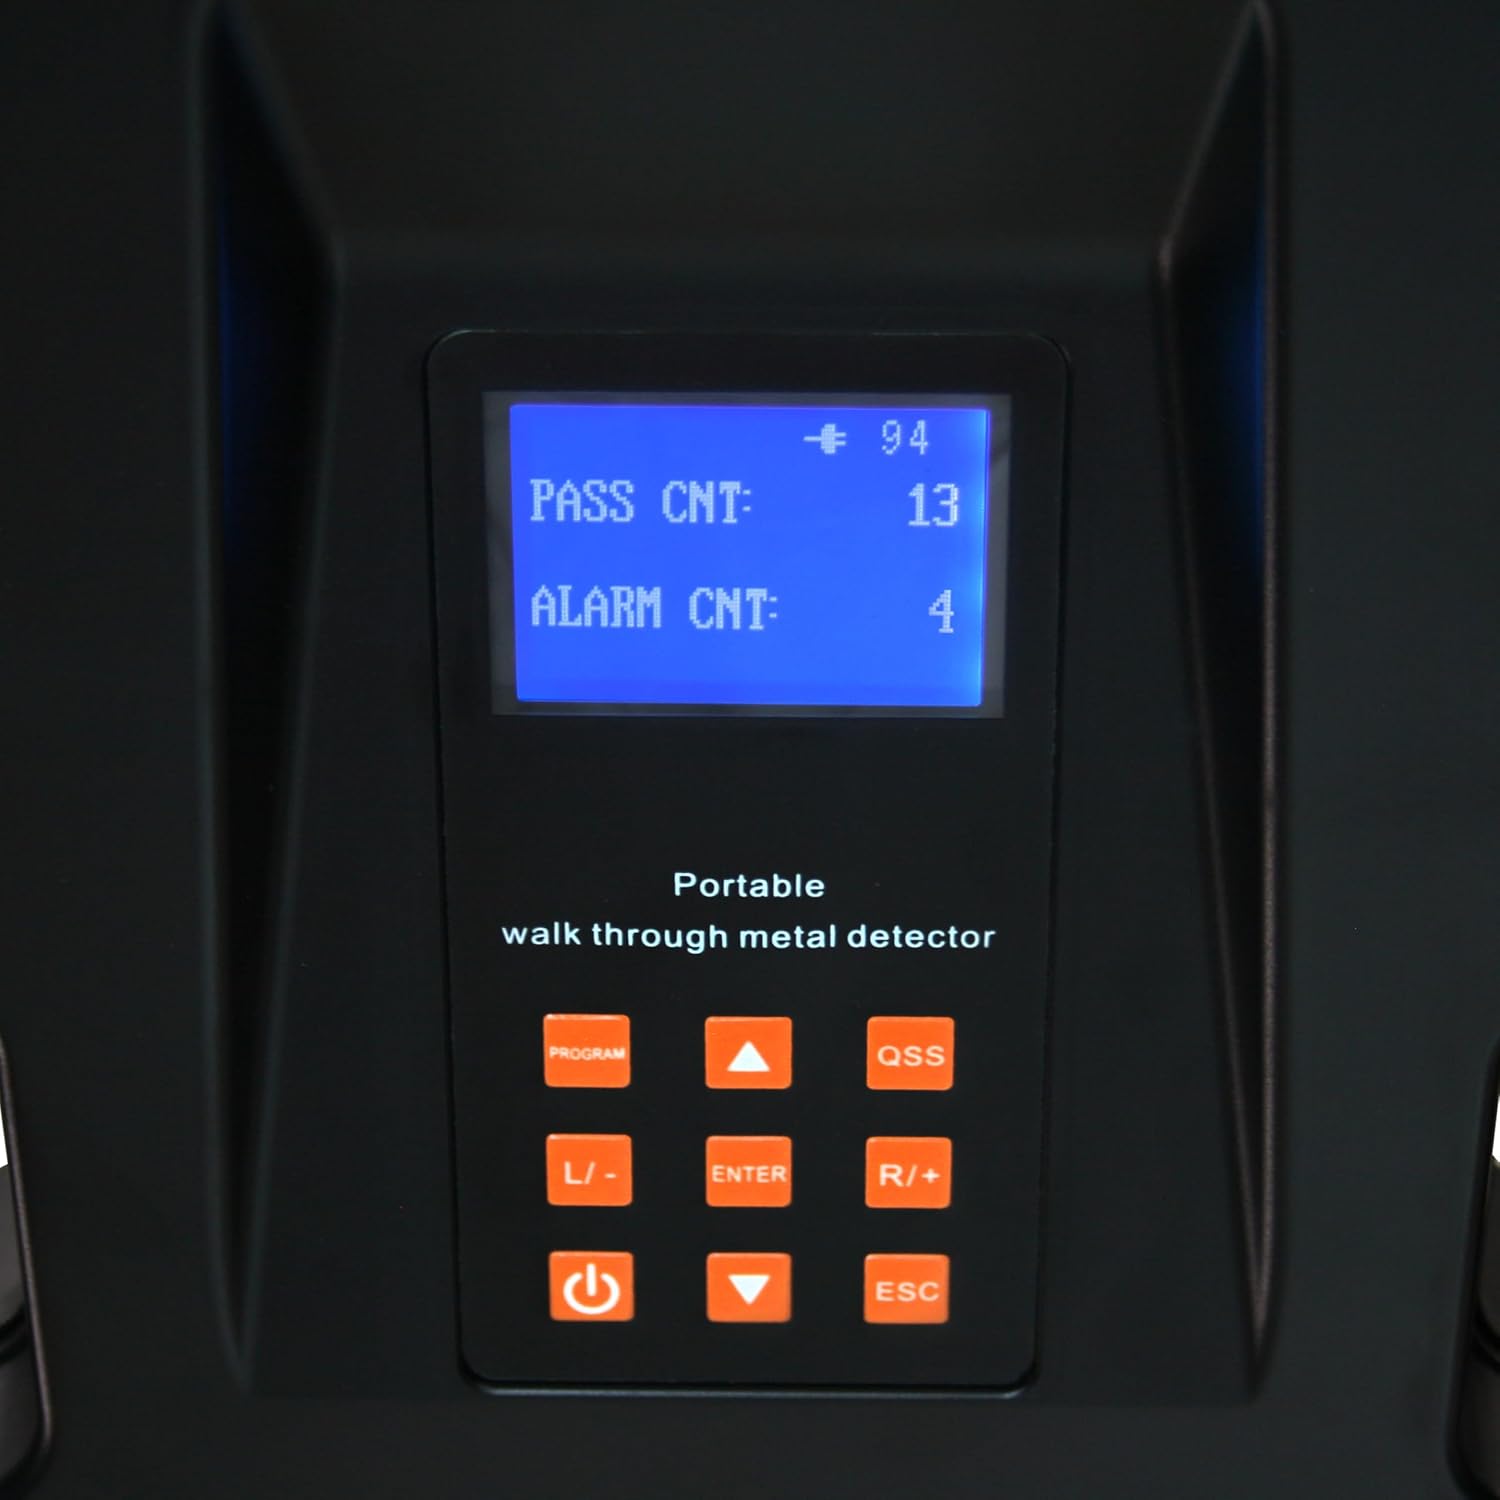
Image 4.1: The control panel displaying pass and alarm counts, with various function buttons.
- Tela de exibição: Shows current settings, pass count, and alarm count.
- Botão PROGRAMAR: Accesses the programming menu for advanced settings.
- QSS Button: Quick Sensitivity Setting for rapid adjustments.
- L/- and R/+ Buttons: Navigate menus and adjust values (Left/Decrease, Right/Increase).
- Botão ENTER: Confirma seleções.
- Botão de energia: Liga/desliga o dispositivo.
- Botão ESC: Sai dos menus ou cancela operações.
4.2 Detection Zones and Sensitivity
The TS-P1 features 3 detection zones with LED indicators for comprehensive head-to-toe scanning. These zones can be independently programmed.
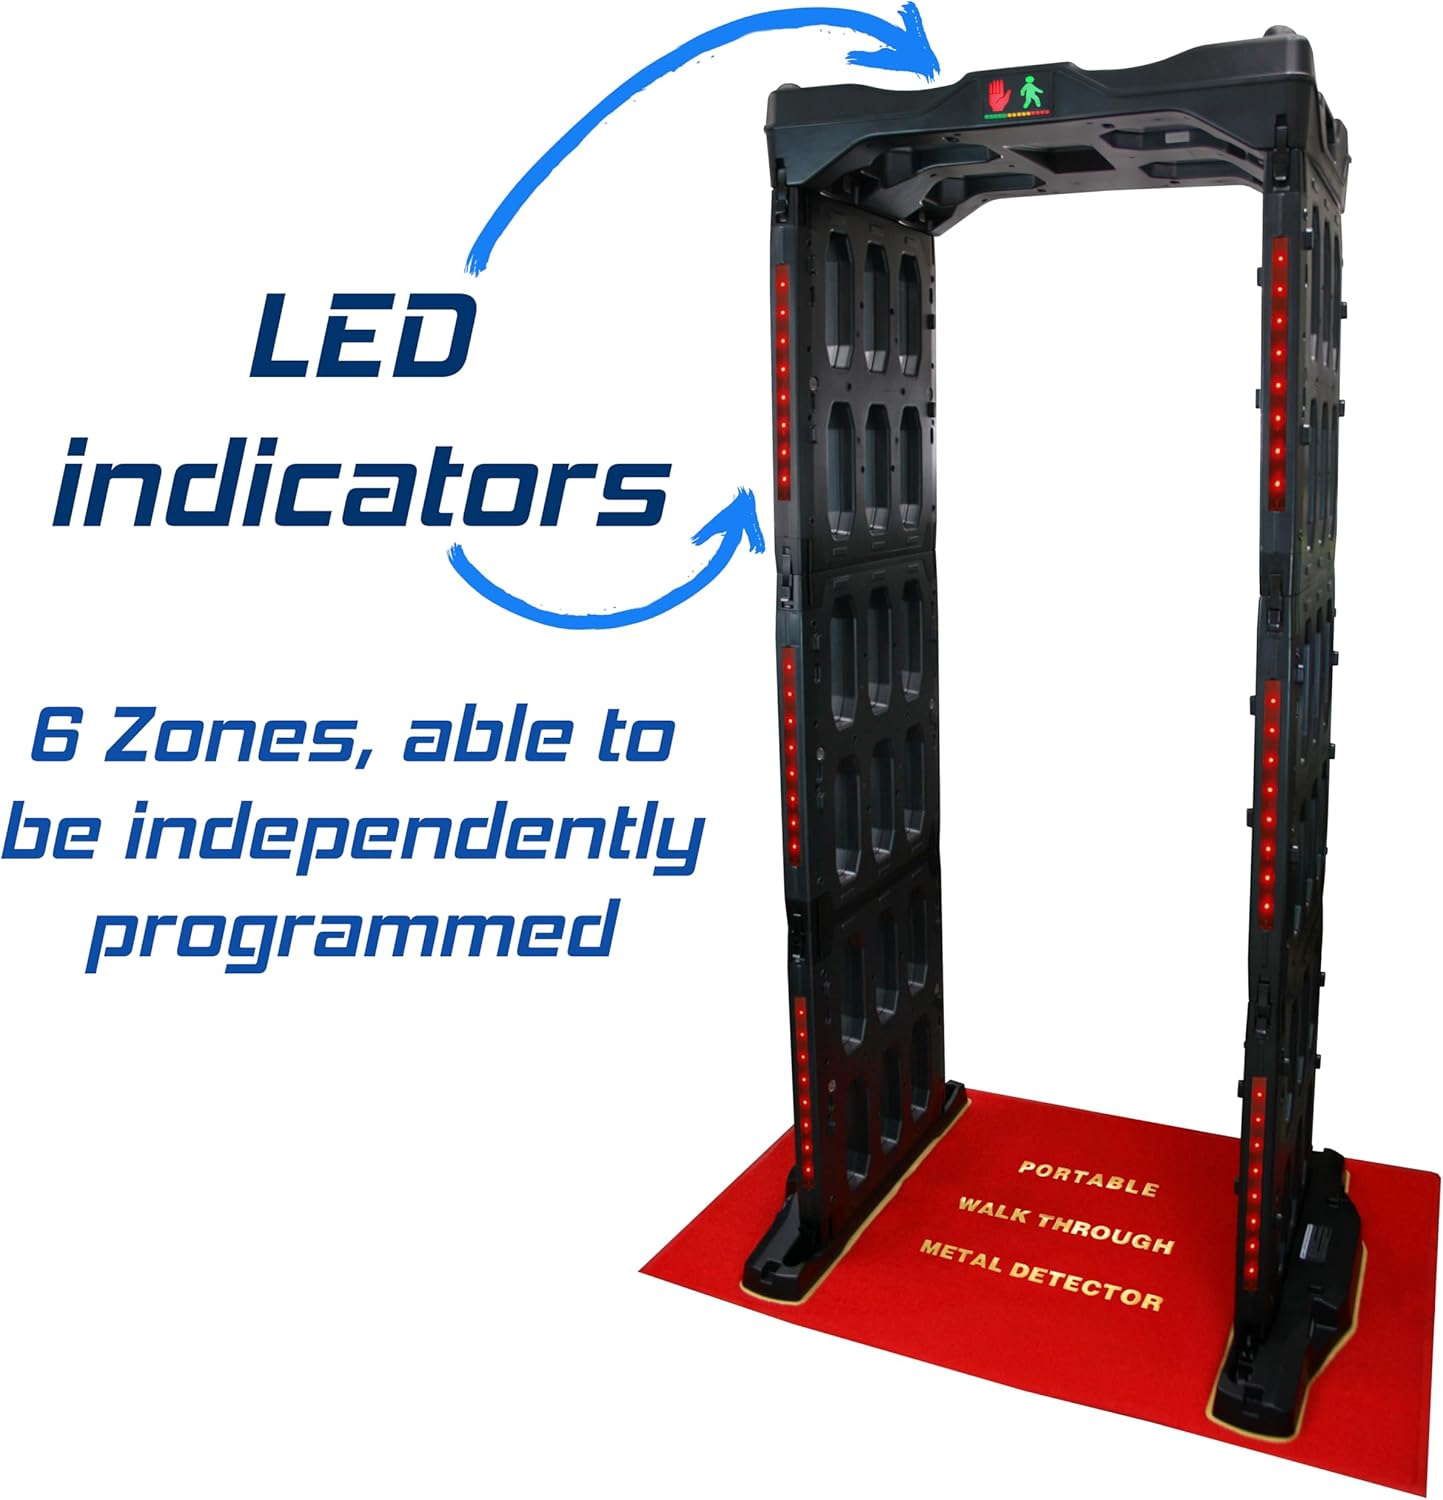
Image 4.2: LED indicators on the side columns, signifying detection zones.
- Ajustando a sensibilidade: The detector offers 100 customizable sensitivity levels. Use the PROGRAM button to enter the sensitivity settings menu. Adjust levels using the L/- and R/+ buttons. Higher sensitivity detects smaller metallic objects (e.g., bobby pins), while lower sensitivity can be used for screening larger items or specific weapons.
- Zone Programming: Each of the 3 detection zones can be programmed independently to fine-tune detection for specific areas of the body. Refer to the detailed programming guide in the full manual for advanced zone configuration.
- Indicação de alarme: When a metallic object is detected, the corresponding LED indicators on the side columns will illuminate, and an audible alarm will sound. The display will update the alarm count.
4.3 Operação da bateria
The internal rechargeable 12V battery provides up to 40 hours of cord-free operation. To charge the battery, connect the power adapter to the DC input port. The device can also operate while plugged in.
5. Manutenção
Regular maintenance ensures the longevity and optimal performance of your Metal Defender TS-P1.
- Limpeza: Use um pano macio e macioamp cloth to wipe down the exterior surfaces. Do not use abrasive cleaners or solvents. Ensure the device is powered off and unplugged before cleaning.
- Pontos de conexão: The device features protective dust covers at connection points. Ensure these are clean and free of debris to maintain proper electrical contact.
- Armazenar: When not in use, collapse the detector and secure it with the provided straps. Store in a dry, temperate environment.
- Cuidados com a bateria: For optimal battery life, avoid fully discharging the battery frequently. Recharge as needed. If storing for extended periods, charge the battery to approximately 50% every few months.

Image 5.1: Protective dust covers for connection points and integrated wheels for mobility.
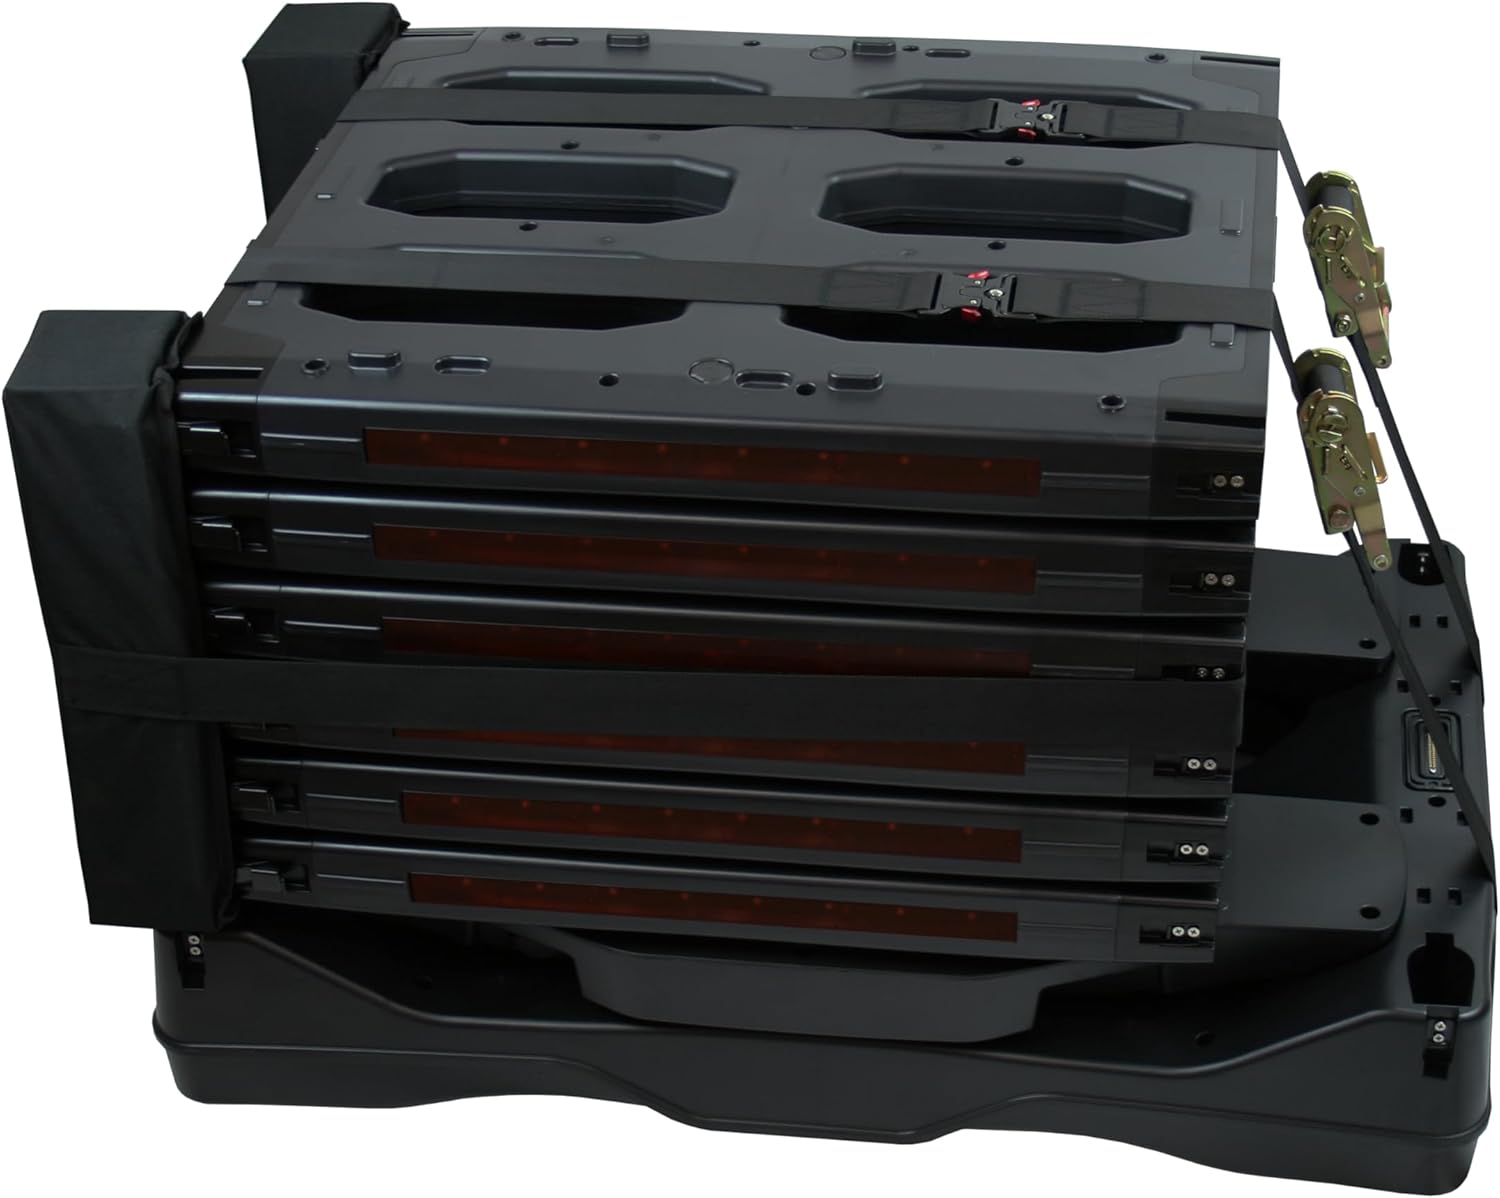
Image 5.2: The detector in its collapsed state, secured with straps.
6. Solução De Problemas
If you encounter issues with your Metal Defender TS-P1, refer to the following common problems and solutions:
| Problema | Possível causa | Solução |
|---|---|---|
| O dispositivo não liga. | Battery discharged; Power cable not connected; Faulty power button. | Charge the battery or connect to AC power. Ensure power cable is securely plugged in. Contact support if power button is unresponsive. |
| False alarms or inconsistent detection. | High sensitivity setting; Environmental interference; Nearby metallic objects. | Reduce sensitivity settings. Relocate the detector away from large metallic structures or other electronic devices. |
| No alarm when metal is detected. | Low sensitivity setting; Alarm volume off; Faulty sensor. | Increase sensitivity. Check alarm volume settings in the PROGRAM menu. Contact support if issue persists. |
| Difficulty collapsing/assembling. | Latches not disengaged; Debris in connection points. | Ensure all latches are fully disengaged. Check connection points for obstructions and clean if necessary. Do not force components. |
For issues not listed here, please contact Metal Defender customer support.
7. Especificações
| Recurso | Detalhe |
|---|---|
| Número do modelo | TS-P1 |
| Marca | Metal Defender |
| Cor | Cinza |
| Material | Plástico |
| Dimensões do produto (montado) | 48"C x 32"L x 84"A (4 pés C x 2.7 pés L x 7 pés A) |
| Dimensões do produto (recolhido) | Approx. 37"L x 24.75"W x 24.75"H (3.1 ft L x 2.06 ft W x 2.06 ft H) |
| Peso do item | 83 libras |
| Fonte de energia | DC (Rechargeable 12V Battery / AC Adapter) |
| Duração da bateria | Até 40 horas |
| Zonas de Detecção | 3 (with LED indicators, independently programmable) |
| Níveis de Sensibilidade | 100 customizable levels |
| Frequência de operação | 6.5 kHz |
| Avaliação de proteção internacional | IP67 |
| Características | Foldable, Lightweight, Wheels for transport, Carry strap, Handheld wand included. |
| Usos recomendados | Security Screening (Events, Schools, Courthouses, Stadiums, Concerts, Clubs, Checkpoints) |
| UPC | 840417439877 |
8. Garantia e Suporte
For warranty information, please refer to the documentation included with your purchase or visit the official Metal Defender webSite. Planos de proteção estão disponíveis para cobertura estendida.
For technical support, troubleshooting assistance, or to inquire about replacement parts, please contact Metal Defender customer service. Contact details can typically be found on the product packaging or the manufacturer's website.
Recursos on-line: Para obter informações e suporte adicionais, visite o Metal Defender Store on Amazon.