1. Introdução
This manual provides essential information and instructions for operating your Sony ZV-E10 II Mirrorless Vlogging Camera Kit with the 16-50mm OSS Lens. Designed for content creators and vloggers, this camera combines a 26 MP APS-C sensor with advanced features for high-quality video and stills. Please read this manual thoroughly before using the camera to ensure proper and safe operation.
2. O que está na caixa
Your Sony ZV-E10 II kit includes the following items:
- Sony Alpha ZV-E10 II Mirrorless Camera (Black)
- Sony E PZ 16-50mm f/3.5-5.6 OSS II Lens
- Bateria recarregável de íon de lítio Sony NP-FZ100 (2280mAh)
- Tampa do corpo Sony ALC-B1EM para câmeras com montagem tipo E
- Alça de ombro
- Tela de vento
- Cartão de Memória de 64 GB
- Bolsa macia
- Leitor de cartão de memória
- Micro cabo HDMI
- 12-inch Flexible Tripod
- Alça de mão
- Carteira para cartão de memória
- Kit de limpeza
3. Produto acabadoview
The Sony ZV-E10 II is a compact and lightweight mirrorless camera designed for ease of use and high-quality content creation. It features a 26 MP APS-C Exmor R CMOS sensor and a BIONZ XR processor for stunning image and video performance.

Figura 3.1: Frente view of the Sony ZV-E10 II camera with the 16-50mm lens and an external microphone attached.
Componentes principais:
- Montagem da lente: E-mount for interchangeable lenses.
- Vari-angle LCD Screen: A 3-inch touchscreen that can be articulated for flexible framing, especially useful for vlogging.
- Microfone embutido: Features a 3-capsule microphone with an included windscreen for clear audio.
- Calçado com múltiplas interfaces: Allows attachment of external accessories like microphones and lights.
- Control Buttons and Dials: Ergonomically placed for intuitive operation.

Figura 3.2: Traseira view of the Sony ZV-E10 II camera, showing the fully articulating LCD touchscreen and control buttons.

Figura 3.3: parte superior view of the Sony ZV-E10 II camera, highlighting the power switch, shutter button, and mode dial.
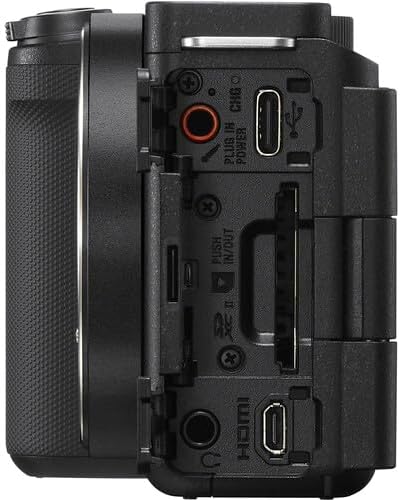
Figura 3.4: Lateral view of the Sony ZV-E10 II camera, displaying the various ports including USB-C, HDMI, and microphone/headphone jacks.
4. Configuração
4.1. Inserindo a bateria e o cartão de memória
- Open the battery/memory card cover located at the bottom of the camera.
- Insert the NP-FZ100 battery with the arrow pointing into the camera until it locks into place.
- Insert the memory card (SD card) into the slot with the contacts facing the correct direction until it clicks.
- Feche a tampa com segurança.

Figura 4.1: parte inferior view of the camera with the battery and memory card compartment open.
4.2. Colocando a lente
- Remova a tampa do corpo da câmera e a tampa traseira da lente.
- Alinhe a marca de índice branca na lente com a marca de índice branca no corpo da câmera.
- Monte a lente girando-a no sentido horário até ouvir um clique.

Figura 4.2: Frente view of the camera body with the lens removed, showing the E-mount sensor.
5. Operando a câmera
5.1. Ligar/desligar
To turn the camera on or off, slide the LIGADO/DESLIGADO switch located on the top plate.
5.2. Modos básicos de disparo
The camera offers various shooting modes accessible via the mode dial or menu. Common modes include:
- Automático Inteligente: Automatically detects the scene and adjusts settings.
- Programa Automático (P): A câmera define a abertura e a velocidade do obturador, enquanto você controla as demais configurações.
- Prioridade de abertura (A): Você define a abertura, a câmera define a velocidade do obturador.
- Prioridade de Obturador (S): Você define a velocidade do obturador, a câmera define a abertura.
- Manuais (M): Controle total sobre a abertura e a velocidade do obturador.
- Modo Filme: Modo dedicado para gravação de vídeo.
5.3. Sistema de autofoco
The ZV-E10 II features an advanced autofocus system with 759 phase-detection points and Real-Time Eye AF for both humans and animals, ensuring sharp focus on your subjects during photos and videos.
- Rastreamento em tempo real: Select a subject on the screen, and the camera will continuously track its movement.
- Foco por toque: Toque na tela LCD para definir o ponto de foco.
6. Recursos avançados
6.1. Product Showcase Setting
This mode is ideal for product reviews. When activated, the camera automatically shifts focus from your face to a product held up to the lens, then back to your face when the product is removed.
6.2. Background Defocus
Achieve a professional-looking blurred background (bokeh) with a single button press. This feature is perfect for isolating your subject and adding a cinematic touch to your content.
6.3. Cinematic Vlog Setting
This setting optimizes video capture for a cinematic look by automatically adjusting frame rate to 24fps and adding black letterbox bars. You can also choose from various "Looks" (e.g., Clean, Chic, Fresh) and "Moods" (e.g., Auto, Gold, Ocean, Forest) to customize the aesthetic.
Video 6.1: This video demonstrates the Cinematic Vlog Setting, showcasing how it locks the frame rate to 24fps, adds letterbox bars, and allows selection of various "Looks" and "Moods" for a cinematic video aesthetic (from 8:57 to 9:30 in the comparison video).
6.4. Creative Looks and S-Cinetone
The camera offers 10 Creative Look presets (e.g., FL, IN, SH, VV2) that allow you to fine-tune saturation, contrast, sharpness, and clarity directly in-camera. Additionally, the S-Cinetone picture profile (PP11) provides a cinematic look optimized for skin tones without extensive post-production grading.
6.5. In-Camera Time-lapse
Create stunning time-lapse videos directly within the camera without needing external intervalometers or complex software. You can set the frame rate and interval time to capture dynamic scenes like moving clouds or changing light conditions.
Video 6.2: This video demonstrates the in-camera time-lapse feature, showing how to access settings for frame rate and interval time to create time-lapse sequences (from 5:16 to 5:34 in the comparison video).
7. Recursos de áudio
7.1. Internal Microphone and Directivity
The ZV-E10 II features an improved internal 3-capsule microphone with adjustable directivity. You can select between Frente, Traseira, ou Todas as direções to optimize audio pickup based on your shooting scenario, effectively isolating your voice from ambient noise.
7.2. Multi-Interface Shoe for External Microphones
For enhanced audio quality, the camera's Multi-Interface (MI) Shoe allows for direct digital audio input from compatible Sony microphones (e.g., Sony ECM-M1) without the need for additional cables. This provides a clean, high-quality audio signal.
Video 7.1: This video illustrates the audio capabilities of the Sony ZV-E10 II, including the internal microphone's directivity settings (Front, Rear, All Directions) and the use of the Multi-Interface Shoe for external microphones like the Sony ECM-M1 (from 11:41 to 14:17 in the comparison video).
8. Estabilização de imagem
The ZV-E10 II incorporates Optical SteadyShot image stabilization, particularly effective with the bundled 16-50mm OSS lens. This feature helps to reduce camera shake, resulting in smoother and more stable footage, especialmente durante filmagens com a câmera na mão.
Video 8.1: This video compares the image stabilization performance between the original Sony ZV-E10 and the ZV-E10 II, demonstrating the improved stability of the newer model's Active SteadyShot (from 14:18 to 15:10 in the comparison video).
9. Manutenção
9.1. Limpeza da câmera e da lente
- Use um pano macio e sem fiapos para limpar o corpo da câmera.
- For the lens, use a lens brush to remove dust, then a lens cleaning solution and a microfiber cloth. Avoid touching the lens surface with your fingers.
- Never use organic solvents such as alcohol, benzene, or thinner to clean the camera.
9.2. Cuidados com a bateria
- Carregue a bateria totalmente antes do primeiro uso.
- Guarde as baterias em um local fresco e seco quando não estiverem em uso.
- Evite expor a bateria a temperaturas extremas.
10. Solução De Problemas
Se você encontrar problemas com sua câmera, consulte as seguintes soluções comuns:
- A câmera não liga: Certifique-se de que a bateria esteja totalmente carregada e inserida corretamente.
- A bateria não carrega: Check the charging cable and adapter. If the charging indicator light is yellow, it may indicate a fault with the battery or charging system. Try a different charging cable or contact support.
- As imagens estão desfocadas: Check focus settings (autofocus mode, focus area). Ensure the lens is clean and properly attached.
- A gravação de vídeo para inesperadamente: Ensure the memory card has sufficient space and is of a high-speed class suitable for 4K recording. Check battery level.
- Menu navigation issues: The ZV-E10 II features an updated, fully touchscreen-enabled menu. Ensure touch operation is enabled in settings if you prefer it.
For more detailed troubleshooting, please visit the Sony support website ou entre em contato com o atendimento ao cliente.
11. Especificações
| Recurso | Detalhe |
|---|---|
| Dimensões do produto | 1.8 x 4.5 x 2.5 polegadas |
| Peso do item | 4.4 libras |
| ASIN | B0DFJTWDK6 |
| Número do modelo do item | ZVE10M2KB |
| Baterias | 1 bateria não padrão (incluída) |
| Data da primeira disponibilidade | 28 de agosto de 2024 |
| Fabricante | Sony |
| Montagens Compatíveis | Sony E |
| Proporção da tela | 4:3 |
| Tecnologia de sensor fotográfico | BSI CMOS |
| Suportado File Formatar | JPEG, MP4 |
| Estabilização de Imagem | Híbrido |
| Distância focal máxima | 50 milímetros |
| Marca | Sony |
| Nome do modelo | ZVE10M2KB |
| Máximo Webresolução de imagem da câmera | 26 MP |
| Tamanho do sensor de foto | 23.6 x 15.6 mm |
12. Garantia e Suporte
Your Sony ZV-E10 II camera is covered by a manufacturer's warranty. For specific warranty terms and conditions, please refer to the documentation included with your product or visit the official Sony support website.
For technical support, product registration, or service inquiries, please contact Sony Customer Support through their official channels.