1. Introdução
This manual provides detailed instructions for the installation, operation, and maintenance of your Geometric Future Eskimo Pro 360mm All-in-One (AIO) CPU Liquid Cooler. Please read this manual thoroughly before installation to ensure proper setup and optimal performance. Keep this manual for future reference.

Image 1.1: Geometric Future Eskimo Pro 360mm AIO CPU Liquid Cooler.
2. Conteúdo da embalagem
Verifique se todos os componentes estão presentes na embalagem:
- Eskimo Pro 360mm Radiator with Integrated Pump/CPU Block
- 3 x Squama 2501 ARGB PWM Fans
- Intel Mounting Brackets and Hardware (LGA 1700/1851, 1200/115X, 2011/2066)
- AMD Mounting Brackets and Hardware (AM4/AM5)
- High-Conductivity Thermal Paste (GF10)
- Fan Screws and Radiator Mounting Screws
- ARGB and PWM Splitter Cables
- Manual do usuário
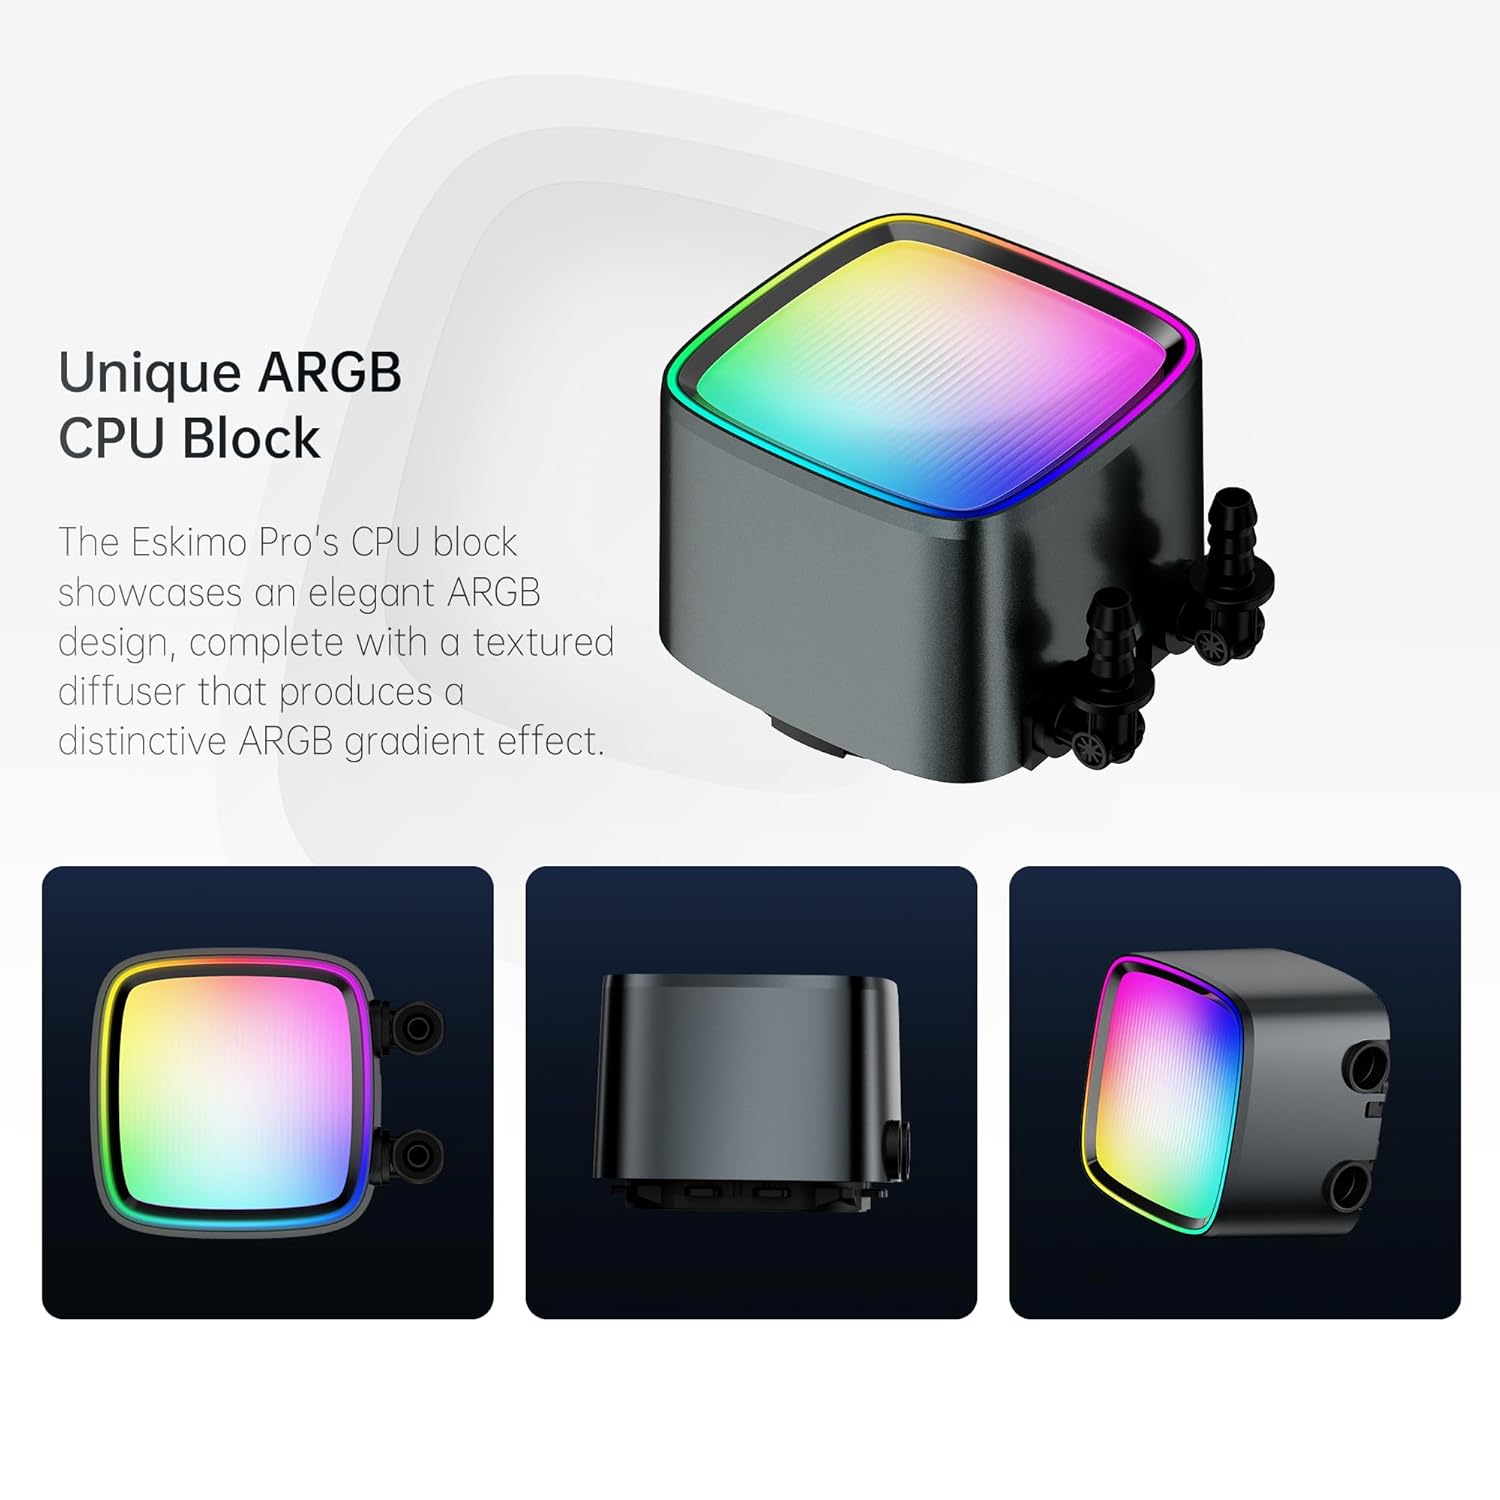
Imagem 2.1: Terminadoview of the Eskimo Pro 360mm AIO cooler with fans and pump/block.
3. Informações de segurança
Observe the following safety guidelines during installation and operation:
- Certifique-se de que seu computador esteja desligado e desconectado da tomada antes da instalação.
- Manuseie os componentes com cuidado para evitar danos.
- Consulte o manual da sua placa-mãe para obter informações específicas sobre a localização das ventoinhas e dos conectores ARGB.
- Avoid touching the fan blades while they are spinning.
- Não tente abrir ou modificar o circuito de refrigeração líquida selado.
4. Configuração e instalação
Follow these steps to install your Eskimo Pro 360mm AIO liquid cooler.
4.1 Pré-instalação
- Check Case Compatibility: Ensure your PC case has sufficient space to mount a 360mm radiator (typically at the top or front).
- Preparar a CPU: Clean any old thermal paste from your CPU and CPU cooler mounting area on the motherboard.
4.2 Mounting the CPU Block
- Identify the correct mounting bracket for your CPU socket (Intel LGA 1700/1851, 1200/115X, 2011/2066 or AMD AM4/AM5).
- Attach the appropriate backplate to the rear of your motherboard, if required by your socket type.
- Secure the standoffs to the motherboard.
- Apply a small amount of the provided GF10 high-conductivity thermal paste to the center of your CPU's integrated heat spreader (IHS).
- Carefully place the CPU block onto the CPU, aligning the mounting holes.
- Secure the CPU block with the retention screws, tightening them in a diagonal pattern until snug.
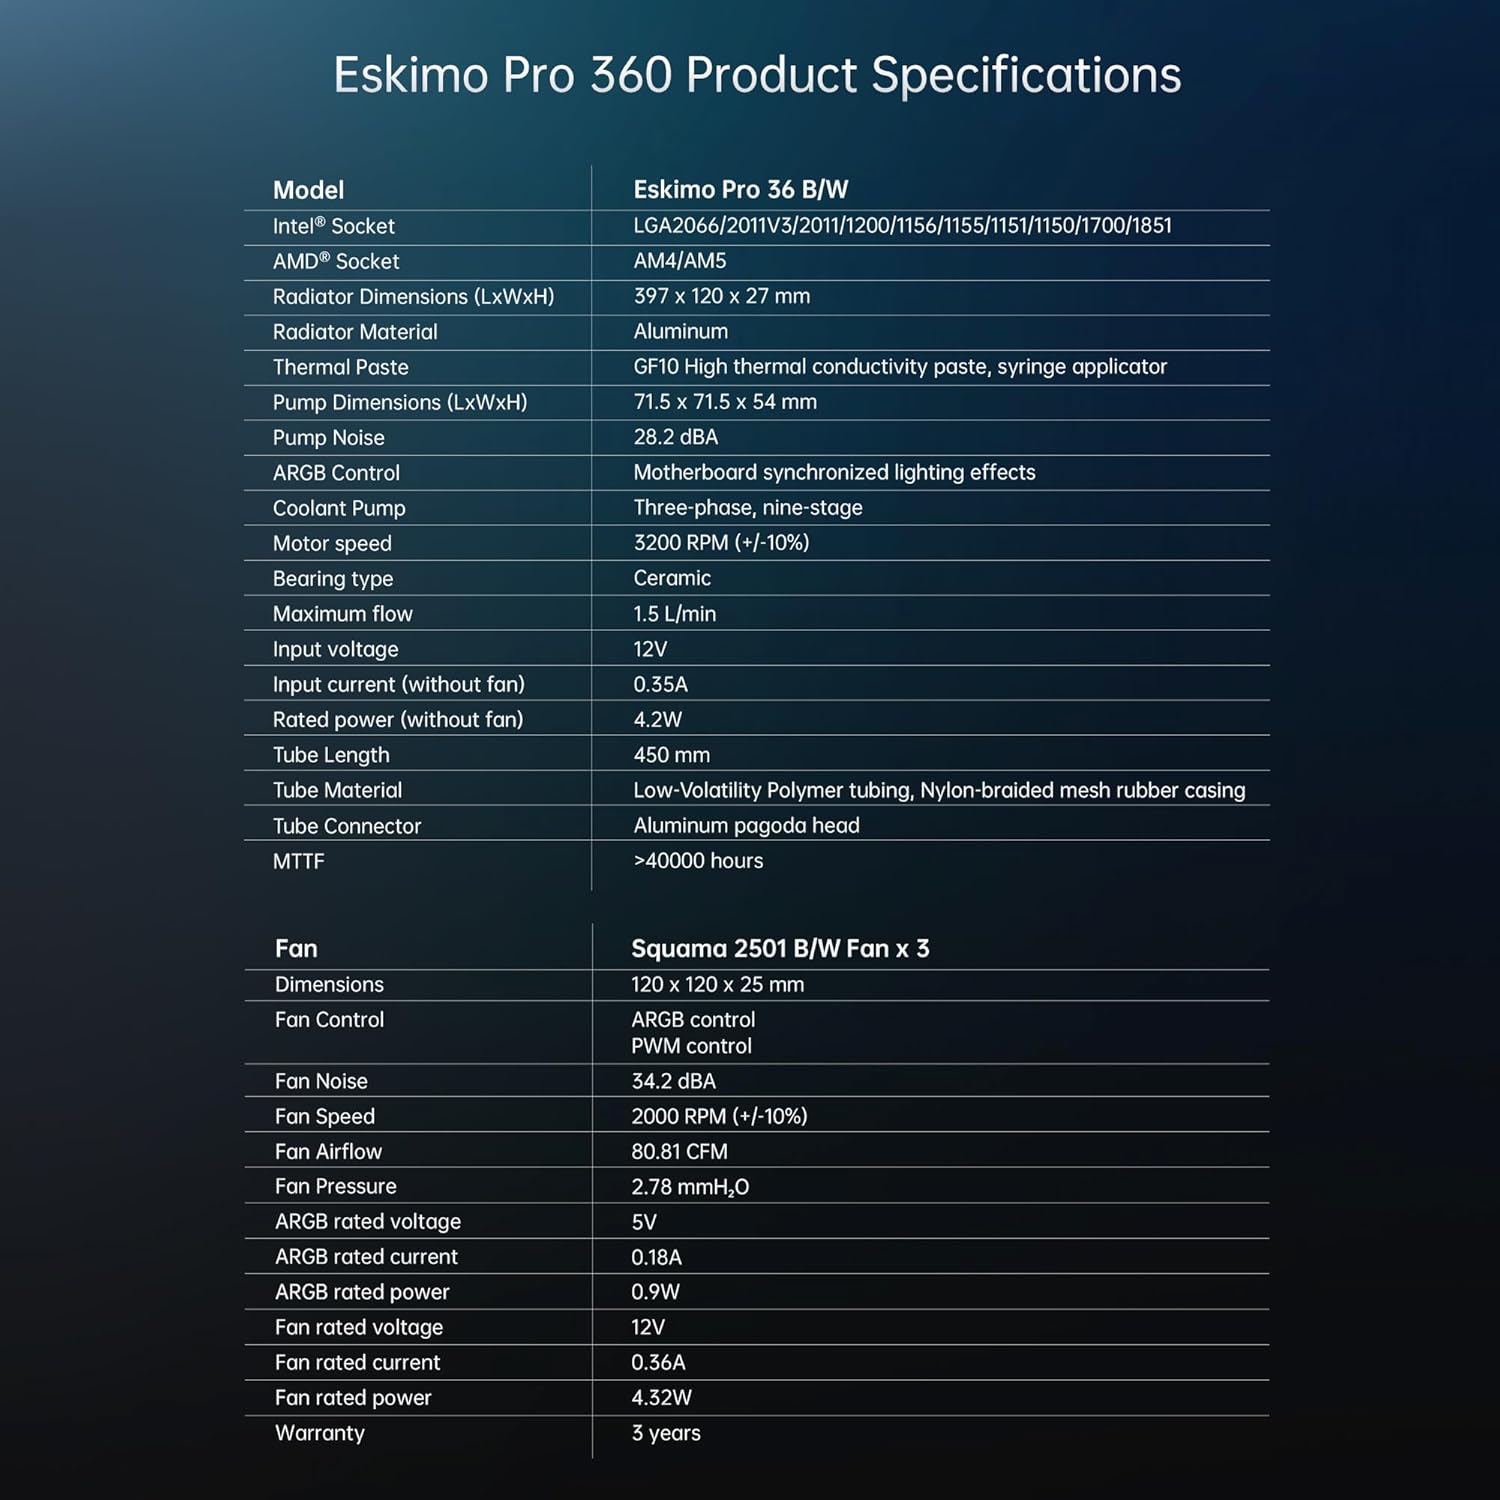
Image 4.1: Universal compatibility with Intel and AMD CPU mounting brackets.

Image 4.2: Illustration of applying high-conductivity thermal paste to the CPU.
4.3 Installing Radiator and Fans
- Attach the three Squama 2501 ARGB fans to the radiator using the provided fan screws. Ensure the fan airflow direction is appropriate for your case's cooling strategy (intake or exhaust).
- Mount the radiator assembly into your PC case using the longer radiator screws.

Imagem 4.3: Lateral view of the radiator, showing the cooling fins.

Image 4.4: Close-up of a Squama 2501 ARGB fan, featuring dragon-scale textured blades.
4.4 cabos de conexão
- Poder da bomba: Connect the pump's 3-pin or 4-pin connector to a dedicated AIO_PUMP or CPU_FAN header on your motherboard. Consult your motherboard manual for the correct header.
- Potência do ventilador: Connect the PWM cables from the Squama 2501 fans to the CPU_FAN or SYS_FAN headers on your motherboard, using the provided splitter cable if necessary.
- Iluminação ARGB: Connect the ARGB cables from the CPU block and fans to a 5V 3-pin ARGB header on your motherboard, using the provided splitter cable if necessary. Do not connect to a 12V RGB header, as this will damage the LEDs.
5. Instruções de operação
Once installed, the Eskimo Pro 360mm AIO cooler operates automatically to maintain optimal CPU temperatures.
5.1 Inicialização
After completing the installation, power on your computer. The fans and pump should start operating, and the ARGB lighting on the CPU block and fans should illuminate.
5.2 Controle de Iluminação ARGB
The ARGB lighting is motherboard-synchronized. Use your motherboard's RGB software (e.g., ASUS Aura Sync, MSI Mystic Light Sync, Gigabyte RGB Fusion, ASRock Polychrome Sync) to customize lighting effects and colors.

Image 5.1: Close-up of the unique ARGB CPU block with a textured diffuser.
5.3 Fan and Pump Speed Control
The fans are PWM controlled, and the pump speed is regulated by the motherboard. You can adjust fan and pump curves through your motherboard's BIOS/UEFI settings or dedicated software to optimize for noise levels and cooling performance.
6. Manutenção
A manutenção regular ajuda a garantir a longevidade e o desempenho do seu cooler AIO.
- Limpeza de pó: Limpe periodicamente a poeira das aletas do radiador e das pás do ventilador usando ar comprimido ou uma escova macia. Certifique-se de que os ventiladores não estejam girando durante a limpeza.
- Gerenciamento de cabos: Ensure all cables are securely connected and not interfering with fan operation or airflow.
- Inspeção visual: Occasionally inspect the tubing for any signs of wear or leaks. The low-volatility polymer tubing with nylon-braided mesh is designed for durability.

Image 6.1: Illustration of the low-volatility polymer tubing with a durable nylon braided rubber sleeve.
7. Solução De Problemas
If you encounter issues with your Eskimo Pro 360mm AIO cooler, refer to the following common problems and solutions.
- Altas temperaturas da CPU:
- Ensure the CPU block is properly seated and making full contact with the CPU.
- Verify that thermal paste was applied correctly.
- Check that fans are spinning and oriented for optimal airflow.
- Confirm the pump is receiving power and operating.
- Ruído da bomba:
- AIO pumps can sometimes produce noise due to air bubbles in the loop. Try gently tilting or shaking your PC case while it's running to help dislodge air bubbles.
- Adjust pump speed settings in your motherboard's BIOS/UEFI. Lower speeds may reduce noise.
- Ensure the radiator is mounted higher than the CPU block if possible, to keep air bubbles away from the pump.
- Iluminação ARGB não funciona:
- Verify all ARGB cables are securely connected to the 5V 3-pin ARGB header on your motherboard.
- Certifique-se de que o software RGB da sua placa-mãe esteja instalado e configurado corretamente.
- Check for any physical damage to the ARGB cables or connectors.
8. Especificações
Detailed technical specifications for the Geometric Future Eskimo Pro 360mm AIO Liquid Cooler:
| Componente | Especificação |
|---|---|
| Modelo | Eskimo Pro 36 B/W |
| Intel® Socket Compatibility | LGA2066/2011v3/2011/1200/115X/1700/1851 |
| AMD® Socket Compatibility | AM4/AM5 |
| Dimensões do radiador (CxLxA) | 397 x 120 x 27 mm |
| Material do Radiador | Alumínio |
| Pasta Térmica | GF10 High thermal conductivity paste, syringe applicator |
| Pump Dimensions (LxWxH) | 71.5 x 71.5 x 54 mm |
| Ruído da bomba | 28.2 dBA |
| Controle ARGB | Motherboard synchronized lighting effects |
| Bomba de refrigeração | Three-phase, nine-stage |
| Velocidade do motor | 3200 RPM (+/-10%) |
| Tipo de rolamento | Cerâmica |
| Fluxo máximo | 1.5 L/min |
| Vol de entradatage | 12V |
| Input current (without fan) | 0.55A |
| Rated power (without fan) | 4.2 W |
| Comprimento do tubo | 450 milímetros |
| Material do tubo | Low-Volatility Polymer tubing, Nylon-braided mesh rubber casing |
| Conector de tubo | Aluminum pagoda head |
| MTTF | >40000 horas |
| Fan (Squama 2501 B/W Fan x 3) | |
| Dimensões | 120 x 120 x 25 mm |
| Controle do ventilador | ARGB control, PWM control |
| Ruído do ventilador | 34.2 dBA |
| Velocidade do ventilador | 2000 RPM (+/-10%) |
| Fluxo de ar | 80.81 CFM |
| Pressão do ventilador | 2.78 mmH₂O |
| ARGB rated voltage | 5V |
| ARGB rated current | 0.18A |
| ARGB rated power | 0.9 W |
| Vol avaliado pelo fãtage | 12V |
| Fan rated current | 0.36A |
| Fan rated power | 4.32 W |
| Garantia | 3 anos |

Image 8.1: Detailed product specifications for the Eskimo Pro 360mm AIO cooler.
9. Informações de garantia
The Geometric Future Eskimo Pro 360mm AIO CPU Liquid Cooler comes with a Garantia de 3 ano A garantia é válida a partir da data da compra e cobre defeitos de materiais e de fabricação sob uso normal. Guarde o comprovante de compra para eventuais solicitações de garantia.
The product has undergone rigorous testing and holds multiple international certifications, including CE, FC, RoHS, and UKCA, ensuring quality and safety standards are met.

Imagem 9.1: Terminadoview of the 3-year warranty and product certifications.
10. Suporte
For technical assistance, warranty claims, or any questions regarding your Geometric Future Eskimo Pro 360mm AIO CPU Liquid Cooler, please contact Geometric Future customer support through their official website or the retailer where the product was purchased. Provide your product model and a detailed description of the issue for efficient support.