VANBAR F83
VANBAR Motorcycle Drive Recorder User Manual
Modelo: F83
Marca: VANBAR
1. Introdução
Obrigado pela compra.asing the VANBAR BR01 Motorcycle Drive Recorder. This manual provides detailed instructions for the proper installation, operation, and maintenance of your device. Please read this manual thoroughly before use to ensure optimal performance and safety.
2. Informações de segurança
- Always ensure the device is securely mounted and all cables are properly routed to avoid interference with motorcycle operation.
- Não tente desmontar ou modificar o dispositivo. Isso pode anular a garantia e representar um risco à segurança.
- Ensure all connections are waterproofed as specified, especially in wet conditions.
- This product is designed for use with a dedicated step-down cable for power supply. Do not attempt to power it via a standard USB cable.
- Operate the device only when it is safe to do so. Avoid distractions while riding.
3. Conteúdo da embalagem
Por favor, verifique se todos os itens listados abaixo estão incluídos em seu pacote:
| Item | Quantidade | Descrição |
|---|---|---|
| Main Display Unit (Drive Recorder) | 1 | 6.25-inch touchscreen display. |
| Câmera Frontal | 1 | FHD 1080P recording. |
| Câmera Traseira | 1 | FHD 1080P recording. |
| Suporte da unidade principal | 1 | For mounting the display unit. |
| Bracket Inner Diameter Rings | Definir | Various sizes (28mm, 25.4mm, 22mm) for different handlebar diameters. |
| Cabo de energia | 1 | Dedicated step-down power cable. |
| Controle remoto | 1 | Wired remote for easy operation. |
| Tool Set | 1 | Includes screwdriver and wrenches for installation. |
| Cartão de memória (64 GB) | 1 | Pre-installed or included for recording. |
| Bandas | Definir | Para gerenciamento de cabos. |
| Camera Cleaning Cloth | 1 | For maintaining camera lens clarity. |
| Manual do usuário | 1 | Esse documento. |

Image: All components included in the VANBAR Motorcycle Drive Recorder package.
4. Produto acabadoview
The VANBAR BR01 features a 6.25-inch large touch screen display, front and rear FHD 1080P cameras, and supports CarPlay/Android Auto for seamless smartphone integration.

Image: Main unit and key accessories of the VANBAR BR01.
Principais características:
- 6.25-inch Large Touch Screen: Enhanced visibility and easy operation, even with gloves. Supports various display modes including navigation, music playback, and recording views.
- Front & Rear FHD 1080P Simultaneous Recording: Captures clear and vivid images from both cameras.
- WDR/HDR Function: Ensures balanced brightness in high contrast lighting conditions, preventing overexposure or underexposure.
- Ajuste automático de brilho: Built-in light sensor adjusts screen brightness based on ambient light.
- CarPlay/Android Auto sem fio: Seamlessly integrates with your smartphone for navigation, calls, and music.
- Controle de voz: Supports Siri/Google Assistant for hands-free operation.
- IP67 Waterproof, Dustproof, and Vibration Resistant: Designed to withstand harsh road conditions and weather.
- Built-in WiFi: Connects to a dedicated app for easy video/photo management and sharing.
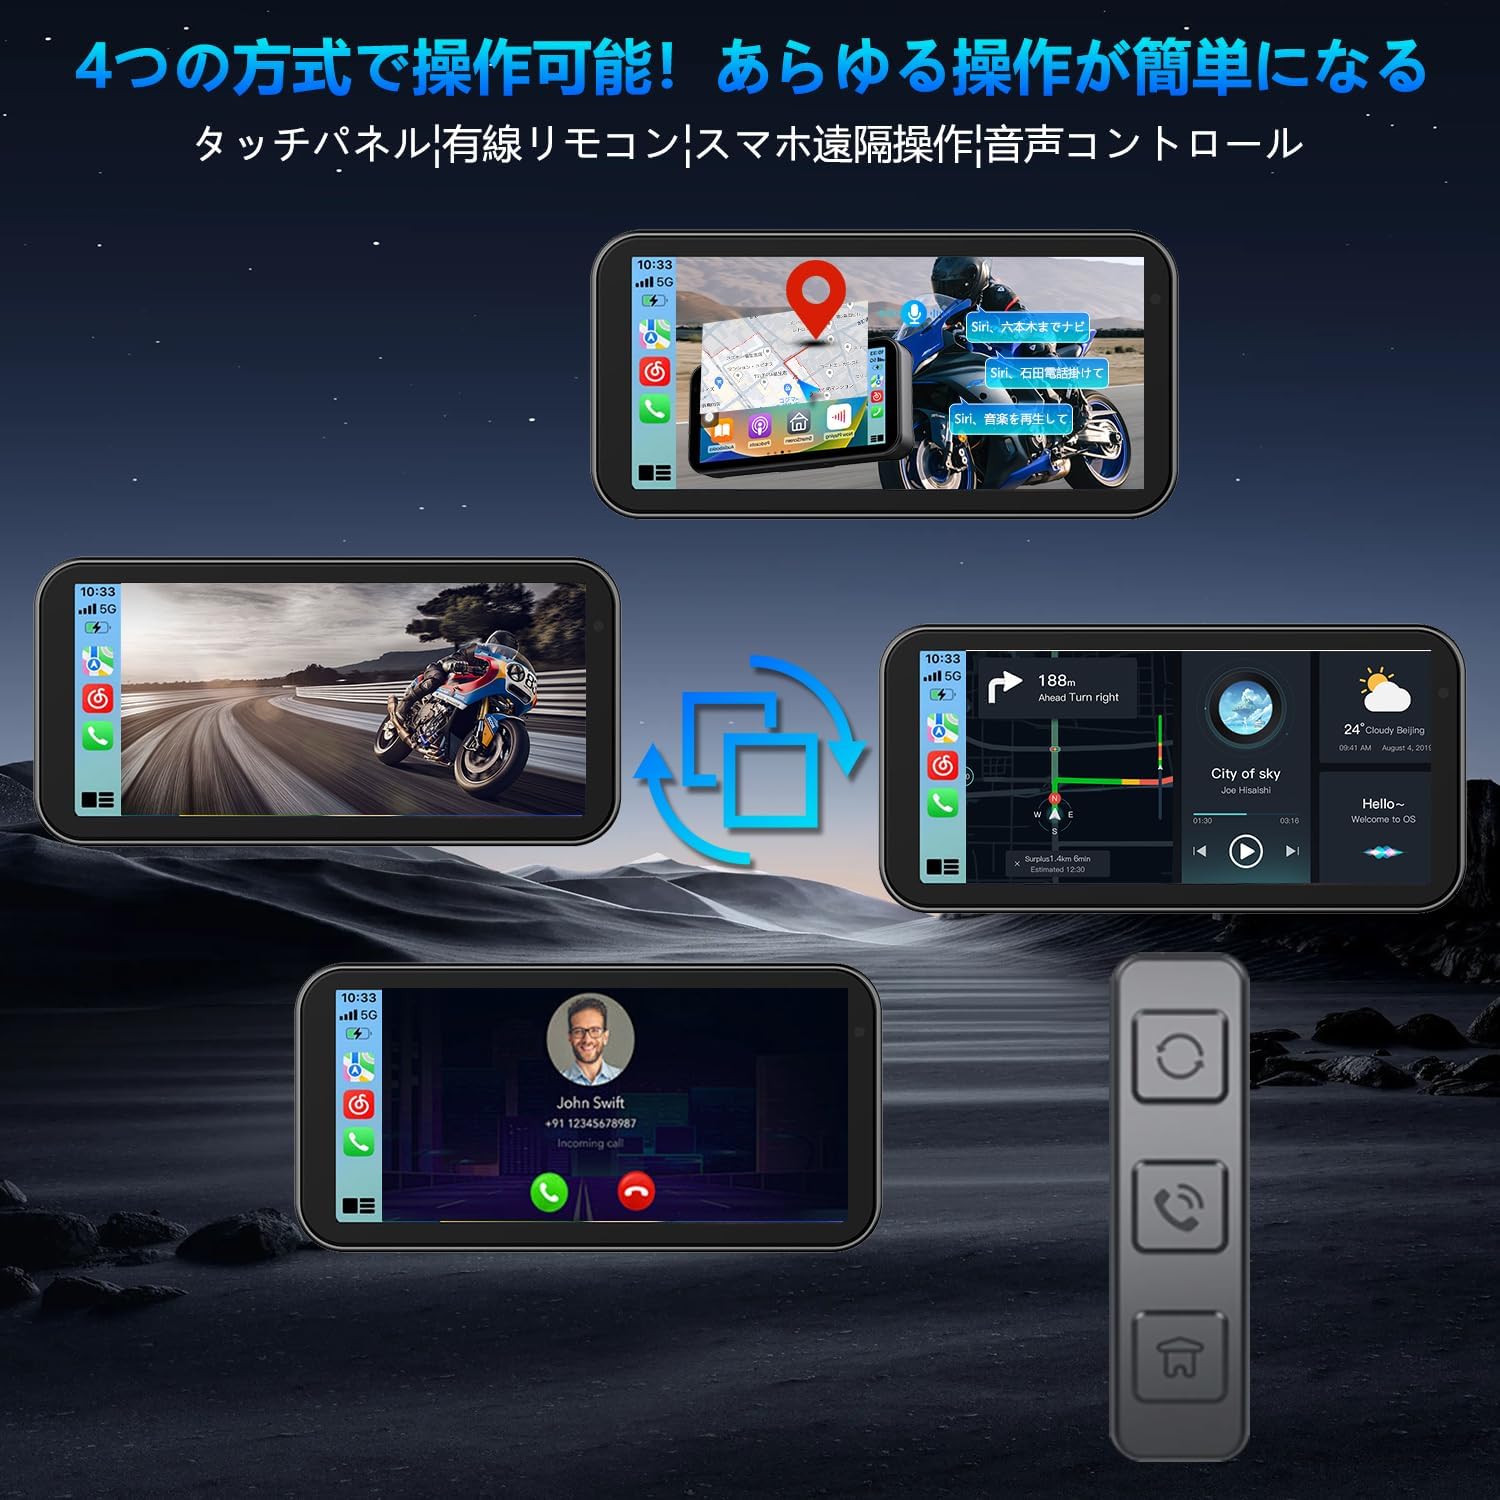
Image: Clear display view on a motorcycle.

Image: Multiple display modes for versatile use.
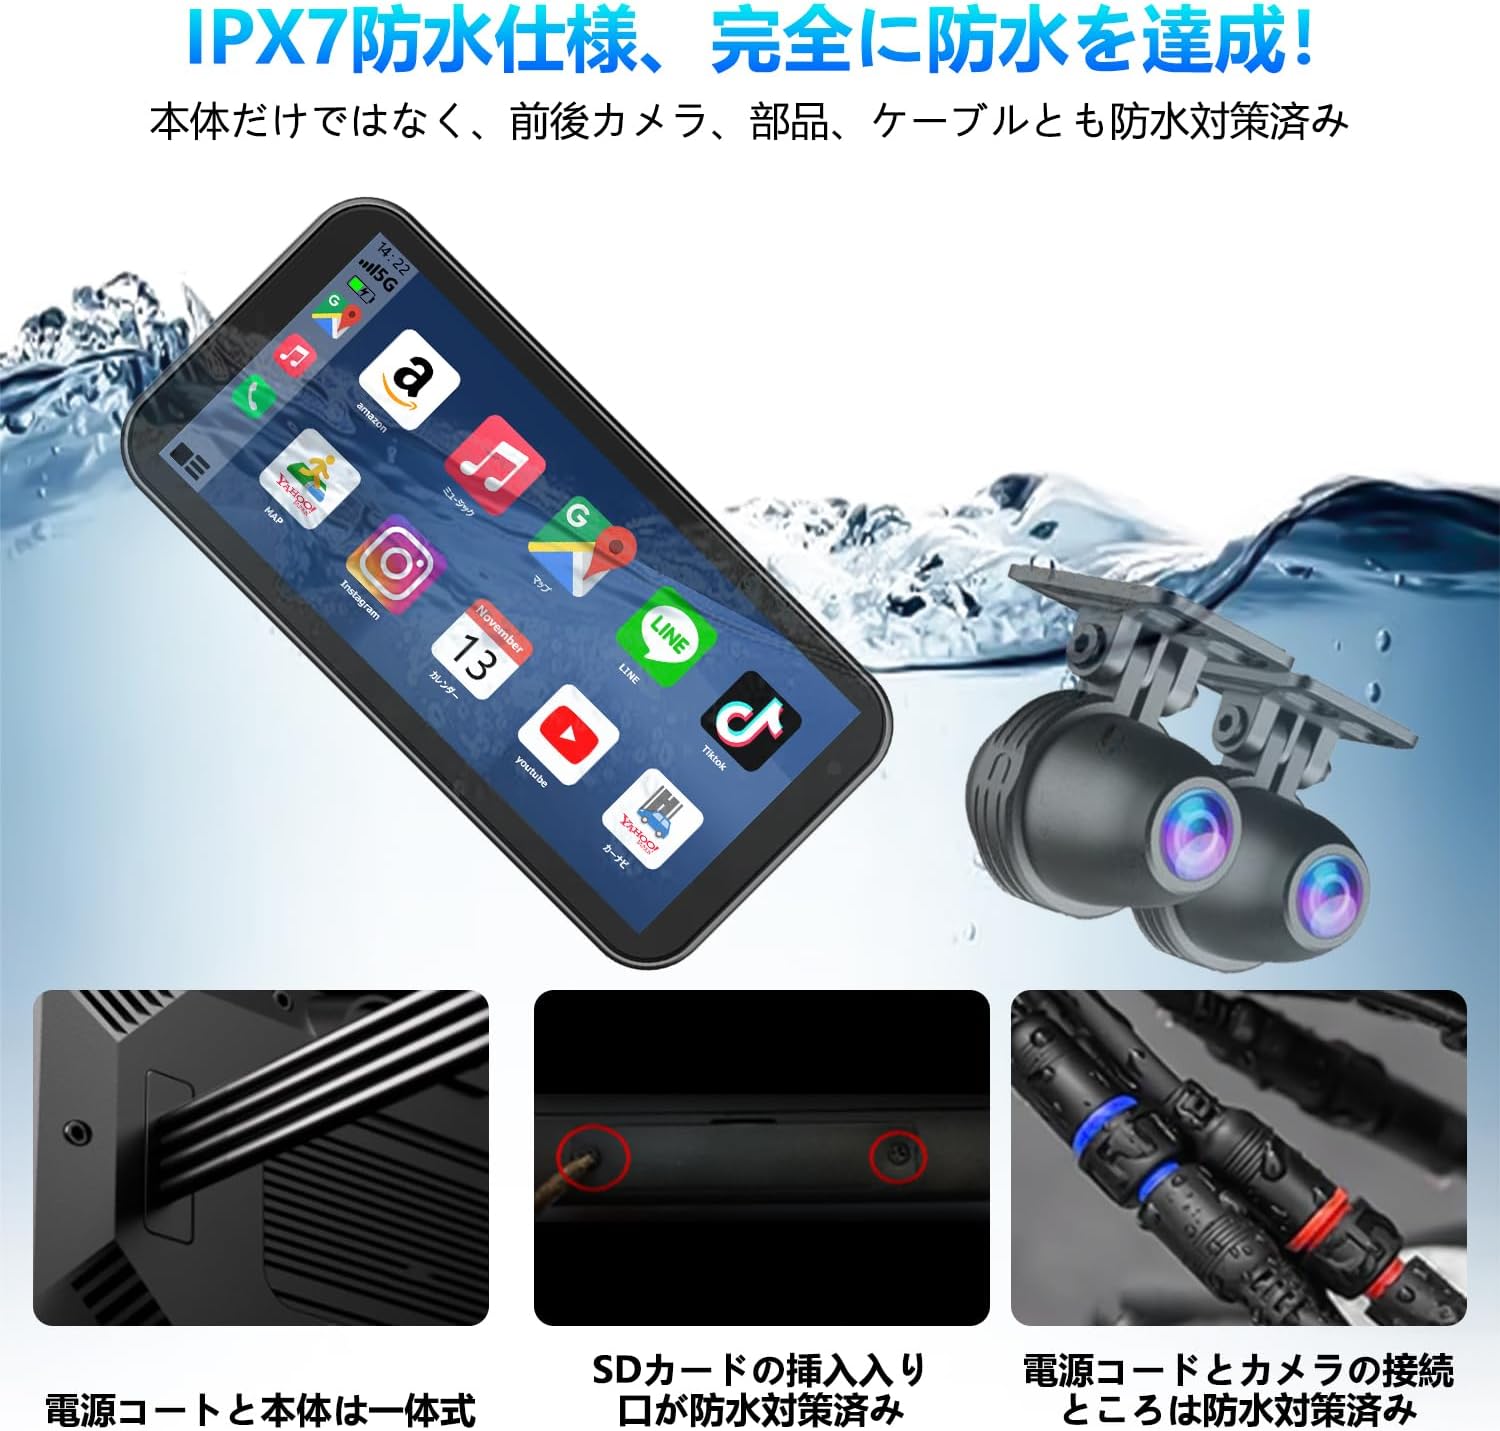
Image: IPX7 waterproof design for all-weather use.
5. Configuração e instalação
5.1 Montagem da unidade principal
- Choose a suitable location on your motorcycle's handlebar for the main display unit. Ensure it does not obstruct your view ou interferir nos controles.
- Attach the main unit bracket to the handlebar. Use the appropriate inner diameter ring for a secure fit.
- Secure the main display unit to the bracket. Adjust the angle for optimal viewindo.
5.2 Instalação da câmera
- Câmera frontal: Mount the front camera in a position that provides a clear, unobstructed view da estrada à frente.
- Câmera traseira: Mount the rear camera at the back of your motorcycle, ensuring it captures a wide view da parte traseira.
- Route the camera cables securely along the motorcycle frame, avoiding moving parts or heat sources. Use the provided bands for cable management.

Image: Front and rear cameras for clear recording.
5.3 Conexão de Energia
The power supply for this product requires the included step-down cable. Do not use a standard USB power cord.
- Connect the dedicated power cable to the main unit.
- Connect the power cable's red wire to an ACC (Accessory) power source (switched power, turns on with ignition).
- Connect the power cable's yellow wire to a constant BAT (Battery) power source (always on).
- Connect the power cable's black wire to a ground point on the motorcycle frame.
- Certifique-se de que todas as conexões estejam seguras e devidamente isoladas.

Image: Detailed wiring diagram for installation.
6. Instruções de operação
6.1 Ligar/Desligar
The device will automatically power on when the motorcycle ignition is turned on (ACC power is supplied) and power off when the ignition is turned off.
6.2 Operação com tela sensível ao toque
The 6.25-inch capacitive touch screen is highly sensitive and can be operated comfortably even with gloves. Navigate through menus and functions by tapping and swiping.
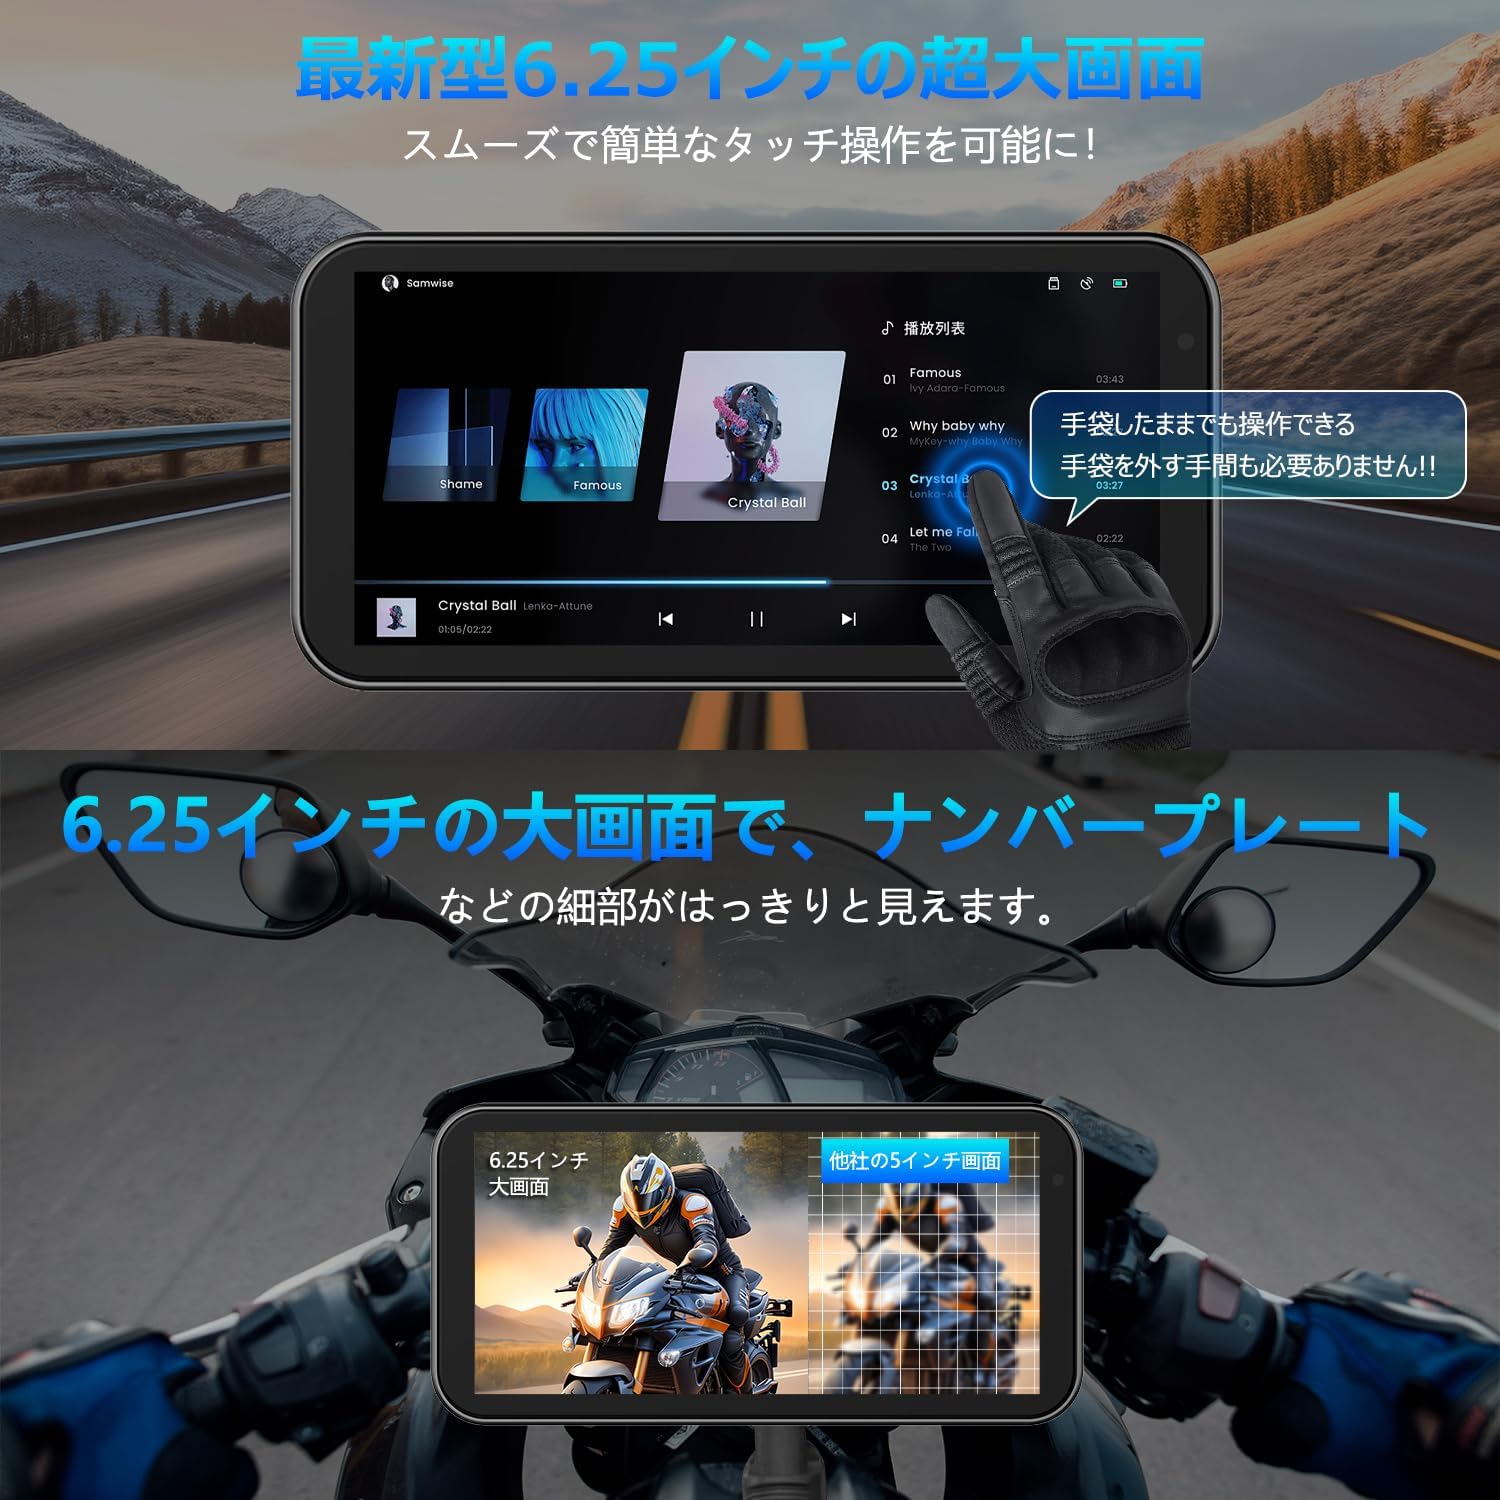
Image: Large display and glove-friendly touch operation.
6.3 CarPlay / Android Auto Connection
The device supports wireless CarPlay and Android Auto, allowing you to use your smartphone's navigation, music, and communication apps directly on the display.
6.3.1 Apple CarPlay Connection Method
- Etapa 1: On the device's home screen, tap the CarPlay icon to enter the connection screen.
- Etapa 2: On your smartphone, turn on Wi-Fi and Bluetooth.
- Etapa 3: The drive recorder's Bluetooth will automatically turn on. Its name will appear as "MT02-XXXX".
- Etapa 4: Connect to the device's Bluetooth from your smartphone.
- Etapa 5: Once connected, Apple CarPlay will function normally.

Image: Apple CarPlay connection steps.
6.3.2 Android Auto Connection Method
- Etapa 1: On the device's home screen, tap the Android Auto icon to enter the connection screen.
- Etapa 2: On your smartphone, turn on Wi-Fi and Bluetooth.
- Etapa 3: The drive recorder's Bluetooth will automatically turn on. Its name will appear as "MT02-XXXX".
- Etapa 4: Connect to the device's Bluetooth from your smartphone.
- Etapa 5: Once connected, Android Auto will function normally.

Image: Android Auto and CarPlay connection steps and icons.
6.4 Controle de voz
Utilize Siri or Google Assistant for hands-free control of navigation, calls, and music playback. This allows for safer operation without touching the display.

Image: Voice control functionality for safe riding.
6.5 Recording Functions
The device records simultaneously from both front and rear cameras in FHD 1080P resolution.
- Gravação em loop: Sobrescreve automaticamente o foo mais antigotage quando o cartão de memória estiver cheio, garantindo a gravação contínua.
- WDR/HDR Function: Wide Dynamic Range and High Dynamic Range technology improve image quality in varying light conditions, such as tunnels or bright sunlight, by balancing exposure.
- Ajuste automático de brilho: The built-in light sensor adjusts the screen brightness automatically to ensure optimal visibility in any environment.

Image: Enhanced recording clarity with WDR/HDR.
6.6 WiFi and Smartphone App
The integrated WiFi allows you to connect the device to a dedicated smartphone app for convenient management of your recordings.
- Recursos do aplicativo: View foo em tempo realtage, reproduzir vídeos gravados, baixar fileAcesse o seu telefone e ajuste as configurações da câmera.
- Compartilhamento: Easily share your travel moments with friends and family.
- Download da aplicação: Scan the QR code or visit the official website para baixar o aplicativo. Baixe o aplicativo aqui

Image: WiFi connectivity and smartphone app for remote operation.
6.7 Conectividade Bluetooth
Connect your Bluetooth earphones or intercom system to the device for audio output, allowing you to hear navigation instructions, music, and calls directly through your helmet.

Image: Simultaneous connection to multiple Bluetooth devices.
7. Manutenção
- Limpeza: Use the provided cleaning cloth or a soft, dry cloth to wipe the display and camera lenses. Do not use abrasive cleaners or solvents.
- Impermeabilização: While the device is IP67 waterproof, ensure all cable connections are properly sealed and secured to maintain water resistance.
- Armazenar: Quando não estiver em uso por longos períodos, guarde o dispositivo em local fresco e seco, longe da luz solar direta e de temperaturas extremas.
- Cartão de memória: Periodically format the memory card (via the device settings or computer) to ensure optimal recording performance and prevent data corruption.
8. Solução De Problemas
| Problema | Possível causa | Solução |
|---|---|---|
| O dispositivo não liga. | Incorrect power connection; loose cable; no power from motorcycle. | Check power cable connections (ACC, BAT, Ground). Ensure motorcycle ignition is on. Verify power source. |
| Screen is dark or too bright. | Automatic brightness adjustment; direct sunlight. | The device adjusts brightness automatically. If still an issue, try to shade the screen or adjust manually if an option is available in settings. |
| CarPlay/Android Auto não está conectando. | Bluetooth/Wi-Fi off on phone; incorrect pairing; app issues. | Ensure Wi-Fi and Bluetooth are enabled on your smartphone. Re-pair the devices. Restart both the device and your phone. |
| Problemas de gravação (ex.: a gravação para, arquivo corrompido) filee). | Memory card full or corrupted; low power; faulty camera. | Format the memory card. Check power supply stability. Ensure cameras are securely connected. Replace memory card if issue persists. |
| Image blurry or unclear. | Dirty lens; camera not focused; vibration. | Clean camera lenses with the provided cloth. Ensure cameras are securely mounted and not vibrating excessively. |
9. Especificações
| Recurso | Detalhe |
|---|---|
| Marca | VANBAR |
| Nome do modelo | Motorcycle recorder (F83) |
| Tamanho da tela | 6.25 polegadas |
| Dimensões do produto | 8 x 16.5 x 2 cm; 1.01 kg |
| Componentes incluídos | Manual do usuário |
| Bateria incluída | Não |
| Uso da bateria | Não |
| Classificação à prova d'água | IP67 |
10. Garantia e Suporte
VANBAR offers a 3-year extended warranty for this product. For any inquiries, technical support, or warranty claims, please contact our customer service team through the following channels:
- Suporte online: Visit the VANBAR official webSite com perguntas frequentes e recursos de suporte.
- Suporte por e-mail: Refer to the contact information provided in your purchase documentation.
- Contato do vendedor Amazon: You can also contact the seller "HUYUEU2020" directly via Amazon for assistance.
Note: This product has obtained technical compliance certification for the Japanese market (Certification Number: 214-240535).
Ask a question about this manual
Ask about setup, troubleshooting, compatibility, parts, safety, or missing instructions. Manuals+ will review the question and use this page’s manual context to help answer it.