1. Introdução
This manual provides detailed instructions for the assembly, installation, and maintenance of your NEWWAY NW1 PC Case. Designed for versatility and aesthetics, the NW1 supports ATX, Micro-ATX, and ITX motherboards, features a distinctive wooden front panel, and includes efficient cooling solutions. Please read this manual thoroughly before beginning installation to ensure proper setup and optimal performance.

Imagem 1.1: Frente angulada view of the NEWWAY NW1 PC Case, showcasing the wooden front panel and tempered glass side panel.
2. Principais características
- Compatibilidade da placa-mãe: Supports ATX, Micro-ATX, and ITX form factors.
- Design elegante: Features a genuine wooden front panel and a tempered glass side panel.
- Resfriamento avançado: Compatible with watercooling systems up to 360mm. Includes three 140mm PWM fans for enhanced airflow.
- Folga dos componentes: Accommodates CPU coolers up to 181mm in height and graphics cards up to 410mm in length.
- Armazenamento flexível: Offers three dedicated slots for 3.5" HDDs or 2.5" SSDs.
- Portas de E/S frontais: Equipped with USB Type-C, USB 3.0, and audio ports for convenient connectivity.
- Dimensões: L430mm x W235mm x H430mm.
- Peso: 6.8 kg.
3. Configuração e Instalação de Componentes
Before installing any components, ensure the PC case is placed on a stable, flat surface.
3.1. Preparando o Caso
- Carefully remove the tempered glass side panel by unscrewing the thumb screws at the rear of the case and sliding the panel off.
- Remove the rear panel if necessary for cable management access.
3.2. Instalação da placa-mãe
The NW1 case supports ATX, Micro-ATX, and ITX motherboards.
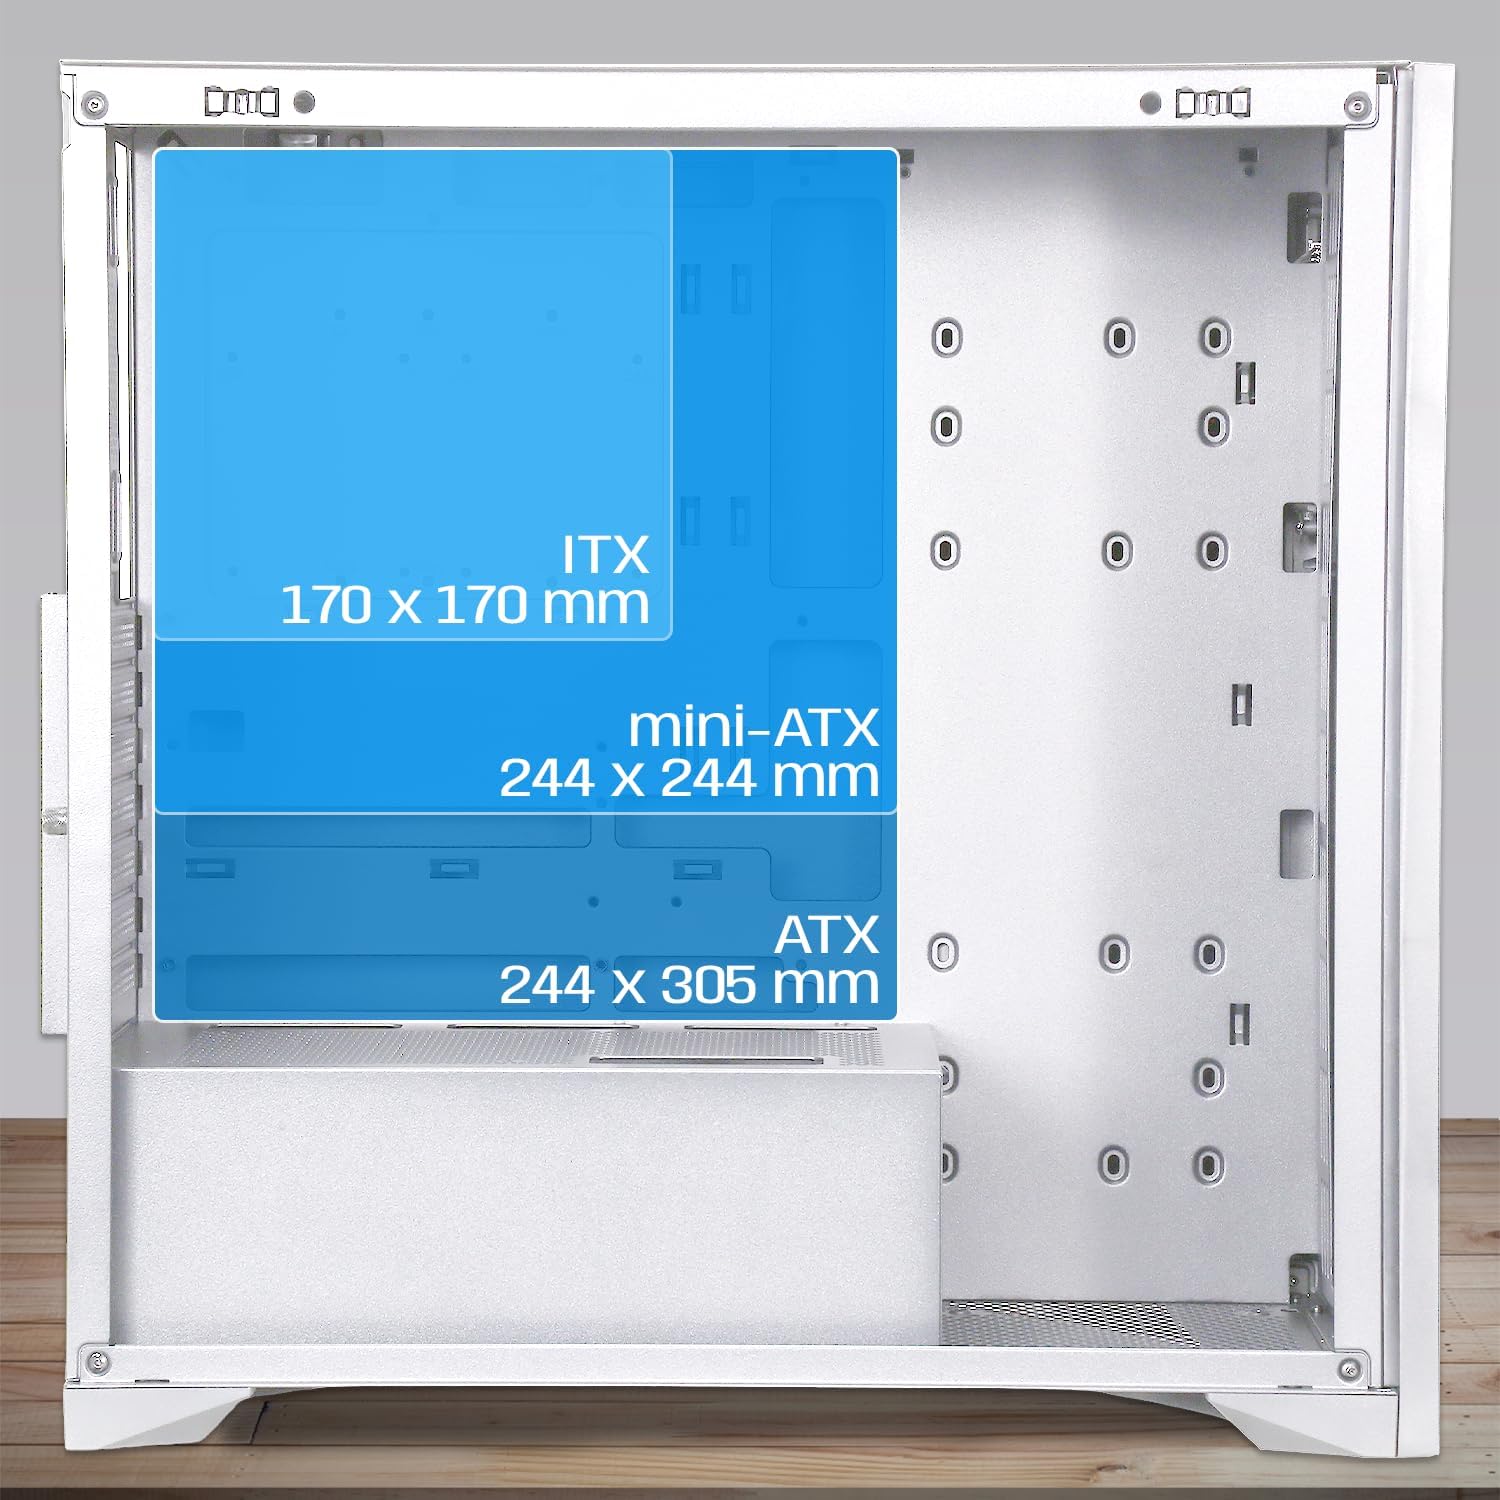
Image 3.1: Diagram illustrating motherboard compatibility and maximum dimensions for ATX, Micro-ATX, and ITX form factors within the case.
- Instale o painel de E/S no slot designado na parte traseira do gabinete.
- Align your motherboard with the pre-installed standoffs. Ensure the standoffs match your motherboard's form factor.
- Fixe a placa-mãe com os parafusos fornecidos.
3.3. CPU Cooler and Graphics Card Installation
O caso fornece ample space for large components.
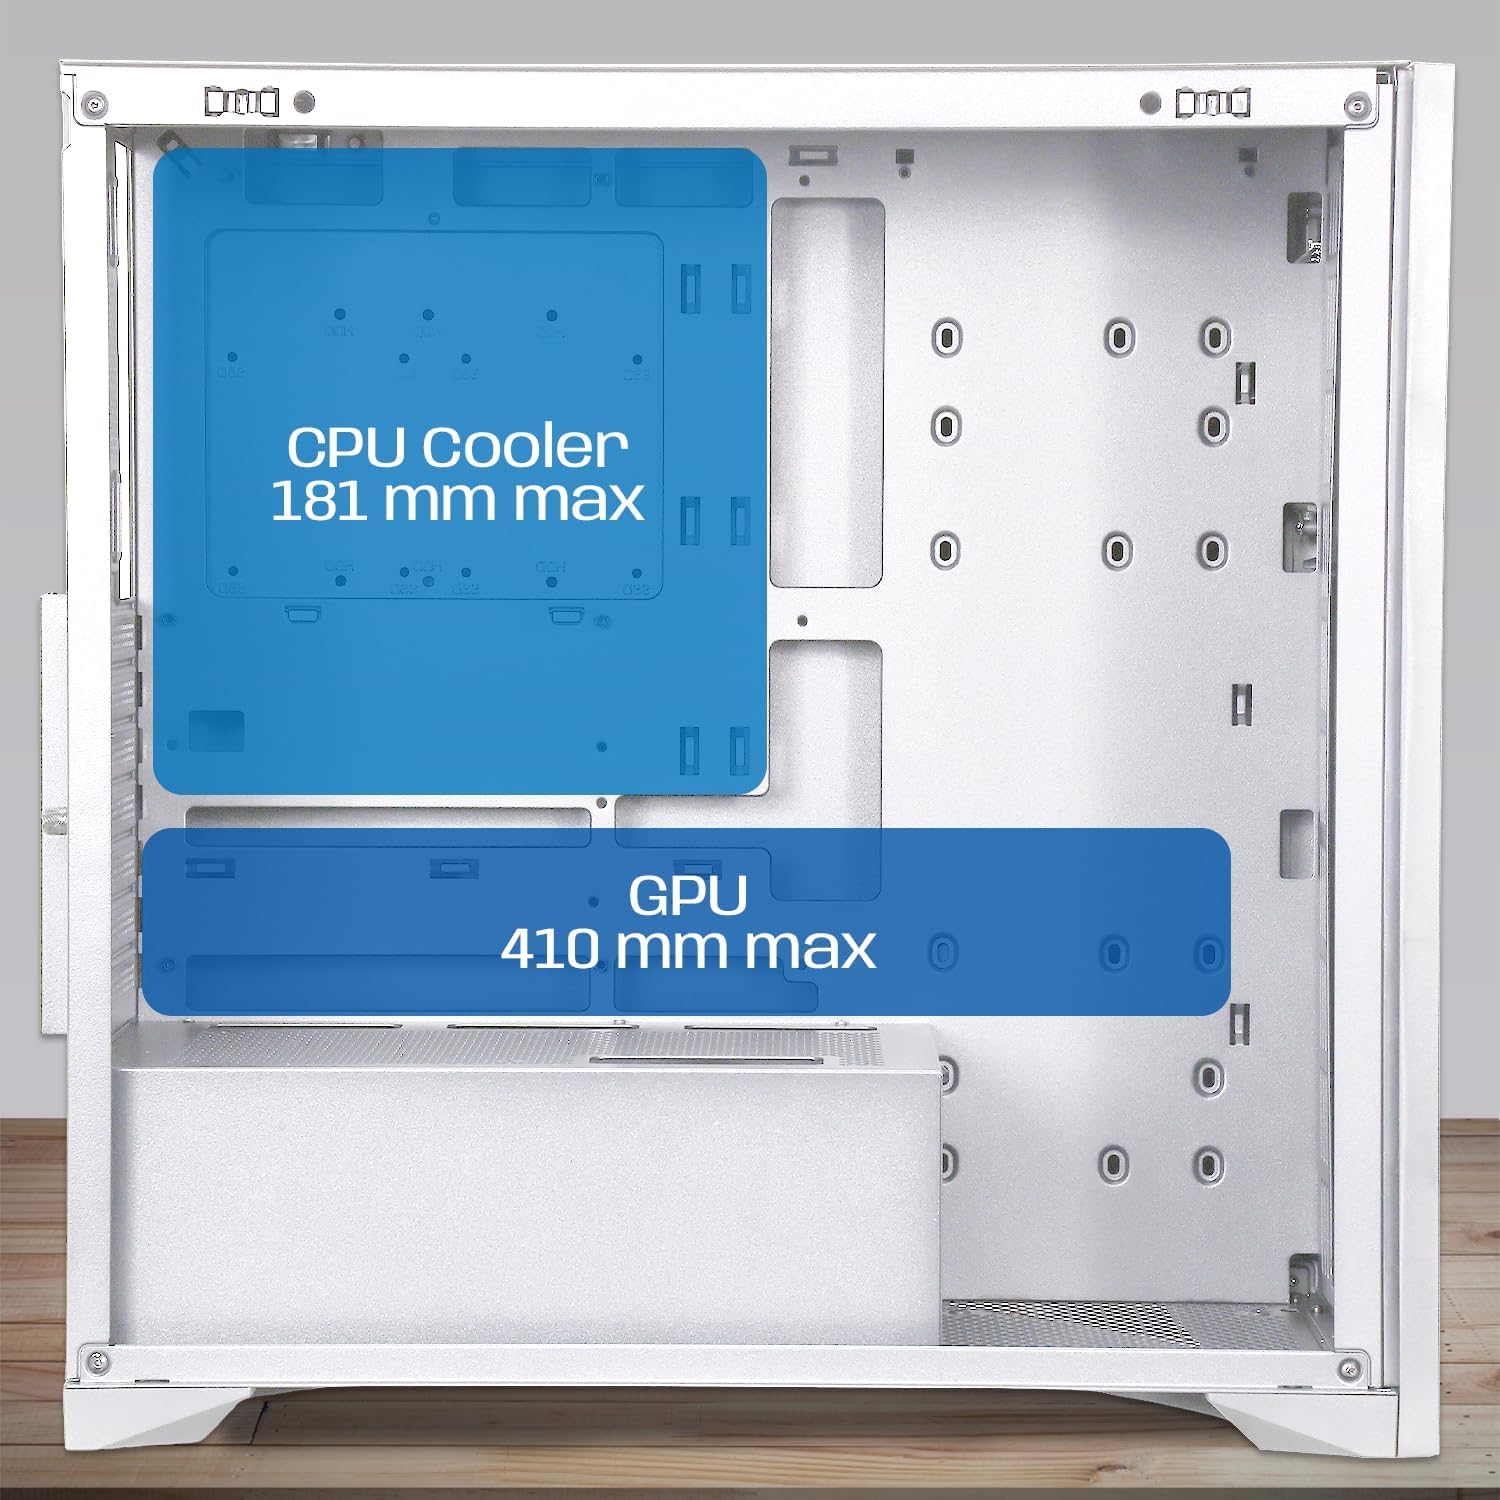
Image 3.2: Diagram showing maximum clearance for CPU coolers (181mm) and graphics cards (410mm) inside the NEWWAY NW1 case.
- Resfriador de CPU: Install your CPU cooler according to its manufacturer's instructions. The case supports coolers up to 181mm in height.
- Placa gráfica (GPU): Remove the necessary expansion slot covers at the rear. Insert your graphics card into the PCIe slot on your motherboard and secure it with screws. The case supports GPUs up to 410mm in length.
3.4. Instalação do dispositivo de armazenamento
The NW1 offers multiple storage options.

Image 3.3: Diagram illustrating the various mounting points for 2.5" SSDs and 3.5" HDDs within the case.
- Locate the 3.5" HDD/2.5" SSD drive bays.
- Monte os seus drives utilizando os parafusos fornecidos.
3.5. Instalação da Unidade de Alimentação (PSU)
The PSU mounts at the bottom of the case.
- Deslize a fonte de alimentação para o compartimento designado na parte inferior traseira do gabinete.
- Fixe a fonte de alimentação com parafusos na parte traseira do gabinete.
3.6. Instalação de ventilador e radiador
The case comes with three 140mm PWM fans pre-installed. Additional cooling can be added.

Image 3.4: Diagram indicating potential fan mounting locations, including the pre-installed front fans and a rear exhaust fan.
- Connect the pre-installed 140mm PWM fans to your motherboard's fan headers.
- For watercooling, install radiators up to 360mm in the designated mounting points (e.g., front or top, depending on size).
3.7. Connecting Front Panel I/O
Connect the front panel cables to the corresponding headers on your motherboard.
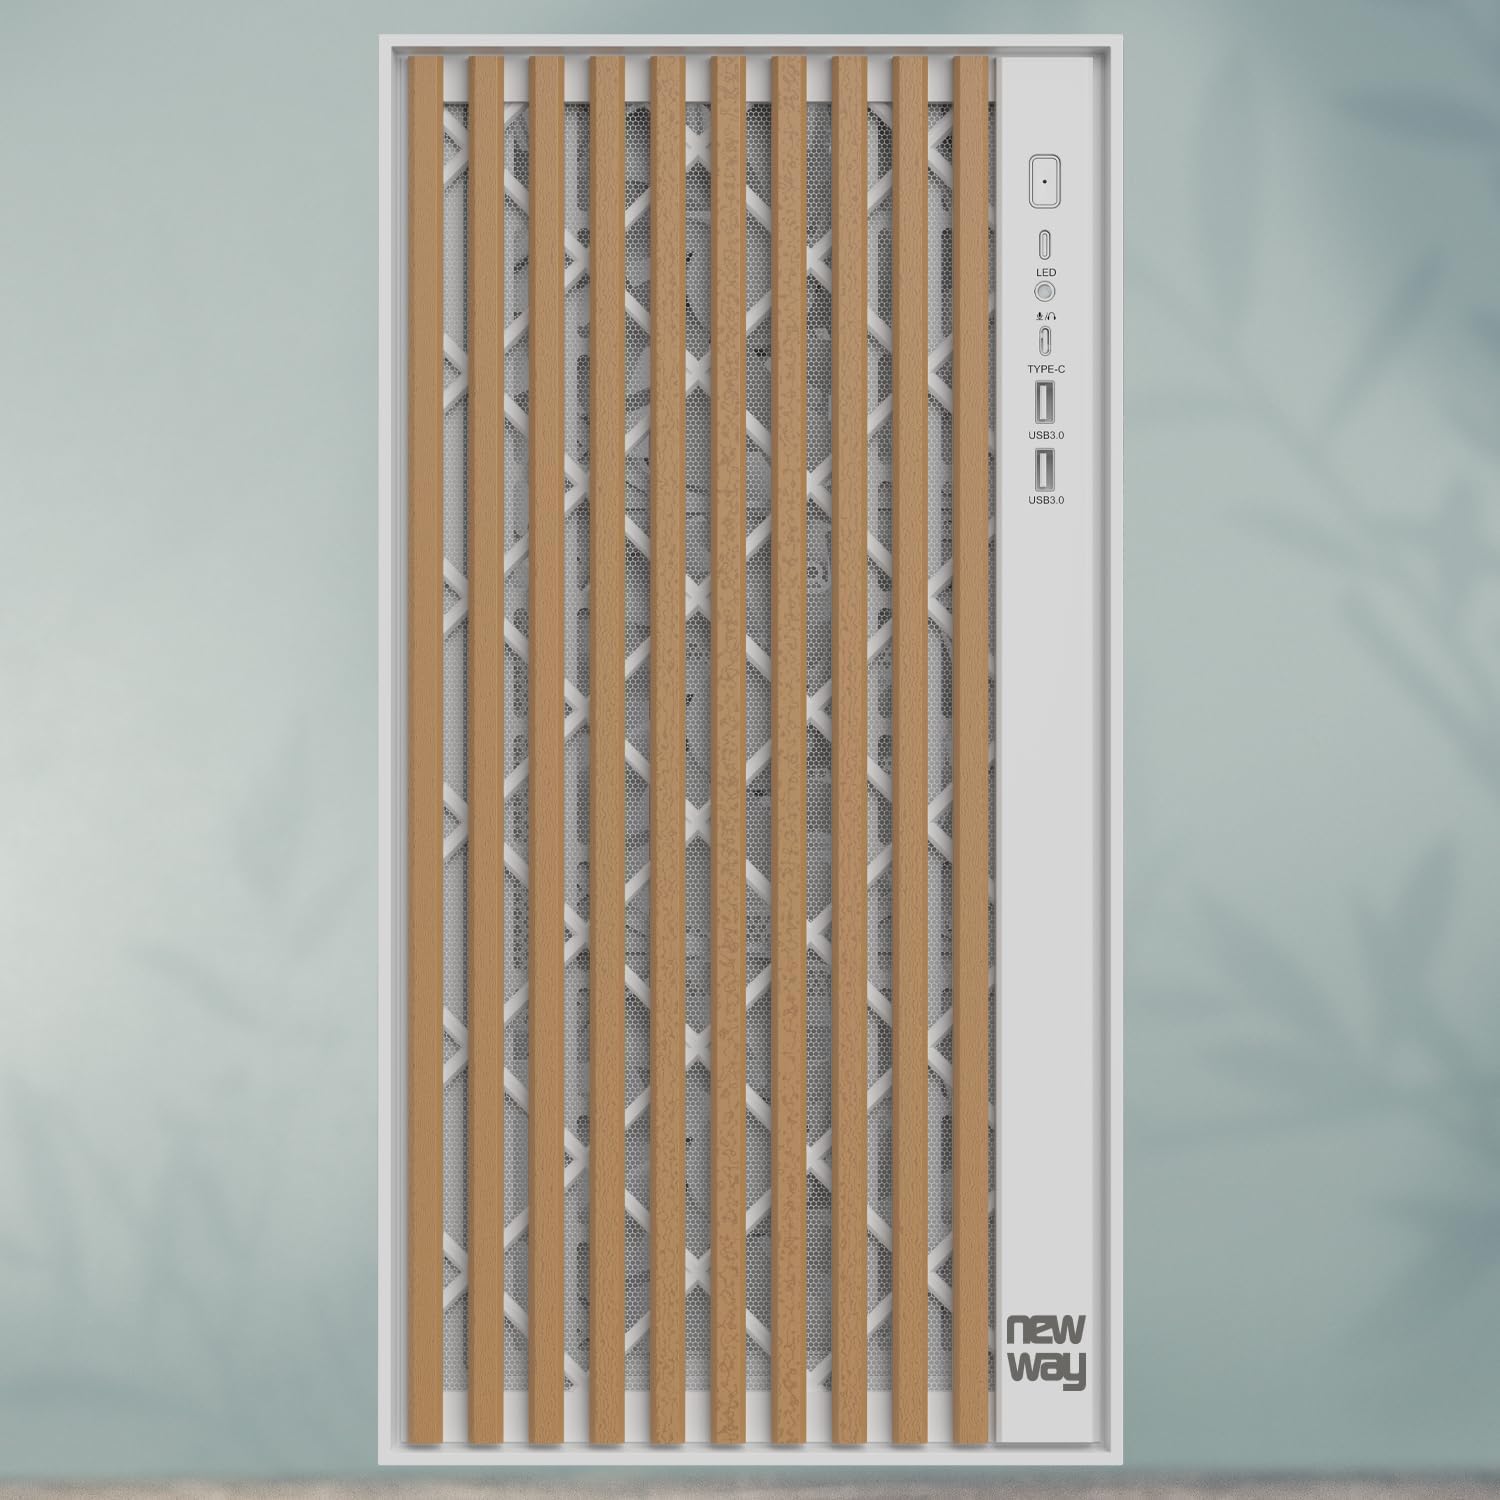
Imagem 3.5: Close-up view of the front panel I/O, showing the LED indicator, USB Type-C port, and USB 3.0 ports.
- Connect the USB Type-C cable to the motherboard's Type-C header.
- Connect the USB 3.0 cables to the motherboard's USB 3.0 headers.
- Connect the HD Audio cable to the motherboard's audio header.
- Connect the Power SW, Reset SW, HDD LED, and Power LED cables to the motherboard's front panel headers, ensuring correct polarity for LEDs.
3.8. Gerenciamento de cabos
Utilize os recortes para passagem de cabos e os pontos de fixação atrás da bandeja da placa-mãe para organizar os cabos de forma prática. Isso melhora o fluxo de ar e a estética.
3.9. Montagem Final
- Once all components are installed and cables are managed, reattach the rear panel (if removed).
- Carefully reattach the tempered glass side panel and secure it with the thumb screws.
4. Instruções de operação
After completing the assembly, connect your peripherals (monitor, keyboard, mouse, power cable) to your system.
- Certifique-se de que todos os cabos estejam conectados com segurança.
- Press the power button on the front panel to turn on your computer.
- The LED indicator on the front panel will illuminate when the system is powered on.
- To restart the system, press the reset button on the front panel.
5. Manutenção
A manutenção regular ajuda a garantir o desempenho ideal e a longevidade dos componentes do seu PC.
- Filtros de poeira: The NW1 case is equipped with dust filters. Regularly clean these filters to maintain good airflow and prevent dust buildup inside the case. Gently remove the filters and clean them with compressed air or by rinsing with water (ensure they are completely dry before reinstallation).
- Limpeza externa: Wipe the exterior surfaces, including the wooden front panel and tempered glass, with a soft, damp pano. Evite produtos de limpeza abrasivos ou solventes.
- Limpeza de interiores: Periodically open the case and use compressed air to remove dust from internal components and fans.
6. Solução De Problemas
Caso encontre algum problema, consulte as seguintes etapas comuns de resolução de problemas:
- Sistema não liga:
- Check if the power supply unit (PSU) is switched on at the back.
- Certifique-se de que todos os cabos de alimentação (ATX de 24 pinos, CPU de 8 pinos, PCIe para GPU) estejam firmemente conectados à placa-mãe e aos componentes.
- Verifique se o cabo do interruptor de alimentação do painel frontal está conectado corretamente ao conector da placa-mãe.
- Ventiladores não estão girando:
- Ensure fan cables are properly connected to the motherboard fan headers.
- Check BIOS/UEFI settings for fan control.
- Sem saída de vídeo:
- Confirm your monitor cable is connected to the graphics card (not the motherboard, unless using integrated graphics).
- Reinstale a placa gráfica no slot PCIe.
- Check if the graphics card requires additional power cables from the PSU.
- Portas USB não funcionam:
- Ensure the front panel USB cables are correctly connected to the motherboard's USB headers.
- Check motherboard drivers.
For further assistance, please contact NEWWAY customer support.
7. Especificações técnicas
| Nome do modelo | NW1 |
| Número do produto | ON-CA-2403 |
| Tipo de caso | Torre média |
| Compatibilidade da placa-mãe | ATX, Micro ATX, ITX |
| Material | Tempered Glass, Metal, Wood |
| Cor | Branco |
| Dimensões (C x L x A) | 430 mm x 235 mm x 430 mm |
| Peso | 6.8 kg |
| Espaço para cooler da CPU | Até 181 mm |
| Espaço livre no comprimento da GPU | Até 410 mm |
| Watercooling Support | Up to 360mm radiators |
| Fãs Incluídos | 3 x 140mm PWM fans |
| Baías de armazenamento | 3 x 3.5" HDD / 2.5" SSD |
| Portas de E / S frontais | USB Type-C, USB 3.0, Audio |
| Montagem de PSU | Montagem inferior |
8. Garantia e Suporte
The NEWWAY NW1 PC Case comes with a Garantia do fabricante de 2 anos. Esta garantia cobre defeitos de materiais e de fabricação sob uso normal.
For warranty claims, technical support, or any inquiries, please contact NEWWAY customer service through their official website ou o varejista onde o produto foi comprado.
Fabricante: MÉTODO IDEAL
País de origem: China