1. Introdução
Obrigado pela compra.asing the Generic Stick Corded Vacuum Cleaner and Mop All in One. This appliance is designed to provide efficient cleaning for various hard floor surfaces by combining vacuuming and mopping functions. Please read this manual thoroughly before operating the device to ensure safe and correct usage, and retain it for future reference.
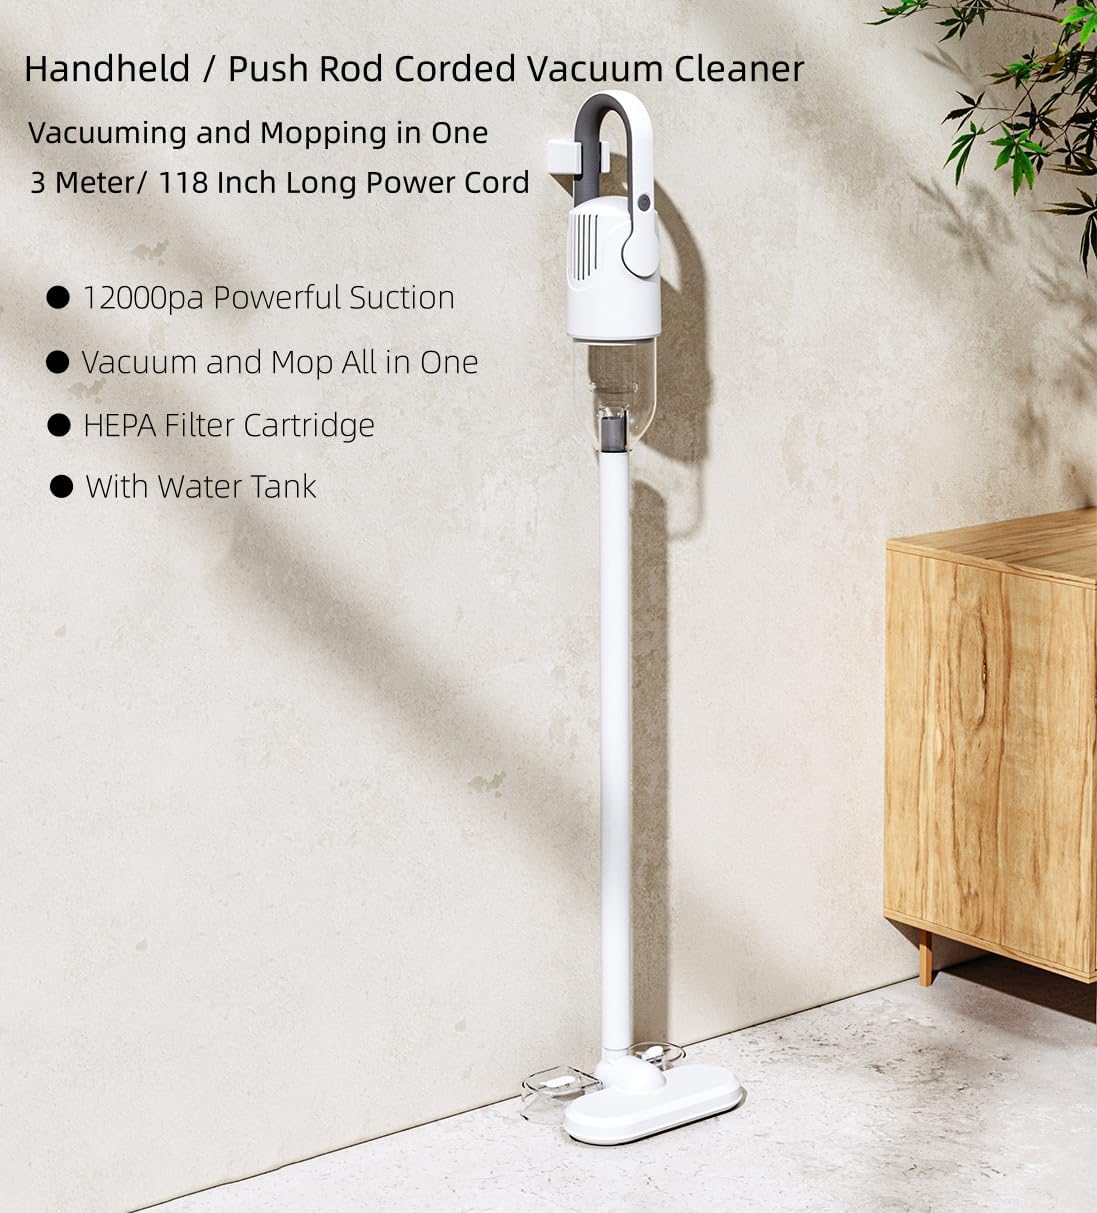
Image 1.1: The Generic Stick Corded Vacuum Cleaner and Mop All in One, showcasing its upright design and integrated features.
2. Instruções de segurança
Sempre siga as precauções básicas de segurança ao usar aparelhos elétricos para reduzir o risco de incêndio, choque elétrico ou ferimentos.
- Leia todas as instruções antes de usar.
- Do not use outdoors or on wet surfaces. This appliance is designed for indoor use on hard floors.
- Não permita que o aparelho seja usado como um brinquedo. É necessária muita atenção quando usado por ou perto de crianças.
- Use somente conforme descrito neste manual. Use somente os acessórios recomendados pelo fabricante.
- Não use com um cabo ou plugue danificado. Se o aparelho não estiver funcionando como deveria, tiver caído, danificado, deixado ao ar livre ou caído na água, devolva-o a um centro de serviço.
- Não puxe ou carregue pelo fio, use o fio como alça, feche uma porta no fio ou puxe o fio em torno de bordas ou cantos afiados. Não passe o aparelho sobre o fio. Mantenha o fio longe de superfícies aquecidas.
- Não desconecte puxando o cabo. Para desconectar, segure o plugue, não o cabo.
- Não manuseie o plugue ou o aparelho com as mãos molhadas.
- Não coloque nenhum objeto nas aberturas. Não use com nenhuma abertura bloqueada; mantenha livre de poeira, fiapos, cabelos e qualquer coisa que possa reduzir o fluxo de ar.
- Mantenha cabelos, roupas largas, dedos e todas as partes do corpo longe de aberturas e peças móveis.
- Desligue todos os controles antes de desconectar.
- Tenha cuidado extra ao limpar escadas.
- Não utilize para coletar líquidos inflamáveis ou combustíveis, como gasolina, nem em áreas onde eles possam estar presentes.
- Não pegue nada que esteja queimando ou soltando fumaça, como cigarros, fósforos ou cinzas quentes.
- Não use sem o coletor de pó e/ou filtros instalados.
- Always disconnect from electrical outlet before connecting or disconnecting hose, or any other accessories.
- Armazene o aparelho dentro de casa em uma área fresca e seca.
3. Conteúdo da embalagem
Carefully unpack your new vacuum cleaner and check that all items are present and in good condition. If any items are missing or damaged, please contact customer support.
- Host body (Main Unit)
- Floor brush (with integrated water tank)
- Long Flat suction nozzle
- Brush suction nozzle
- Water tank (for floor brush)
- Rag (mop pad)
- Manual do usuário
4. Produto acabadoview
Familiarize-se com os principais componentes do seu aspirador de pó.

Image 4.1: Illustration of the main unit and included cleaning attachments.
Componentes principais:
- Unidade principal: Contains the motor, dustbin, and handle.
- Varinha de extensão: Connects the main unit to the floor brush or other attachments.
- Escova de chão: The primary cleaning head for floors, featuring a water tank for mopping.
- Filtro HEPA: Localizado dentro da lixeira, captura poeira fina e alérgenos.
- Cabo de alimentação: A 3-meter (118-inch) cord for continuous power.
Anexos:
- Long Flat Suction Nozzle: Ideal for reaching into narrow gaps, crevices, and corners.
- Brush Suction Nozzle: Suitable for cleaning delicate surfaces, upholstery, curtains, and removing pet hair.
5. Configuração
5.1 Montagem
- Conecte a haste de extensão: Insert the extension wand firmly into the main unit until it clicks into place.
- Conecte a escova de chão: Connect the floor brush to the other end of the extension wand, ensuring it is securely fastened.
- Attach Water Tank and Rag (for mopping): If you intend to mop, attach the water tank to the floor brush and secure the mop rag to the bottom of the water tank.
5.2 Enchendo o Tanque de Água
- Detach the water tank from the floor brush.
- Abra a tampa do tanque de água.
- Fill the tank with clean water. A small amount of floor cleaning solution or disinfectant can be added if desired (do not use corrosive liquids or excessive foam-producing detergents).
- Close the cap securely and reattach the water tank to the floor brush.
5.3 Conexão de Energia
Unwind the power cord and plug it into a standard electrical outlet. Ensure the cord is not tangled or obstructed during operation.
6. Instruções de operação
6.1 Ligar/Desligar
Press the power button located on the main unit handle to turn the vacuum cleaner on. Press it again to turn the appliance off.
6.2 Aspiração
For dry vacuuming, simply turn on the appliance and move the floor brush over the desired surface. The powerful 12000Pa suction will effectively pick up dust, dirt, and debris.
6.3 Esfregar
If the water tank is filled and the mop rag is attached, the appliance will automatically dispense water to keep the mop pad wet as you clean. This allows for simultaneous vacuuming and mopping.

Image 6.1: Close-up of the floor brush with the integrated water tank, illustrating the wet mopping function.
6.4 Combined Vacuuming and Mopping
The design allows for both functions to occur simultaneously. As you vacuum, the mop pad will clean the floor, providing a one-step cleaning solution for hard surfaces.
6.5 Manobras
The floor brush features a flexible joint allowing 180° left and right rotation and 90° front and rear rotation. This enables easy navigation around furniture and access to hard-to-reach areas. The slim design also allows cleaning under furniture.
6.6 Usando anexos
To use the long flat suction nozzle or brush suction nozzle, detach the extension wand from the floor brush and connect the desired attachment directly to the main unit or the extension wand for handheld cleaning. This is ideal for cleaning sofas, car interiors, curtains, and high areas.
7. Manutenção
A manutenção regular garante o desempenho ideal e prolonga a vida útil do seu aspirador de pó.
7.1 Esvaziando a Lixeira
- Certifique-se de que o aparelho está desligado.
- Localize o botão de liberação do compartimento de poeira na unidade principal.
- Pressione o botão para destacar o recipiente de lixo.
- Esvazie o conteúdo em uma lixeira.
- Recoloque a lixeira firmemente.
7.2 Limpeza do filtro HEPA
The HEPA filter should be cleaned regularly to maintain suction power and air quality. It is washable and reusable.
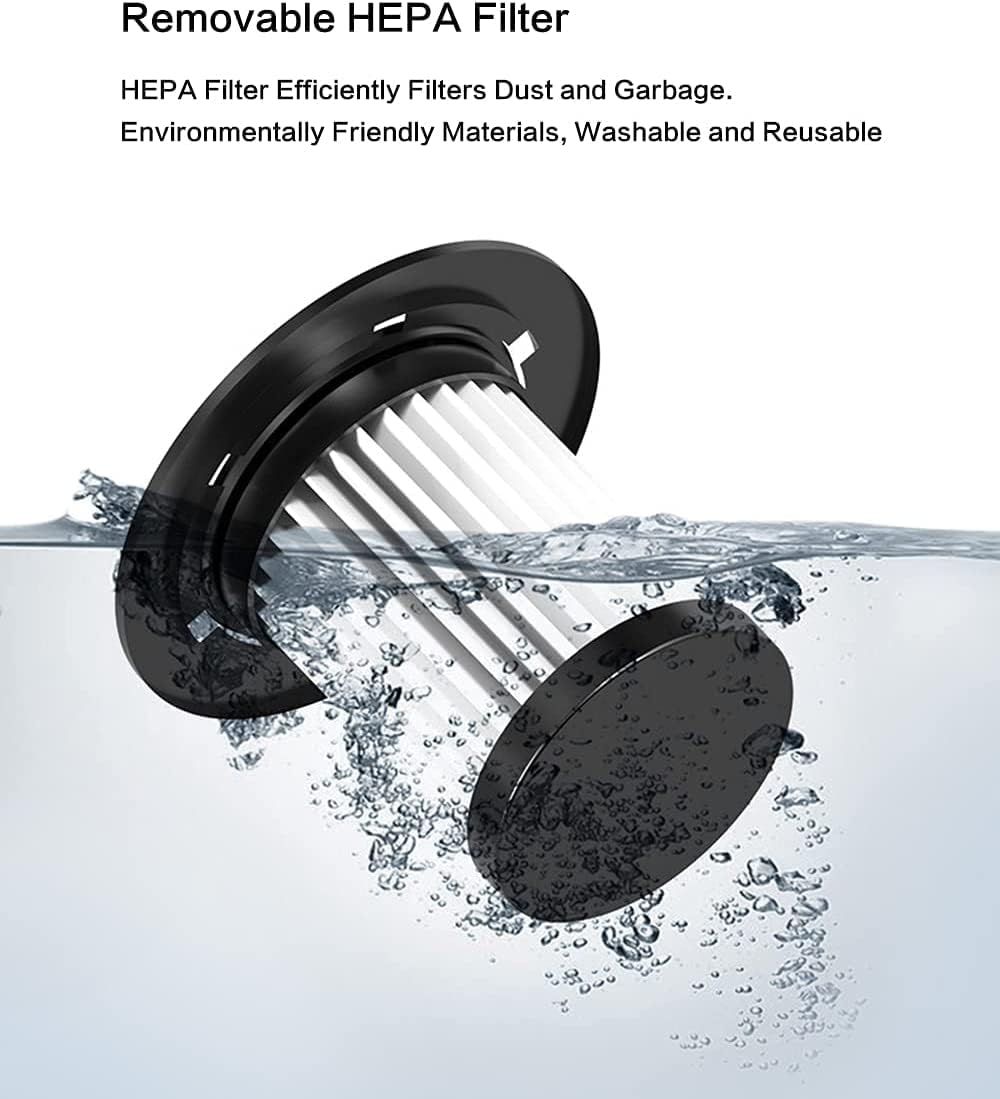
Image 7.1: The removable HEPA filter, shown being rinsed under water for cleaning.
- Desligue o aspirador.
- Remova o caixote do lixo.
- Remova cuidadosamente o filtro HEPA do recipiente de lixo.
- Enxágue o filtro em água corrente até que esteja limpo. Não use detergentes.
- Deixe o filtro secar completamente ao ar livre por pelo menos 24 horas antes de reinstalá-lo. Não utilize o aspirador com o filtro molhado.
- Após secar, coloque o filtro de volta no compartimento de pó e recoloque o compartimento na unidade principal.
7.3 Limpeza do reservatório de água e do pano de limpeza
- Esvazie a água restante do tanque após cada uso.
- Enxágue o tanque de água com água limpa.
- Remove the mop rag and wash it by hand or machine.
- Allow the water tank and mop rag to air dry completely before reassembly or storage.
7.4 Limpeza e armazenamento gerais
- Limpe a parte externa do aspirador de pó com um pano macio e seco.amp pano. Não use produtos químicos agressivos ou produtos de limpeza abrasivos.
- Store the vacuum cleaner in a cool, dry place, away from direct sunlight and moisture.
8. Solução De Problemas
Caso encontre algum problema com seu aspirador de pó, consulte a tabela a seguir para problemas comuns e suas soluções.
| Problema | Possível causa | Solução |
|---|---|---|
| O vácuo não liga | Not plugged in; Power outlet fault; Damaged power cord | Check power plug; Test outlet with another appliance; Contact customer support if cord is damaged |
| Baixo poder de sucção | Dustbin full; Filter clogged; Obstruction in nozzle/hose | Empty dustbin; Clean HEPA filter; Check for and remove any blockages |
| Water not dispensing for mopping | Water tank empty; Water tank not properly installed; Mop pad dry | Fill water tank; Ensure water tank is securely attached; Wet mop pad manually if needed |
| Ruído incomum | Obstruction in brush roll or air duct; Loose parts | Check for and remove obstructions; Ensure all parts are securely assembled |
Se o problema persistir após tentar essas soluções, entre em contato com o suporte ao cliente para obter mais assistência.
9. Especificações
Technical details for the Generic Stick Corded Vacuum Cleaner and Mop All in One.
- Nome do modelo: Household Quiet Deep Clean Vacuum Cleaner and Mop in One
- Número do modelo: AN-20241229-421
- Marca: Genérico
- Fonte de energia: Elétrico com fio
- O quetage: 600 watts
- Potência de sucção: 12000Pa
- Comprimento do cabo: 3 metros (118 polegadas)
- Tipo de filtro: HEPA Filter (Washable and Reusable)
- Capacidade do caixote do lixo: 600 Mililitros
- Nível de ruído: 65 decibéis
- Dimensões do produto: 7"C x 4.3"L x 47.2"A (17.8 cm C x 10.9 cm L x 119.9 cm A)
- Peso do item: 2.65 libras (1.2 kg)
- Características especiais: Lightweight, Stick Vacuum Handheld Corded, Stick Vacuum with Water Tank, Wet/Dry Functionality
- Recomendação de superfície: Hard Floor (Marble, Ceramic Tile, Wood Floor)
- Cor: Branco

Image 9.1: Illustration of the high-speed main motor and air duct design, contributing to strong suction and performance.
10. Garantia e Suporte
This product is covered by a manufacturer's warranty against defects in materials and workmanship. Please refer to the warranty card included in your package for specific terms and conditions, including the warranty period and coverage details.
For technical support, troubleshooting assistance, or to inquire about replacement parts, please contact the retailer or manufacturer's customer service. Keep your purchase receipt and model number (AN-20241229-421) readily available when contacting support.


