OREiN 80/110 CFM
OREiN 3-in-1 Bathroom Fan with LED Light & Humidity Sensor Instruction Manual
Model: 80/110 CFM
1. Introdução
Thank you for choosing the OREiN 3-in-1 Bathroom Fan. This innovative unit combines a powerful exhaust fan, an energy-efficient LED light with selectable color temperatures, and a smart humidity sensor to provide optimal ventilation and illumination for your bathroom. Designed for quiet operation and easy installation, this fan ensures a fresh and comfortable environment. Please read this manual thoroughly before installation and operation to ensure safe and proper use.
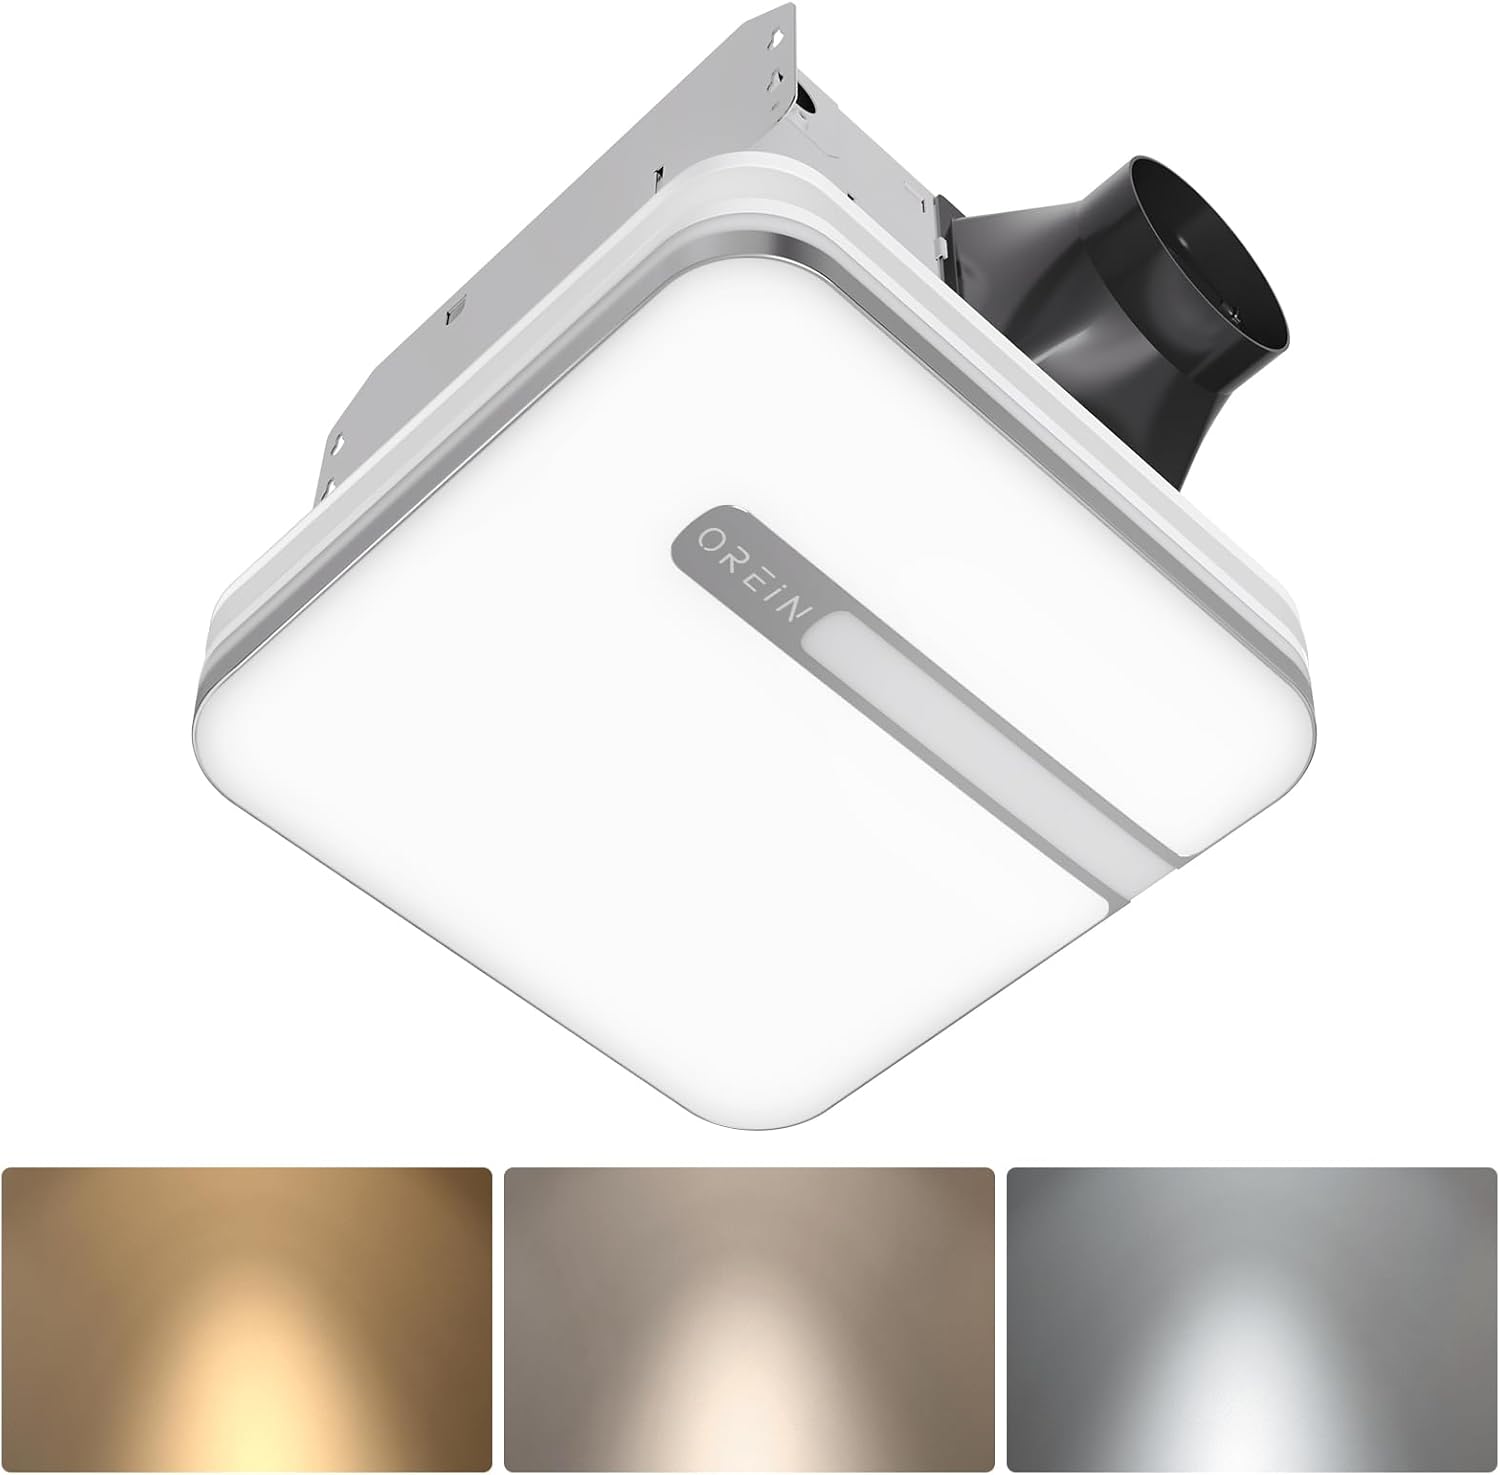
Image 1.1: OREiN 3-in-1 Bathroom Fan with LED Light and Humidity Sensor.
2. Informações de segurança
Always follow basic safety precautions when installing, operating, or maintaining this product to reduce the risk of fire, electric shock, or injury to persons.
- AVISO: Para reduzir o risco de incêndio, choque elétrico ou ferimentos às pessoas, observe o seguinte:
- Use esta unidade somente da maneira pretendida pelo fabricante. Se tiver dúvidas, entre em contato com o fabricante.
- Antes de fazer manutenção ou limpar a unidade, desligue a energia no painel de serviço e bloqueie os meios de desconexão de serviço para evitar que a energia seja ligada acidentalmente. Quando o meio de desconexão do serviço não puder ser bloqueado, prenda com segurança um dispositivo de aviso proeminente, como um tag, para o painel de serviço.
- O trabalho de instalação e a fiação elétrica devem ser feitos por pessoa(s) qualificada(s) de acordo com todos os códigos e padrões aplicáveis, incluindo códigos e padrões de construção com classificação de incêndio.
- É necessário ar suficiente para a combustão adequada e exaustão dos gases através da chaminé (chaminé) do equipamento de queima de combustível para evitar o refluxo. Siga as diretrizes e padrões de segurança do fabricante do equipamento de aquecimento, como aqueles publicados pela National Fire Protection Association (NFPA), e pela American Society for Heating, Refrigeration and Air Conditioning Engineers (ASHRAE), e pelas autoridades locais.
- Ao cortar ou furar uma parede ou teto, não danifique a fiação elétrica e outros serviços ocultos.
- Os ventiladores canalizados devem sempre ser ventilados para o exterior.
- This unit is suitable for use in a shower or tub enclosure when installed in a GFCI protected branch circuit.
3. Conteúdo da embalagem
Ao abrir a embalagem, verifique se todos os componentes estão presentes e sem danos:
- OREiN 3-in-1 Bathroom Fan Unit
- Cobertura de luz LED
- Fast-Install Mounting Bracket
- Manual de Instruções (este documento)
- Installation Hardware (screws, wire connectors)
4. Recursos do Produto
- Smart Humidity Sensor: Automatically activates the fan when humidity reaches 60% to prevent moisture buildup and fogged mirrors. A green LED indicator confirms humidity mode is active.
- Cores de luz ajustáveis: Choose between 3000K (warm white), 4000K (natural white), and 5000K (daylight) to suit your preference.
- Função de luz noturna: A 2200K nightlight provides soft illumination for safe nighttime navigation.
- Operação silenciosa: Operates at ultra-quiet 0.8/1.0 sones for minimal noise disruption.
- Selectable Airflow: Choose between 80 CFM and 110 CFM airflow settings for efficient moisture removal.
- Luz LED integrada: Delivers 1500lm of bright, energy-efficient illumination.
- Fácil instalação: Designed for simple mounting between ceiling joists with a fast-install bracket.

Image 4.1: Internal design highlighting quiet and energy-efficient components.

Image 4.2: Visual representation of the fan's quiet operation at low decibel levels.
5. Configuração e instalação
This section provides general guidance for installation. For detailed electrical wiring, consult a qualified electrician.
- Preparação: Ensure power is turned off at the circuit breaker before beginning any installation work.
- Tamanho da abertura: The fan unit requires a ceiling opening of approximately 10.24" x 9.37" (260mm x 238mm). Ensure there are no obstructions like joists in the desired installation area.
- Montagem: The fast-install bracket allows for secure mounting between ceiling joists. Position the fan unit and secure the bracket using appropriate screws. The design allows for installation from below the ceiling, eliminating the need for attic access in many cases.
- Canalização: Connect the fan to standard 4-inch ducting and ensure it is vented to the outdoors.
- Conexão elétrica: Connect the electrical wiring according to local codes and the provided wiring diagram. The light and fan may have independent wiring for separate control.
- Instalação da cobertura de luz: Once the fan unit is secured and wired, attach the LED light cover. It typically connects with spring clips for easy removal and maintenance.

Image 5.1: Product dimensions and recommended installation opening size.

Image 5.2: Simplified installation process showing the fan unit being placed into the ceiling opening.
6. Instruções de operação
6.1. Humidity Sensing Mode vs. Manual Mode
The fan offers two operating modes: Manual and Humidity Sensing. You can switch between these modes by cycling the wall switch of the fan to the "OFF" position and then back to the "ON" position.
- Manual Mode (Red LED Indicator): The fan will run continuously when turned on via the wall switch.
- Humidity Sensing Mode (Green LED Indicator): The fan will automatically turn on when the humidity level in the room reaches 60%. It will continue to run until the humidity drops below the threshold, then run for an additional 20 minutes before turning off.
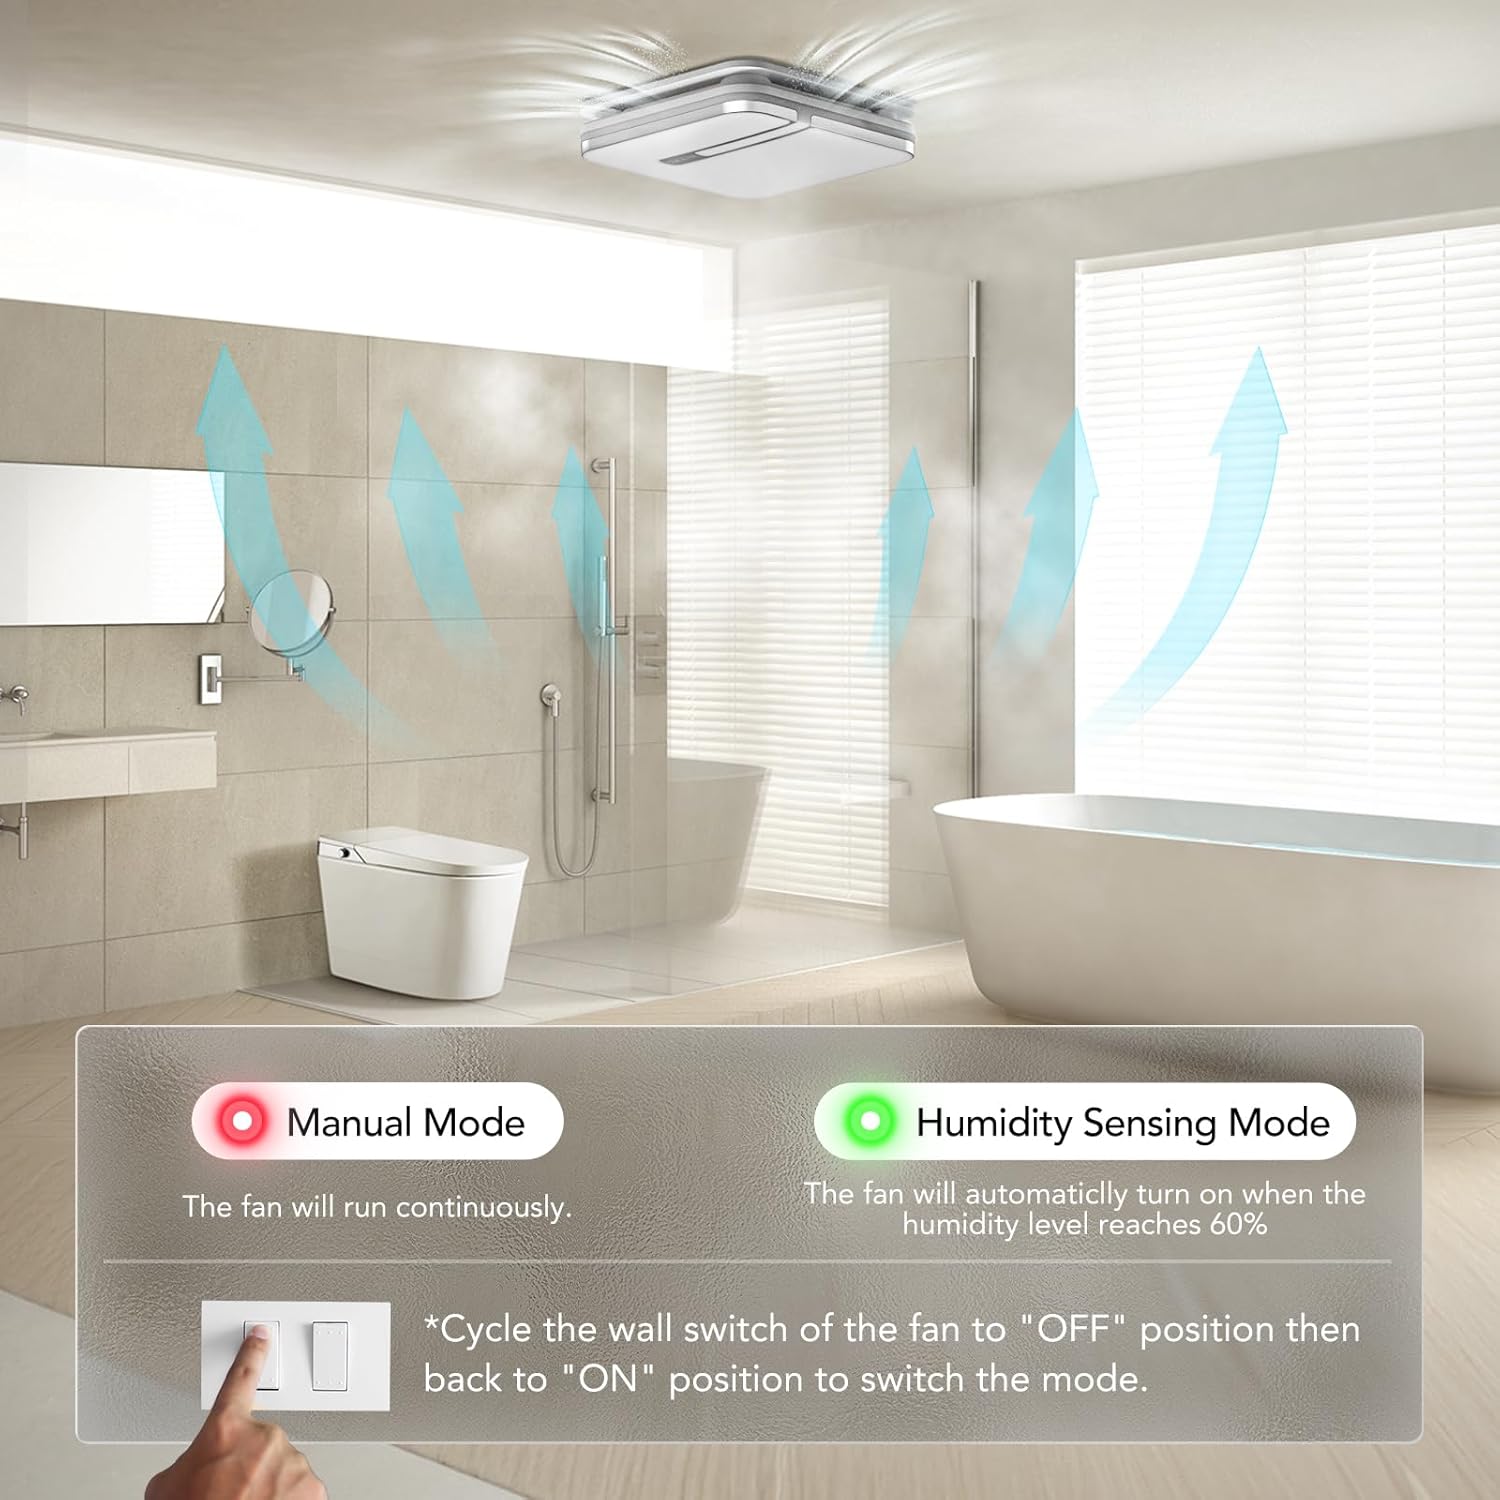
Image 6.1: Switching between Manual and Humidity Sensing Modes.

Image 6.2: How the humidity sensor automatically activates the fan.

Image 6.3: Humidity sensor logic: fan turns on above 60% humidity and runs for 20 minutes after humidity drops.
6.2. Adjusting Light Color Temperature
The LED light offers three color temperature options: 3000K (Warm White), 4000K (Natural White), and 5000K (Daylight). To select the desired color temperature, locate the toggle switch on the back of the lampshade and slide it to your preferred setting.

Image 6.4: Selecting the light color temperature (3000K, 4000K, 5000K).

Image 6.5: Visualizing the different light color temperatures in a bathroom setting.
6.3. Activating Night Light
To activate the 2200K night light mode, quickly cycle the light switch ON-OFF-ON within 2 seconds. This will switch the main light to the softer night light setting.

Image 6.6: The 2200K night light provides subtle illumination.

Image 6.7: Instructions for activating the nightlight mode.
6.4. Selecting CFM Airflow
The fan allows you to select between 80 CFM and 110 CFM airflow settings. This selection is made by sliding a toggle switch located on the fan housing. Choose the appropriate CFM based on your bathroom size and ventilation needs.
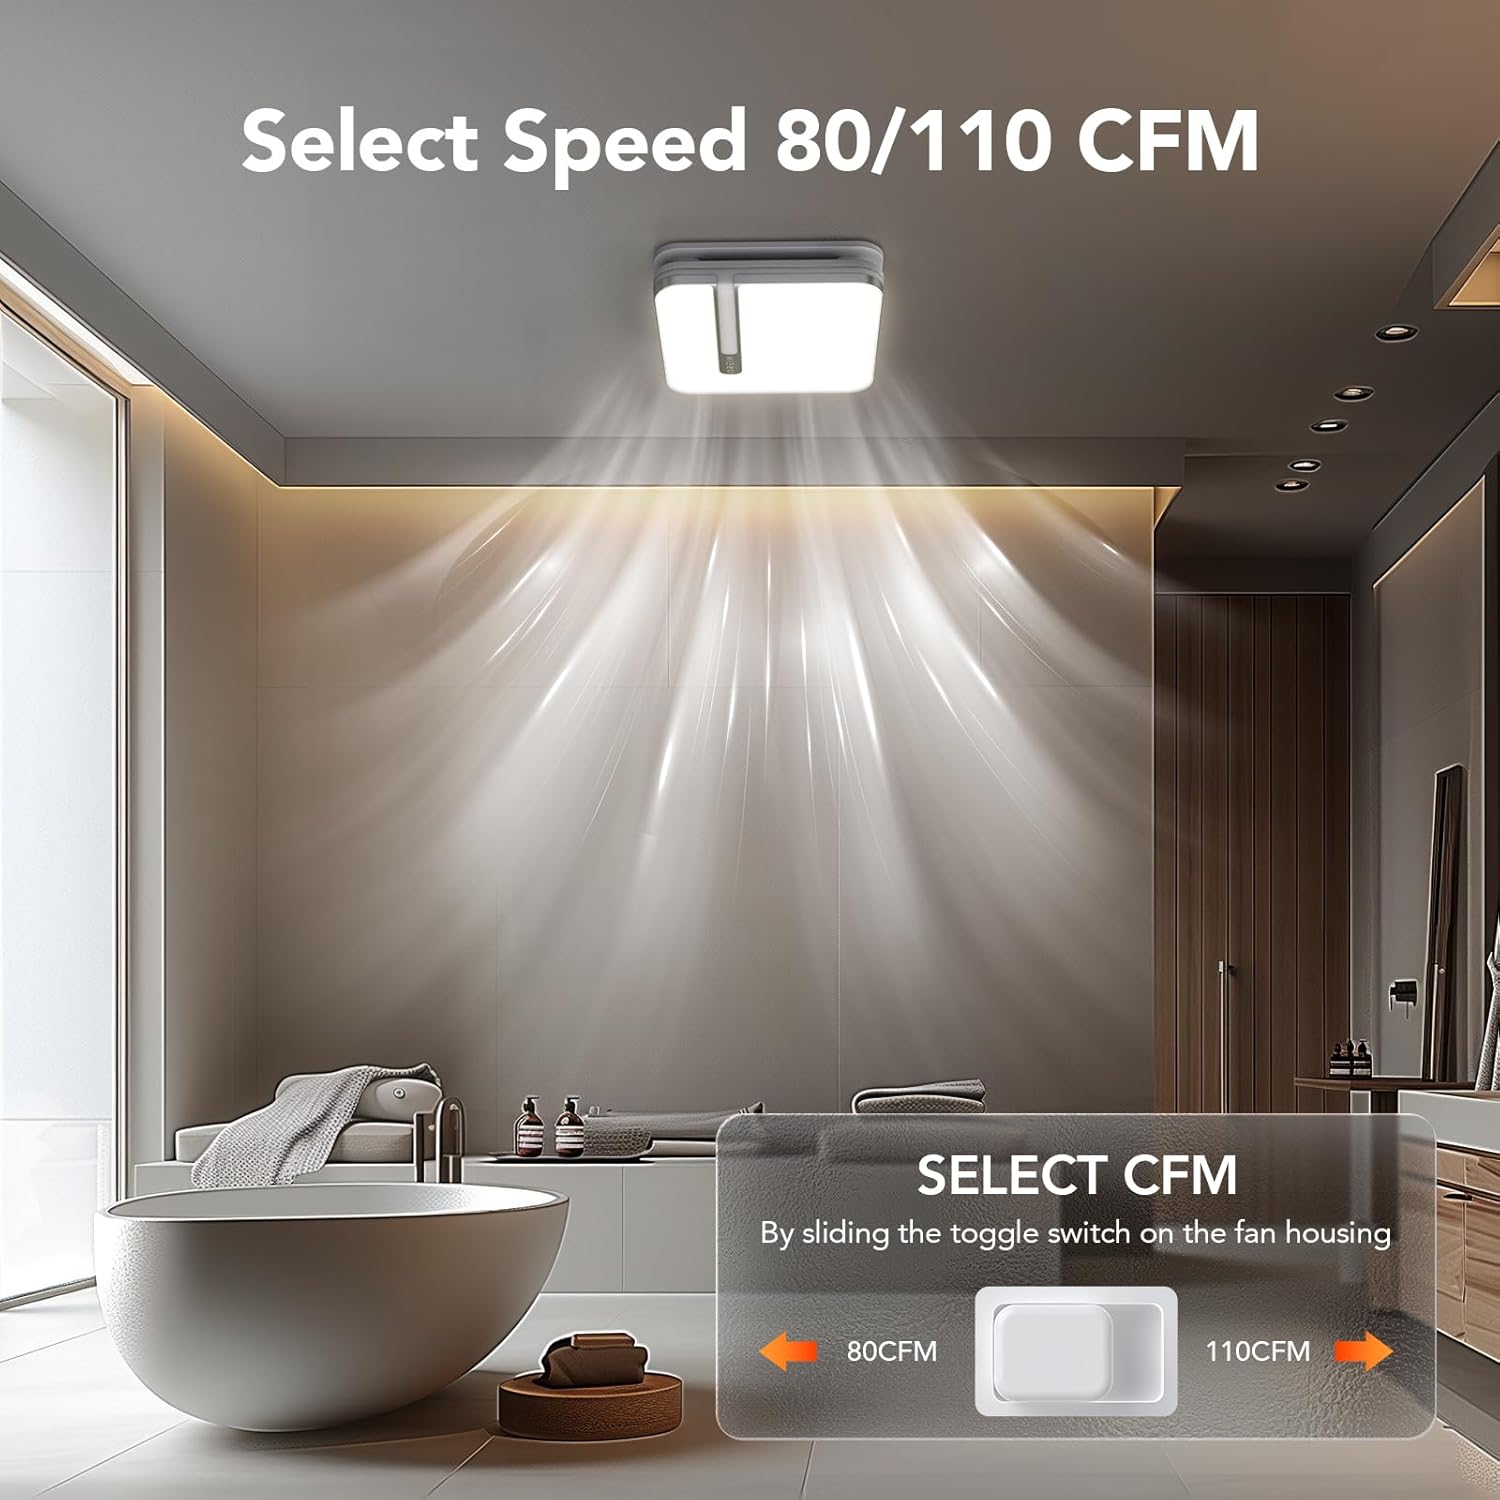
Image 6.8: Location of the CFM selection switch (80 CFM or 110 CFM).
7. Manutenção
Regular maintenance ensures optimal performance and longevity of your OREiN bathroom fan.
- Cleaning the Light Cover: The light cover can be easily removed for cleaning. Gently unclip the cover from the fan housing. Clean with a soft, damp cloth and mild detergent. Ensure it is completely dry before reattaching.
- Limpeza das pás do ventilador: Periodically, inspect the fan blades for dust and debris buildup. Turn off power at the circuit breaker before attempting to clean the fan blades. Use a soft brush or vacuum cleaner to remove any accumulation.
- Inspeção de dutos: Annually inspect the ducting for any blockages or damage that could impede airflow.
8. Solução De Problemas
If you encounter issues with your OREiN bathroom fan, refer to the following common troubleshooting steps:
| Problema | Possível causa | Solução |
|---|---|---|
| O ventilador não liga. | Não há energia na unidade. | Check circuit breaker. Ensure wall switch is ON. Verify electrical connections. |
| A luz não acende. | Loose connection or faulty LED module. | Check the push clip connection for the light. If issue persists, contact support. |
| O ventilador é excessivamente barulhento. | Obstruction in fan blades or motor. | Turn off power and inspect fan blades for debris. Ensure proper installation and secure mounting. |
| O sensor de umidade não está ativando. | Incorrect mode selected or sensor malfunction. | Cycle the wall switch to ensure Humidity Sensing Mode (green LED) is active. Ensure humidity in the room is above 60%. |
| Poor ventilation/steam not clearing. | Incorrect CFM setting, blocked ducting, or undersized fan for room. | Ensure 110 CFM is selected if needed. Check ducting for blockages. Ensure proper room sealing. |
If the problem persists after trying these solutions, please contact OREiN customer support.
9. Especificações
| Recurso | Detalhe |
|---|---|
| Marca | OREiN |
| Modelo | 80/110CFM |
| Fluxo de ar (CFM) | Selectable 80 / 110 CFM |
| Sones (Noise Level) | 0.8 / 1.0 Sones |
| Saída de luz | 1500 lm |
| Temperatura de cor (CCT) | 3000K / 4000K / 5000K Selecionável |
| Night Light CCT | 2200 mil |
| Fonte de energia | DC |
| Dimensões do produto | Approx. 1"D x 1"W x 1"H (Unit), 13.1'' x 13.1'' (Light Cover) |
| Install Size | 10.24" x 9.37" (260 mm x 238 mm) |
| Diâmetro do duto | 4 polegadas |
| Tipo de montagem | Montagem embutida |
| Peso do item | 18.06 libras |
| UPC | 734376313753 |
Note: Product dimensions provided as 1"D x 1"W x 1"H are likely placeholders and may not reflect actual physical size. Refer to installation size for accurate cutout dimensions.

Imagem 9.1: Terminadoview of different OREiN fan models and their specifications.
10. Garantia e Suporte
OREiN is committed to providing high-quality products and excellent customer service. For any questions, concerns, or support needs regarding your 3-in-1 Bathroom Fan, please contact us through the following channels:
- Contato da Amazon: You can contact us directly through Amazon's messaging system for assistance with your purchase.
- Suporte por telefone: For 24-hour service, please call: 1 (844) 506-1530
- On-line: Procurar 'OREiN' online to find our official website and additional support resources.
Please retain your proof of purchase for warranty claims. For detailed warranty information, refer to the product packaging or contact customer support.

Image 10.1: OREiN Customer Support is available to assist you.
Ask a question about this manual
Ask about setup, troubleshooting, compatibility, parts, safety, or missing instructions. Manuals+ will review the question and use this page’s manual context to help answer it.