
1. Produto acabadoview
The Vetroo M06 is a compact mid-tower PC case designed for Micro-ATX and Mini-ITX motherboards. It features a high-airflow mesh front panel to ensure efficient cooling for gaming and high-performance systems. The chassis offers a capacity of approximately 25 liters, making it suitable for various desktop environments.

Figure 1: Vetroo M06 PC Case with approximate dimensions (15.5"D x 7.8"W x 13.0"H).
2. Configuração e instalação
2.1 Compatibilidade de componentes
This case supports Micro-ATX and Mini-ITX motherboards. Ensure your components adhere to the following maximum dimensions:
- Comprimento da GPU: Até 355 mm
- Altura do refrigerador da CPU: Até 165 mm
- Comprimento da PSU: Up to 160mm (adjustable mounting)
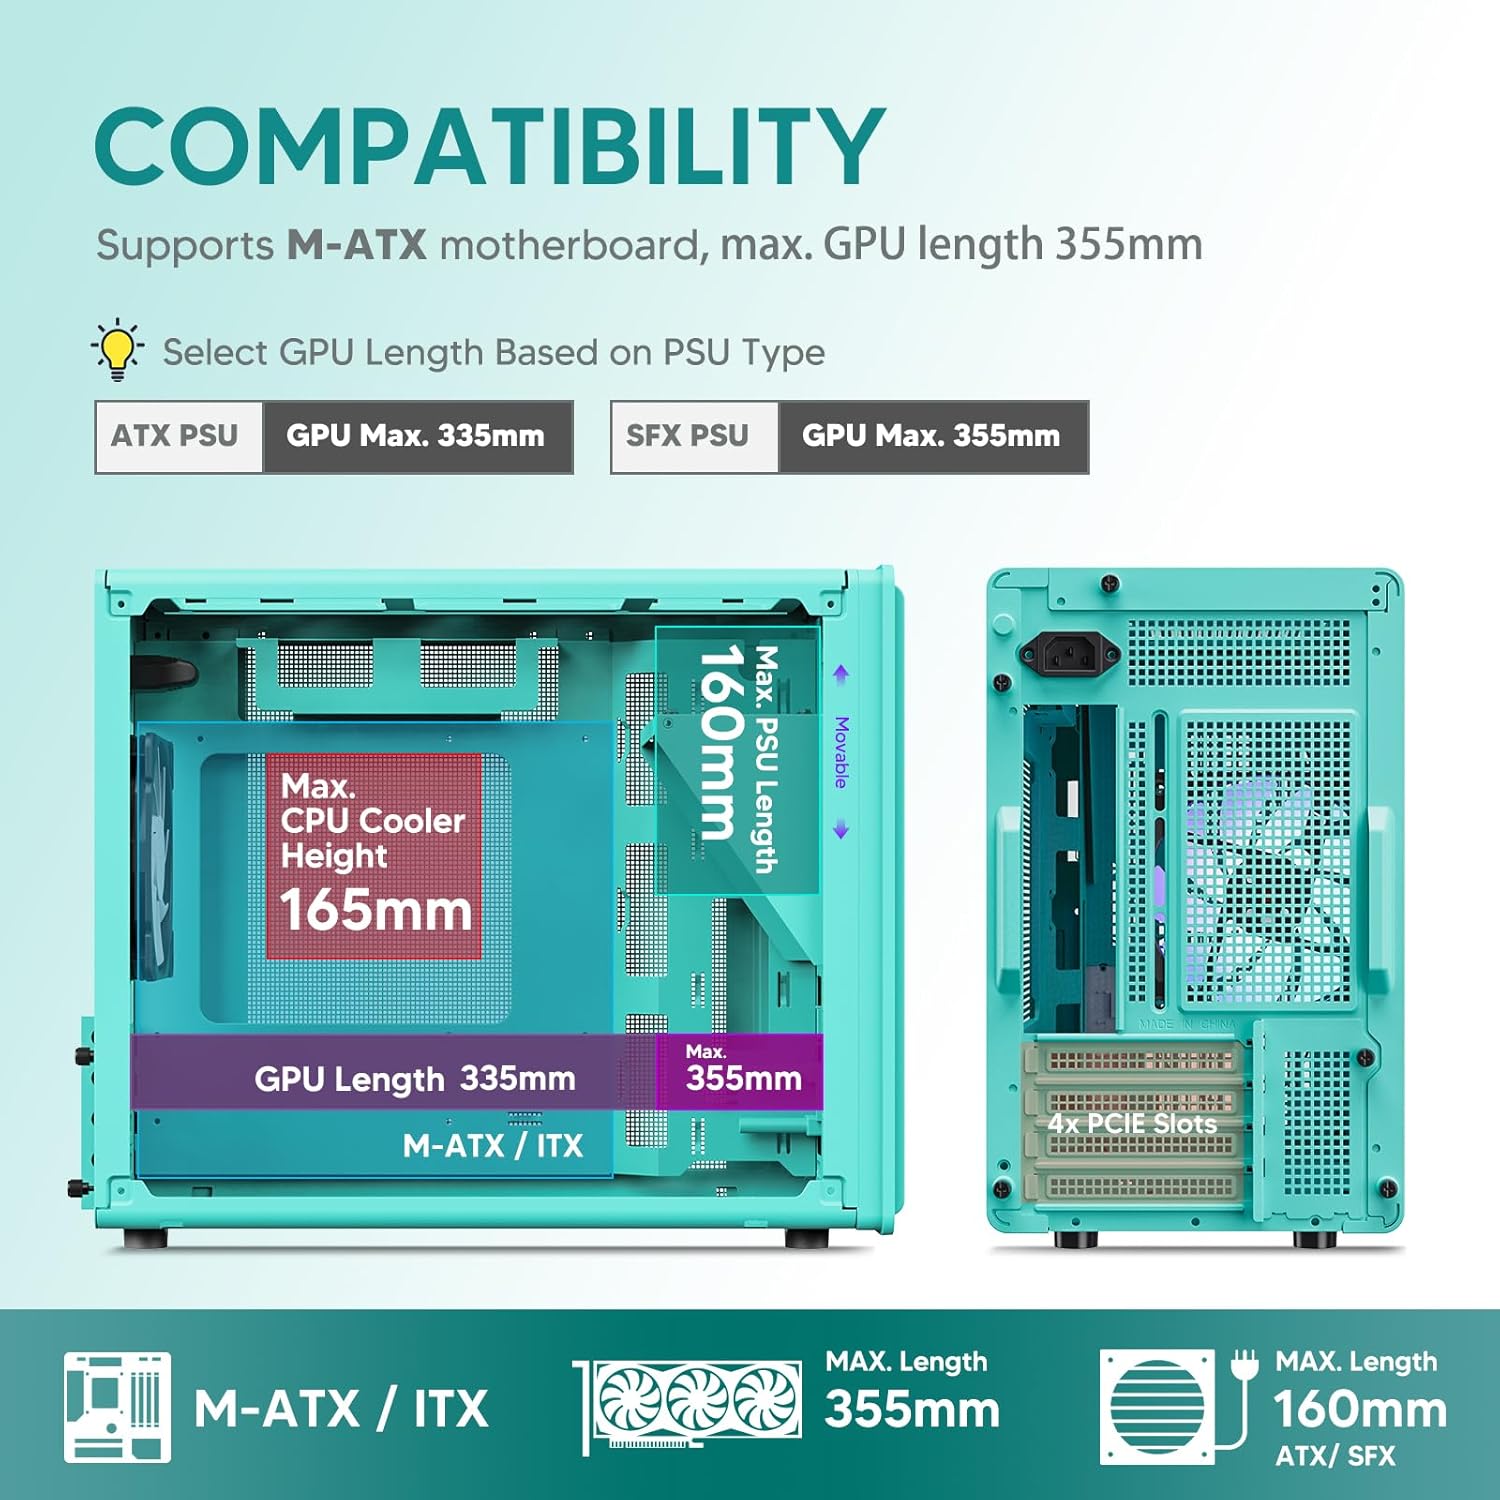
Figure 2: Component compatibility and maximum dimensions within the M06 case.
2.2 Instalação da placa-mãe
- Remove the side panels by unscrewing the captive screws.
- Instale o painel de E/S na abertura traseira do gabinete.
- Align your Micro-ATX or Mini-ITX motherboard with the standoffs inside the case.
- Fixe a placa-mãe com os parafusos fornecidos.
2.3 Instalação da placa gráfica (GPU)
- Remova as tampas dos slots PCIe necessárias da parte traseira do gabinete.
- Insert the GPU into the primary PCIe slot on your motherboard.
- Fixe a placa de vídeo ao gabinete com parafusos.
2.4 Instalação da Unidade de Fonte de Alimentação (PSU)
The M06 case features an adjustable PSU mount to accommodate different power supply sizes and cable management needs.
- Determine the optimal mounting position (Location 1, 2, or 3) for your PSU based on its length and your cable routing plan.
- If using an SFX PSU, attach the included SFX bracket to the PSU.
- Slide the PSU into the chosen mounting location and secure it with screws from the rear of the case.

Figure 3: Adjustable PSU mounting options and SFX bracket.
2.5 Instalação do Sistema de Refrigeração
The case supports various cooling configurations to maintain optimal temperatures.
- Fãs: Up to 5x 120mm fans.
- Radiador: Supports a 240mm liquid radiator at the top.

Figure 4: Cooling system layout with fan and radiator support.
2.6 Instalação de dispositivo de armazenamento
The M06 case provides mounting options for both HDDs and SSDs.
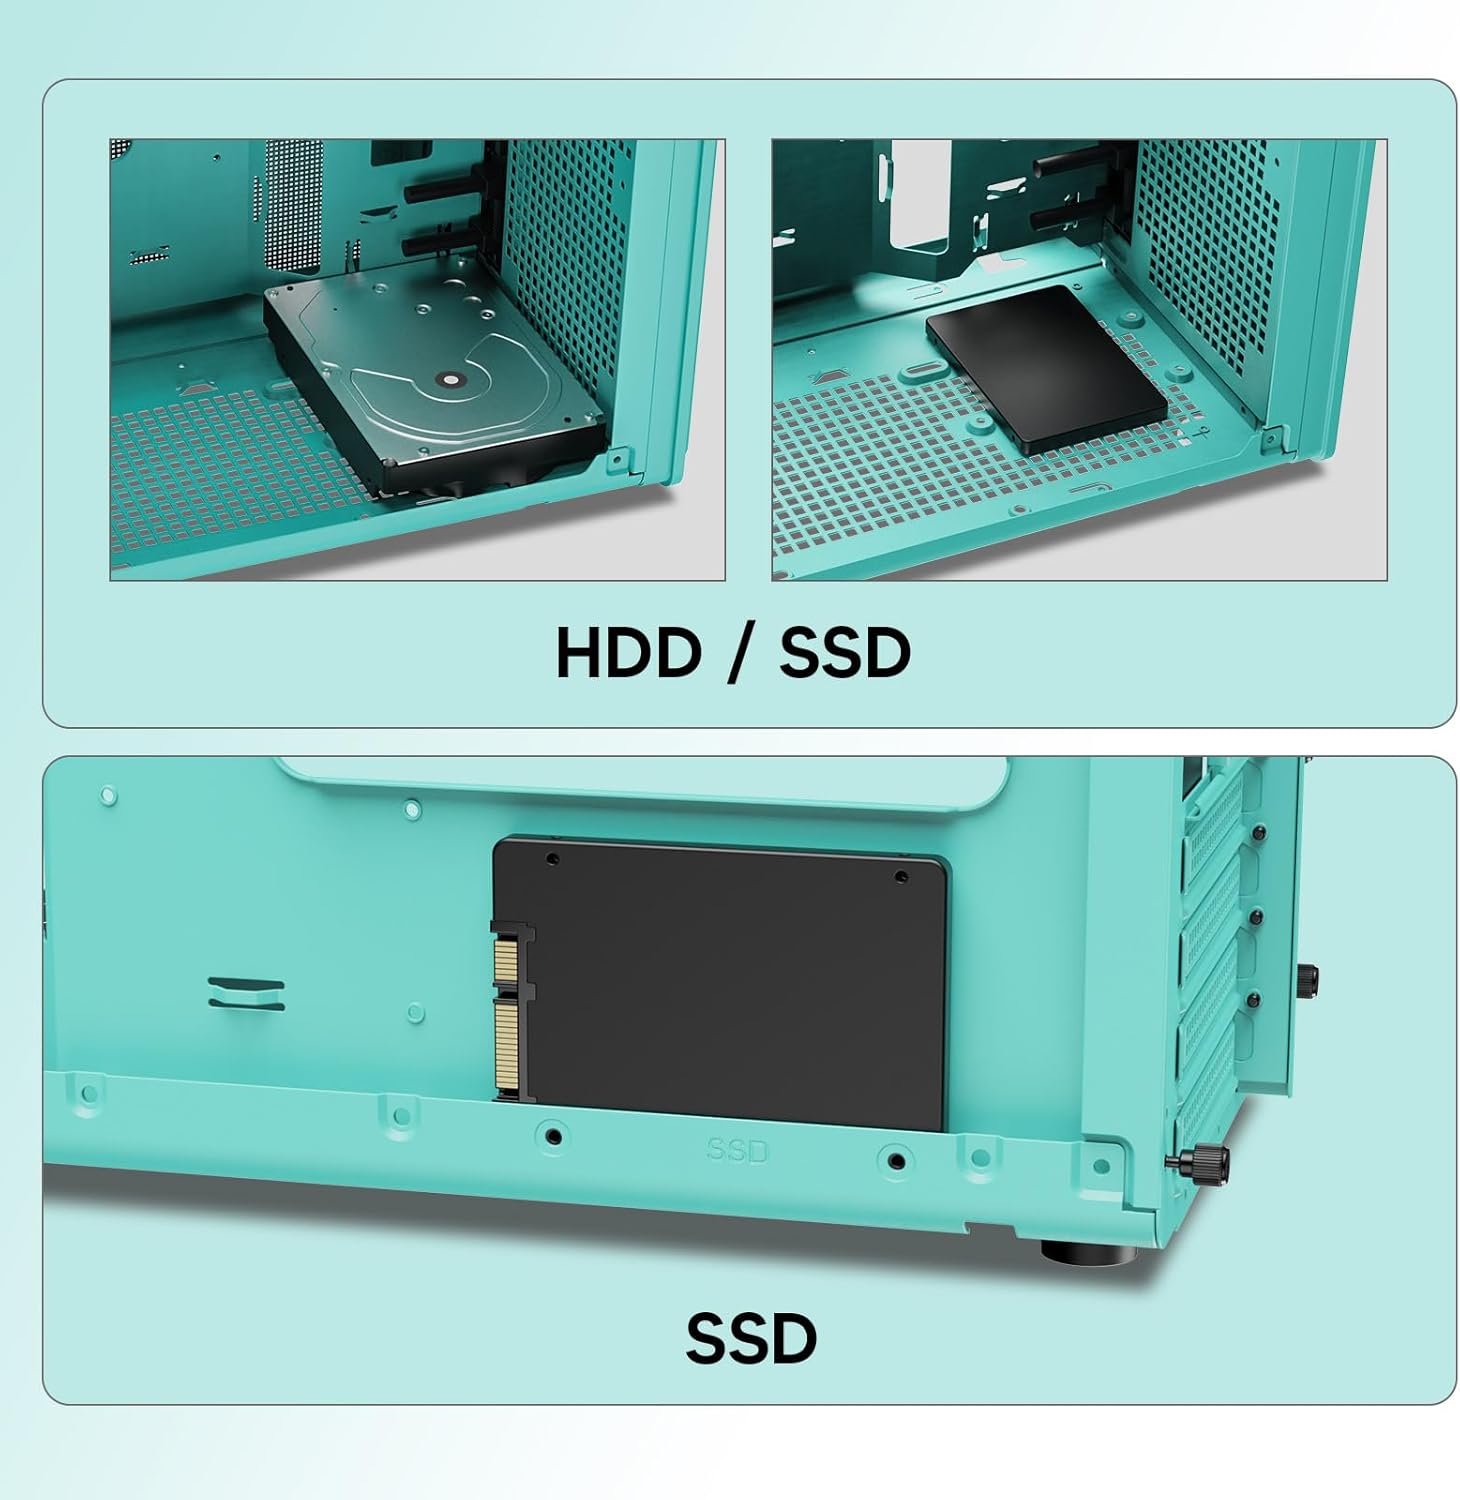
Figure 5: HDD and SSD mounting locations.
2.7 Conexões do painel de E/S frontal
Connect the front panel cables to the corresponding headers on your motherboard.
- Botão de energia: For turning the system on/off.
- Botão de reinicialização: For restarting the system.
- Porta USB 3.0: Para transferência de dados em alta velocidade.
- Conectores de áudio HD: Para fones de ouvido e microfone.
- Porta USB Tipo-C: For modern peripheral connectivity.

Figure 6: Front I/O Panel layout.
3. Instruções de operação
Once all components are installed and connected, ensure all cables are properly routed and secured. Close the side panels. Connect your monitor, keyboard, mouse, and power cable to the rear of your PC. Press the power button on the front I/O panel to start your system.
Vídeo 1: Acabouview of the Vetroo M06 Micro-ATX Computer Case in Mint Green, demonstrating its features and compact design.
4. Manutenção
4.1 Limpeza
Regular cleaning helps maintain optimal airflow and component longevity. Use compressed air to clear dust from the mesh panels and internal components. For external surfaces, a soft, damp recomenda-se o uso de pano.
4.2 Otimização do fluxo de ar
The M06 case is designed for excellent airflow. Ensure that fan orientations are correct (intake/exhaust) to create a positive or neutral pressure system, minimizing dust buildup and maximizing cooling efficiency.

Figure 7: Excellent airflow design of the M06 case.
5. Solução De Problemas
- Sistema não liga:
Check all power connections, including the PSU to the wall outlet, PSU to motherboard (24-pin and CPU 8-pin), and front panel power switch cable to the motherboard header. Ensure the PSU switch is in the 'ON' position. - Sem saída de vídeo:
Verify that your monitor is connected to the graphics card (GPU) and not the motherboard's integrated graphics ports (unless you are using integrated graphics). Reseat the GPU and RAM modules. - Componentes superaquecidos:
Ensure all case fans and CPU cooler fans are spinning correctly. Verify proper thermal paste application on the CPU. Check for obstructions to airflow and clean any dust buildup. - Portas do painel frontal não funcionam:
Confirm that all front panel I/O cables (USB 3.0, USB Type-C, HD Audio) are securely connected to the correct headers on your motherboard. - Problemas de encaixe dos componentes:
Refer to Section 2.1 for maximum component dimensions. If a component does not fit, verify its specifications against the case's limits. For PSU, ensure the adjustable mount is set correctly.
6. Especificações
The following table details the technical specifications of the Vetroo M06 PC Case:
| Recurso | Especificação |
|---|---|
| Marca | Vetroo |
| Nome do modelo | M06 |
| Tipo de caso | Minitorre |
| Compatibilidade da placa-mãe | Micro-ATX, Mini-ITX |
| Dimensões do produto (P x L x A) | 15.55" x 7.87" x 13.07" |
| Material | Acrylonitrile Butadiene Styrene (ABS), SPCC Steel (0.8mm) |
| Comprimento máximo da GPU | 355 mm |
| Altura máxima do cooler da CPU | 165 mm |
| Comprimento máximo da fonte de alimentação | 160mm (Adjustable) |
| Método de resfriamento | Ar |
| Suporte dos fãs | Up to 5x 120mm fans |
| Suporte para radiador | 1x 240mm (Top) |
| Portas de E / S frontais | 1x USB 3.0, 1x USB Type-C, HD Audio, Power, Reset |
| Internal Bays Quantity | 5 (for HDD/SSD) |

Figure 8: Illustration of the 0.8mm steel plate construction.
7. Garantia e Suporte
7.1 Informações de garantia
The Vetroo M06 PC Case comes with a Garantia de 1 ano from the date of purchase. This warranty covers manufacturing defects and issues arising from normal use. It does not cover damage caused by misuse, accidents, unauthorized modifications, or improper installation.
7.2 Suporte ao cliente
For technical assistance, warranty claims, or any questions regarding your Vetroo M06 PC Case, please refer to the official Vetroo webVisite o site ou entre em contato diretamente com o suporte ao cliente. Guarde o comprovante de compra para validação da garantia.