
1. Introdução
This manual provides detailed instructions for the installation, operation, and maintenance of your plplaaoo 100A MPPT Solar Charge Controller. This advanced controller is designed to optimize energy harvest from your solar panels and manage battery charging efficiently for 12V, 24V, 36V, and 48V solar power systems. Please read this manual thoroughly before installation and use to ensure proper function and safety.
2. Instruções de segurança
Observe as seguintes precauções de segurança durante a instalação e operação:
- Ensure all wiring is correctly connected and securely fastened to prevent loose connections and overheating.
- Sempre desconecte o painel solar e a bateria antes de instalar ou ajustar o controlador.
- Use appropriate tools and wear protective gear, including eye protection, during installation.
- Install the controller in a well-ventilated area, away from flammable gases and liquids.
- Não desmonte nem tente reparar o controlador por conta própria. Contate pessoal qualificado para assistência técnica.
- Ensure the battery bank is properly sized and compatible with the controller's voltage e classificações atuais.
- Avoid short-circuiting the solar panel, battery, or load terminals.
3. Recursos do Produto
- Rastreamento do Ponto de Máxima Potência (MPPT): Achieves up to 98% conversion efficiency by intelligently tracking the maximum power point of solar panels under varying conditions.
- Vol Automáticotage Adaptação: Automatically detects and adapts to 12V, 24V, 36V, or 48V battery systems.
- Multifunctional Control: Supports various operating modes including PWM charging, constant current output, and voltage regulamento.
- Integrated USB and DC Outputs: Features dual 5V 1A USB ports and a 2A DC output for charging external devices.
- Proteção abrangente: Includes safeguards against overvoltage, overcurrent, overtemperature, overload, short circuits, and reverse polarity.
- Interface amigável: Equipped with a backlit LCD display for real-time monitoring and intuitive buttons for configuration.
- Construção durável: Features an aluminum heatsink for efficient cooling and robust design for harsh environments (0°C to 60°C).
- Compatibilidade da bateria: Compatible with gel, sealed lead-acid, and lithium batteries.
4. Conteúdo da embalagem
- 1 x plplaaoo 100A MPPT Solar Charge Controller
- 1 x Manual do Usuário
5. Produto acabadoview e Componentes
Familiarize yourself with the main components and interface of the solar charge controller.

Figura 5.1: Frente view of the solar charge controller, highlighting the LCD screen and various connection terminals.
The controller features an intuitive LCD display and clearly labeled ports for easy connection. The display provides real-time information about the system's status.
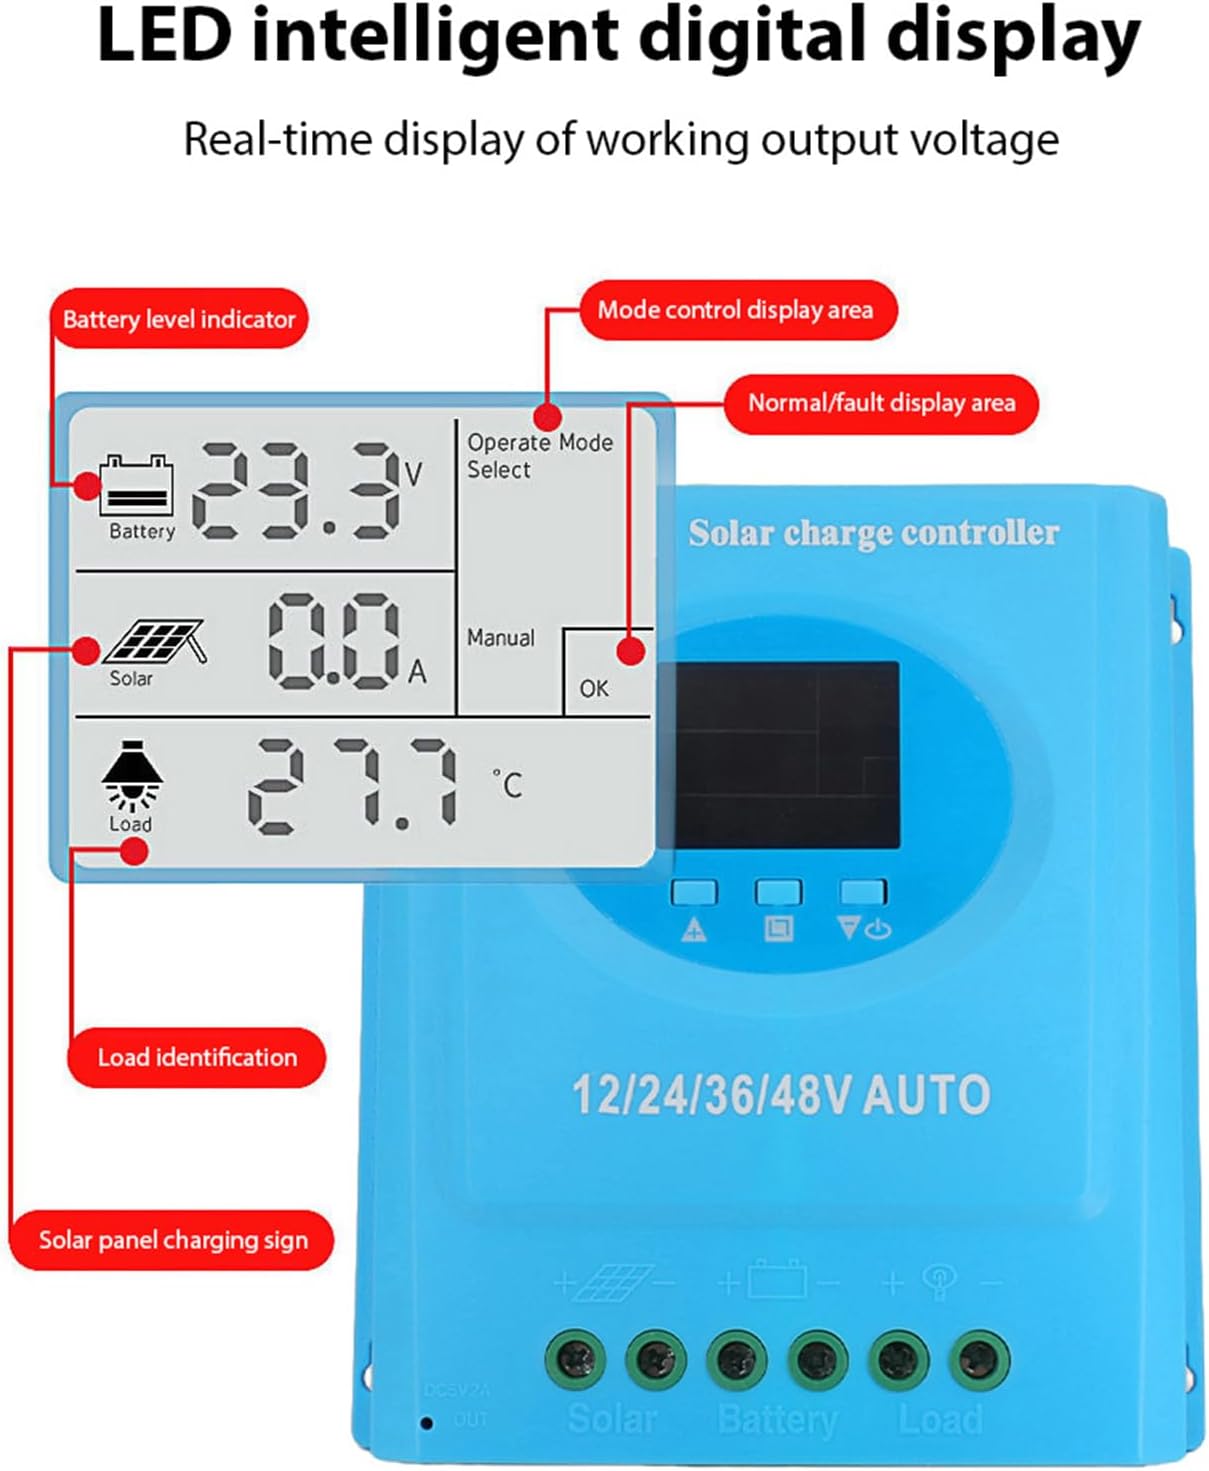
Figura 5.2: Detalhado view of the controller's connection ports.

Figura 5.3: Detalhado view of the LCD display, indicating battery level, solar panel charging sign, load identification, operating mode, and real-time voltage.
5.1. Portas de conexão
- Interface USB dupla: Two 5V 1A USB ports for charging mobile devices.
- Solar Panel Port: Connects to your solar panels (positive and negative).
- Porta da bateria: Connects to your battery bank (positive and negative).
- DC Load Port: Connects to your DC loads (positive and negative).
- Porta de saída CC: Additional DC output.
6. Configuração e instalação
Follow these steps for proper installation of the solar charge controller. Ensure all power sources are disconnected before beginning.
6.1. Método de fiação
Conecte os componentes na seguinte ordem para evitar danos:
- Conecte a bateria: Connect the battery to the controller's battery terminals (positive to positive, negative to negative). The controller will automatically detect the battery voltage.
- Conecte o painel solar: Conecte o painel solar aos terminais do controlador (positivo com positivo, negativo com negativo).
- Conecte a carga CC: Connect the DC load to the controller's load terminals (positive to positive, negative to negative).
Importante: Conecte sempre primeiro a bateria, depois o painel solar e, por último, a carga. Para desconectar, siga a ordem inversa.

Figura 6.1: Solar energy system wiring diagram. Note the correct polarity for all connections.
6.2. Montagem
Mount the controller vertically on a flat surface in a well-ventilated area, ensuring adequate clearance for air circulation around the heatsink. Avoid direct sunlight, high temperatures, and humid environments.
7. Instruções de operação
Once installed, the controller will automatically begin operating. The LCD display provides real-time system status.
7.1. Informações do visor LCD
The LCD screen displays various parameters:
- Indicador de Nível da Bateria: Shows the current charge status of the battery.
- Solar Panel Charging Sign: Indicates when the solar panels are actively charging the battery.
- Load Identification: Shows the status of the connected DC load.
- Operating Mode Display Area: Displays the current operating mode (e.g., manual, automatic).
- Normal/Fault Display Area: Indicates normal operation or displays error codes if a fault occurs.
- Real-time Working Output Voltage: Mostra o volume atualtage do sistema.
7.2. Funções dos botões
The controller typically features multiple buttons for navigation and setting adjustments:
- Botão de menu: Used to enter and exit the menu settings.
- Botões para cima / para baixo: Used to navigate through menu options and adjust parameter values.
- Botão OK: Used to confirm selections and save settings.
Refer to the on-screen menu for specific parameter adjustments such as battery type, load control mode, and charging thresholds.
8. Manutenção
A manutenção regular garante o desempenho ideal e a longevidade do seu controlador de carga solar.
- Limpeza: Limpe periodicamente a parte externa do controlador com um pano seco para remover poeira e detritos. Certifique-se de que as aberturas de ventilação estejam desobstruídas.
- Verificação de conexão: Annually inspect all wiring connections for tightness and corrosion. Re-tighten if necessary.
- Verificação ambiental: Ensure the installation environment remains within the specified operating temperature range and is free from excessive moisture or dust.
- Inspeção da bateria: Regularly check the battery terminals for corrosion and ensure the battery is in good condition.
9. Solução De Problemas
If you encounter issues with your solar charge controller, refer to the following common problems and solutions:
| Problema | Possível causa | Solução |
|---|---|---|
| O controlador não liga / LCD em branco |
|
|
| Bateria não carrega |
|
|
| Carregar não está funcionando |
|
|
| Código de erro exibido | Falha específica do sistema. | Refer to the controller's display for the specific error code and consult the full product documentation or contact support for detailed interpretation and resolution. |
10. Especificações
| Parâmetro | Valor |
|---|---|
| Modelo | plplaaoozi6egog4wm-0A |
| Marca | plplaaoo |
| Corrente nominal | 100A |
| Vol do Sistematage | 12V / 24V / 36V / 48V Automatic Adaptation |
| Tipo de carregamento | MPPT (Maximum Power Point Tracking) |
| Eficiência de Conversão | Até 98% |
| Saída USB | Dual 5V 1A ports |
| Saída DC | 2A |
| Temperatura de operação | 0°C a 60°C |
| Dimensões (aprox.) | 19.5 cm x 18.3 cm x 6.8 cm (7.7 pol. x 7.2 pol. x 2.7 pol.) |

Figura 10.1: Approximate dimensions of the solar charge controller.
11. Garantia e Suporte
Para informações sobre garantia, suporte técnico ou assistência, entre em contato com o revendedor ou o fabricante diretamente. Guarde o comprovante de compra como prova de aquisição.