1. Informações importantes de segurança
Read all instructions before operating the drone. Failure to follow instructions may result in injury or property damage.
- Recomendação de idade: This drone is intended for users aged 14 and older. It is not a toy for children.
- Ambiente de voo: Operate the drone in open, clear areas, away from people, animals, buildings, and power lines. Avoid flying in strong winds or adverse weather conditions.
- Segurança da bateria: Use only the provided batteries and charging cables. Do not overcharge or puncture batteries. Dispose of batteries properly.
- Segurança da hélice: Keep hands, face, and loose clothing away from rotating propellers. Always power off the drone before handling propellers.
- Linha de visão: Mantenha sempre contato visual com o drone durante o voo.
- Respeite a privacidade: Be mindful of privacy laws when using the camera features.
2. Conteúdo da embalagem
Verifique se todos os itens estão presentes na embalagem:
- Drone dobrável E99 Pro
- Controle remoto
- Rechargeable Drone Batteries (Quantity: 2)
- Cabo de carregamento USB
- Hélices sobressalentes
- Chave de fenda
- Estojo de transporte
- Manual do usuário (este documento)

Image: Contents of the E99 Pro Foldable Drone package, including the drone, remote, and carrying case.
3. Identificação do componente
3.1 Componentes do Drone

Image: The E99 Pro drone in its unfolded state, showing the main body, propellers, and front camera.
- Câmera frontal: Main 4K HD camera for aerial photography and video.
- Câmera inferior: Secondary 4K HD camera for alternative perspectives and optical flow positioning.
- Hélices: Quatro lâminas rotativas para o voo.
- Braços do motor: Foldable arms holding the motors and propellers.
- Compartimento da bateria: Located on the underside of the drone.
- Botão de energia: Para ligar/desligar o drone.
3.2 Componentes do Controle Remoto

Image: Detailed diagram of the remote control with labels for each button and joystick function.
- Throttle Lever (Left Joystick): Controla a altitude (para cima/para baixo) e a rotação (para a esquerda/para a direita).
- Steering Rod (Right Joystick): Controla os movimentos para frente/para trás e para a esquerda/para a direita.
- One Key Up/Landing Button: Inicia a decolagem ou o pouso automático.
- Headless Mode / Return Home (Long Press): Activates headless mode or initiates return to home.
- One Key Correction: For fine-tuning flight stability.
- 3D Roll: Activates 360-degree flip function.
- Left Fly Fine Tuning: Adjusts left/right drift.
- Right Fly Fine Tuning: Adjusts left/right drift.
- Forward Fine-tuning: Adjusts forward/backward drift.
- Backward Fine-tuning: Adjusts forward/backward drift.
- Interruptor de alimentação: Liga/desliga o controle remoto.
- Suporte para telefone: Extends to hold a smartphone for FPV viewindo.
4. Configuração
4.1 Drone Battery Installation and Charging
- Insira a bateria do drone totalmente carregada no compartimento da bateria na parte inferior do drone. Certifique-se de que ela se encaixe firmemente no lugar.
- To charge, connect the drone battery to the USB charging cable, then plug the USB cable into a 5V/1A USB adapter (not included). The charging indicator will show charging status.
- O tempo de carregamento é de aproximadamente 60 a 80 minutos por bateria.
4.2 Instalação da bateria do controle remoto
- Abra a tampa da bateria na parte traseira do controle remoto.
- Insira 3 pilhas AA (não incluídas) respeitando a polaridade indicada.
- Feche a tampa da bateria com segurança.
4.3 Desdobrando o Drone
- Gently unfold the front motor arms first, then the rear motor arms, until they are fully extended and locked into position.
- Ensure all arms are securely locked before flight.
4.4 App Download and Connection (FPV)
- Scan the QR code in the manual (or search your app store) for the recommended FPV application.
- Instale o aplicativo em seu smartphone.
- Ligue o drone e o controle remoto.
- On your smartphone, connect to the drone's Wi-Fi network (usually named 'WIFI-XXXXXX').
- Open the FPV application to view A transmissão ao vivo da câmera e o acesso a controles adicionais.
5. Instruções de operação
5.1 Ligar/Desligar e Emparelhamento
- Pressione e mantenha pressionado o botão liga/desliga do drone até que as luzes indicadoras acendam.
- Press the power switch on the remote control. The remote will beep.
- Push the left joystick (throttle) fully up, then fully down. The remote will beep, and the drone lights will become solid, indicating successful pairing.
5.2 Calibração do Giroscópio
- After pairing, place the drone on a flat, level surface.
- Push both joysticks down and to the bottom-left corner simultaneously for 2-3 seconds. The drone lights will flash rapidly and then become solid, indicating successful calibration.
5.3 Decolagem e Pouso
- Decolagem com um único toque: Press the 'One Key Up/Landing' button once. The drone will automatically ascend to a stable hovering height.
- Decolagem manual: Push both joysticks down and to the bottom-right corner to unlock the motors. Then, slowly push the left joystick (throttle) up to ascend.
- Aterrissagem com uma tecla: Press the 'One Key Up/Landing' button once. The drone will automatically descend and land.
- Pouso manual: Slowly pull the left joystick (throttle) down until the drone lands. Once landed, pull both joysticks down and to the bottom-right corner to stop the motors.
5.4 Controles básicos de voo
- Altitude: Empurre o joystick esquerdo para cima para subir, puxe para baixo para descer.
- Rotação: Empurre o joystick esquerdo para a esquerda para girar no sentido anti-horário e para a direita para girar no sentido horário.
- Para frente / para trás: Empurre o joystick direito para cima para voar para a frente e puxe para baixo para voar para trás.
- Left/Right Sideways Flight: Mova o joystick direito para a esquerda para voar para a esquerda, mova-o para a direita para voar para a direita.
5.5 Recursos avançados de voo
- Modos de velocidade: Press the speed button on the remote to cycle through 3 different speed settings (low, medium, high).
- Modo sem cabeça: Press the 'Headless Mode' button. In this mode, the drone's orientation is relative to the pilot, regardless of the drone's front direction. Press again to exit.
- Giros de 360°: Fly the drone to a height of at least 3 meters. Press the '3D Roll' button, then push the right joystick in any direction to perform a flip.
- Resistência ao vento: The drone is designed with upgraded motors for stable flight in light wind conditions. Avoid flying in strong winds.

Image: The E99 Pro drone demonstrating its wind-resistant capabilities during flight.
5.6 Operação da câmera

Image: Diagram illustrating the E99 Pro's dual camera system, showing the main lens, 90-degree adjustment, and 120-degree wide angle view.
- Foto: While connected to the FPV app, tap the photo icon to capture still images.
- Vídeo: While connected to the FPV app, tap the video icon to start recording. Tap again to stop.
- FPV Live Video: The FPV app provides a real-time view from the drone's camera to your smartphone.
- Troca de câmeras: Use the app to switch between the front and bottom 4K HD cameras.
6. Manutenção
- Limpeza: Use um pano macio e seco para limpar o drone e o controle remoto. Não use água nem solventes.
- Substituição da hélice: If a propeller is damaged, use the provided screwdriver to remove the screw, replace the propeller with a spare, and re-secure the screw. Ensure correct propeller (A or B) is installed on the corresponding motor arm.
- Cuidados com a bateria: Store batteries in a cool, dry place. Do not store fully charged or fully depleted for extended periods. Charge them to about 50% for long-term storage.
- Armazenar: Fold the drone arms and store the drone and remote in the carrying case when not in use to protect them from damage.
7. Solução De Problemas
| Problema | Possível causa | Solução |
|---|---|---|
| O drone não responde ao controle remoto. | Não emparelhado; bateria fraca; interferência. | Emparelhe novamente o drone e o controle remoto; carregue as baterias; mova-o para uma área com menos interferência. |
| O drone voa de forma errática ou deriva. | Not calibrated; damaged propeller; uneven surface for takeoff. | Realizar a calibração do giroscópio; substituir as hélices danificadas; decolar de uma superfície plana. |
| FPV app shows no image or disconnects. | Wi-Fi not connected; app error; weak signal. | Ensure phone is connected to drone's Wi-Fi; restart app and drone; fly closer to the drone. |
| O drone não decola. | Motors not unlocked; low battery. | Unlock motors (joysticks down-right); charge drone battery. |
8. Especificações
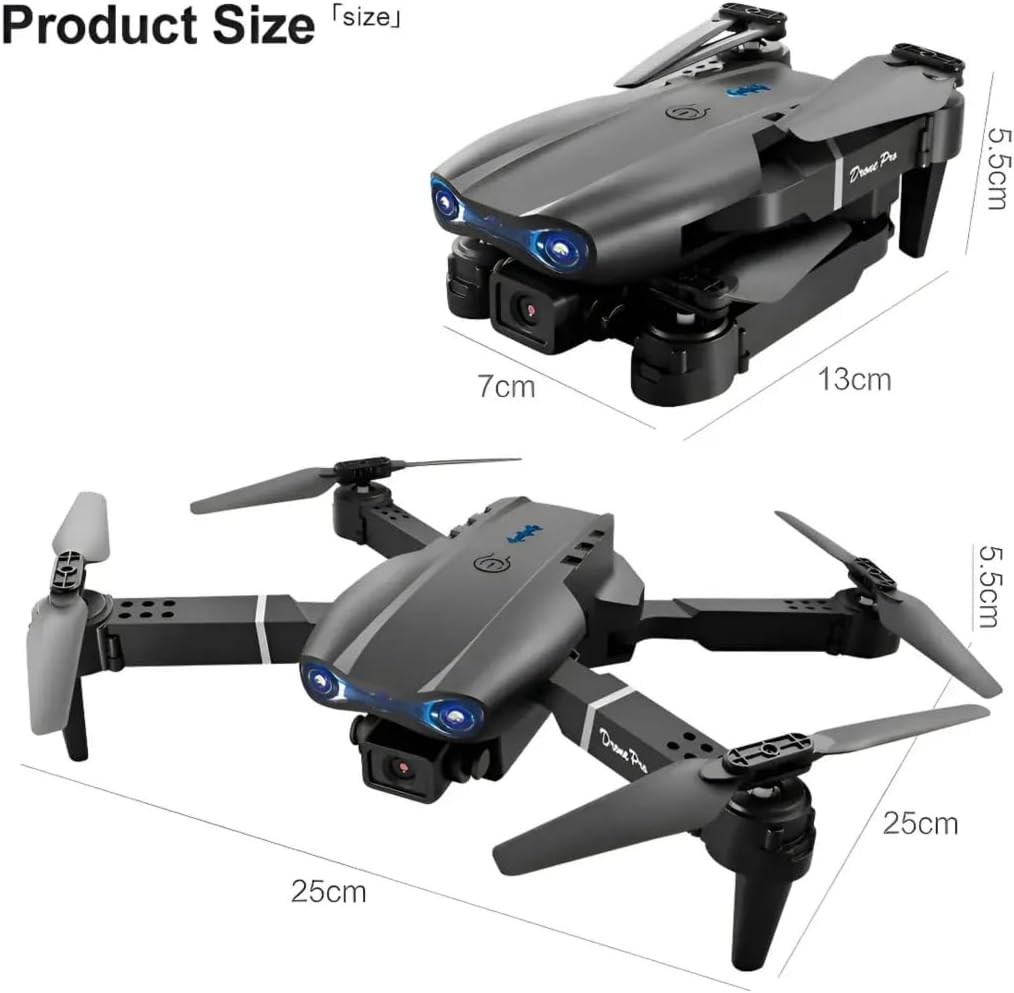
Image: Dimensions of the E99 Pro drone in both folded and unfolded states.
| Recurso | Detalhe |
|---|---|
| Nome do modelo | E99 |
| Marca | Genérico |
| Resolução de captura de vídeo | 4K |
| Resolução Estática Efetiva | 8 MP |
| Tecnologia de Conectividade | Wifi Bluetooth |
| Nível de habilidade | Todos |
| Peso do item | 340 gramas (12 onças) |
| Capacidade da bateria do drone | 1800 Miliamp Horas (por bateria) |
| Tipo de controle | Controle remoto |
| Material | Plástico |
| Dimensões do produto (desdobrado) | 9.84"C x 9.84"L x 2.17"A (25 cm x 25 cm x 5.5 cm) |
| Pilhas para controle remoto | 3 pilhas AA (não incluídas) |
9. Garantia e Suporte
Para informações sobre garantia ou suporte técnico, consulte os dados de contato fornecidos pelo seu revendedor ou pelo fabricante. website.
Guarde o comprovante de compra como prova para eventuais solicitações de garantia.


