
1. Introdução
This manual provides essential instructions for the installation, operation, and maintenance of your Aninerel 3000W Hybrid Solar Inverter, model ANJ-3KW-LV-WIFI. This device is designed to convert 24V DC power to 110V AC pure sine wave power, suitable for various off-grid and backup power applications. Please read this manual thoroughly before installation and use to ensure safe and efficient operation.
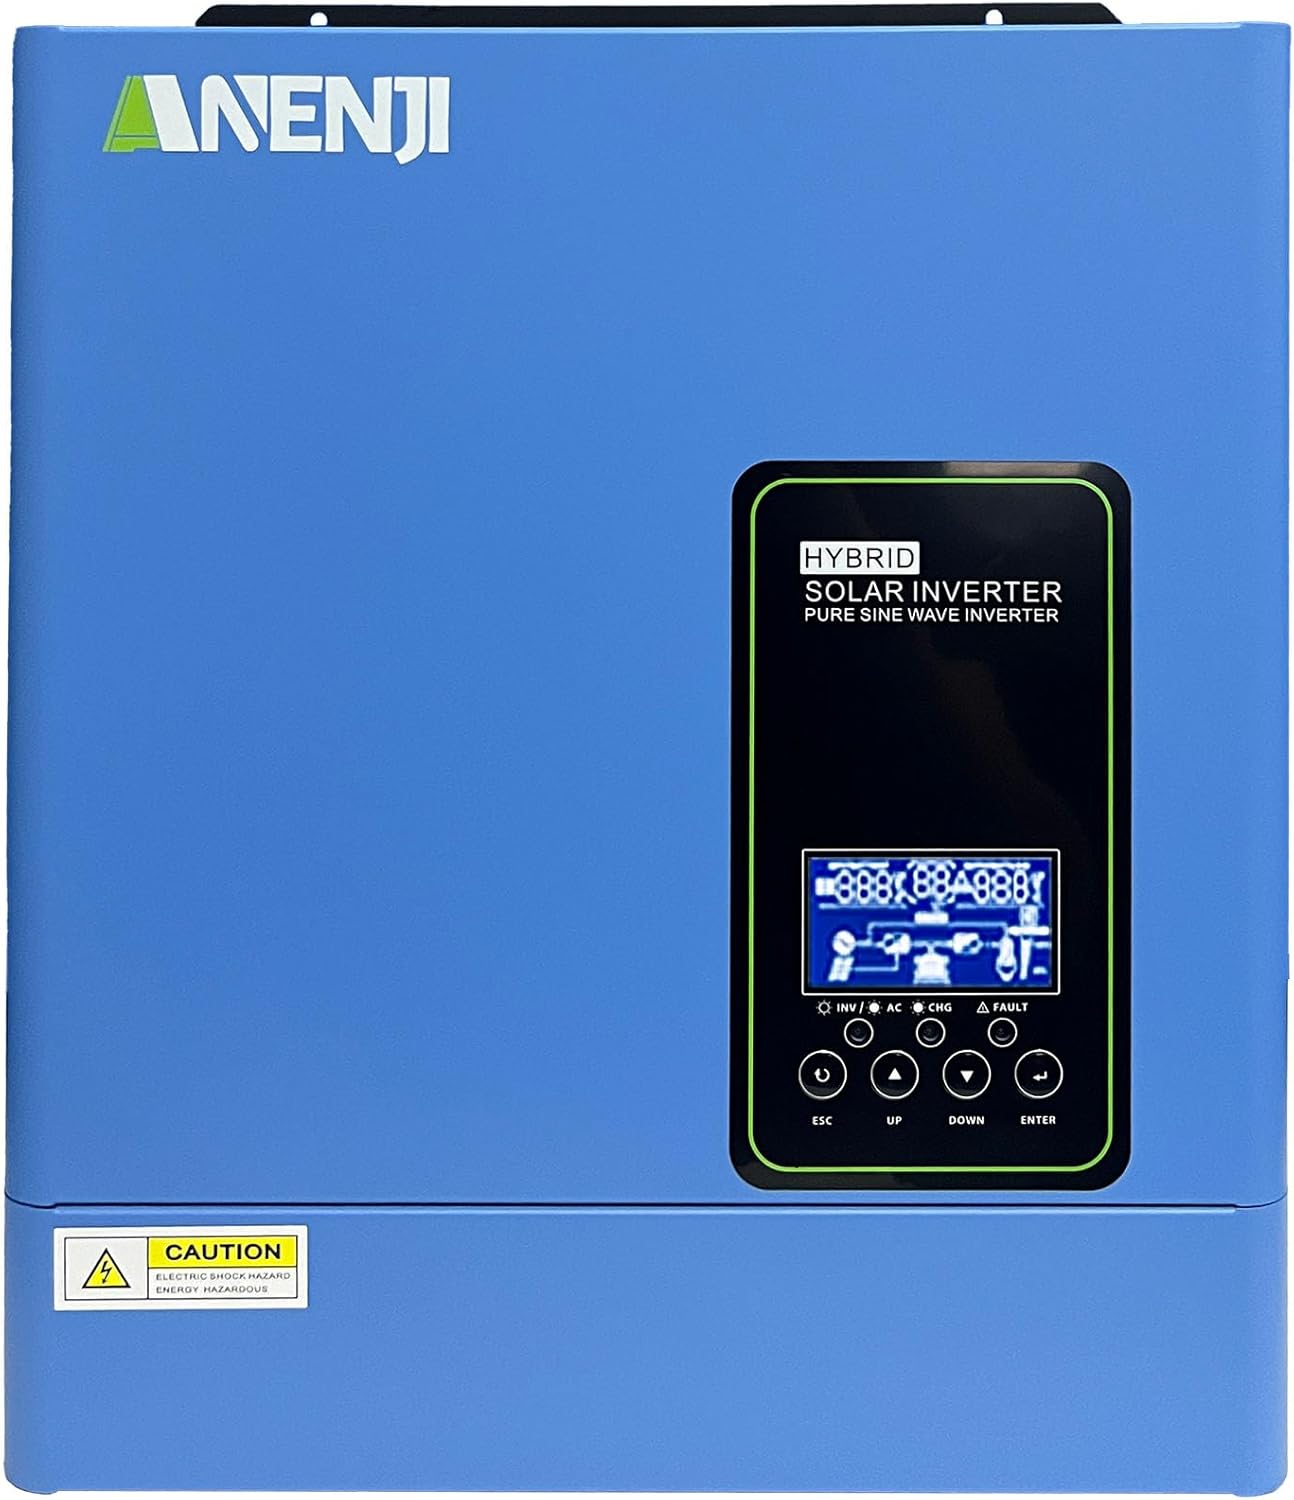
Figura 1.1: Frente view of the Aninerel 3000W Hybrid Solar Inverter. The inverter features a blue casing with the Aninerel logo and a central LCD display panel with control buttons.
2. Instruções de segurança
Observe sempre as seguintes precauções de segurança para reduzir o risco de choque elétrico, incêndio ou ferimentos:
- Read all instructions and cautionary markings on the unit and in this manual before installation or operation.
- Do not disassemble the inverter. Refer servicing to qualified personnel. Incorrect reassembly may result in electric shock or fire.
- Para reduzir o risco de choque elétrico, desconecte toda a fiação antes de tentar qualquer manutenção ou limpeza.
- This inverter is designed for indoor or semi-outdoor use with an IP65 rating. Avoid direct exposure to rain or snow.
- Ensure proper ventilation around the inverter to prevent overheating. Do not block ventilation openings.
- Utilize ferramentas adequadas e equipamentos de proteção individual durante a instalação.
- Ensure all wiring connections are tight and secure to prevent loose connections that can cause overheating.
- Do not connect the inverter to a public utility grid without proper authorization and safety measures.
3. Produto acabadoview
The Aninerel 3000W Hybrid Solar Inverter integrates a pure sine wave inverter, an MPPT solar charge controller, and a battery charger into one compact unit. It is designed to provide uninterrupted power support.
3.1 Principais Características
- Saída de onda senoidal pura de 3000 W: Converts 24V DC to 110V AC, providing stable power for sensitive electronics.
- Integrated 100A MPPT Solar Charge Controller: Maximizes solar energy harvesting with up to 500VDC PV input.
- Flexible Charging and Output Modes: Offers multiple modes (Solar Only, AC Priority, Hybrid Charging; Mains Priority, PV Priority, Hybrid Output) for diverse power management.
- Ampla compatibilidade com baterias: Supports AGM, GEL, Lead-acid, Li-ion, and LiFePO4 24V batteries.
- Visor LCD inteligente: Provides real-time monitoring and allows for easy configuration of system settings.
- Wi-Fi integrado: Enables remote monitoring of the inverter status (registration required).
- Design robusto: IP65-rated enclosure for durability in various environments, with intelligent cooling.
- Proteções abrangentes: Inclui sobrevol.tage, subvoltage, reverse polarity, and short circuit protection.

Figura 3.1: Painel frontal e traseiro sobrepostoview. This diagram labels the LCD display, indicators, function buttons, RS485 communication port, grounding terminal, battery input, dry contact port, built-in Wi-Fi, AC input, AC output, PV input, and power on/off switch.
3.2 Painel frontal e indicadores
- Tela LCD: Shows system status, operational data, and configuration settings.
- Indicador de carga: Illuminates to indicate battery charging status.
- Indicador de status: Provides general operational status of the inverter.
- Indicador de falha: Lights up to signal system errors or warnings.
- Function Buttons (ESC, UP, DOWN, ENTER): Utilizado para navegar pelos menus e ajustar as configurações no LCD.
3.3 Conexões do Painel Traseiro
- Porta de comunicação RS485: For external communication and monitoring.
- Terminal de aterramento: Essencial para aterramento de segurança.
- Entrada de bateria: Conecta-se ao banco de baterias de 24V.
- Porta de contato seco: Para controle ou sinalização externa.
- Built-in Wi-Fi Module: For wireless monitoring.
- Entrada CA: Connects to grid utility or generator AC power.
- Saída AC: Conecta-se às cargas domésticas.
- Entrada fotovoltaica: Connects to solar panel arrays.
- Interruptor de ligar/desligar: Controls the main power to the inverter.
4. Instalação e Configuração
Proper installation is crucial for the safe and efficient operation of your hybrid solar inverter. Ensure all connections are made by a qualified electrician and adhere to local electrical codes.
4.1 Montagem do inversor
- Choose a suitable location that is dry, well-ventilated, and protected from direct sunlight and moisture.
- Ensure sufficient clearance around the inverter for proper airflow and cooling.
- Mount the inverter vertically on a sturdy surface using appropriate fasteners.
4.2 Conexões de Fiação
Follow the wiring diagram carefully. All wiring should be performed with the inverter and all power sources disconnected.
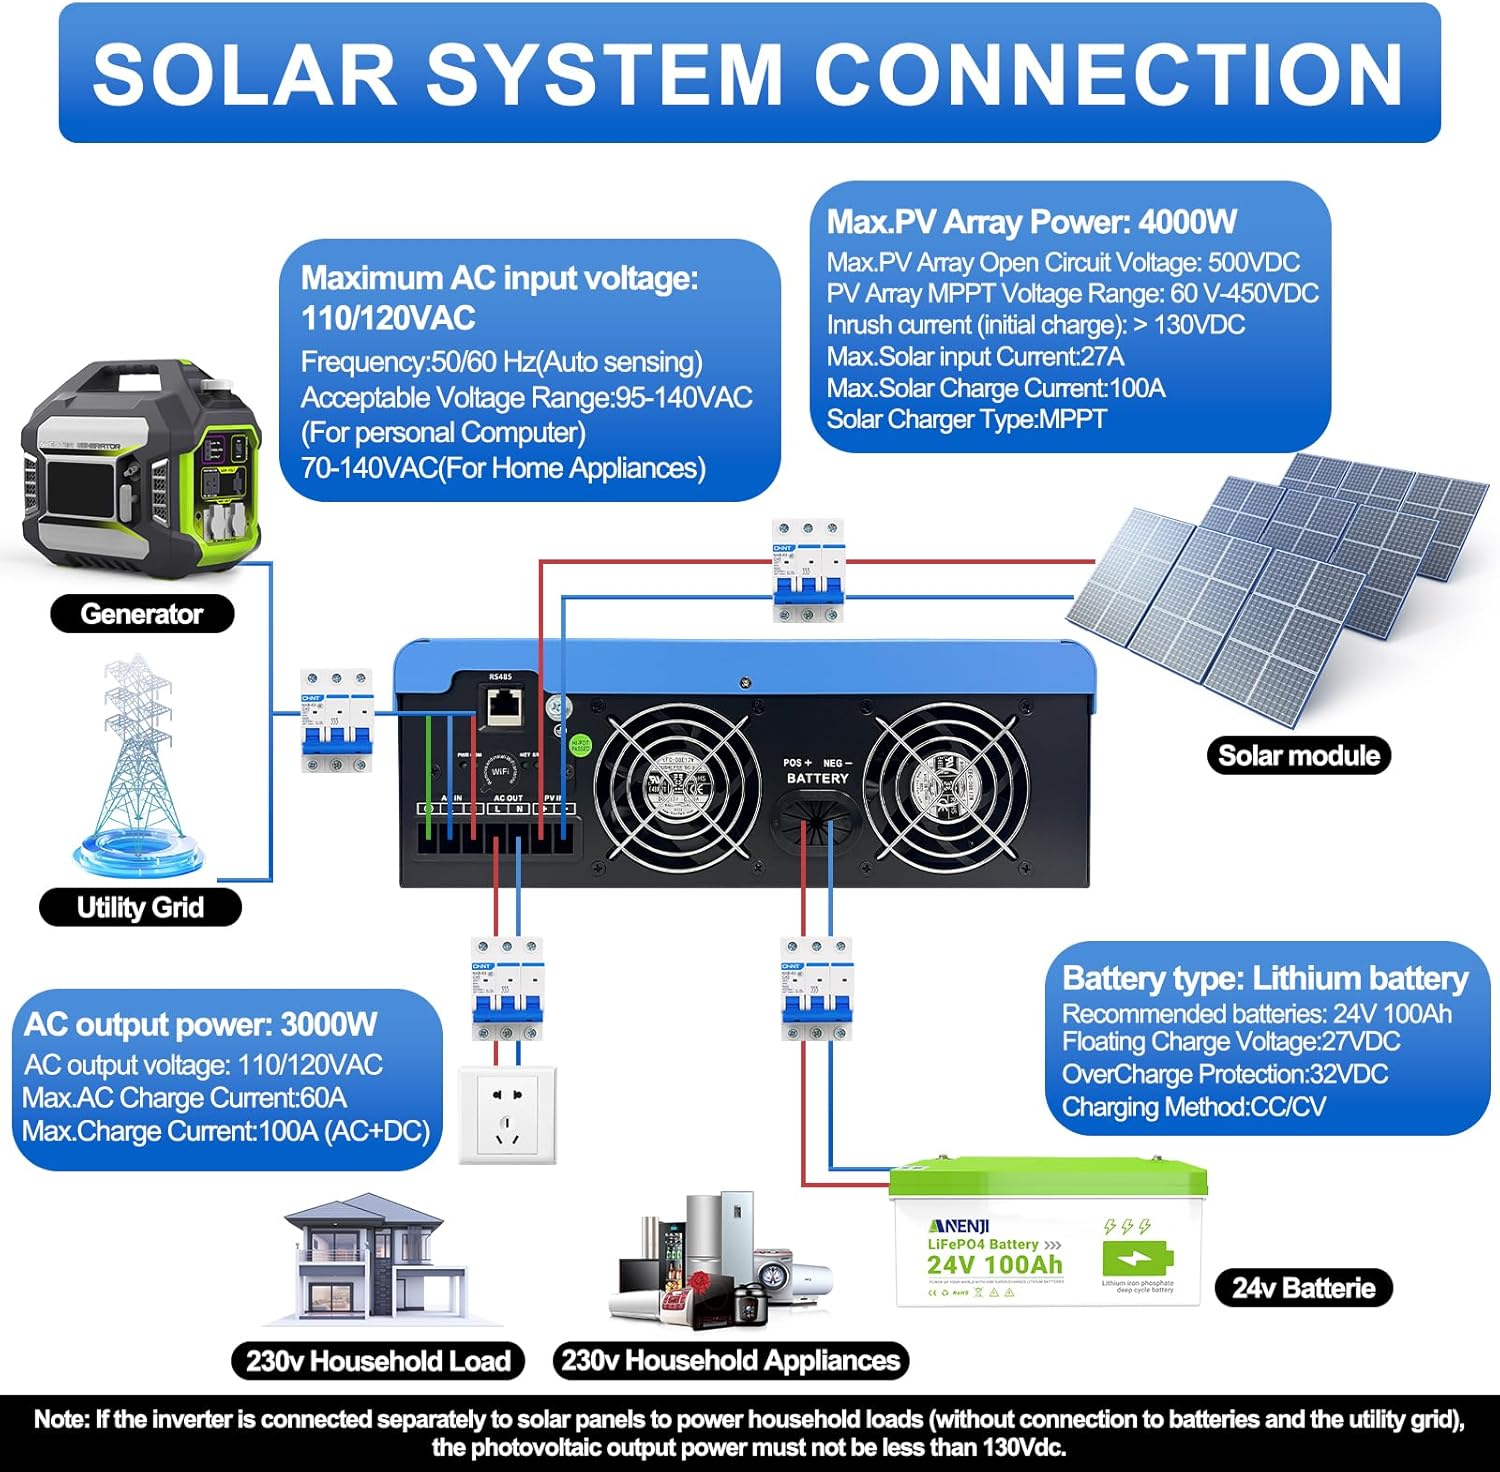
Figure 4.1: Solar System Connection Diagram. This diagram illustrates the connections for solar panels, generator, utility grid, 24V battery, and household loads to the inverter. It shows the PV input, battery input, AC input, and AC output terminals.
4.2.1 Conexão da Bateria
- Connect the 24V battery bank to the battery input terminals on the inverter. Ensure correct polarity (+ to + and - to -).
- Use appropriate cable gauges for the battery connections to handle the expected current.
- The ANJ-3KW-LV-WIFI model supports a 24-volt DC system and is recommended for use with batteries of at least 100 ampere-hours capacity.

Figure 4.2: Inverter Battery Connection. This diagram shows wiring configurations for both 12-volt and 24-volt battery systems, emphasizing correct series/parallel connections for the desired voltage.
4.2.2 PV (Solar Panel) Connection
- Connect the solar panel array to the PV input terminals. Observe correct polarity.
- Garanta que a tensão total em circuito aberto seja de 100 kV.tage of the PV array does not exceed 500VDC.
- O volume MPPTtage range is 60-450VDC. Ensure your PV array voltage falls within this range for optimal charging.
4.2.3 Conexão de entrada CA
- Connect the utility grid or generator AC power to the AC input terminals.
- The inverter supports 110/120VAC input with auto-sensing frequency (50/60Hz).
4.2.4 Conexão de Saída CA
- Connect your household loads or appliances to the AC output terminals.
- The inverter provides 3000W continuous AC output at 110/120VAC.
4.3 Inicialização
- After all connections are secure, switch on the battery breaker first.
- Then, switch on the PV array breaker (if applicable).
- Finally, switch on the AC input breaker (if applicable) and the inverter's main power switch.
- Observe the LCD display for initial boot-up and status indicators.
5. Operação
The inverter offers various configurable settings to optimize power management based on your specific needs.
Tela LCD de 5.1 polegadas e configurações
The LCD display provides real-time information and allows you to configure operational parameters using the function buttons.
- Use o UP e ABAIXO Botões para navegar pelas opções do menu.
- Imprensa DIGITAR Para selecionar uma opção ou confirmar uma configuração.
- Imprensa ESC to exit a menu or cancel an action.
5.2 Charging Priority Modes
These settings determine how the battery bank is charged from available power sources.

Figure 5.1: Charger Source Priority. This diagram illustrates three charging priority options: Solar First (solar panels charge first, AC input only if solar is unavailable), Solar and AC Input Simultaneously (both solar and utility charge at the same time), and Solar Only (solar energy is the exclusive charging source).
- Energia solar em primeiro lugar: Prioritizes solar power for charging. AC input will only charge the battery when solar power is insufficient or unavailable.
- AC Priority (Utility Priority): Prioritizes AC input (utility or generator) for charging. Solar power will supplement or take over if AC input is unavailable.
- Somente Solar: The inverter will only charge the battery bank from solar power. AC input will not be used for charging.
5.3 Output Priority Modes
These settings determine the power source for your connected loads.

Figure 5.2: Output Source Priority. This diagram shows three output priority options: Solar First (power from solar first, AC input supplements if solar is insufficient), AC First (redirects AC input to power loads, uses solar/batteries when AC is unavailable), and DC Priority (prioritizes solar first, then battery, then AC input only when voltage drops to a programmable value).
- Solar First (PV Priority): Prioritizes solar power to supply loads. If solar power is insufficient, the battery bank will supplement, and then AC input will be used.
- AC First (Mains Priority): Prioritizes AC input (utility or generator) to power loads. If AC input is unavailable, the inverter will switch to battery power.
- DC Priority (Battery Priority): Prioritizes solar power first, then battery power. AC input will only engage when the battery voltage drops below a programmable threshold.
5.4 Wi-Fi Monitoring
The built-in Wi-Fi module allows for remote monitoring of your inverter's performance and status via a dedicated application. Registration may be required to access this feature.

Figure 5.3: Wi-Fi Monitoring. This image depicts a user monitoring the hybrid inverter's status wirelessly via a smartphone application, highlighting the convenience of the built-in Wi-Fi feature.
6. Manutenção
Regular maintenance helps ensure the longevity and optimal performance of your Aninerel Hybrid Solar Inverter.
- Limpeza: Limpe periodicamente a parte externa do inversor com um pano seco. Certifique-se de que as aberturas de ventilação estejam livres de poeira e detritos.
- Conexões: Annually check all electrical connections (battery, PV, AC input/output) for tightness and corrosion. Tighten any loose connections.
- Ambiente: Assegure-se de que o ambiente de instalação permaneça dentro das faixas de temperatura e umidade especificadas.
- Firmware: Verifique o fabricante website para quaisquer atualizações de firmware disponíveis para melhor desempenho ou novos recursos.
7. Solução De Problemas
Esta seção fornece soluções para problemas comuns que você pode encontrar. Se o problema persistir, entre em contato com o suporte ao cliente.
| Problema | Possível causa | Solução |
|---|---|---|
| O inversor não liga. | Sem conexão de bateria ou bateria fracatage; Power switch off; Loose wiring. | Verifique as conexões da bateria e voltage; Ensure power switch is ON; Verify all wiring is secure. |
| Sem saída CA | Overload; Short circuit on output; Inverter in fault mode; Output priority setting. | Reduce load; Check for short circuits; Refer to LCD fault codes; Adjust output priority settings. |
| A bateria não está carregando com energia solar. | Low PV voltage; Incorrect PV connection; Solar charging disabled; Faulty solar panels. | Verifique o volume do conjunto fotovoltaicotage (must be >60VDC); Verify PV polarity; Check charging priority settings; Inspect solar panels. |
| Aviso de superaquecimento | Insufficient ventilation; Excessive ambient temperature; Overload. | Ensure clear airflow around inverter; Relocate to cooler area; Reduce connected load. |
| Wi-Fi monitoring not working | No Wi-Fi signal; Incorrect app configuration; Registration issue. | Check Wi-Fi signal strength; Reconfigure app settings; Contact support for registration issues. |
8. Especificações
Technical specifications for the Aninerel 3000W Hybrid Solar Inverter ANJ-3KW-LV-WIFI:
| Recurso | Especificação |
|---|---|
| Número do modelo | ANJ-3KW-LV-WIFI |
| Saída de potência contínua | 3000 W |
| Potência de pico de saída | 6000 W |
| Volume de entrada CCtage | 24V |
| Vol de saída ACtage | 110 V CA |
| Forma de onda de saída | Pure Sine Wave |
| Potência máxima de entrada PV | 4000 W |
| Controlador MPPT de corrente | 100A |
| Máx. Vol. Circuito Aberto PVtage | 500 VCC |
| Vol. MPPT da matriz fotovoltaicatage Alcance | 60-450 VCC |
| Corrente máxima de entrada CA | 60A |
| Frequência de saída | 50/60 Hz (detecção automática) |
| Compatibilidade da bateria | AGM, GEL, Lead-acid, Li-ion, LiFePO4 (24V) |
| Classificação de proteção | IP65 |
| Dimensões do produto | 15 x 6.98 x 18 polegadas |
| Peso do item | 16.5 libras |
9. Garantia e suporte
For warranty information, please refer to the warranty card included with your product or visit the official Aninerel website. For technical support, troubleshooting assistance, or service inquiries, please contact Aninerel customer service through their official channels.
Manufacturer: Shenzhen Anenji Energy Technology Co.,Ltd