
1. Introdução
This manual provides detailed instructions for the installation, operation, and maintenance of your Zebronics DMS200 Monitor Desk Stand. Please read this manual thoroughly before installation and use to ensure proper function and safety. The DMS200 is designed to support monitors from 17 to 32 inches, with a maximum load capacity of 7 kg, offering ergonomic adjustments for an optimized viewexperiência.

Image 1.1: Zebronics DMS200 Monitor Desk Stand overview.
2. Informações de segurança
Observe as seguintes precauções de segurança para evitar ferimentos ou danos ao produto:
- Não exceda a capacidade máxima de peso de 7 kg (15.4 lbs).
- Ensure the desk surface is stable and strong enough to support the combined weight of the stand and monitor.
- Always follow the installation instructions carefully. Improper installation can lead to equipment damage or personal injury.
- Mantenha crianças e animais de estimação afastados durante a instalação. Peças pequenas podem representar risco de asfixia.
- Não aperte os parafusos em excesso, pois isso pode causar danos.
- Verifique regularmente todas as conexões para garantir que permaneçam seguras.
3. Conteúdo da embalagem
Verifique se todos os componentes estão presentes antes de iniciar a instalação:
- Conjunto do braço do monitor
- Secretária Clamp (C-clamp)
- Grommet Mount Base
- Placa VESA
- Kit de ferragens (parafusos, arruelas, chaves Allen)
- Manual de instruções
4. Configuração e instalação
The Zebronics DMS200 offers two installation methods: C-clamp e montagem com ilhós. Escolha o método mais adequado para sua mesa.
4.1. Escolhendo um método de montagem
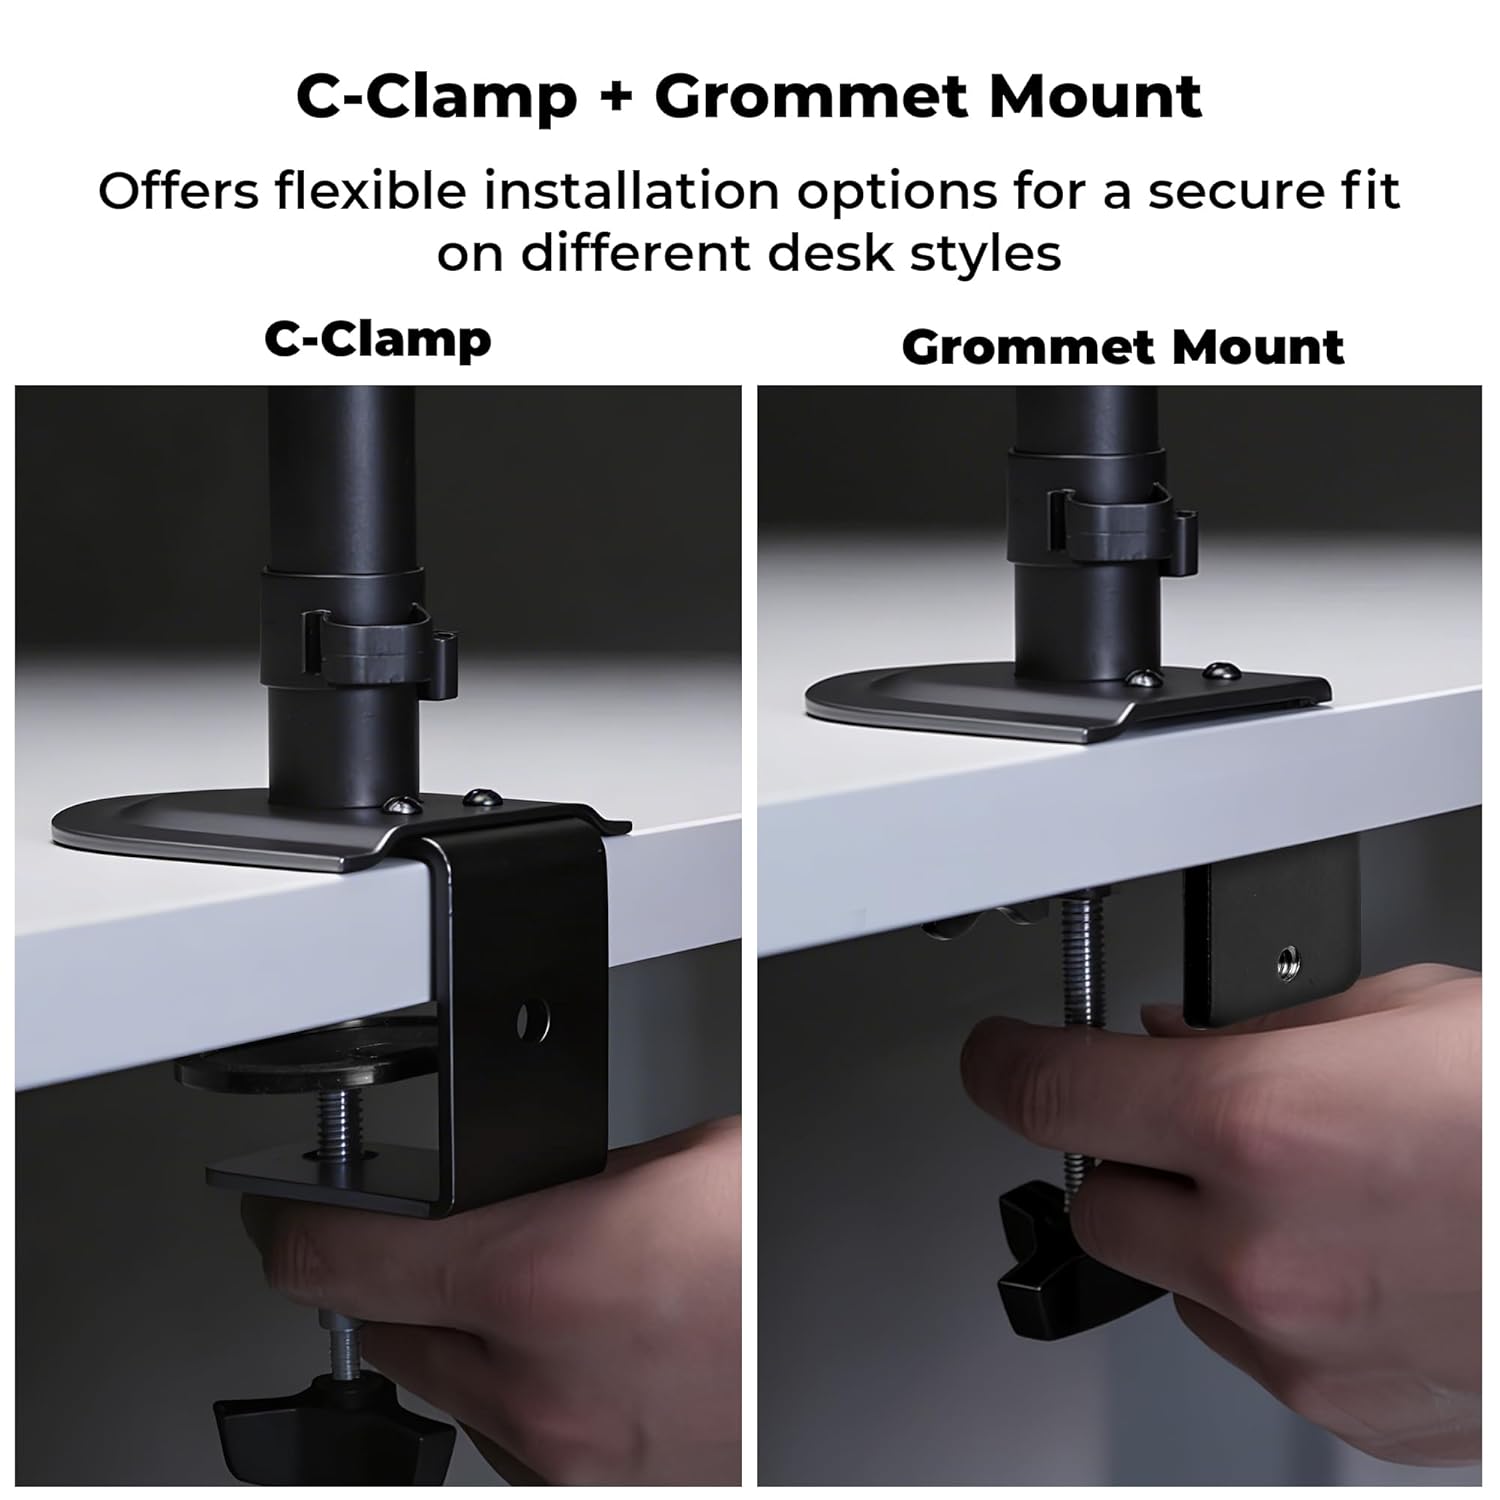
Imagem 4.1: C-Clamp and Grommet Mount options.
- C-Clamp: Ideal for desks without pre-drilled holes. Clamps to the edge of the desk.
- Montagem com ilhós: Requires a pre-drilled hole (or drilling one) in the desk. Provides a more flush installation.
4.2. C-Clamp Instalação
- Anexe o C-clamp até a base do poste principal.
- Position the stand on the edge of your desk.
- Aperte o C-clamp Aperte os parafusos até que o suporte esteja firmemente preso à mesa. Certifique-se de que esteja estável e não balance.
4.3. Instalação de suporte com ilhós
- Desmonte o C-clamp from the main pole if it was pre-attached.
- Insira a haste principal pelo orifício de passagem de cabos na sua mesa.
- Secure the grommet base plate and tighten the nut from underneath the desk until the stand is firm.
4.4. Garantir a estabilidade
After mounting the stand, verify its stability on the desk. The anti-slip base and robust construction ensure reliable support for monitors up to 7 kg.

Image 4.4: Stand stability and maximum load capacity.
4.5. Conectando o monitor
The DMS200 supports VESA patterns of 75x75mm and 100x100mm.

Image 4.5: VESA mount plate for monitor attachment.
- Attach the VESA plate to the back of your monitor using the appropriate screws from the hardware kit. Ensure the screws are not overtightened.
- Carefully slide the monitor (with the VESA plate attached) onto the monitor arm's mounting head.
- Secure the monitor to the arm by tightening the locking screw or mechanism on the mounting head.
4.6. Gerenciamento de cabos
Utilize the integrated cable management clips to keep your workspace tidy.

Image 4.6: Integrated cable management.
- Route your monitor's power and display cables through the clips located along the arm and pole.
- Ensure cables have enough slack for full range of motion without being strained.
5. Instruções de operação
The DMS200 monitor arm provides various adjustments for optimal ergonomic positioning.

Image 5.1: Monitor arm adjustment capabilities.
- Ajuste de altura: Loosen the collar on the main pole, adjust the arm to the desired height, and then re-tighten the collar.
- Ajuste de inclinação: The monitor can be tilted up to ±5°. Adjust the tilt angle by gently pushing or pulling the top or bottom of the monitor. If the monitor does not hold its position, tighten the tilt mechanism screw with an Allen key.
- Ajuste giratório: The arm allows for ±90° swivel. Gently rotate the monitor left or right to achieve the desired viewângulo de engate.
- Rotação: The VESA plate allows for 360° rotation, enabling portrait or landscape orientation. Rotate the monitor gently to switch orientations.
- Extensão do braço: The mechanical arm can extend up to 42 cm. Adjust the arm's position by gently pulling or pushing it to bring the monitor closer or further away.
6. Manutenção
To ensure the longevity and proper function of your monitor stand:
- Limpeza: Limpe o suporte com um pano macio e seco.amp pano. Evite produtos de limpeza abrasivos ou solventes que possam danificar o acabamento.
- Verificações periódicas: Verifique periodicamente todos os parafusos e conexões para garantir que estejam firmes e seguros. Reaperte-os, se necessário.
- Capacidade de carga: Do not place items on the monitor arm or exceed the maximum weight capacity.
7. Solução De Problemas
| Problema | Possível causa | Solução |
|---|---|---|
| Monitor sags or does not hold tilt position. | Tilt mechanism screw is loose. | Tighten the tilt adjustment screw on the VESA head using the provided Allen key. |
| O suporte balança ou está instável. | Secretária clamp/grommet mount is not tight enough. | Aperte novamente o parafuso C-clamp or grommet mount screw/nut. Ensure the desk surface is stable. |
| Monitor cannot be rotated or swiveled smoothly. | Joints may be too tight or require lubrication. | Check for any obstructions. If joints are too stiff, apply a small amount of silicone-based lubricant (avoid oil-based). |
| Cables are strained during adjustment. | Insufficient slack in cable management. | Re-route cables, ensuring enough slack is provided for the full range of arm movement. |
8. Especificações
| Recurso | Detalhe |
|---|---|
| Modelo | DMS200 |
| Tamanho de tela suportado | 17 - 32 polegadas |
| Capacidade Máxima de Carga | 7 kg (15.4 libras) |
| Compatibilidade VESA | 75x75mm, 100x100mm |
| Tipo de montagem | C-Clamp, montagem de grommet |
| Ajustes | Height, Tilt (±5°), Swivel (±90°), Rotation (360°) |
| Extensão do braço | Até 42 cm |
| Material | Metal (Rust-Proof) |
| Cor | Preto |
| Peso do item | 1670 gramas |
9. Garantia e Suporte
Garantia: The Zebronics DMS200 Monitor Desk Stand comes with a 1-year carry-in warranty to the service center from the date of purchase.
Apoiar: For technical assistance, troubleshooting, or warranty claims, please contact Zebronics customer support. Refer to the official Zebronics webPara obter os detalhes de contato, consulte o site ou a documentação da sua compra.
Manufacturer: Zebronics India Private Limited, 13/7 Smith Road, Royapettah, Chennai, Tamil Nadu - 600 002, India.