1. Introdução
Produto acimaview
The Visual Land VL-G4 is a compact and versatile portable media player designed for on-the-go entertainment. It features a 1.8-inch screen, 4GB of internal storage, and supports various media formats. This device allows you to enjoy your favorite music, videos, and images, along with additional functionalities such as an FM radio and a voice recorder.
Os principais recursos incluem:
- 4 GB storage capacity, sufficient for approximately 4,000 songs.
- Até 6 horas de reprodução de áudio com uma única carga.
- 1.8-inch color LCD display for media viewindo.
- Supports MP3, WMA, and WAV audio formats; AMV video format; JPG image format.
- Integrated FM radio tuner.
- Gravador de voz embutido.
- Functions as a USB flash memory drive for data storage.
- Built-in speaker for shared listening.
This manual provides detailed instructions for setting up, operating, and maintaining your VL-G4 device to ensure optimal performance and user experience.
2. Configuração
2.1 Conteúdo da embalagem
Antes de começar, verifique se todos os itens estão presentes na embalagem:
- Visual Land VL-G4 Media Player
- Fones de ouvido
- Adaptador CA
- Cabo USB
- Manual do Usuário (este documento)
2.2 Carregando o dispositivo
The VL-G4 is equipped with an internal lithium-ion battery. Before initial use, fully charge the device.
- Connect the small end of the USB cable to the USB port on the bottom of the VL-G4.
- Connect the large end of the USB cable to the AC adapter.
- Conecte o adaptador CA a uma tomada de parede padrão.
- O dispositivo indicará o status de carregamento em sua tela. Uma carga completa normalmente leva de 2 a 3 horas.
- Alternatively, you can connect the USB cable directly to a powered USB port on your computer for charging.
2.3 Carregando mídia Files
To transfer music, videos, or images to your VL-G4:
- Certifique-se de que o dispositivo está ligado.
- Connect the VL-G4 to your computer using the provided USB cable.
- Your computer should recognize the VL-G4 as a removable disk drive.
- Open the VL-G4 drive on your computer. You can create folders (e.g., 'Music', 'Videos', 'Photos') to organize your files.
- Drag and drop your desired MP3, WMA, WAV, AMV, or JPG files into the appropriate folders on the VL-G4 drive.
- Uma vez file transfer is complete, safely eject the VL-G4 drive from your computer before disconnecting the USB cable.
Note: For video playback, AMV format is supported. You may need to convert other video formats using the included software (if applicable) or third-party conversion tools.
3. Instruções de operação
3.1 Layout e controles do dispositivo
Familiarize yourself with the buttons and ports on your VL-G4:
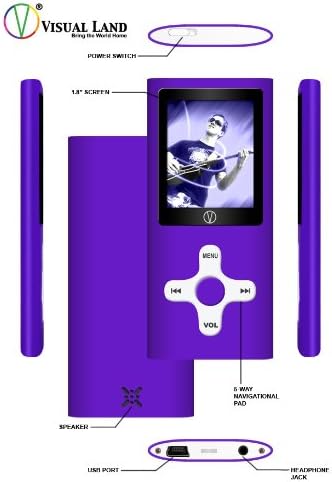
- Interruptor de alimentação: Located on the top edge, slides to turn the device On or Off.
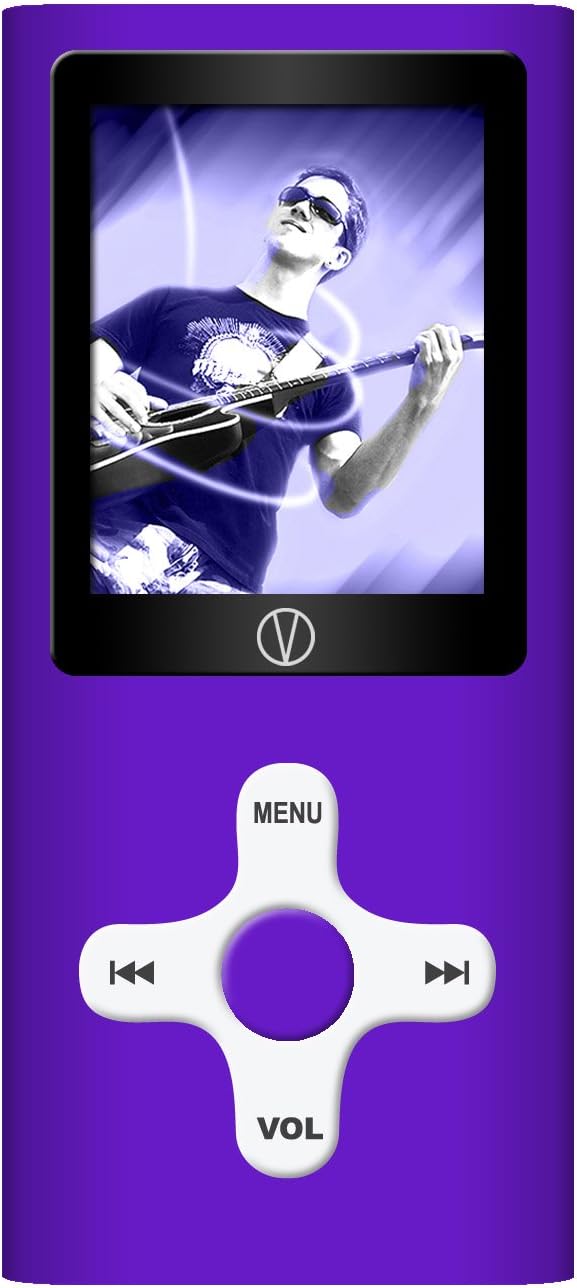
- Tela de 1.8 polegadas: Displays menus, media content, and device status.
- 5-Way Navigational Pad: Central control for menu navigation and media playback.
- MENU button (Top): Acessa o menu principal ou retorna à tela anterior.
- Botões Esquerda/Direita: Navigate through menus, skip tracks, fast forward/rewind.
- Play/Pause/Confirm button (Center): Starts/pauses playback, confirms selections.
- VOL button (Bottom): Enters volume adjustment mode. Use Left/Right to change volume.
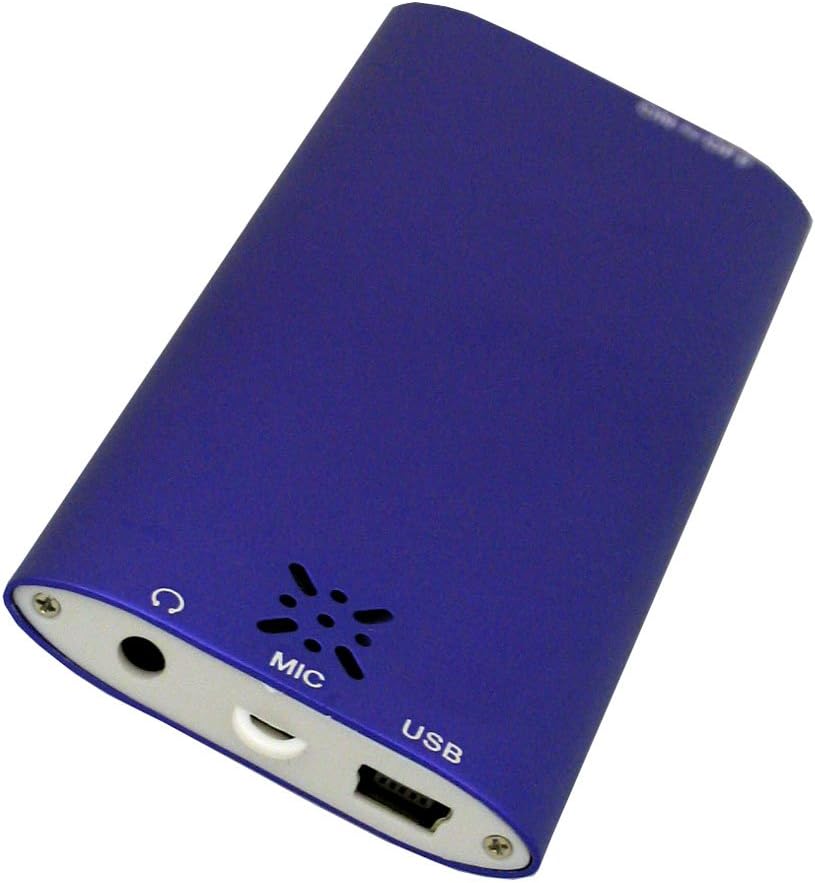
- Palestrante: Built-in speaker for audio output without earphones.
- Porta USB: Para carregar e conectar a um computador.
- Plug do fone de ouvido: 3.5mm port for connecting earphones.
- Microfone: Built-in microphone for voice recording.
3.2 Ligar/Desligar
To power on the device, slide the Power Switch to the 'On' position. To power off, slide it to the 'Off' position.
3.3 Navegação básica
From the main menu, use the Left/Right buttons on the navigational pad to scroll through options. Press the central Play/Pause/Confirm button to select an option. Press the MENU button to go back to the previous screen or the main menu.
3.4 Audio Playback (MP3/WMA/WAV)
- From the main menu, select 'Music' or 'Audio'.
- Navegue pelas suas pastas e files using the Left/Right buttons.
- Press the central Play/Pause/Confirm button to start playback of a selected track.
- Durante a reprodução:
- Press Play/Pause/Confirm to pause/resume.
- Press Left/Right briefly to skip to the previous/next track.
- Press and hold Left/Right to fast forward/rewind within a track.
- Press the VOL button, then use Left/Right to adjust the volume. Press VOL again to exit volume mode.
- The device offers EQ presets (Natural, Rock, Pop, Classical, Soft, Jazz, DBB) which can typically be accessed through the music playback options menu.
3.5 Video Playback (AMV)
- No menu principal, selecione 'Vídeo'.
- Navigate to your desired AMV video file.
- Press the central Play/Pause/Confirm button to begin playback.
- Playback controls are similar to audio playback.
3.6 Imagem Viewing (JPG)
- From the main menu, select 'Photos' or 'Images'.
- Navigate to your JPG image files.
- Press the central Play/Pause/Confirm button to view uma imagem.
- Use Left/Right buttons to cycle through images.
- Some models may offer a slideshow function, typically accessible via the options menu during image viewindo.
Rádio 3.7 FM
- Connect earphones to the headphone jack; they act as the antenna for the FM radio.
- No menu principal, selecione 'Rádio FM'.
- Use the Left/Right buttons to manually tune frequencies.
- Look for an 'Autoscan' or 'Search' option within the FM radio menu to automatically find and save available stations.
3.8 Gravador de Voz
- From the main menu, select 'Recorder' or 'Voice'.
- Select 'Start Recording' or a similar option. The built-in microphone (MIC) will capture audio.
- Press Play/Pause/Confirm to stop recording.
- Recordings are typically saved in a dedicated folder and can be played back from the 'Audio' or 'Recorder' menu.
3.9 Using as a USB Drive
When connected to a computer, the VL-G4 functions as a standard USB mass storage device. You can drag and drop any file type onto it, making it useful for carrying documents or other data in addition to media files.
4. Manutenção
4.1 Limpeza
To clean your VL-G4, use a soft, dry, lint-free cloth. Do not use liquid cleaners, aerosols, or solvents, as these can damage the device's finish or internal components.
4.2 Cuidados com a bateria
- Evite descarregar completamente a bateria com frequência.
- Carregue o dispositivo regularmente, mesmo quando não estiver em uso, para manter a saúde da bateria.
- Do not expose the device to extreme temperatures, as this can degrade battery performance and lifespan.
4.3 Armazenamento
When storing the device for extended periods, ensure it is partially charged (around 50%) and kept in a cool, dry place away from direct sunlight and extreme temperatures.
5. Solução De Problemas
If you encounter issues with your VL-G4, refer to the following common problems and solutions:
| Problema | Solução possível |
|---|---|
| O dispositivo não liga. | Ensure the battery is charged. Connect to the AC adapter and try again. Check the power switch position. |
| Nenhum som nos fones de ouvido/alto-falante. | Check volume level. Ensure earphones are properly plugged in. Test with different earphones. Verify media file não está corrompido. |
| O computador não reconhece o dispositivo. | Ensure the device is powered on. Try a different USB port or cable. Restart your computer. |
| Files não estão tocando. | Verifique o file format is supported (MP3/WMA/WAV for audio, AMV for video, JPG for images). Ensure files não estão corrompidos. |
| Bateria de curta duração. | Ensure the device is fully charged. Reduce screen brightness. Close unused applications. Battery performance may degrade over time with usage. |
6. Especificações
| Recurso | Detalhe |
|---|---|
| Número do modelo | VL-G4 |
| Capacidade de armazenamento de memória | 4 GB |
| Tamanho da tela | 1.8 Inches (Note: Product description states 1.8-inch, specifications list 2.4 inches. Using 1.8-inch as per detailed description.) |
| Formatos de áudio suportados | MP3, WMA, WAV |
| Formatos de vídeo suportados | AMV |
| Formatos de imagem suportados | JPG |
| Características especiais | FM Radio, Video Playback, Voice Recorder, Built-in Speaker |
| Tecnologia de Conectividade | USB |
| Battery Life (Audio) | Até 6 horas |
| Dimensões do produto | 1.6 x 0.34 x 3.6 polegadas |
| Peso do item | 1.28 onças |
7. Informações de garantia
The Visual Land VL-G4 Portable Media Player comes with a one-year limited warranty from the date of purchase. This warranty covers manufacturing defects under normal use. It does not cover damage caused by misuse, accidents, unauthorized modifications, or normal wear and tear. Please retain your proof of purchase for warranty claims.
8. Suporte ao cliente
For further assistance, technical support, or warranty inquiries, please refer to the contact information provided on the Visual Land official website or the original product packaging. When contacting support, please have your product model number (VL-G4) and proof of purchase readily available.


