Introdução
This manual provides comprehensive instructions for the safe and effective operation, maintenance, and troubleshooting of the Testo 400563 4354 IAQ Kit. This device is designed for simple and intuitive operation for reading, saving, and analyzing ventilation and indoor air quality parameters, including Relative Humidity (RH), Temperature, Carbon Dioxide (CO2), and Barometric Pressure.
Informações de segurança
Please read this section carefully before operating the device. Failure to comply with these instructions may result in injury or damage to the instrument.
- Always operate the device within its specified operating temperature and humidity ranges.
- Do not expose the device to extreme temperatures, direct sunlight, or corrosive environments.
- Evite deixar cair ou submeter o dispositivo a impactos fortes.
- Only use specified batteries and dispose of them properly.
- Não tente abrir ou reparar o dispositivo por conta própria. Encaminhe todos os serviços de manutenção a pessoal qualificado.
- Mantenha o dispositivo limpo e livre de poeira e detritos.
Produto acimaview
The Testo 400563 4354 IAQ Kit is a versatile instrument for environmental measurements. Familiarize yourself with its components:
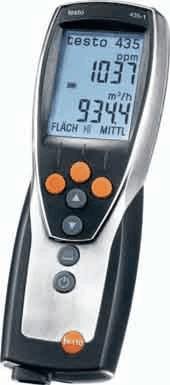
Figura 1: Testo 435-4 IAQ Meter. This image displays the handheld meter, featuring a large digital display at the top showing readings like "1037 ppm" and "934.4 m³/h". Below the screen are several control buttons: three orange circular buttons at the top, followed by two grey arrow buttons (up and down), another grey circular button, and finally a power button with a power symbol. The device has a sleek, ergonomic design with a black body and silver-colored accents.
Componentes principais:
- Mostrar: Large LCD for clear reading of measurement values and menu navigation.
- Botões de controle: Intuitive buttons for power, navigation, selection, and function activation.
- Entrada do sensor: Port for connecting various probes (e.g., CO2, humidity, temperature).
- Compartimento da bateria: Located at the rear for power supply.
Configurar
1. Instalação da bateria:
- Localize a tampa do compartimento da bateria na parte traseira do dispositivo.
- Open the cover by sliding or unscrewing it (refer to specific model instructions if screws are present).
- Insert the required batteries (e.g., AA or AAA, typically 3 or 4) ensuring correct polarity (+/-).
- Feche bem a tampa do compartimento da bateria.
2. Conexão da sonda:
- Connect the desired measurement probe (e.g., CO2 probe, humidity/temperature probe) to the designated input port on the device.
- Ensure the connection is firm and secure to prevent inaccurate readings.
Instruções de operação
1. Ligar/Desligar:
- Para ligar, pressione e segure o Poder button (usually marked with Ⓢ) até que o visor se ilumine.
- Para desligar, pressione e segure o Poder botão novamente até que o display desligue.
2. Fazendo medições:
- Once powered on and a probe is connected, the device will typically display real-time measurements for the connected parameters (e.g., CO2 in ppm, Temperature in °C/°F, RH in %).
- Position the probe in the environment you wish to measure. Ensure proper air circulation around the sensor for accurate readings.
- Allow a few moments for readings to stabilize, especially for CO2 and humidity.
3. Navigating Menus and Saving Data:
- Use o Para cima/para baixo arrow buttons to navigate through different measurement modes or menu options.
- Pressione o Entrar / OK button (often a central circular button) to select an option or confirm a setting.
- To save a measurement, look for a Salvar or Memória button/option. Follow the on-screen prompts to store data.
- To recall saved data, navigate to the Memória or Lembrar opção de menu.
Manutenção
1. Limpeza:
- Limpe o dispositivo casing com um suave, damp pano. Não use produtos de limpeza abrasivos ou solventes.
- Ensure no liquid enters the sensor openings or electrical connections.
- For probes, follow specific cleaning instructions provided with the probe itself.
2. Substituição da bateria:
- Substitua as pilhas quando o indicador de bateria fraca aparecer no visor.
- Always use new batteries of the specified type.
- Descarte baterias velhas de acordo com os regulamentos locais.
3. Calibração:
- Regular calibration is essential for maintaining measurement accuracy.
- Refer to the device's on-screen calibration menu or consult Testo's official support for recommended calibration intervals and procedures.
- Some probes may require specific calibration gases or humidity standards.
Solução de problemas
| Problema | Possível causa | Solução |
|---|---|---|
| O dispositivo não liga. | Baterias descarregadas ou instaladas incorretamente. | Check battery polarity; replace with new batteries. |
| Leituras imprecisas. | Sensor dirty, damaged, or out of calibration; improper probe connection. | Clean sensor; ensure probe is securely connected; perform calibration. |
| Display shows "Error" or "---". | Sensor malfunction; out of measurement range; internal error. | Check probe connection; move to an environment within measurement range; restart device; contact support if persistent. |
| Não foi possível salvar os dados. | Memory full; incorrect save procedure. | Delete old data; refer to operating instructions for saving data. |
Especificações
The following specifications are for the Testo 400563 4354 IAQ Kit:
- Tipo de produto: CO2/Temp/RH/Barometric Meter
- Modelo: 400563 4354
- Marca: Texto
- Número da peça: AO-10382-23
- Quantidade da embalagem: CADA
- Dimensões da embalagem: 16.3 x 13 x 4.3 polegadas; 8.2 libras
- ASIN: B00481RUUA
- Primeiro disponível: 18 de julho de 2012
Note: Specific measurement ranges and accuracies depend on the probes used with the device. Refer to individual probe documentation for detailed specifications.
Garantia e Suporte
For warranty information, technical support, or service inquiries, please contact Testo customer service or visit their official website.
Você pode encontrar mais informações e detalhes de contato no site. Testo Store on Amazon.


