1. Introdução
Obrigado pela compra.asing the Fonestar AS-170RU Hi-Fi Amplifier. This device is designed to provide high-fidelity stereo audio amplification, featuring a built-in USB/MP3 player, AM/FM digital tuner, and multiple audio inputs. This manual provides detailed instructions for safe installation, operation, and maintenance of your amplifier. Please read this manual thoroughly before use and retain it for future reference.
2. Instruções de segurança
- Fonte de energia: Garantir o ampO amplificador está conectado a uma fonte de alimentação compatível com a tensão.tage specified on the unit. Disconnect the power cord from the outlet if the unit will not be used for an extended period.
- Ventilação: Não obstrua as aberturas de ventilação. Certifique-se de que haja espaço suficiente ao redor do aparelho para permitir a circulação adequada de ar e evitar o superaquecimento.
- Água e Umidade: Não exponha o aparelho à chuva, umidade ou respingos/gotejamento de líquidos. Não coloque objetos contendo líquidos, como vasos, sobre o aparelho.
- Fontes de calor: Mantenha a unidade longe de fontes de calor, como radiadores, aquecedores, fogões ou outros aparelhos (incluindo amplificadores) que produzem calor.
- Limpeza: Limpe apenas com um pano seco. Não use limpadores líquidos ou em aerossol.
- Manutenção: Não tente consertar este produto sozinho. Encaminhe todos os serviços de manutenção para pessoal de serviço qualificado.
- Colocação: Coloque o aparelho sobre uma superfície plana e estável. Evite colocá-lo sob luz solar direta ou perto de campos magnéticos fortes.
3. Conteúdo da embalagem
Por favor, verifique se os seguintes itens estão incluídos em seu pacote:
- Fonestar AS-170RU Hi-Fi Ampmais vivo
- Controle remoto
- Antena AM
- Antena FM
- Manual do usuário (este documento)
4. Produto acabadoview
4.1 Painel Frontal
The front panel provides access to essential controls and the display.
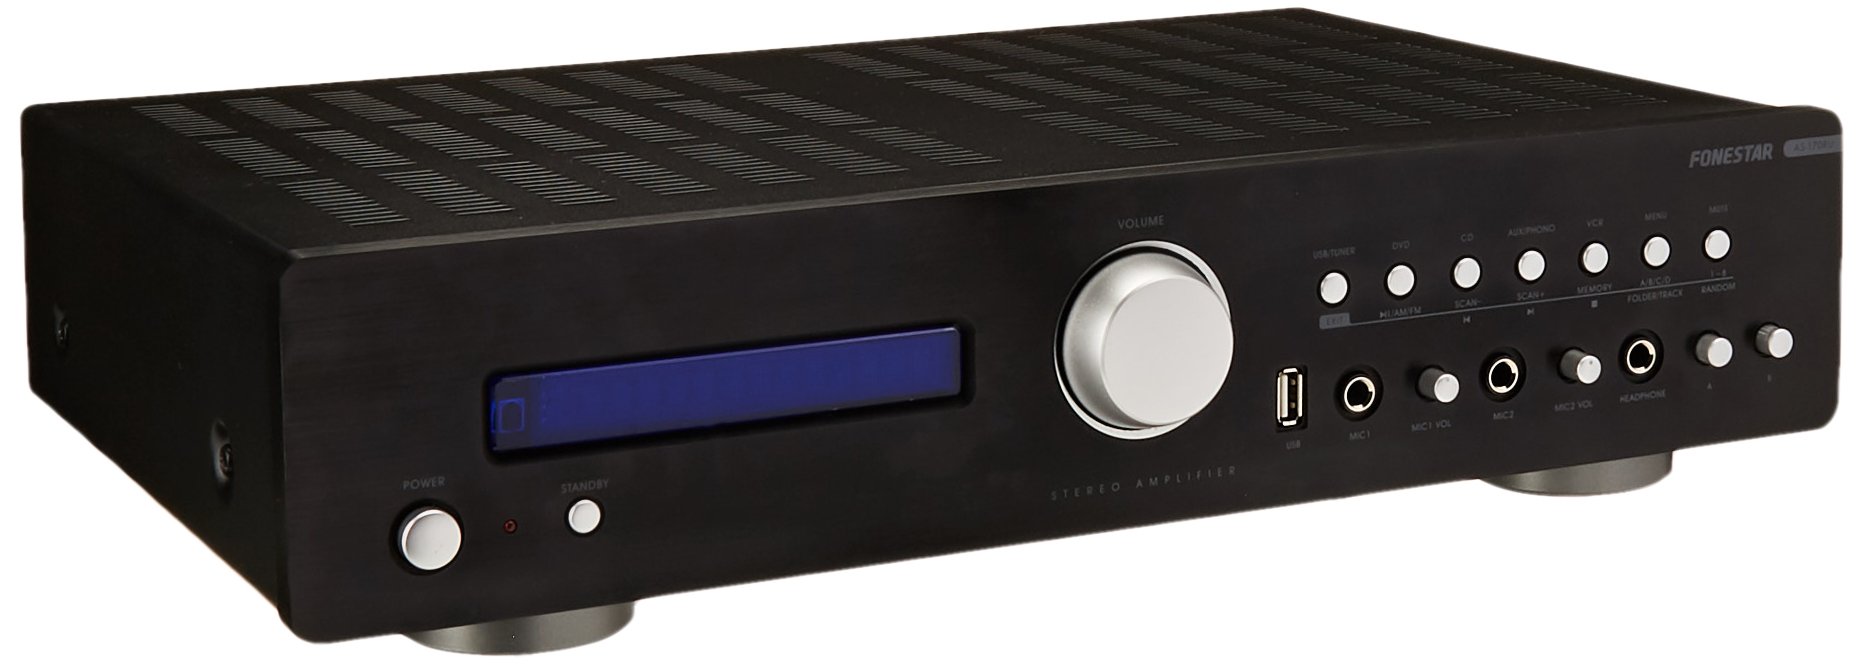
Image: Fonestar AS-170RU Front Panel. Esta imagem mostra a parte frontal. view do amplifier, showing the VFD display, USB port, headphone output, input selectors, volume knob, and other control buttons.
- Botão de energia: Transforma o amplifier ligado ou desligado.
- Visor VFD: Shows current input, volume level, tuner information (frequency, RDS), and USB/MP3 track details (ID3 tag).
- Porta USB: For connecting USB storage devices to play MP3 files.
- Saída de fone de ouvido: Tomada de 6.3 mm para conectar fones de ouvido.
- Seletores de entrada: Buttons for choosing audio sources (CD, DVD, VCR, AUX/Phono, USB/Tuner).
- Controle de volume: Rotary knob to adjust the master volume level.
- Entradas de microfone: Two 6.3mm microphone jacks with independent volume control.
- Controles de tom: Buttons or menu options for adjusting Bass, Treble, and Balance.
4.2 Painel traseiro
The rear panel contains all the necessary connections for your audio sources, speakers, and antennas.

Image: Fonestar AS-170RU Rear Panel. This image illustrates the rear connections of the amplifier, including speaker terminals (A/B), various RCA input jacks (CD, DVD, VCR, AUX/Phono), REC OUT, PRE OUT, AMP IN, and antenna connections (FM COAX, AM LOOP ANT).
- Speaker Outputs (A/B): Terminals for connecting two pairs of speakers. Supports 4-16 ohms for A or B, or 8-16 ohms for A+B.
- Entradas de áudio (RCA):
- Entrada de CD: Para conectar um leitor de CD.
- DVD Input: For connecting a DVD player or other audio source.
- VCR Input: For connecting a VCR or other audio source.
- AUX/PHONO Input: For connecting auxiliary devices or a turntable (Phono input may require a pre-amplifier if your turntable does not have one built-in).
- REC SAÍDA: RCA output for connecting to a recording device.
- PRE SAÍDA: RCA output for connecting to an external power ampmais vivo.
- AMP EM: RCA input for connecting an external pre-ampmais vivo.
- Conexões de antena:
- FM COAX 75Ω: For connecting an FM antenna.
- AM LOOP ANT: For connecting the supplied AM loop antenna.
4.3 Controle Remoto
The included remote control allows convenient operation of the amplificador à distância.

Image: Fonestar AS-170RU Remote Control. This image shows the remote control unit with various buttons for power, input selection, volume, mute, tuner functions, USB playback controls, and tone adjustments.
- ESPERA: Ligar / desligar.
- Seletores de entrada: Buttons for CD, DVD, VCR, AUX/PHONO, USB/TUNER.
- Aumentar / diminuir o volume (VOL +/-): Ajusta o volume principal.
- MUDO: Silencia a saída de áudio.
- AM / FM: Switches between AM and FM tuner modes.
- ESCANEAR: Busca estações de rádio.
- MEMÓRIA: Stores radio station presets.
- USB Playback Controls: Play/Pause, Stop, Skip Track, Folder/Track navigation.
- EQ OFF / BASS / TREBLE: Access tone controls.
- RDS / ID3: Displays RDS information for radio or ID3 tag para MP3 files.
5. Configuração
5.1 Conectando alto-falantes
- Garantir o ampO amplificador está desligado e desconectado da tomada.
- Connect your speakers to the "SPEAKERS OUTPUT" terminals on the rear panel.
- Match the positive (+) terminal of the amplifier (red) to the positive (+) terminal of your speaker, and the negative (-) terminal (black) to the negative (-) terminal.
- The AS-170RU supports two groups of speakers (A and B). You can connect one pair to "SPEAKERS A" and another to "SPEAKERS B".
- Ensure your speakers' impedance matches the amplifier's specifications: 4-16 ohms for A or B, or 8-16 ohms for A+B.
5.2 Conectando fontes de áudio
Use RCA cables to connect your audio components to the corresponding input jacks on the rear panel.
- Leitor de CD: Connect to the "CD" input.
- Leitor de DVD: Connect to the "DVD" input.
- VCR: Connect to the "VCR" input.
- Auxiliary Device (e.g., smartphone, tablet): Connect to the "AUX/PHONO" input.
- Toca discos: Connect to the "AUX/PHONO" input. If your turntable does not have a built-in pre-amplifier, you may need an external phono pre-ampmais vivo.
5.3 Conectando Antenas
- Antena FM: Connect the supplied FM wire antenna to the "FM COAX 75Ω" terminal. Extend the wire for optimal reception.
- Antena AM: Connect the supplied AM loop antenna to the "AM LOOP ANT" terminals. Position the loop for best reception.
5.4 Conexão de Energia
Once all audio and speaker connections are made, plug the amplifier's power cord into a suitable AC power outlet.
6. Instruções de operação
6.1 Operação básica
- Ligar/desligar: Press the Power button on the front panel or the STANDBY button on the remote control to turn the amplifier ligado ou desligado.
- Selecione a fonte de entrada: Press the desired input selector button on the front panel (CD, DVD, VCR, AUX/PHONO) or the remote control (CD, DVD, VCR, AUX/PHONO, USB/TUNER).
- Ajustar volume: Rotate the Volume knob on the front panel or use the VOL +/- buttons on the remote control to adjust the sound level.
- Mudo: Press the MUTE button on the remote control to temporarily silence the audio. Press it again to restore sound.
6.2 Reprodução USB/MP3
- Insert a USB storage device (flash drive) into the USB port on the front panel.
- Select "USB/TUNER" as the input source. The amplifier will automatically detect and begin playing MP3 files.
- Use the playback controls on the remote control (Play/Pause, Stop, Skip Track, Folder/Track) to navigate and control your music.
- The VFD display will show track information, including ID3 tags se disponível.
- O amplifier supports up to 65,000 indexable folders and files, with a maximum of 8 folder levels.
6.3 AM/FM Tuner Operation
- Select "USB/TUNER" as the input source, then press the AM/FM button on the remote control to switch between AM and FM bands.
- Digitalização automática: Press the SCAN button on the remote control to automatically search for and store available radio stations.
- Sintonia manual: Use the tuning buttons (usually arrow keys) on the remote control to manually adjust the frequency.
- Estações predefinidas: O amplifier supports 64 presets. Use the MEMORY button to store and recall your favorite stations.
- Função RDS: If available, press the RDS button on the remote control to display Radio Data System information (e.g., station name, program type).
6.4 entradas de microfone
- Connect microphones to the 6.3mm MIC 1 and MIC 2 jacks on the front panel.
- Adjust the independent volume controls for each microphone to achieve the desired level.
6.5 Tone and Balance Control
O amplifier allows adjustment of bass, treble, and balance through its menu system or dedicated buttons on the remote control. Refer to the remote control section for specific buttons like EQ OFF, BASS, TREBLE.
7. Manutenção
- Limpeza: Desligue a energia antes de limpar. Use um pano macio e seco para limpar as superfícies externas. Não use produtos de limpeza abrasivos, ceras ou solventes.
- Ventilação: Verifique periodicamente se as aberturas de ventilação estão livres de poeira e detritos.
- Armazenar: Se for armazenar o aparelho por um período prolongado, desconecte-o da tomada e guarde-o em local fresco e seco, longe da luz solar direta e de temperaturas extremas.
8. Solução De Problemas
If you encounter problems with your amplifier, refer to the following table for possible solutions.
| Problema | Possível causa | Solução |
|---|---|---|
| Sem energia | Cabo de alimentação desconectado; tomada com defeito; Amplificador em modo de espera. | Ensure power cord is securely plugged in. Test the outlet with another device. Press the Power/STANDBY button. |
| Sem som | Entrada incorreta selecionada; Volume muito baixo; Alto-falantes não conectados corretamente; Função mudo ativa. | Select the correct input source. Increase volume. Check speaker connections. Deactivate MUTE. |
| Má recepção de rádio | Antena desconectada ou mal posicionada; Interferência. | Connect and adjust the position of the AM/FM antennas. Move the ampMantenha o amplificador longe de outros dispositivos eletrônicos. |
| A reprodução USB não está funcionando | Dispositivo USB não inserido corretamente; Incompatível file format; USB device faulty. | Ensure USB device is fully inserted. Check if files are MP3 format. Try a different USB device. |
| Amplifier turns off unexpectedly or cycles power | Overheating; Short circuit in speaker wiring; Internal fault. | Ensure adequate ventilation. Check speaker wires for frayed strands causing short circuits. If the problem persists, disconnect power and contact qualified service personnel. |
9. Especificações
- Modelo: AS-170RU
- Potência de saída: 80 + 80 W RMS at 4 Ω
- Impedância do alto-falante: 4-16 Ω (A or B), 8-16 Ω (A+B)
- Proteção: 3 circuits (short circuits, overload, overvoltage)
- Leitor USB: MP3 file playback, ID3 tag support. Max 65,000 indexable folders/files, max 8 folder levels.
- Sintonizador: Digital AM/FM, 64 presets, RDS.
- Entradas: 2 x Microphone (6.3mm), 4 x RCA (CD, DVD, VCR, AUX/Phono), 1 x RCA (AMP DENTRO).
- Saídas: 1 x RCA (REC OUT), 1 x RCA (PRE OUT), Headphone (6.3mm).
- Mostrar: Blue VFD.
- Controle de Tom: Bass, Treble, Balance (via menu/remote).
- Dimensões: 40 x 40 x 60 cm (aproximadamente 15.7 x 15.7 x 23.6 polegadas)
- Peso: 7.2 kg (aprox. 15.87 lbs)
10. Garantia e Suporte
For warranty information and technical support, please refer to the warranty card included with your product or contact your authorized Fonestar dealer. Do not attempt to repair the unit yourself, as this may void your warranty.


