1. Introdução
Thank you for choosing the Microlife BP A80 Semi-automatic Upper Arm Blood Pressure Monitor. This device is designed for accurate and reliable measurement of blood pressure in adults. Please read this instruction manual thoroughly before using the device to ensure safe and correct operation. Keep this manual for future reference.
2. Informações importantes de segurança
- Consulte seu médico antes de usar este dispositivo se você tiver algum problema de saúde.
- Do not self-diagnose or self-medicate based on blood pressure measurements. Always consult a healthcare professional.
- This device is not suitable for use on infants, children, or pregnant women without medical advice.
- Não utilize o dispositivo em um veículo em movimento ou em um avião.
- Mantenha o dispositivo e seus componentes fora do alcance de crianças.
- Use only Microlife-approved cuffs and accessories.
- Avoid strong electromagnetic fields, such as those near mobile phones or microwave ovens, during use.
3. Produto acabadoview
Familiarize yourself with the components of your Microlife BP A80 blood pressure monitor:

Figura 1: Microlife BP A80 Blood Pressure Monitor showing the main unit, display, power button, cuff, and inflation bulb.
- Unidade principal: Contains the electronics and display.
- Mostrar: Shows blood pressure readings (systolic, diastolic, pulse) and other indicators.
- Botão de energia: Utilizado para ligar e desligar o aparelho.
- Punho: Applied to the upper arm for measurement.
- Bulbo de inflação: Used to manually inflate the cuff.
- Cuff Connector: Port on the main unit for connecting the cuff tube.
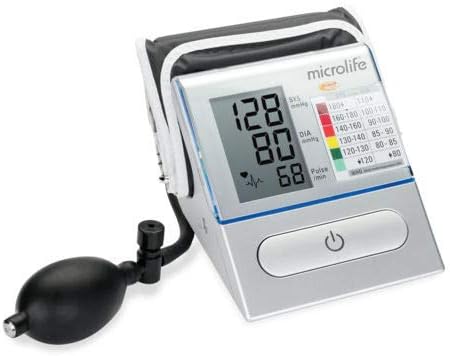
Figura 2: Detalhado view of the Microlife BP A80 display, highlighting the blood pressure values (systolic, diastolic, pulse) and the integrated WHO blood pressure classification indicator.
4. Configuração
4.1. Instalação da bateria
- Open the battery compartment cover located on the bottom or back of the device.
- Insert four 1.5V AA batteries, ensuring correct polarity (+/-) as indicated inside the compartment.
- Feche bem a tampa do compartimento da bateria.
- If the battery symbol appears on the display, replace all batteries.
4.2. Conectando a braçadeira
- Insert the air tube connector of the cuff firmly into the cuff socket on the left side of the monitor.
- Certifique-se de que a conexão esteja segura para evitar vazamento de ar durante a medição.
5. Instruções de operação
5.1. Antes da Medição
- Evite comer, fumar ou praticar exercícios físicos por pelo menos 30 minutos antes da medição.
- Rest for 5-10 minutes in a quiet environment before taking a measurement.
- Sente-se confortavelmente com as costas apoiadas e os pés totalmente no chão. Não cruze as pernas.
- Coloque o braço sobre uma superfície plana de forma que a braçadeira fique na altura do coração.
- Remova roupas apertadas do seu braço.
5.2. Aplicando o Cuff
- Coloque a braçadeira na parte superior do braço, sem roupa, aproximadamente 2 a 3 cm acima da articulação do cotovelo.
- Ensure the artery mark on the cuff aligns with your brachial artery (on the inside of your arm).
- Wrap the cuff snugly around your arm, but not too tightly. You should be able to insert two fingers between the cuff and your arm.
5.3. Fazendo uma medição
- Pressione o LIGADO/DESLIGADO button to turn on the monitor. The display will show all segments briefly.
- Once the display shows "0", begin inflating the cuff by repeatedly squeezing the inflation bulb.
- Inflate the cuff until the pressure displayed is about 30 mmHg higher than your usual systolic pressure. If you don't know your usual pressure, inflate to 180-200 mmHg.
- Stop inflating. The device will automatically deflate the cuff slowly and measure your blood pressure.
- Assim que a medição estiver concluída, sua pressão sistólica, pressão diastólica e frequência cardíaca serão exibidas.
- Pressione o LIGADO/DESLIGADO button to turn off the device. If you forget, it will automatically shut off after approximately 1 minute.
6. Compreendendo suas leituras
Your blood pressure monitor displays three values:
- Pressão sistólica (SIST): The top number, indicating the pressure when your heart beats.
- Pressão diastólica (DIA): The bottom number, indicating the pressure when your heart rests between beats.
- Taxa de pulso: Your heart rate per minute.
The Microlife BP A80 also features a WHO (World Health Organization) blood pressure classification indicator on the display, which uses a color scale to help you interpret your readings:
| Categoria | Sistólica (mmHg) | Diastólica (mmHg) | Cor do indicador |
|---|---|---|---|
| Ótimo | < 120 | < 80 | Verde |
| Normal | 120-129 | 80-84 | Verde claro |
| Normal alto | 130-139 | 85-89 | Amarelo |
| Hipertensão Grau 1 | 140-159 | 90-99 | Laranja |
| Hipertensão Grau 2 | 160-179 | 100-109 | Vermelho |
| Hipertensão Grau 3 | ≥ 180 | ≥ 110 | Vermelho escuro |
Note: This classification is a general guideline. Always consult your doctor for interpretation of your blood pressure readings.
7. Manutenção
7.1. Limpeza
- Clean the monitor and cuff gently with a soft, dry cloth.
- Se necessário, use um pano levemente umedecido.ampened with water or a mild detergent. Do not use abrasive cleaners or solvents.
- Do not immerse the device or cuff in water.
7.2. Armazenamento
- Store the device and cuff in a clean, dry place, away from direct sunlight and extreme temperatures.
- Se o dispositivo não for utilizado por um longo período, remova as pilhas para evitar vazamentos.
- Evite deixar cair ou submeter o dispositivo a impactos fortes.
8. Solução De Problemas
If you encounter any issues with your Microlife BP A80, please refer to the following table:
| Problema | Possível causa | Solução |
|---|---|---|
| O dispositivo não liga. | As pilhas estão descarregadas ou inseridas incorretamente. | Substitua as pilhas por novas, certificando-se de que a polaridade está correta. |
| "E1" or "Error" displayed. | A braçadeira não está devidamente conectada ou há vazamento de ar. | Check cuff connection. Re-apply cuff snugly. |
| "E2" displayed. | Movement during measurement or irregular pulse. | Remain still and quiet during measurement. Repeat measurement after a few minutes. |
| Leituras inconsistentes. | Improper cuff placement, incorrect body position, or external factors. | Ensure correct cuff placement and body posture. Avoid talking or moving. Take multiple readings at different times. |
If the problem persists, contact Microlife customer support.
9. Especificações
- Modelo: PA A80
- Método de medição: Oscilométrico
- Faixa de medição:
- Blood Pressure: 20-280 mmHg
- Pulso: 40-200 batimentos por minuto
- Precisão:
- Pressão arterial: ±3 mmHg
- Pulso: ± 5% da leitura
- Fonte de energia: 4 pilhas AA de 1.5 V
- Tipo de exibição: LCD
- Dimensões: Approximately 16.5 x 16 x 10 cm (as per package dimensions, actual device may vary slightly)
- Peso: Approximately 600 grams (including batteries, as per package weight)
- Condições de operação: 10-40 °C (50-104 °F), 15-95% relative humidity non-condensing
- Condições de armazenamento: -20-55 °C (-4-131 °F), 15-95% relative humidity non-condensing
- Código Internacional de Artigos (EAN): 04719003310080
10. Garantia e Suporte
Microlife products are manufactured to the highest quality standards. For detailed warranty information specific to your region, please refer to the warranty card included with your product or visit the official Microlife website.
For technical support, troubleshooting assistance, or to inquire about replacement parts, please contact Microlife customer service. Contact details can typically be found on the Microlife website ou na embalagem do produto.
Website: www.microlife.com