1. Introdução
The TASCAM DR-70D is a compact, high-quality 4-channel audio recorder designed for videographers and filmmakers. It integrates seamlessly with DSLR cameras, providing professional audio recording capabilities with multiple input options and flexible control.

Image 1.1: The TASCAM DR-70D 4-Channel Audio Recorder, designed for DSLR cameras.
This manual provides detailed instructions for setting up, operating, and maintaining your DR-70D recorder to ensure optimal performance and longevity.
2. Principais características
- Four XLR/TRS Combo Inputs: Equipped with high-quality HDDA mic preamps, offering 64dB of gain and phantom power (24V/48V) for professional microphones.
- Two Internal Omnidirectional Microphones: Built-in stereo microphones for capturing ambient sound or quick recordings without external mics.
- Vários modos de gravação: Supports MONO/DUAL MONO, STEREO/DUAL STEREO, and 2MIX/DUAL 2MIX for versatile recording scenarios.
- Dual Recording Function: Records a safety track at a lower level to prevent clipping and distortion.
- Design compacto e robusto: Designed to mount between a tripod and camera, or on top via a hot shoe mount (with optional adapter). Features durable construction.
- Built-in Mixer: Allows individual recording of each input for post-production, while sending a stereo mix to headphones and the camera.
- Slate Tone Generator: Provides reference slate tones for easy audio/video synchronization.
- Camera Input/Output: Dedicated jacks for monitoring camera audio and sending a stereo mix to the camera for simplified editing.
- Gravação em cartão SD: Records to SD, SDHC, or SDXC cards up to 128GB.
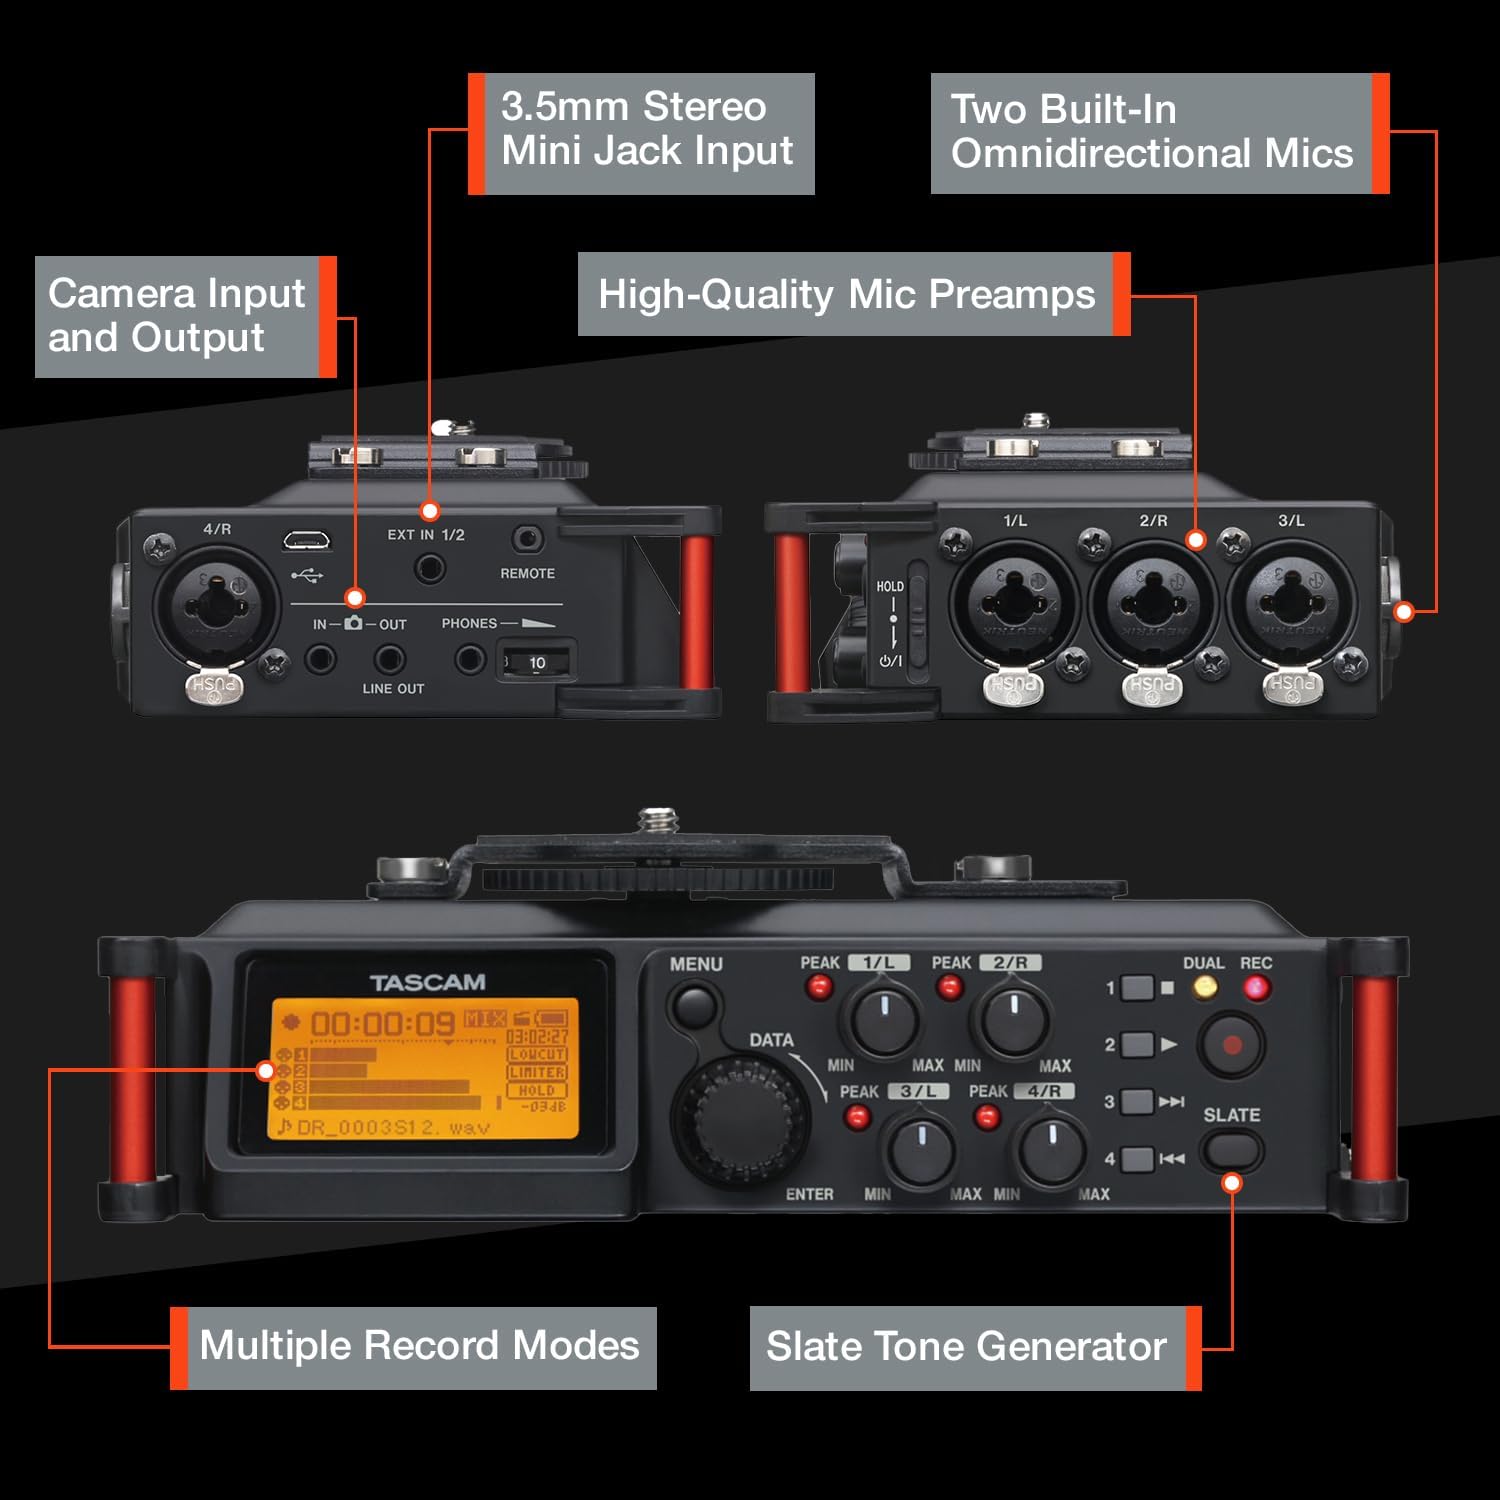
Imagem 2.1: Terminadoview of the TASCAM DR-70D's inputs, outputs, and controls.
3. Configuração
3.1. Instalação da bateria
- Certifique-se de que a unidade está desligada.
- Localize o compartimento da bateria na parte inferior da unidade.
- Abra a tampa do compartimento.
- Insert four (4) AA batteries, observing the correct polarity (+/-) as indicated inside the compartment.
- Feche bem a tampa do compartimento da bateria.
Note: The DR-70D can also be powered via a USB power adapter (sold separately) or a dedicated AC adapter (sold separately).
3.2. Instalação do cartão SD
- Certifique-se de que a unidade está desligada.
- Locate the SD card slot on the side of the unit.
- Insert an SD, SDHC, or SDXC card (up to 128GB) into the slot until it clicks into place.
- To remove, push the card gently until it ejects, then pull it out.
Note: It is recommended to format the SD card using the DR-70D's menu system before first use and periodically thereafter.
3.3. Mounting the DR-70D
The DR-70D offers versatile mounting options for integration with camera rigs:
- Between Camera and Tripod: The unit features tripod threads on the bottom and a camera mounting plate on top, allowing it to be placed directly between your camera and tripod.
- On Camera Hot Shoe: An optional AK-DR70C adapter (sold separately) can be used to mount the DR-70D onto a camera's hot shoe.
- On Follow-Focus Cages: The tripod threads also allow mounting on various camera cages.

Image 3.1: The DR-70D's compact and tough design allows for various mounting configurations.
4. Instruções de operação
4.1. Ligar/desligar
- Para ligar, pressione e segure o botão liga/desliga até que o visor ilumine.
- To power off, press and hold the power button until the unit shuts down.
4.2. Connecting Microphones and Line Sources
The DR-70D features four combo XLR/TRS inputs (1-4) and a 3.5mm stereo mini-jack input (EXT IN 1/2).
- XLR/TRS Inputs (1-4): Connect professional microphones or line-level devices using XLR or 1/4-inch TRS cables. Activate phantom power (24V or 48V) via the menu for condenser microphones.
- 3.5mm Stereo Mini-Jack Input (EXT IN 1/2): Connect consumer-level microphones or line-level devices. This input supports plug-in power.

Image 4.1: The 3.5mm stereo mini jack input for connecting external microphones or line sources.
4.3. Setting Recording Levels
- Use the individual gain knobs for each input (1-4) to adjust the input level.
- Monitor the level meters on the display to ensure signals are strong but do not peak into the red, which indicates clipping.
- The built-in limiter can be activated via the menu to prevent sudden loud sounds from distorting the recording.
- High-Pass Filter (HPF) can be applied to reduce unwanted low-frequency noise.
4.4. Modos de gravação
The DR-70D offers several recording modes to suit different production needs:
- MONO/DUAL MONO: Ideal for recording a single performer or sound source, with an option to record a safety track.
- STEREO/DUAL STEREO: Best for recording with the built-in microphones or an external stereo microphone setup, with an option for a safety track.
- 2MIX/DUAL 2MIX: Creates stereo files from two or more mixed inputs. Dual Recording creates a backup track at up to 12dB lower levels to prevent distortion.

Image 4.2: Illustration of MONO/DUAL MONO recording mode.

Image 4.3: Illustration of STEREO/DUAL STEREO recording mode.

Image 4.4: Illustration of 2MIX/DUAL 2MIX recording mode.
4.5. Monitoramento de áudio
- Connect headphones to the 3.5mm PHONES jack for real-time audio monitoring.
- The DR-70D's built-in mixer allows you to monitor the individual inputs or the stereo mix.
- Use the CAMERA IN jack to monitor audio from your camera, allowing you to evaluate the camera's audio signal alongside the DR-70D's output.
4.6. Using the Slate Tone Generator
The slate tone generator helps synchronize audio and video files in post-production.
- Pressione o ARDÓSIA button to generate a reference tone.
- Slate tones can be added automatically at the start and/or end of a recording, or manually at any time.

Image 4.5: The SLATE button for generating reference tones.
4.7. Integração de Câmeras
- Entrada da câmera: Connect your camera's audio output to the DR-70D's IN-O jack to monitor camera audio.
- Saída da câmera: Send a stereo mix from the DR-70D to your camera's audio input via the SAÍDA DE LINHA jack. This simplifies synchronization in editing software.

Image 4.6: The camera input jack for monitoring camera audio.

Image 4.7: The camera output jack for sending audio to your camera.
5. Manutenção
- Limpeza: Use um pano macio e seco para limpar a parte externa da unidade. Evite produtos de limpeza abrasivos ou solventes.
- Armazenar: Store the DR-70D in a cool, dry place away from direct sunlight and extreme temperatures. Remove batteries if storing for extended periods.
- Atualizações de firmware: Confira o Tascam webO site é atualizado periodicamente para obter atualizações de firmware, garantindo o desempenho ideal e o acesso a novos recursos.
6. Solução De Problemas
| Problema | Possível causa | Solução |
|---|---|---|
| A unidade não liga. | Dead or incorrectly inserted batteries; no external power. | Replace batteries, check polarity, or connect to a power adapter. |
| Nenhum áudio foi gravado. | Incorrect input selection; low gain; faulty microphone/cable; SD card issue. | Verify input settings, increase gain, test microphone/cable, ensure SD card is inserted and formatted. |
| Áudio distorcido. | Input levels too high; limiter not active. | Reduce input gain, activate the limiter, check microphone placement. |
| Nenhum som nos fones de ouvido. | Headphone volume too low; incorrect monitoring settings; faulty headphones. | Increase headphone volume, check monitoring mix settings, test with different headphones. |
| Erro no cartão SD. | Card not formatted; incompatible card; card full. | Format the SD card in the DR-70D, use a compatible card (SD/SDHC/SDXC), delete old files. |
7. Especificações
| Recurso | Detalhe |
|---|---|
| Dimensões do produto | 6.25 x 4.5 x 2.25 polegadas |
| Peso do item | 1.16 libras |
| Número do modelo do item | DR-70D |
| Baterias | 4 pilhas AA (incluídas) |
| interface de hardware | USB |
| Fator de forma do microfone | Construído em |
| Formato de áudio | WAV |
| Entrada para fones de ouvido | 3.5 milímetros |
| Capacidade de armazenamento de memória | Supports SD, SDHC, SDXC up to 128 GB (card not included) |
| Fabricante | Tascam |
8. Garantia e Suporte
Para informações sobre garantia e suporte técnico, consulte o site oficial da Tascam. website or contact your local Tascam distributor. Keep your proof of purchase for warranty claims.
Tascam oficial Website: www.tascam.com


