1. Introdução
The Triton 265709 Router Module is specifically designed for integration with the Triton Workcentre WX7. This module transforms your Workcentre into a fully functional router table, enabling precise woodworking operations such as shaping, planing, grooving, creating moldings, and notching. It is compatible with Triton router models TRA001, MOF001, and JOF001. Constructed from high-quality, durable materials, this module features extruded aluminum guides with micro-adjustments, rotating spacers, multi-position guards, and an efficient dust extraction nozzle. Quick-install horizontal and vertical featherboards are included for enhanced safety and control. Simple assembly and configuration ensure professional results for various woodworking tasks.
2. Informações de segurança
Always prioritize safety when operating power tools. Read and understand all instructions before use. Wear appropriate personal protective equipment (PPE), including eye protection, hearing protection, and a dust mask. Ensure the Workcentre and router module are stable and securely assembled. Disconnect power before making adjustments or changing accessories. Keep hands clear of the router bit during operation. Maintain a clean and well-lit work area. Do not operate the tool in damp ou condições úmidas.
3. Conteúdo da embalagem
- 1 x Triton 265709 Router Module
- Hardware de montagem
- Horizontal featherboards (2)
- Vertical featherboards (2)
- Bocal de extração de poeira
4. Configuração
4.1 Desembalagem e Inspeção
Carefully remove all components from the packaging. Inspect for any damage that may have occurred during transit. Report any damaged or missing parts to your supplier immediately.
4.2 Assembly of the Router Module
Follow the detailed assembly instructions provided with your Workcentre WX7 for integrating the 265709 Router Module. Ensure all fasteners are tightened securely. The module is designed for simple and straightforward assembly.

Figure 1: Assembled Triton 265709 Router Module, ready for installation into a Workcentre.
4.3 Instalação do roteador
The module is compatible with Triton routers TRA001, MOF001, and JOF001. Mount your chosen router to the underside of the module plate according to your router's specific instructions. Ensure the router bit is centered and securely fastened.

Figura 2: Visão de cima para baixo view of the router module, showing the main guide, side guides, and featherboards.
4.4 Installing Featherboards
Attach the horizontal and vertical featherboards to the module as needed for your specific operation. These provide downward and inward pressure to keep the workpiece firmly against the table and fence, improving cut quality and safety.

Figure 3: Close-up of a featherboard, designed for quick installation and adjustment.
5. Instruções de operação
5.1 Operação Geral
Once the router module is installed in your Workcentre WX7 and your router is mounted, you can begin various woodworking tasks. The module provides a stable platform for precise routing operations.

Figure 4: The Triton Router Module seamlessly integrated into a Workcentre WX7, providing a stable routing platform.
5.2 Adjusting Guides and Featherboards
The extruded aluminum guides feature micro-adjustments for precise positioning relative to the router bit. Use the rotating spacers to fine-tune the fence opening. Adjust the multi-position guards and featherboards to safely secure your workpiece during routing. Ensure all adjustments are locked before operation.

Figura 5: Frente view highlighting the adjustable fence, micro-adjustments, and multi-position guards.
5.3 Extração de Poeira
Connect a dust extraction system to the integrated dust extraction nozzle. This helps maintain a clear view of your work, reduces airborne dust, and keeps your workspace clean.

Figura 6: Lateral view of the router module, illustrating the dust extraction port for connection to a vacuum system.
5.4 Performing Routing Operations
Feed the workpiece smoothly and consistently against the fence and table. Always feed against the rotation of the router bit. For best results and safety, take multiple shallow passes rather than one deep pass, especially with harder materials or larger bits.

Figure 7: A user demonstrating a routing operation, pushing the workpiece against the fence and featherboards.
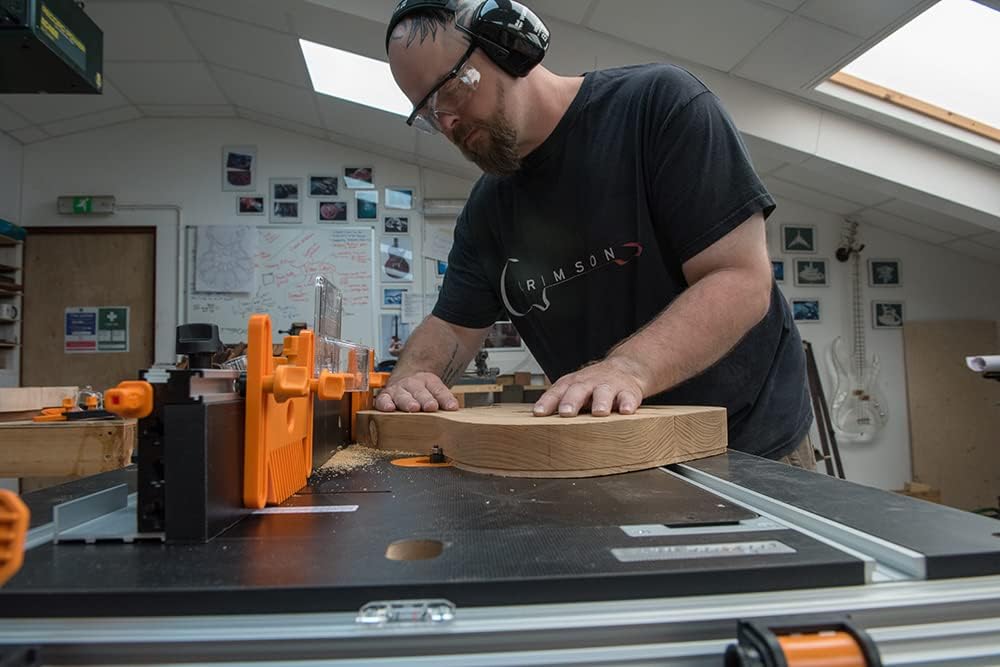
Figura 8: Close view of a workpiece being routed, showing the dust and the precision of the cut.

Figure 9: A user routing a curved workpiece, demonstrating the versatility of the module for different shapes.
6. Manutenção
6.1 Limpeza
After each use, disconnect the power and clean the router module thoroughly. Remove all sawdust and debris from the table surface, guides, and dust extraction port. Use a soft brush or compressed air. Avoid using solvents that may damage plastic components.
6.2 Inspeção
Regularly inspect all fasteners to ensure they are tight. Check the condition of the featherboards and guards for wear or damage. Replace any worn or damaged parts immediately to maintain safe and effective operation.
7. Solução De Problemas
- Qualidade de corte ruim: Ensure router bit is sharp and clean. Check router speed settings for the material being cut. Verify that the workpiece is held firmly against the fence and table.
- Excesso de poeira: Confirm the dust extraction system is properly connected and functioning. Clear any blockages in the dust extraction nozzle.
- Workpiece Movement: Adjust featherboards and guards to apply adequate pressure. Ensure the fence is securely locked in place.
- Module Not Stable: Verify that the router module is correctly installed and secured within the Workcentre WX7. Check all assembly fasteners.
8. Especificações
| Recurso | Especificação |
|---|---|
| Fabricante | Tritão |
| Número do modelo | 265709 |
| Dimensões do produto (C x L x A) | 75 x 42 x 10 cm |
| Peso | 9.8 quilos |
| Material | Alumínio |
| Cor | Multicolorido |
| Compatible Routers | Triton TRA001, MOF001, JOF001 |
| Compatibilidade | Triton Workcentre WX7 |
| Componentes incluídos | 1 Router Module |
9. Garantia e Suporte
For warranty information, please refer to the documentation provided with your original purchase or visit the official Triton Tools website. For technical support, spare parts, or service inquiries, please contact Triton Tools customer service directly. Keep your purchase receipt as proof of purchase.


