1. Introdução
This manual provides detailed instructions for the installation, operation, and maintenance of your Alpine MRV-M500 Class D Mono Car Amplifier. Please read this manual thoroughly before attempting installation or operation to ensure proper use and to prevent damage to the unit or your vehicle's electrical system. The Alpine MRV-M500 is designed to deliver powerful and clear audio performance for your car's subwoofer system.
2. Informações de segurança
- Desconecte a bateria: Always disconnect the negative terminal of your vehicle's battery before beginning any installation work to prevent electrical shorts and potential injury.
- Instalação profissional: Caso tenha dúvidas sobre qualquer parte do processo de instalação, é altamente recomendável procurar a ajuda de um instalador profissional qualificado.
- Fiação adequada: Use appropriate gauge wiring for power, ground, and speaker connections as specified in this manual to prevent overheating and ensure optimal performance. Incorrect wiring can lead to fire or equipment failure.
- Ventilação: Garantir o amplifier is mounted in a location with adequate ventilation to prevent overheating. Do not cover the amplifier with carpets or other materials that could obstruct airflow.
- Níveis de volume: A exposição prolongada a níveis de volume elevados pode causar danos à audição. Ajuste o volume para um nível seguro e confortável.
3. Conteúdo da embalagem
Verifique se todos os itens estão presentes no seu pacote:
- Alpine MRV-M500 Mono Car Ampmais vivo
- Wiring Kit (Power cable, Ground cable, Remote turn-on wire, RCA interconnects, Speaker wire, Fuse holder, Fuse, Terminals, Cable ties)
- Hardware de montagem (parafusos)
- Manual do Proprietário (Este documento)

Image 1: Alpine MRV-M500 amplifier and various components of the included wiring kit, including power cables, RCA cables, speaker wire, and mounting hardware.

Image 2: The Alpine MRV-M500 amplifier shown with its mounting brackets and a wiring harness, indicating components for installation.
4. Configuração e instalação
4.1 Local de Montagem
Escolha um local de montagem que proporcione ventilação adequada para o(s) amplifier. Avoid mounting in enclosed spaces or directly on carpet. Secure the amplifier firmly to a solid surface using the provided mounting hardware to prevent movement during vehicle operation.
4.2 Conexões de Fiação
Refer to the diagram below and the following instructions for proper wiring. Ensure all connections are secure and insulated.
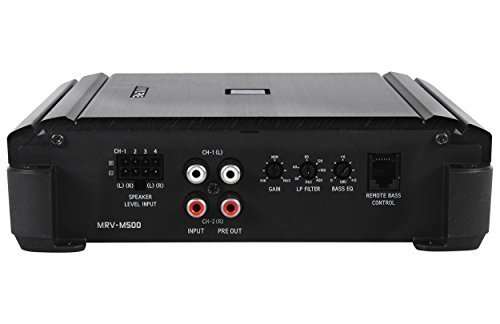
Image 3: Rear panel of the Alpine MRV-M500 amplifier, displaying the various input and control connections including speaker level input, RCA input/pre-out, gain, LP filter, bass EQ, and remote bass control port.
4.2.1 Conexão de Energia
- Connect the power cable (typically red) from the amplifier's +12V terminal to the positive terminal of the vehicle's battery.
- Install the fuse holder within 18 inches (45 cm) of the battery and insert the appropriate fuse (refer to specifications for fuse rating).
4.2.2 Conexão de aterramento
- Connect the ground cable (typically black) from the amplifier's GND terminal to a clean, unpainted metal surface on the vehicle's chassis.
- Ensure the ground point is free of paint, rust, or dirt for a good electrical connection. The ground cable should be as short as possible, ideally less than 3 feet (1 meter).
4.2.3 Remote Turn-On Connection
- Connect the remote turn-on wire (typically blue) from the ampConecte o terminal REM do amplificador à saída remota da sua unidade principal. Este fio ativa o sinal. ampLigue e desligue o amplificador com o sistema de áudio do seu carro.
4.2.4 Input Connection (RCA or Speaker Level)
- Entrada RCA: Se o seu aparelho de som tiver saídas pré-amplificadas RCA, conecte-as à entrada correspondente. amplifier's RCA INPUT terminals (CH-1(L) and CH-2(R)).
- Entrada de nível de alto-falante: If your head unit does not have RCA pre-outs, use the speaker level input harness. Connect the speaker wires from your head unit's speaker outputs to the corresponding wires on the amplifier's speaker level input harness.
4.2.5 Conexão de alto-falante
- Conecte seu(s) subwoofer(s) ao amplifier's SPEAKER OUTPUT terminals.
- Para um desempenho sonoro ideal, assegure-se de que a polaridade esteja correta (+ com + e - com -).
4.2.6 Remote Bass Control (Optional)
- If using an optional remote bass control, connect it to the REMOTE BASS CONTROL port on the ampmais vivo.
5. Instruções de operação
Após a instalação, ajuste o ampAjustes do amplificador para um desempenho sonoro ideal.
5.1 Controles e Ajustes
- GANHO: This control matches the output level of your head unit to the input sensitivity of the amplifier. Start with the gain set to minimum, then slowly increase it until you achieve a clear, undistorted sound at your desired maximum volume from the head unit. Avoid setting the gain too high, as this can introduce distortion.
- LP FILTER (Low Pass Filter): Este controle define o limite superior de frequência para o amplifier's output. For subwoofers, set this to a frequency typically between 50Hz and 120Hz. This ensures that only low-frequency sounds are sent to the subwoofer, improving overall sound clarity.
- EQ DE BAIXO: This control provides a bass boost at a specific frequency. Use sparingly and adjust carefully to avoid distortion or damage to your subwoofer.
- REMOTE BASS CONTROL: If connected, this allows for convenient adjustment of the bass level from the driver's seat.
6. Manutenção
- Limpeza: Limpe periodicamente o ampLimpe a parte externa do amplificador com um pano macio e seco. Não utilize produtos químicos agressivos ou abrasivos.
- Verificações de conexão: Regularly inspect all wiring connections to ensure they are secure and free from corrosion. Loose connections can lead to poor performance or damage.
- Substituição de fusíveis: Se o amplifier stops working, check the fuse in the external fuse holder. Replace it only with a fuse of the exact same type and rating. Never use a higher-rated fuse.
7. Solução De Problemas
Se você tiver problemas com seu ampAmplificador, consulte a tabela a seguir antes de entrar em contato com o suporte.
| Problema | Possível causa | Solução |
|---|---|---|
| Sem energia / Amplifier não liga | Fusível queimado Conexão de energia ou aterramento solta Sem sinal de ativação remota | Verifique e substitua o fusível Verifique se todas as conexões de energia e aterramento estão seguras. Verifique a conexão do cabo remoto com a unidade principal. |
| Sem som | Loose RCA or speaker wires Seleção de entrada incorreta O ganho está muito baixo. | Check all input and output connections Ensure correct input (RCA or speaker level) is used Ajuste o controle de ganho |
| Som distorcido | O ganho está muito alto. Incorrect LP Filter setting Alto-falante danificado | Reduzir a configuração de ganho Adjust LP Filter to appropriate frequency Inspect speaker for damage |
| Amplifier Superaquece | Ventilação inadequada Impedância inadequada do alto-falante Volume elevado sustentado | Garanta a circulação adequada de ar ao redor. ampmais vivo Verifique se a impedância dos alto-falantes corresponde à dos alto-falantes. ampcapacidades do amplificador Reduza o volume ou permita amplifier to cool |
8. Especificações
- Modelo: MRV-M500
- Fabricante: Alpino
- AmpLifier Type: Classe D Mono
- Potência RMS: 500 Watts
- Número de canais: 1 (Mono)
- Volumetage: 14.4 Volts (nominal)
- Tipo de montagem: Montagem em superfície
- Número do modelo do item: MRV-M500+RWK81
9. Garantia e Suporte
This Alpine product is covered by a manufacturer's warranty. Please refer to the warranty card included with your product or visit the official Alpine website for detailed warranty terms and conditions. For technical support, service, or further assistance, please contact Alpine customer service.
Suporte ao Cliente Alpine: Refer to your product packaging or the official Alpine website para informações de contato atualizadas.