1. Introdução
This manual provides detailed instructions for the installation, operation, maintenance, and troubleshooting of your Gateway SX2865 SFF Desktop Motherboard H61 (Model DB.U7411.001). This motherboard is designed for Small Form Factor (SFF) desktop systems, featuring the Intel H61 Express chipset and supporting LGA 1155/1156 CPUs and DDR3 RAM. Please read this manual thoroughly before proceeding with any installation or configuration to ensure proper functionality and safety.
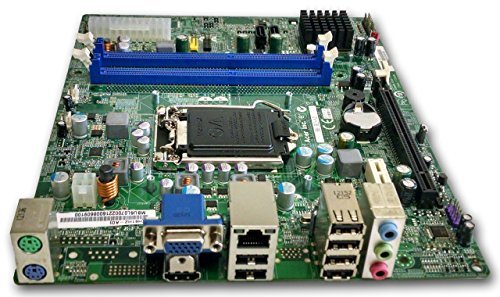
Figura 1: Sobreview of the Gateway SX2865 SFF Desktop Motherboard H61. This image displays the main components and layout of the motherboard, including the CPU socket, RAM slots, and various connectors.
2. Informações de segurança
Ao manusear e instalar componentes de computador, observe sempre as seguintes precauções de segurança:
- Desconecte o cabo de alimentação da tomada antes de instalar ou remover qualquer componente.
- Use uma pulseira antiestática para evitar danos por descarga eletrostática (ESD) em componentes sensíveis.
- Handle the motherboard by its edges to avoid touching sensitive components or circuits.
- Garanta uma ventilação adequada dentro do gabinete do computador para evitar o superaquecimento.
- Não exponha a placa-mãe à umidade ou a temperaturas extremas.
- Se tiver dúvidas sobre qualquer etapa da instalação, consulte um técnico qualificado.
3. Configuração e instalação
Follow these steps to properly install the Gateway SX2865 SFF Desktop Motherboard into your system:
3.1. Preparando o Chassi
- Open your computer chassis and ensure it is clean and free of dust.
- Install the I/O shield provided with your chassis or motherboard into the rear panel opening.
- Verify that the standoffs in the chassis align with the mounting holes on the motherboard. Adjust if necessary.
3.2. Instalação da CPU
- Locate the CPU socket (LGA 1155/1156) on the motherboard.
- Levante cuidadosamente a alavanca de carregamento e abra a tampa do soquete da CPU.
- Carefully align the CPU with the socket, matching the golden triangle on the CPU with the triangle mark on the socket. Do not force the CPU into the socket.
- Feche a tampa da tomada e pressione a alavanca de carga até que ela trave no lugar.
- Apply a thin layer of thermal paste to the CPU surface (if not pre-applied on the cooler).
- Install the CPU cooler according to its manufacturer's instructions, ensuring it is securely fastened.
3.3. Instalação da RAM
- Localize os slots DDR3 DIMM na placa-mãe.
- Abra as travas em ambas as extremidades do slot DIMM.
- Alinhe o entalhe no módulo de RAM com a chave no slot DIMM.
- Pressione firmemente ambas as extremidades do módulo de RAM até que as presilhas se encaixem no lugar.
3.4. Motherboard Mounting
- Carefully place the motherboard into the chassis, aligning the mounting holes with the standoffs.
- Fixe a placa-mãe com parafusos, tomando cuidado para não apertá-los em excesso.
3.5. Conectando periféricos e energia
- Conecte o conector de alimentação ATX de 24 pinos e o conector de alimentação da CPU de 4 pinos da sua fonte de alimentação à placa-mãe.
- Conecte os cabos de dados SATA dos seus dispositivos de armazenamento (HDD/SSD) às portas SATA na placa-mãe.
- Connect front panel connectors (power button, reset button, USB, audio) to their respective headers on the motherboard. Refer to the motherboard's silkscreen labels for correct orientation.
- Install any expansion cards (e.g., graphics card) into the appropriate PCIe slots and secure them.
- Connect all necessary cables to your power supply.
4. Operação e Configuração
4.1. Inicialização
- After all components are installed and connected, close the chassis.
- Conecte seu monitor, teclado e mouse.
- Conecte o cabo de alimentação à fonte de alimentação e a uma tomada de parede.
- Pressione o botão liga / desliga do seu computador.
4.2. Configuração da BIOS/UEFI
The BIOS (Basic Input/Output System) or UEFI (Unified Extensible Firmware Interface) is firmware that initializes hardware during the booting process. To enter the BIOS/UEFI setup utility:
- During the initial boot-up sequence, repeatedly press the designated key (commonly Del, F2, ou F10). The exact key may vary; check the on-screen prompts.
- Within the BIOS/UEFI, you can configure settings such as:
- Data e hora do sistema
- Boot Order (to install an operating system from a USB drive or DVD)
- SATA Mode (AHCI, IDE)
- CPU and Memory settings (advanced users)
- Salve as alterações e saia da BIOS/UEFI para continuar a inicialização.
4.3. Instalação do Sistema Operacional e dos Drivers
After configuring the BIOS/UEFI, proceed with installing your preferred operating system (e.g., Windows, Linux). Once the OS is installed, install the necessary drivers for the motherboard's components (chipset, audio, LAN, etc.). These drivers are typically available on the manufacturer's website (Acer/Gateway) or can be found through the operating system's update features.
5. Manutenção
A manutenção regular ajuda a garantir a longevidade e o desempenho estável da sua placa-mãe:
- Remoção de poeira: Periodically clean the inside of your computer case, including the motherboard, CPU cooler, and fan vents, using compressed air. Ensure the system is powered off and unplugged before cleaning.
- Atualizações da BIOS: Verifique o fabricante website (Acer/Gateway) for BIOS/UEFI updates. Updates can improve stability, add support for new hardware, or fix bugs. Follow the update instructions carefully to avoid damaging the motherboard.
- Atualizações de Driver: Keep your system drivers updated to ensure optimal performance and compatibility.
- Inspeção física: Occasionally inspect the motherboard for any signs of damage, loose connections, or bulging capacitors.
6. Solução De Problemas
Se você encontrar problemas com sua placa-mãe, consulte as etapas comuns de solução de problemas a seguir:
- Sem energia:
- Ensure the power supply is connected correctly to the motherboard (24-pin ATX and 4-pin CPU).
- Check that the power supply switch is in the 'ON' position.
- Verify the power cord is securely plugged into both the power supply and the wall outlet.
- Confirm the front panel power button connector is correctly attached to the motherboard.
- Nenhuma exibição:
- Ensure the monitor is powered on and connected to the correct video output (either integrated graphics or a dedicated graphics card).
- Reinstale os módulos de RAM. Tente inicializar o sistema com apenas um módulo de RAM instalado.
- Reseat the graphics card (if applicable).
- Check if the CPU cooler is properly installed and the CPU power connector is secure.
- System Fails to Boot / POST Errors:
- Listen for beep codes from the motherboard's speaker (if installed). Consult the motherboard's documentation for beep code meanings.
- Clear the CMOS (Complementary Metal-Oxide-Semiconductor) by removing the CMOS battery for a few minutes or using the clear CMOS jumper (refer to motherboard layout).
- Ensure all essential components (CPU, RAM, GPU) are correctly installed.
- Operating System Issues:
- Verify that all necessary drivers are installed and up to date.
- Check SATA cable connections for storage devices.
- Run diagnostic tools for hard drives/SSDs and RAM.
7. Especificações
Key technical specifications for the Gateway SX2865 SFF Desktop Motherboard H61 (Model DB.U7411.001):
| Recurso | Detalhe |
|---|---|
| Marca | Porta de entrada |
| Nome do modelo | SX2865 |
| Número do modelo do item | DB.U7411.001 |
| Fabricante | Acer |
| Tipo de chipset | Intel H61 Express |
| Soquete da CPU | LGA 1155 or LGA 1156 |
| Processadores compatíveis | Intel Xeon (and other compatible LGA 1155/1156 CPUs) |
| Tecnologia de memória RAM | DDR3 |
| Velocidade do relógio de memória | 2133 MHz (Max supported, actual speed depends on CPU and RAM) |
| Capacidade de armazenamento de memória | 16 GB (Maximum supported) |
| Dispositivos compatíveis | Computador pessoal |
| Plataforma | Linux (and other compatible operating systems) |
| Fator de forma | uATX (Micro-ATX) |
8. Garantia e Suporte
For warranty information and technical support regarding your Gateway SX2865 SFF Desktop Motherboard H61 (Model DB.U7411.001), please refer to the documentation provided with your original system or contact the manufacturer directly.
- Fabricante: Acer (as per product specifications)
- Marca: Porta de entrada
- Visite o site oficial Suporte de gateway website or Suporte Acer website for drivers, FAQs, and contact information.
- Guarde o comprovante de compra para reclamações de garantia.


