1. Introdução
Obrigado pela compra.asing the iTOMA CKS3501BT Radio Alarm Clock. This manual provides detailed instructions for setting up and operating your device. Please read it thoroughly before use to ensure proper functionality and to maximize your user experience.
Conteúdo da embalagem:
- iTOMA CKS3501BT Radio Alarm Clock
- Adaptador de energia
- Antena de fio FM
- Manual do usuário (este documento)
2. Produto acabadoview
Familiarize yourself with the controls and display of your iTOMA CKS3501BT Radio Alarm Clock.
Controles do painel superior:
- VOL- / VOL +: Ajustar volume.
- DEFINIR: Enter setup mode for time, date, and alarms.
- FUSO HORÁRIO: Adjust time zone.
- AL 1 / AL 2: Set Alarm 1 / Alarm 2.
- SNOOZE / DIMER: Snooze active alarm; adjust display brightness.
- SINTONIA - / SINTONIA +: Tune FM radio frequency; navigate menu options.
- MEMÓRIA: Save and recall FM radio presets.
- FONTE: Select audio source (FM, Bluetooth, AUX).
- PODER: Turn unit on/off.
Visor frontal:
- 1.4-inch blue LED display for time, date, and status indicators.
- Indicators for Alarm 1, Alarm 2, FM frequency, Bluetooth status.

Figura 2.1: Frente view of the iTOMA CKS3501BT Radio Alarm Clock, showing the large blue LED display and top panel controls.
3. Configuração
3.1 Inicialização
- Conecte o adaptador de energia à entrada DC IN na parte traseira da unidade.
- Conecte o adaptador de energia a uma tomada padrão. O visor acenderá.
- The unit includes a pre-installed backup battery to maintain time and alarm settings during power outage.
3.2 Configurar a hora e a data
- Ensure the unit is powered DESLIGADO (imprensa PODER button if display is on).
- Pressione e segure o DEFINIR botão até que o ano pisque no display.
- Use o SINTONIA - / SINTONIA + botões para ajustar o ano. Pressione DEFINIR para confirmar.
- Repeat the process for Month, Day, Hour, and Minute.
- Após ajustar os minutos, pressione DEFINIR Para confirmar e sair do modo de configuração de hora.
3.3 Horário de Verão Automático (DST)
The unit is equipped with an Auto DST feature. To enable or disable:
- Ensure the unit is powered DESLIGADO.
- Pressione e segure o FUSO HORÁRIO button. The display will show "DST ON" or "DST OFF".
- Use o SINTONIA - / SINTONIA + buttons to toggle between "DST ON" and "DST OFF".
- Solte o FUSO HORÁRIO botão para confirmar sua seleção.
4. Instruções de operação
4.1 Configurações de alarme (Alarme duplo)
The CKS3501BT features two independent alarms (AL1 and AL2) that can be set to wake you with a buzzer or FM radio.
- Ensure the unit is powered DESLIGADO.
- Pressione e segure qualquer um AL 1 or AL 2 Pressione o botão até que a hora do alarme comece a piscar.
- Usar SINTONIA - / SINTONIA + to adjust the hour. Press the respective AL botão para confirmar.
- Repita por alguns minutos.
- Next, select the alarm source: Use SINTONIA - / SINTONIA + to choose between "Buzzer" or "FM Radio". Press the AL botão para confirmar.
- If FM Radio is selected, use SINTONIA - / SINTONIA + to set the desired wake-up volume. Press the AL botão para confirmar.
- Finally, select the alarm schedule: Use SINTONIA - / SINTONIA + to choose "Every Day", "Weekdays", or "Weekends". Press the AL Botão para confirmar e sair do modo de configuração do alarme.
Para ativar/desativar um alarme, pressione o botão correspondente. AL 1 or AL 2 button briefly when the unit is powered DESLIGADO. The alarm indicator (1 or 2) will appear/disappear on the display.
4.2 Função de soneca
Quando o alarme tocar, pressione o SNOOZE / DIMER Pressione o botão para silenciá-lo temporariamente por 9 minutos. O alarme tocará novamente após o período de soneca.
4.3 Temporizador
The sleep timer allows you to fall asleep to FM radio or Bluetooth audio, which will automatically turn off after a set duration (10 to 90 minutes).
- While the unit is playing FM radio or Bluetooth audio, press the DORMIR button (often integrated with SNOOZE or another button, refer to device markings if different).
- Pressione repetidamente o DORMIR button to cycle through sleep timer options (e.g., 90, 80, 70... 10 minutes, OFF).
- A unidade desligará automaticamente após o tempo selecionado.
4.4 Operação de rádio FM

Figure 4.1: The iTOMA CKS3501BT can receive FM radio signals, indicated by the radio icon and waves.
- Ensure the FM wire antenna is properly connected to the antenna jack on the back of the unit for optimal reception.
- Pressione o PODER botão para ligar a unidade.
- Pressione o FONTE Pressione o botão repetidamente até que "FM" apareça no visor.
- Sintonia manual: Imprensa SINTONIA - / SINTONIA + briefly to adjust the frequency step by step.
- Analise automatica: Pressione e segure SINTONIA - / SINTONIA + aguardando alguns segundos para que o sistema procure automaticamente a próxima estação disponível.
4.5 Saving and Recalling FM Presets
The unit can store up to 10 FM radio stations as presets.
- Sintonize a estação FM desejada.
- Pressione e segure o MEMÓRIA Pressione o botão até que "P01" (ou o próximo número predefinido disponível) pisque no visor.
- Usar SINTONIA - / SINTONIA + para selecionar o número predefinido desejado (P01-P10).
- Imprensa MEMÓRIA Novamente, para confirmar e salvar a estação.
- Para acessar uma estação predefinida, pressione brevemente o botão. MEMÓRIA Pressione repetidamente o botão para alternar entre as estações salvas.
4.6 Operação Bluetooth
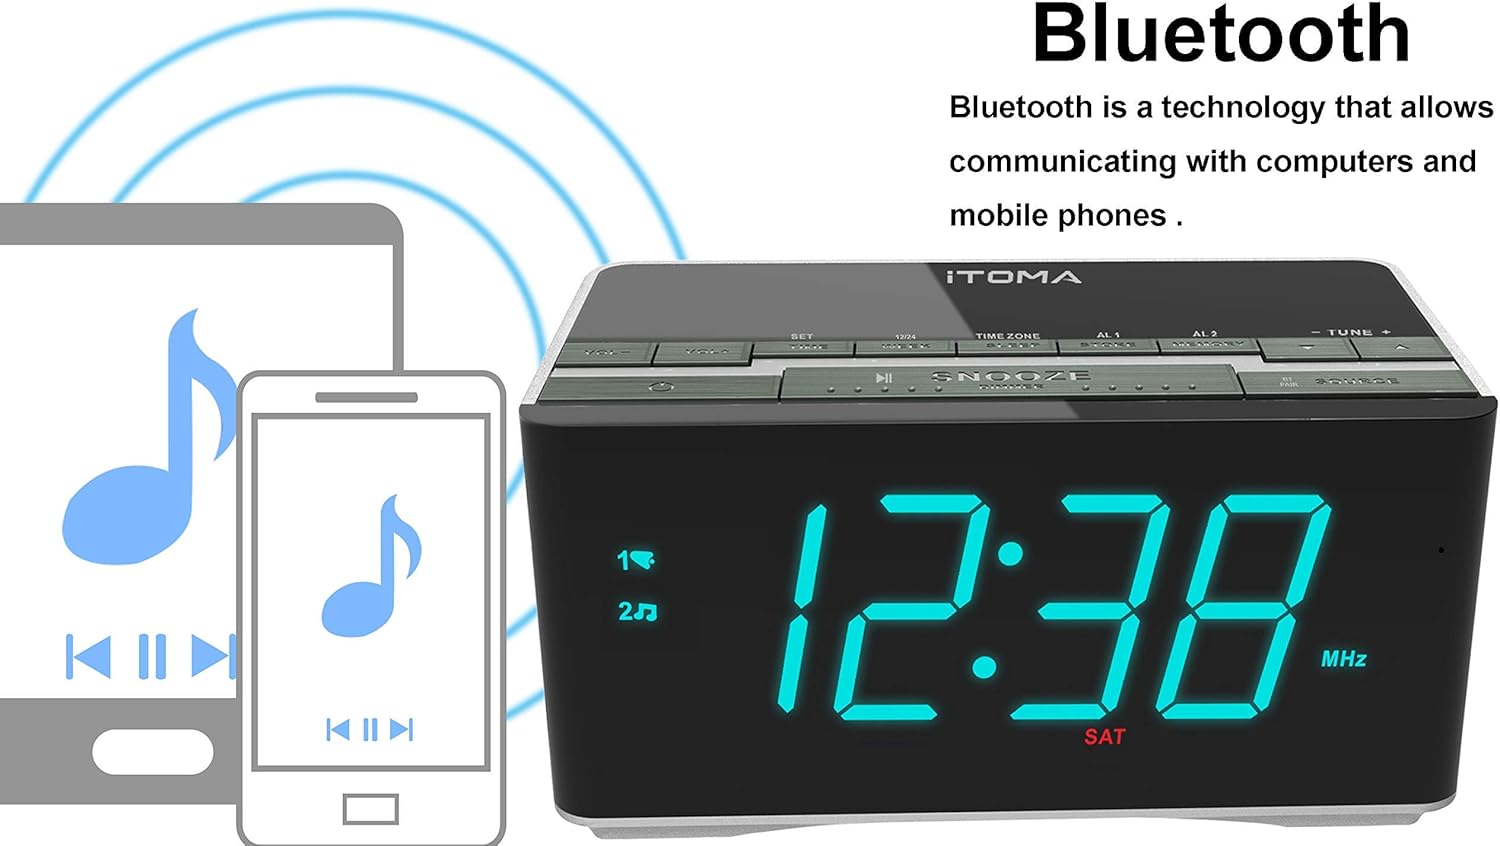
Figure 4.2: The iTOMA CKS3501BT supports Bluetooth connectivity for wireless audio streaming from compatible devices.
- Pressione o PODER botão para ligar a unidade.
- Pressione o FONTE button repeatedly until "BT" appears on the display and the Bluetooth indicator flashes, indicating pairing mode.
- No seu dispositivo com Bluetooth (por exemplo, smartphone, tablet), ative o Bluetooth e procure por dispositivos disponíveis.
- Select "iTOMA CKS3501BT" from the list. Once paired, the Bluetooth indicator on the alarm clock will stop flashing and remain solid.
- You can now play audio from your device through the alarm clock's speakers. Use the VOL - / VOL + Use os botões do despertador ou do seu dispositivo para ajustar o volume.
4.7 Entrada auxiliar (AUX)
Connect external audio devices (e.g., MP3 players) using a 3.5mm audio cable (not included).
- Connect one end of a 3.5mm audio cable to the AUX IN jack on the back of the unit.
- Conecte a outra extremidade à entrada de fone de ouvido ou à saída de áudio do seu dispositivo externo.
- Pressione o PODER botão para ligar a unidade.
- Pressione o FONTE Pressione o botão repetidamente até que "AUX" apareça no visor.
- Reproduza áudio do seu dispositivo externo. Ajuste o volume usando o VOL - / VOL + buttons on the alarm clock or your external device.
4.8 portas de carregamento USB

Figure 4.3: The iTOMA CKS3501BT features a USB port for charging mobile devices.
The USB port on the back of the unit is for charging mobile devices only. It does not support data transfer or playing music from USB drives.
- Connect your mobile device's USB charging cable to the USB port on the alarm clock.
- Conecte a outra extremidade do cabo ao seu dispositivo móvel.
- Seu dispositivo começará a carregar.
4.9 Brilho da tela (Diminuir)

Figure 4.4: The iTOMA CKS3501BT offers an auto-dimmer function and manual brightness control for its display.
The display has an auto-dimmer feature that adjusts brightness based on ambient light. You can also manually adjust it.
- Pressione o SNOOZE / DIMER button repeatedly to cycle through different brightness levels (e.g., High, Medium, Low, Auto).
- Select "Auto" for automatic brightness adjustment.
5. Manutenção
5.1 Limpeza
- Desconecte o adaptador de energia antes de limpar.
- Use um pano macio e seco para limpar a parte externa da unidade.
- Do not use liquid cleaners, abrasive cleaners, or sprays, as they may damage the finish.
5.2 Bateria de reserva
The unit contains a pre-installed lithium-metal backup battery. This battery is designed to retain time and alarm settings during brief power interruptions. It is not user-replaceable and does not power the unit for normal operation.
6. Solução De Problemas
| Problema | Possível causa | Solução |
|---|---|---|
| A unidade não liga. | Adaptador de energia não está conectado ou está com defeito. | Certifique-se de que o adaptador de energia esteja firmemente conectado à unidade e a uma tomada elétrica em funcionamento. |
| No sound from FM radio. | Weak signal; volume too low; incorrect source. | Adjust FM antenna position. Increase volume. Ensure "FM" source is selected. |
| O dispositivo Bluetooth não pôde ser emparelhado. | Unit not in pairing mode; device too far; Bluetooth already connected. | Ensure "BT" is flashing on the display. Move device closer. Disconnect from other Bluetooth devices. |
| O alarme não dispara. | Alarm not activated; volume too low; incorrect time. | Verify alarm indicator (1 or 2) is on. Check alarm volume setting. Confirm alarm time is correct. |
| O carregamento USB não está funcionando. | Cabo com defeito; dispositivo incompatível; aparelho sem energia. | Try a different USB cable. Ensure the alarm clock is powered on. |
7. Especificações
- Modelo: CKS3501BT
- Mostrar: LED azul de 1.4 polegadas
- Fonte de energia: AC 100-240V, 50/60Hz (via power adapter)
- Bateria de reserva: 1 x Lithium-metal (pre-installed)
- Bandas de Rádio: FM
- Versão Bluetooth: (Not specified, assuming standard)
- Saída de carregamento USB: (Not specified, typically 5V/1A)
- Entrada auxiliar: Jack estéreo de 3.5 mm
- Dimensões: 14.5 x 8 x 7.52 cm (5.71 x 3.15 x 2.93 polegadas)
- Peso: 390.09 g (0.86 lbs)
- Material: Plástico

Figure 7.1: Dimensions of the iTOMA CKS3501BT Radio Alarm Clock.
8. Garantia e Suporte
For warranty information or technical support, please refer to the warranty card included with your product or visit the official iTOMA webGuarde o comprovante de compra como prova de aquisição.
iTOMA Official Website: www.itoma.com